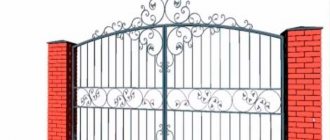
If you have purchased a plot of land, be it a house or a dacha, the question of registering the plot always arises. One of the most beautiful pieces of jewelry that shows the owner’s self-sufficiency and good taste is forged items. It can be either just a forged barbecue or entire compositions of forged products.
From forged metal you can make gazebos that are striking in their beauty; a bench or staircase will fit perfectly into any interior. Forged fences are made, even balconies. You can make a railing on the porch.
Today you can make all this beauty yourself; it is not difficult, as it might seem at first glance. The fact is that these things can be created without resorting to the services of a forge. You can use DIY cold forging machines right at home. And photos of forging clearly illustrate the results.
What you need to know about forging?
Forging is a process of processing a special workpiece. Its purpose is to give the metal the required dimensions and shape. There is a distinction between hot forging and cold forging.
The master needs to get acquainted with both varieties in order to know the advantages and disadvantages of each.
Hot forging method
In the hot method, the metal workpiece is heated strongly. As a result, the metal becomes ductile. Hot forging gives the workpiece the required dimensions and desired shape. The master has a variety of work options available to him.
Fire safety rules must be followed; it is important that the master knows how to work with fire.Heating a metal workpiece also has its disadvantages. First of all, it is necessary to arrange a special room. You will need to buy a forge, for which you will have to buy fuel.
Having an idea of the temperature conditions used in the forging process, you can easily select the desired type of forging.
Painting of forged products
Any metal product requires a primer before painting. If you do not take such actions, then even the most expensive paint will lose its properties. The thing is that any primer has corrosion resistance and adheres better to the metal. This is why the paint will adhere more firmly to the primer than to bare metal.
Cheap primer and paint will not give the desired effect for forged elements. After their application, the paint quickly fades and peels off the coating.
There are special types of paint - “3 in 1”. They have the combined properties of a primer and paint. Typically, such materials are much more expensive, but when using them you will not need to spend money on a primer.
Cold forging method
Cold forging is a labor-intensive process. To achieve the desired shape from a metal workpiece, it is bent, pressed and welded. The technique is a little simpler compared to the hot method.
The workshop does not require a lot of space, and to set it up you do not need to purchase a special forge; it is enough to buy a forging machine.
The manufacturing process of a product involves working with semi-finished products. If a mistake has been made, it is impossible to correct it.
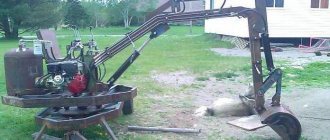
Making a snail with a lever
Drawing of a forging machine.
Before you begin the practical part of the work, you need to prepare theoretically. We are talking about calculations and drawings of the machine and its parts. Nobody will give you the exact dimensions, because this is an independent design.
Much will depend on the availability of similar materials, the scale of future cold forging work, the dimensions of the room where you are going to work and many other factors. The main thing is the principles that you need to understand in order to make a homemade cold forging machine with your own hands - the most convenient option for you and only you.
Here's what you need to gather before you begin assembly:
- metal plates or tabletop cloth with a thickness of at least 4 mm;
- metal round pipe for a rack or frame;
- metal rod;
- bearings of different calibers;
- drill;
- welding machine;
- hacksaw for metal;
- M8 bolts.
Basic parts
The twister has only four basic parts
Pay special attention to their preparation and, most importantly, installation:
- frame or stand;
- table top;
- main shaft;
- lever arm.
Rack
Only made of metal, no wooden beams. We place it in a thoughtful place so that you have access to the machine from any side. The machine will be subject to heavy loads, so the best option may be a thick-walled pipe or a metal corner.
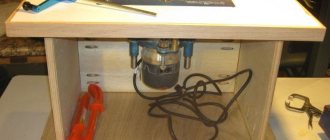
Tabletop
Homemade forging machine.
The most important part of the machine, which is best made from a metal plate with a decent thickness, preferably at least 5 mm. In the production of forging machines with your own hands, you cannot save on the thickness of the metal, because the table top and other basic elements will take on a huge load.
The preferred shape is a circle. You need to make two of these tabletops: the second is needed for bending the rods and placing the snails.
Main shaft
From the same metal plate, cut four right triangles with equal sides. Weld the triangles to the bottom of the structure, and their base is in the center of the circle. Another shaft option is not made from triangles, but from a pipe with thick walls of a suitable diameter. Fasten either with bolts or welding.
Lever or handle
And again “as tightly as possible”: attach the lever to the shaft with a ring so that it rotates around it. Attach the bending roller to the top tabletop
It is very important to correctly calculate the length of the lever, which depends on the diameter of the tabletop circle. One rod should be approximately equal to this diameter, the second rod should be longer
Bearings are attached to the lever at its end, this is done to provide greater freedom in the directions of movement of the lever. The lever elements and fixed triangles are secured with a special round nut with a large diameter.
Attachment parts
Be careful here, you need to choose the degree of complexity or, so to speak, “artistry.” We have three options for you.
Simple static snail
In no case do we ignore the requirement in the drawings - cold forging loves precision and thoughtfulness in everything.
Then cut out segments from thick metal strips repeating the snail pattern and weld them as firmly as possible perpendicular to the tabletop. Simple, but not at all ingenious: on this tightly welded snail you can only make the same simple bends without any flight of creative thought.
Metal bending machine.
However, it all depends on what you are going to forge. If, for example, you have plans for a long wrought-iron fence with a simple design, then a simple static snail will be the best option.
Collapsible snail made of removable parts
Let’s say right away that this is the most popular option among amateur craftsmen. The contours of snails are also applied to the tabletop. Threaded holes are drilled along this contour. Snail segments from metal strips are prepared using cardboard templates, and exactly the same matching holes are drilled into them as on the tabletop.
The segments are not welded, but are secured with bolts or cylindrical stops. The main advantage is the ability to bend spiral parts with different radii and different numbers of revolutions.
Modular system with different snails
An option with the greatest artistic freedom for forging with your own hands: instead of segments with stops, removable modules with different snails are used here - both in shape and size. The modules are prepared on separate metal platforms on which the segments are welded.
Of course, you need to tinker a lot with such a machine, but this game is worth the effort: you can forge real metal lace. It all depends on your plans: a simple fence or a lacy gazebo in the garden?
Choosing metal
Metals with certain properties are suitable for hand forging. The more ductile the metal, the easier it is to change its shape. However, ductility is inextricably linked with strength.
An increase in one characteristic inevitably entails a decrease in another. When buying a workpiece, the master must know exactly what its composition is.
Craftsmen make decorative forging elements from copper, steel, duralumin or brass. In addition, alloys can also be used. Information about metals that can be easily forged can be found in the Steel and Alloys Guide.
Disadvantages of metal elements
No matter how good people say about forging, there will always be bad things. Moreover, in this case, the disadvantages force many people to abandon forged elements and products.
Of course, the main and main disadvantage is the price. The fact is that most of such work takes a lot of time and effort. In addition, various expensive machines and the cost of the metal itself play a role. For example, if you compare a regular fence made of profiled sheets and the same fence with forged elements, the price can almost double or even triple.
The next and final disadvantage of forging is its susceptibility to corrosion. No matter how well the material is processed, the metal will always be poorly affected by humidity and dampness.
What tools are needed for forging?
Inventory varies depending on the forging method. A forge with an anvil and hammers with tongs will be needed for hot forging.
For the cold method, you need a “Gnutik” tool, which allows you to bend the workpiece at an angle, and a “Snail” machine for forging, which you can make yourself. The latest machine allows you to create decorative elements with a spiral shape.
Note!
Lamp for disinfection of coronavirus (COVID-19) - an overview of the best options, as well as instructions for useHow to make a medical mask: instructions for making simple and complex masks to protect against coronavirus (COVID-19)
How to learn to knit and crochet: detailed instructions for beginners
In addition to the basic tools for the cold method, “Flashlight”, “Wave”, “Twister”, a ring machine and others can be additionally used.
The modern market offers industrial machines designed to perform technological operations. In the photo of forging you can see a product made on the “Master 2” machine from the MAH company.
Equipment for rolling at home
You can buy devices for cold forging yourself or make them yourself from available materials. Initially, you need to create 2-3 basic workbenches to process one rod. The design and complexity of manufacturing depend on the type of work performed. A thorough study of the process will allow you to make the equipment yourself.
To create complex forged products you will need more than one workbench
Gnutik: what products can be created with its help
It is not necessary to create bending drawings for cold forging yourself. It is enough to look at the principle of operation once to make the tool yourself. The machine is a steel tooling, which is divided into three parts. The middle element (lead) is movable; a central roller (wedge) is attached to it, which bends the rod. On the side plates, the rollers are made replaceable and inserted into the groove. By choosing different diameters, you can vary the bending angle of the rod or plate. A lever is attached to the top of the leash, which sets the structure in motion.
Note! Bending a rod requires a lot of force, so attaching the workbench to a movable support will lead to incorrect bending and make work difficult.
The rollers should rotate freely in the holes, which will reduce the force required to bend the plate. Grooves for the rollers can be drilled in several places symmetrically to each other. This will allow you to quickly move the parts, varying the desired bending angle.
The bender helps bend metal rods at any angle
Mechanism for bending metal with a bend:
- a plate or rod is installed between the rollers;
- using a vice, the central roller is pressed against the metal;
- By rotating the lever, the plate moves along the roller, acquiring the desired bend.
For convenience, a dial (a tape with divisions showing the height of the angle) is placed under the central roller. It is used to produce parts with high precision that must fit together perfectly.
The bending tool is quite easy to use.
Snail: a simple tool for creating curls
The second name is a do-it-yourself conductor for cold forging. For manufacturing, you need to familiarize yourself with the bending process, for example, watch a forging video. Then the design itself will not raise questions and will be easy to repeat. The workbench is a frame on which the main matrix or spiral module stands. A rod is driven into the snail and moved around with a metal roller, pressing against the arc. The frame must be made of metal, since wood quickly collapses after prolonged stress. A metal corner, thick-walled pipe or channel are suitable for this purpose.
The machine is designed for two tabletops. One serves as a support and takes on most of the pressure, and the second holds the shape of the snail. Two circles with a thickness of at least 5 mm are cut out. The first part is installed on the frame. The center of the circle is marked on top, and a three- or four-leaf leg is welded to distribute the load.
The upper part of the volute, on which the metal is bent, is called a module. It can be static or typesetting.
The snail tool allows you to create curls from forged metal
A static module is a device for cold forging, designed for bending pattern parts of the same type. The bend radius or angle cannot be changed. Before starting to form the module, markings are drawn on the tabletop. A snail is assembled from metal plates (at least 0.6 mm thick) and welded.
The typesetting module consists of several parts. Its use is the most common for do-it-yourself artistic forging, as it allows you to create elements of different radii. Initially, parts are marked on the tabletop and the grooves are calculated. Removable parts of the snail are cut out of thick metal. Holes for fixing to the tabletop need to be cut only in the middle. Otherwise, the stress is distributed unevenly and the groove breaks faster.
The module for forging with your own hands can be made replaceable. A structure of the required radius is welded onto a metal circle. It is attached to the tabletop with grooves or bolts. To produce elements of different diameters, several modules are made that can be used on one machine.
The typesetting module will allow you to create curls of various radii from forged metal
A rotating shaft and lever need to be secured between the tabletops. It is necessary that the distance between the roller and the module be at least 2 cm, and the shaft stroke must extend beyond the tabletop. A movable element is installed on the lever handle to adjust the radius of the roller stroke.
Wave: how to create and use this tool
Wave is a tool for forging lines like a sine wave. Two rollers are machined to the specified dimensions. The first roller is static (the rod will bend around it), it is fixed on a support. The second is the leading one, it is mounted on a lever and rotates when it comes into contact with the surface. Pressure is generated between the shafts, which acts on the metal and causes it to bend.
The static roller can be machined into the shape of a stepped pyramid. Thus, the radius of the wave can be changed by moving the lever and rod higher by a division. When using such a machine, one side must always be held in order to avoid damaging the bend. To more accurately repeat the wave shape, two static rollers are machined, one of which holds the rod in the desired position, preventing further deformation, and the second is used for bending.
The “Wave” tool will help you make the rod wavy.
Flashlight and twister: features of these machines
A flashlight is a cold forging equipment for working with several rods and creating three-dimensional baskets. To avoid constructing a frame, you can use a regular vice to secure the tool. The tool consists of three parts: two dies and a roller. The matrix can be made of strong, preferably hardened metal 4-5 cm wide.
In each matrix, a central hole is machined into which the roller is mounted. Grooves are made on the sides for installing rods. The second matrix must move freely along the lever, since during deformation the distance between the working surfaces decreases. When the lever is rotated, the rods bend in a spiral, forming a structure similar to a flashlight. Do-it-yourself metal products, which consist of several rods, are secured by welding.
The twister machine has a similar design. However, instead of a shaft, a rod is inserted into the matrix, which is pressed with a plate or bolts. Between them you need to install a movable element that moves forward when the shaft rotates. The rod twists along the longitudinal axis, forming a symmetrical spiral.
You can create forged elements using the flashlight and twister tools
Important! The running matrix should approach static with each rotation. If it is fixed in one position, the master will have to make more efforts to bend the rods.
DIY forging photo
Note!
- How to crochet slippers? TOP 8 best ideas from craftswomen. Step-by-step instructions on how to knit beautiful and warm slippers with your own hands
- Washing secrets: how to preserve clothes
- What is the difference between a steam generator and a steamer?