Description of the locator circuit. In Fig. 1 tone generator circuit. The RC generator is assembled on transistor T1 and operates in the range of 959 – 1100 Hz. Smooth frequency adjustment is carried out by a variable resistor R 5. In the collector circuit of transistor T 2, which serves to match the generator T1 with the phase inverter T3, using switch Bk1, relay contacts P1 can be connected, designed to manipulate the oscillations of the generator T1 with a frequency of 2-3 Hz. Such manipulation is necessary for clear identification of signals in the receiving device in the presence of interference and interference from underground cables and overhead AC circuits. The manipulation frequency is determined by the capacitance of capacitor C7. The pre-terminal and final cascades are made according to a push-pull circuit. The secondary winding of the output transformer Tr3 has several outputs. This allows you to connect to the output various loads that may be encountered in practice. When working with cable lines, a higher voltage connection of 120-250 Volts is required. Fig. 2 shows a circuit of a network power supply with stabilization of the 12V output voltage.
Schematic diagram of a receiving device with a magnetic antenna - Fig. 3. It contains an oscillating circuit L1 C1. The audio frequency voltage induced in circuit L1 C1 through capacitor C2 is supplied to the base of transistor T1 and is further amplified by subsequent stages on transistors T2 and T3. Transistor T3 is loaded onto the headphones. Despite the simplicity of the circuit, the receiver has quite high sensitivity. Design and details of the locator. The generator is assembled in a housing and from parts of an existing low-frequency amplifier, converted according to the circuit in Fig. 1,2. The front panel contains handles for the frequency regulator R5 and the output voltage regulator R10. Switches Vk1 and Vk2 are ordinary toggle switches. As transformer Tr1, you can use an interstage transformer from old transistor receivers “Atmosfera”, “Spidola”, etc. It is assembled from Sh12 plates, package thickness is 25 mm, the primary winding is 550 turns of PEL 0.23 wire, the secondary winding is 2 x 100 turns of PEL 0.74 wire. Transformer Tr2 is assembled on the same core. Its primary winding contains 2 x 110 turns of PEL 0.74 wire, and the secondary winding contains 2 x 19 turns of PEL 0.8 wire. The Tr3 transformer is assembled on a Sh-32 core, the thickness of the package is 40 mm; the primary winding contains 2 x 36 turns of PEL 0.84 wire; the secondary winding 0-30 contains 80 turns; 30-120 - 240 turns; 120-250 – 245 turns of wire 0.8. Sometimes I used a power transformer 220 x 12+12 V as T3. In this case, the secondary winding 12+12 V was switched on as the primary winding, and the primary as the output 0 - 127 - 220. Transistors T4-T7 and T8 should be installed on radiators. Relay P1 type RSM3.
The installation of the locator receiver amplifier is made on a printed circuit board which, together with the A4 batteries and the Bk1 switch, is fixed in a plastic box. I used a ski pole as a receiving rod, the lower part of which was cut to height for ease of use. A box with an amplifier is attached to the upper part below the handle. At the bottom, a plastic tube with a ferrite antenna is attached perpendicular to the rod. The ferrite antenna consists of a F-600 ferrite core measuring 140x8 mm. The antenna coil is divided into 9 sections of 200 turns each, wires PESHO 0.17, its inductance is 165 mH. It is convenient to set up the generator using an oscilloscope. Before turning on, load the output winding TP3 onto a 220 V x 40 W light bulb. Using an oscilloscope or headphones, check the passage of the audio signal through the 0.5 capacitor from the first stage to the output stage. Using resistor P5, set the frequency to 1000 Hz using the frequency meter. By rotating resistor P10, check the output signal level adjustment by the light bulb. Tuning the receiver should begin by tuning the L1C1 circuit to the specified resonant frequency. The easiest way to do this is with a sound generator and a level indicator. The circuit can be adjusted by changing the capacitance of capacitor C1 or moving sections of the windings of Coil L1.
The starting point to start searching for the route should be a place where the generator can be connected to a pipeline or cable. The wire connecting the generator to the pipeline should be as short as possible and have a cross-section of at least 1.5-2 mm. The grounding pin is driven into the ground in the immediate vicinity of the generator to a depth of at least 30-50 cm. The place where the pin is driven in should be 5-10 m away from the route. Using the receiver, having found the zone of greatest audibility of the signal, the zone is specified direction of the route by rotating the magnetic antenna in the horizontal plane. In this case, you should maintain a constant height of the antenna above the ground level. The loudest signal is obtained when the antenna axis is directed perpendicular to the direction of the path. A clear maximum signal is obtained if the antenna is directed exactly above the path line. If the route has a break, then there will be no signal in this place and further. Live underground power cables can be detected using a receiver alone because there is a significant electromagnetic alternating field around them. When searching for routes of de-energized underground cables, the locator generator is connected to one of the cable cores. In this case, the winding of the output transformer is connected completely to obtain the maximum signal level. The location of grounding or cable breakage is detected by the loss of signal in the receiving device phones when the operator is located above the point of cable damage. I have made 6 similar devices. All of them showed excellent results during operation; in some cases, the locator was not even adjusted.
Source: radioskot.ru
Generator for locator
When carrying out construction and repair work, quite often it is necessary to look for power, communication and other cables, pipelines and other utilities hidden in building structures or laid underground.
Knowing the exact route and depth of their location is necessary not only in order to get to the object for repair or replacement, but also to avoid accidental damage to it when performing other work. To search for such objects, there are locator devices, the operation of which is based on recording the electromagnetic field created by a well-conducting object located in an environment with poor conductivity, through which an alternating current of a certain frequency flows, created using a special generator. The author offers a relatively cheap, compared to industrial designs, homemade multi-mode generator for a locator. It is capable of working in conjunction with various search receivers: both industrial and homemade.
In various amateur radio literature, descriptions of the simplest “wiring finders” have been published more than once, allowing you to detect wires of a 220 V, 50 Hz household electrical network at a depth of several centimeters in a concrete wall. Unfortunately, by increasing the sensitivity of the receiver of the radiation generated by such wires, it is not possible to significantly increase the detection depth and accuracy of determining their route. Interference from other similar cables laid nearby and various devices powered by the network, of which there are many today, begins to take its toll.
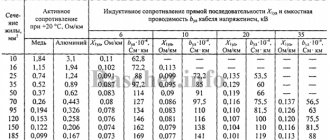
To successfully solve the problem of searching for a cable laid at a depth of several meters, and sometimes several tens of meters, it is necessary to supply it with a powerful signal of a higher frequency than the network frequency (from hundreds of hertz to several tens of kilohertz) from a special generator. Similarly, an electromagnetic field is created around other search objects, for example, metal water pipes. In this case, the second terminal of the generator is grounded.
The frequency of the search signal is selected based on the minimum attenuation of the electromagnetic field in the surrounding cable or other communication in an environment (soil, concrete) sufficiently distant from the frequency of possible interference. In addition, various types of signal modulation are used, giving it a “color” that facilitates better recognition by ear or using the automatic detector built into the search receiver.
A set of a generator that sends a search signal to the wanted object and a search receiver is called a locator or cable finder. Today, domestic and foreign industry produces quite a few types of locators. Their cost ranges from 25 thousand to 350 thousand rubles. But those that are cheaper than 100 thousand rubles, in most cases do not meet the operational requirements for them. They are capable of operating only at two or three frequencies; their generators have insufficient power to search for objects located at great depths.
The described generator does not have the disadvantages characteristic of “cheap” devices for similar purposes. It has been in operation for more than 12 years and has shown high reliability and efficiency in searching for cable routes and utility lines located at a depth of up to 50 m, as well as in localizing damaged cable lines. The total cost of a set of radio components and materials necessary for its manufacture does not exceed several thousand rubles.
The generator is compatible with many industrial route finder receivers of domestic and foreign production, designed to search for utility lines laid in walls, ground, pipes, channels, and mines.
High power, wide range of changes in operating frequency, various combinations of output voltage and current - all this allows you to confidently trace, even in conditions of strong interference, communications laid at a depth of up to 50 m at a distance from the generator up to 5 km.
Assembly technology
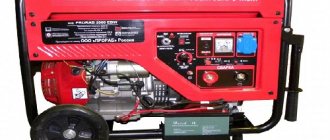
The device has a simple design and consists of two components - a receiver to which the signal is received, and a generator that regulates the operation of the device. The stronger the generator, the more powerful the device will be and the greater the distance at which it can detect lines. Thus, a device powered by a 24 V battery is capable of tracing an area of 4 km and operating for about a hundred hours without interruption. The diagram for a locator working on this principle is shown below.
As can be seen from the drawing, the device is equipped as follows: a modulator and a generator are assembled on transistor T1, P14. Under the conditions that the switch comes into an open state, the transistor with the base circuit creates a frequency generator of 1 kHz. And when the circuit is turned on, even partially, it becomes possible to increase the load on the device. Thus, when the capacitor is turned on, the power of the generator increases sharply, and it begins to operate in the VHF range.
To construct a cable line locator with your own hands, you need to carefully work out its second part, the receiver.
The most important condition here is the fact that the magnetic antenna is tuned to the audio frequency voltage of the generator. The signal passing through the transistors creates a stable circuit, and the transistor stages provide the necessary amplification, which guarantees uninterrupted operation of the device.
To mount the cable locator shown in the diagram above, you will need the following:
- We take a getinaks board, which will be the basis of the future device.
- Install the power terminals on the front panel.
- We wind the first transformer on a ferrite ring (diameter 0.8 cm), and the second on a steel core.
When assembling, follow the drawings to avoid mistakes.
:: ELECTRICAL TEST ::
This probe can be used to quickly determine the capacitance of capacitors in PF, NF, check their stability under temperature changes, find broken wires, trace wires on printed circuit boards, and also to search for live wires without touching them. The circuit uses only three transistors and a couple of other radio components. Simplicity allows you to assemble it in just an hour.
Probe circuit for an electrician
List of detector components
- C1 trimmer capacitor 30pF
- C2 1nF
- D1 1N4148
- LED1 3mm
- Q1 BC559C
- Q2 BC559C
- Q3 BC549C
- R1 1M
- R2 2M
- R3 5M
- R4 2m
- R5 1M5
- R6 33k
- R7 33k
- R8 270R
- SG1 piezoelectric speaker
When the capacitor being tested touches the sensor, the circuit beeps at a frequency that varies depending on the capacitance. If the user has sufficiently damp skin, simply holding one terminal of the capacitor while testing while touching the other to the probe is all that is needed to trigger the sound.
When the probe is properly configured it consumes only 10 µA - that is, a power switch is required. The design is optimized for capacitors smaller than 0.1 µF. Large capacitors produce too low frequencies. The entire device is powered by two CR2032 lithium cells that fit into a TicTac box. Using a power switch is unnecessary as the circuit consumes almost no power when not in use.
Features and Specification
The Mastech ms6812 cable tester-router is sold in a small cardboard box, on the back of which the main technical characteristics of the device are written.
Thus, a locator consists of a signal transmitter and receiver, with the help of which it is possible to carry out the following actions:
- track the cable route;
- search for wire;
- test for wire breaks;
- detect the location of a wiring break;
- determine the polarity, integrity and condition of telephone lines when connecting the transmitter to telephone sockets;
- send a single-tone signal over the wires.
Technical characteristics of the Matech hidden wiring detector:
- generated frequency - 1.5 kHz;
- frequency range - from 100 Hz to 300 kHz;
- device weight - 417 g.
Mastech runs on a Krona battery. The package includes: receiver, transmitter, set of batteries, soft case and instruction manual presented in English.
DIY cable finder diagrams
Attention! Before creating a topic on the forum, use the search! The user who created a topic that already existed will be immediately banned! Read the topic naming rules. Users who created a topic with unclear titles, for example: “Help, Circuit, Resistor, Help, etc.” will also be blocked forever. A user who creates a topic in a different forum section will be immediately banned! Respect the forum and you will be respected too!
Group: Participant Messages: 208 User No.: 94134 Registration: 30-July 12 Place of residence: Poltava
There’s simply no time for stuffing cones. And the need for the device is great. What I found on the net, the size of a spinning rod, does not fit. the requirements are as follows: 1 size no larger than a pack of cigarettes 2 two sensitivity modes 15-30 cm and 2-3 cm 3 indication-sound
The task is mainly to search for a “goat” or a break in the car wiring harnesses. My idea of the device is that instead of a fuse for the desired circuit, we put a 3 kHz generator (for example) I’m thinking of assembling a 555 timer. The receiver is something like a stethoscope, only instead of a microphone - a ferrite rod and a pair thousand turns 0.03. the question is how viable this idea is and how to implement two fixed degrees of sensitivity. Yes and. Guys, don’t rush to kick, it’s better to point in the right direction. (I myself know that I am weak in design)
Group: Participant Messages: 145 User No.: 105848 Registration: 30-March 14 Place of residence: Tallinn
Group: Participant Messages: 208 User No.: 94134 Registration: 30-July 12 Place of residence: Poltava
Causes and types of damage to cable lines
There are many factors that negatively affect the integrity of power cables, the most common of which include the following:
- Ground movement can be caused by a failure of water supply, sewer or heating networks, as well as seasonal phenomena, for example, spring thawing.
- Exceeding the permissible operating standards for cable lines, which can lead to thermal overload of the line caused by an increase in current load.
- Formation of a high level of electric current in the cable line from a transit short circuit.
- Mechanical damage during excavation work without taking into account the passage of underground communications and the depth of the route.
- Errors when laying cable lines. As an example, we can cite violations of the technology for connecting cores with cable couplings.
- Manufacturing defects.
Note that when cable routes are laid open, some of the above causes of damage are extremely rare. In particular, the likelihood of the influence of soil movement and mechanical impacts due to excavation work is reduced. In addition, damage zones of open cable lines, in most cases, can be detected by visual inspection, without the use of special methods.
Having dealt with the reasons, let’s move on to the types of damage, since this directly determines the method by which the emergency section of the cable line will be localized.
Most often, repair teams have to deal with the following types of faults:
- A defect caused by a complete or partial break of a cable line. Most often, the cause of the accident is excavation work without determining the passage of cable routes. Somewhat less frequently, the cause of this damage can be a short circuit in the couplings.
- In power cables (more than 1 kV), breakdown of one of the conductors to ground (single-phase short circuit) is often encountered. Leakage current, as a rule, is caused by a decrease in the quality of insulation during operation of the cable line.
- Interphase damage, as well as types of metal short circuits, can occur in any lines; the cause of damage is the same as in the previous paragraph.
- Routine cable testing, which involves high voltage levels, shows low insulation reliability and leads to breakdown. Under certain circumstances, such a line can continue to operate, but due to its low level of reliability, an accident can occur at any time.