Proper sharpening of the chisel ensures precise cutting and ease of control of the tool. However, not only the sharpness of its blade is important, but also the sharpening angles, which depend on the type of tool and the characteristics of the work performed. If you sharpen the cutting surface correctly and maintain the appropriate chamfer angle, the carpenter will make much less effort when removing chips and can easily maintain their thickness. And this directly affects not only the cutting accuracy, but also labor productivity.
The cutting part of the chisel can be sharpened and finished using both manual and powered abrasive tools. Typically these include a variety of sharpening stones, sandpaper-wrapped stones, sheet abrasives, cloth and felt polishing pads, and vertical and horizontal sharpening machines. In order to sharpen a chisel, you first need to fix it at the desired angle to the abrasive plane. Many people do this manually, which, with certain skills, provides more or less acceptable quality. However, most craftsmen sharpen chisels using special devices that fix their blades strictly at a given angle.
Sharpening angles
The following is a list of sharpening angles for all common materials. The first fraction indicates the relief angle during roughing, the second - the relief angle during finishing. The third fraction shows the size of the front angle. The numerator indicates the angles for cutters that sharpen and bore parts, and the denominator indicates the angles for tools that plane workpieces.
- Steel (hardness less than eight hundred Megapascals) – 8/6, 12/8, 15/12.
- Steel (hardness more than eight hundred Megapascals) – 8/6, 12/8, 10/10.
- Steel (hardness more than a thousand Megapascals) – 8/6, 12/10, 10/8.
- Gray cast iron (Brinnel hardness less than two hundred and twenty) – 6/6, 10/10, 12/8.
- Gray cast iron (Brinnell hardness more than two hundred and twenty) – 6/6, 10/10, 8/5.
- Malleable cast iron – 8/8, 10/10, 8/8.
The main plan angle should be 30 - 45 degrees. The width of the chamfer depends on the cross-section of the cutting rods.
What abrasive wheels are used for sharpening turning tools? Sharpening of a tool through the holder and at an angle of 5 degrees is carried out with a wheel made of electrocorundum, having a grain size of forty - fifty, hardness CM1/2. The peripheral speed of the circle is 25 m/s.
Preparatory sharpening is carried out with products made of black silicon carbide, having a grain size of twenty-five to forty, hardness M3-SM1. The final sharpening of the cutting tool is carried out with wheels made of green silicon carbide, having a grain size of sixteen - twenty-five, hardness M3-SM1.
The parameters of grinding wheels for steel and carbide cutters are specified in the table of sharpening modes. There you can also see the circumferential torsion speeds.
Currently, final sharpening is recommended to be done using a diamond wheel. This is especially true for inserts made of hard alloys. The peripheral speed of the circle during preparatory/final sharpening should not exceed twelve to fifteen meters per second.
Design of turning tools
Sharpening cutters for a metal lathe will not be done correctly until the master understands the nuances, features and rules of sharpening turning cutters. The main components of this design are the rod, which secures the device to the lathe, and the working head, its cutting part must be adjusted and constantly sharpened.
Let's take a closer look at the tool head. It consists of two types of base - rear and front. The front one has a distinctive feature - it removes the chips generated during work. The rear surface is the part of the fixture to which the workpiece is located during processing. Depending on the location, it can be auxiliary or primary.
The main component of the cutter is the cutting edge; it is located at the cross section between the front and rear planes. The device for sharpening wood chisels and cutters also has an additional edge, which is located at the cross-section of the main and auxiliary bases.
The main characteristics of sharpening metal turning tools are the sharpening angles of the tools, which are divided into additional and main. We will talk about them further.
Design of turning tools
Tool sharpening
Each of us has encountered a situation in life when blunt tools, be it an ordinary knife or carpentry tools, interfere with normal work.
Dull tools require greater effort and therefore your hands get tired faster and dangerous situations may arise. Sharpening the tool in advance will provide you with a quick and easy work process without any extra effort. Each type of tool has a cutting edge with its own individual sharpening angle. Tools with sharpening angles up to 25° have sharper edges, but are not suitable for work that requires significant effort; in this case, tools with a large sharpening angle are used. It is necessary to take this fact into account and therefore, before starting the sharpening process, we advise you to familiarize yourself with the optimal sharpening angles for various tools. By the way, good sharpeners are equipped with an angular scale for setting the supporting surface for a specific tool, which greatly facilitates the process of sharpening the tool.
Features and Specifications
Comparing solutions presented in stores from various manufacturers, for example, products from Bosch and the Skil 7720 model, you can find that they all have a similar design, in which the following components can be distinguished:
- Frame. Made of durable plastic and has a comfortable handle.
- Tool start button and speed control.
- An informative indicator that helps you find out about the tool blocking and the operating speed set at any given moment.
- A special socket allows you to quickly change and install the working tool.
It’s not hard to guess why an electric wood chisel is often called a multi-cutter. After all, this device has the capabilities of various types of working tools. For example, the equipment of one of the most popular multifunctional models among domestic consumers, Skil 7720, includes:
- steel violin blades for universal use, 35 mm wide - 5 pieces;
- steel flat cutters with a blade width of 15 mm - 2 pieces;
- steel spatulas 60 mm wide - 3 pieces;
- steel knives 60 mm wide - 5 pieces.
Having such a large set of working tools at hand, any home craftsman will be able to solve a wide variety of tasks using an electric chisel.
To get a more complete picture of the device’s capabilities, let’s return to the aforementioned multifunctional electric chisel Skil 7720 and get acquainted with its technical characteristics:
- vibration level - 12.7 m/s2;
- acoustic power level - 92 dB;
- acoustic pressure level - 81 dB;
- three operating speeds with an oscillation frequency of 6500/8500/i9500 rpm;
- platform working stroke - 2.2 mm;
- operating power indicator - 250 W;
- weight - 1.2 kg.
However, not only the above operating parameters make the Skil 7720 model a convenient and effective tool in the hands of a home craftsman. This is also facilitated by the presence of a special device in the design, with which you can quickly and without the help of additional solutions change the working tool. In this electric chisel, the manufacturer provides the possibility of additional feed of the tool forward, which also has a positive effect on the convenience and efficiency of its use.
Purpose of turning tools
Any cutting tool performs two functions: processing the surface of a part with a given accuracy and cutting the bar into pieces of a given size. To solve these problems, the structure of a turning cutter has the following characteristics:
- geometric dimensions (they determine the shape of the turning tool);
- sharpening angle of the cutting edge.
The head of the turning cutter is made of a special shape. This is necessary to solve the assigned tasks. Its geometric parameters are set based on the type and structure of the processed wooden workpiece and the steel used for its manufacture. The selected grade of steel will determine the strength and durability of the tool.
When choosing the right turning tool, the workpiece is processed quickly and with high quality.
How to sharpen a semicircular chisel?
To correct carpentry tools with a semicircular cutter, a wooden block with an edge that follows its shape is used.
- silicon block;
- wood blank;
- abrasive powder;
- sandpaper with a grain size of 400, 800, 1000, 2000 microns;
- a piece of leather for polishing.
- Wet the silicon block in a soap solution. Next, they begin to work, performing sideways movements, pressing the chamfer to the touchstone at the desired angle until a burr is formed.
- Next, a wooden block with a rounded edge, which is decorated with sandpaper, is used. During the processing process, the abrasive is changed to an analogue with a small denomination.
- At the end of the process, the cutting edge is polished and straightened using leather.
If you sharpen the chisel correctly, ensuring the appropriate chamfer angle, the quality of the carpenter's work improves. Moreover, not only the accuracy of the cut, but also the level of productivity of the woodworker depends on the sharpness of the working surface.
Turning cutters
A huge number of different jobs that are constantly performed using lathes has led to the creation of a number of cutters that allow productive technological operations to be performed. They all have a different design and purpose for which they were created. Each turning cutter, depending on what geometric shape it has, received its own separate name. It depends not only on the form, but also on its properties and purpose. All of them will be listed below.
1 – straight cutter through passage; 2 – bent through; 3 – pass-through persistent; 4 – scoring cutter; 5 – wide passage; 6 – boring cutter; 7 – boring thrust; 8 – cutting cutter; 9 – thread cutter; 10 – shaped cutter.
Pass-through straight cutters are used if you need to grind the outer surface of a cylindrical shape.
Thrust cutters are used for turning cylindrical surfaces and shafts with small shoulders
If you pay attention to the shape of the cutter, then the main angle of such a tool is exactly ninety degrees. This will reduce the vibration that appears during work.
A straight-through bent cutter is considered a more universal tool. Without changing its position in the tool holder, you can grind both cylindrical surfaces and trim the ends of the workpiece. This cutter is often used to process stepped shafts or any other parts that, as a result of the technological process, require trimming a small shoulder.
A scoring cutter is used to machine external end surfaces. During operation, the feed of the tool must be such that its movement is perpendicular to the axis of rotation of the part that will be processed.
Boring cutters are used to bore various through holes that have been previously machined with a drill.
Boring thrust cutters are also used for boring parts after drilling. Typically this tool is used for machining blind holes.
Parting cutters are used to cut material. Usually, in order to get the desired result when performing work with such cutters, you need to choose a tool whose head length will be greater than the radius of the workpiece itself. In this case, the rule is observed when the thickness of the head towards the body of the cutter gradually decreases. This is done to minimize the friction that is generated during cutting of the part between the end planes and the auxiliary cutting edges.
Thread cutters are used to cut internal or external threads. In this case, the profile of the thread that is being cut must correspond to the shape of the cutting part of the tool.
Grooving cutters are used for processing technological grooves of various profiles and purposes.
Shaped cutters are used to process special shaped surfaces
In this case, it is important to maintain the profile that will be at the cutting edge of the tool. It must be such that it corresponds to the profile of the workpiece and its surface that will be processed
Such cutters are sharpened exclusively on the front surface. For this reason, the edge profile does not change.
Modern, efficient production is characterized by the use of special cutters, which are equipped with non-sharpening and often multifaceted carbide inserts. When the blade wears out, the plate is removed and rearranged in such a way as to secure the next unused edge of the blade.
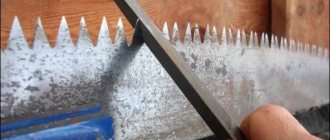
Sharpening technique
In order to properly process the working surface of the chisel, it is recommended to use special products that have both grinding and polishing properties. Most often, preference is given to sharpening water stones or fine-grained sheet abrasives on a water-resistant basis.
Preparatory stage
Sharpening stones are pre-soaked in water. During the sharpening process, the liquid helps create a viscous grinding suspension, as it mixes with abrasive dust.
Angle editing and chamfering
The wood chisel is fixed at a given angle; according to the standards, the inclination is about 25°. This parameter may vary depending on the purpose of the joinery:
- The chamfer of the tool for slotting work is sharpened at an angle of 27-30°;
- for accurate trimming of wood with the removal of thin chips, a correction of the working surface by 20-22° is required;
- A universal chisel for most woodworking is sharpened at an angle of 25°.
It is worth considering that the sharpening angle of the chisel also depends on the parameters of the blade: thick blades provide a relatively steep bevel.
If you need to form a chamfer with significant adjustments to the sharpening angle, you should start working on a sharpening machine. To easily correct the sharpness of the cutting edge, perform the following steps:
- process the chamfer on the abrasive stone until visible damage is completely eliminated. In this case, the specified slope must be maintained both in the longitudinal and transverse directions;
- check the cutting edge for geometric evenness. Here it is necessary to achieve strict perpendicularity of the line in relation to the canvas. Otherwise, you will have to straighten the edge on the sharpening stone, after which the working surface is ground again to an ideal sharpness.
The angle for sharpening chisels should be about 25°
If it is necessary to adjust the sharpness of a chisel with a bevel on the edge, grind it with a stop, lifting the cutting blade up within 5°.
Features of cutter processing
The work is carried out taking into account the following recommendations:
- First, the flat side of the canvas is processed. Movements are performed along the same trajectory along the entire length of the stone;
- then change the position of the chisel and work with the main working surface of the wood carving tool. Movements should be uniform, without jerking, but quite fast. In this case, it is necessary to maintain the desired angle of inclination;
- after the coarse-grained abrasive begins to leave scratches on the surface of the cutting blade, switch to a medium-grained stone. Next, if necessary, use an abrasive material with fine grain;
- when sharpening the chamfer, 1.5-2 mm is allocated, the perimeter is made at an acute angle of 5-7°. The chamfer is formed in just a few movements along the entire length of the stone.
It is noteworthy that the process of sharpening a wood chisel takes no more than 10 minutes if a simple correction of the sharpness of the carpentry is performed. If there are significant irregularities, chips or other defects on the surface of the tool, sharpening will take up to 1 hour or more.
Final polishing
The process of sharpening a chisel for wood carving is completed by straightening using various devices. Most often, they use a leather belt rubbed with GOI paste, or a kitchen cleaner on a flat wooden surface. The blade can also be polished on a felt wheel using polishing paste.
How to sharpen a tool yourself?
To sharpen cutters, you can use a hand or electric tool. The second method is preferable, since sharpening with a good power tool is faster and sometimes even better.
Required Tools
To sharpen the blade you will need:
- whetstone;
- abrasive stone.
The initial rough cleaning of the blade is carried out on an abrasive stone. At the end, use a sharpening stone with fine grit.
You can also sharpen the blade on an electric sharpening machine.
Peculiarities
To straighten or sharpen the blade of the tool, you can use an electric sharpening machine. It is better to choose models with two grinding wheels.
At first, you can do rough cleaning and processing. On the second - finishing sharpening. Accordingly, the wheels should have different sizes of abrasive chips.
During operation, it is necessary to cool the blades in machine oil. Otherwise, it may overheat and lose its performance. Also, cooling in oil helps to harden the tool.
Features of sharpening
When sharpening you need to consider:
- Correct sharpening angles for each cutter.
- For beginners, it is better to take more developed, rather than sharper, sharpening angles. As your skill increases, you can decrease the angle.
- For rough cleaning and primary processing, sharpening with a more developed angle is also used.
- The initial sharpening of the blade and the formation of the cutting edge are done before working on an electric sharpening machine.
As the master masters the tool, he will come to his own sharpening angles for a particular cutter, which will be convenient to use.
Chisel sharpening angle
The inclination of the chisel blade chamfer depends on the type of work for which it is intended. Typically its value lies in the range of 25±5º. This value is standardized by GOST 1184-80, but in practice it may differ slightly in one direction or another. Typically, the angle at which a chisel blade needs to be sharpened is directly related to its thickness: thicker blades tend to have a steeper bevel.
To perform slotting work using a mallet, the chamfer must be sharpened at an angle of 27÷30º. The steeper angle prevents damage to the cutting edge when significant impact forces are applied to the chisel. If you have the only chisel at home, it is better to sharpen it with a bevel of about 25º - this is suitable for most carpentry work. But for accurate trimming and removal of thin chips, the tool will have to be sharpened to 20÷22º. The bevel of the cutting edge relative to the chamfer plane is usually about 5º.
How to choose the right cutter?
When choosing a cutter, you need to take into account a number of recommendations. Determine what type of metal you will be working with, what processing operations you are planning and what degree of load the cutter will experience. Determine what type of metal you will be working with, what processing operations you are planning and what degree of load the cutter will experience.
Determine what type of metal you will be working with, what processing operations you are planning and what degree of load the cutter will experience.
Decide what is most important - the accuracy of the geometry of the product or the level of surface treatment. Depending on this, the cutter is selected in accordance with the classifying characteristics and geometric proportions.
Determine for yourself how important it is to ensure the wear resistance of the device and how long it should remain unchanged.
Types of incisors
All wood cutters necessary for manual work have the same design and consist of a metal blade with a shank on which a wooden handle is attached.
To cut simple geometric patterns on a flat surface, you can get by with a couple of simple cutters, but to create complex volumetric and openwork works from wood, you will need to use a large number of special cutters.
The most widely used types of these instruments are:
- jamb knife - a tool like a shoe knife with a short triangular blade, the bevel angle of which can be different, which makes it universal and suitable for a wide range of jobs;
- The chisel is the most common type of wood cutter. It performs the bulk of the work when creating most carved products; it has a smooth blade with a cutting edge at the end, which can be straight, oblique, semicircular or angled in the shape of the letter V;
- cranberry - a tool similar to a chisel, with a blade that has two bends of one hundred and twenty degrees (so that the handle does not catch the plane being processed when working). With a variety of cutting parts - semicircular, bracket, straight and others;
- spoon cutter - a cutter for cutting spoons and other utensils, made in the shape of a ring or half ring with a sharpened side edge;
- a hatchet is a knife that looks like a slightly beveled ax blade, which is a fairly universal tool, the corners of which can make cuts both towards you and away from you, and with the middle of the blade you can cut off bulges.
For those who are just starting to master the technique of wood carving, at first it will be enough to buy 5-6 cutters - a jamb knife, a flat chisel and two semicircular and corner ones with different radii and bending angles. But you need to take high-quality, professional tools, despite their rather high price. Cheap kits for beginners are made of poor steel, they become dull very quickly and working with them will not bring pleasure to the carver.
Experienced craftsmen prefer to make wood cutters for themselves. Making them is not very difficult and can be done by anyone, even at home.
Tools and materials for sharpening
To adjust the sharpness of a wood carving chisel, various types of tools and materials are used:
- sharpening machines of vertical and horizontal types;
- sharpening stones;
- bars with sandpaper;
- sheet abrasives;
- cloth polishing resources and felt bases.
Sharpening of chisels can be done using a machine
To fix the tool use:
- metal models of factory-made mandrels with angular adjustment;
- homemade wooden versions of devices in which the angle is formed using wedges.
The fixing device provides two functional components in the form of a carriage for moving along the abrasive surface and an inclined platform with a clamp. The latter is pre-set at a given angle.
Classification
Lathes are divided into:
- center ones with mechanized feed. It is possible to perform work on this equipment using hand-held cutting tools (when installing a special tool rest on the frame). An oblong piece of wood is held by a spindle and a movable tailstock. The longitudinal feed of the caliper is mechanized. These machines can be used to work with a copier. When working with short, light workpieces, the tailstock fastening may not be used. When processing the inside of a wooden part, a faceplate serves as a fastener. The moving elements in the operating mode on these lathes are the cutters moving along the piece of wood being processed and the rotating spindle.
- Lathes are used to produce parts on a flat, wide wooden base. Beautiful multi-level carvings, bas-reliefs, high reliefs - this is what can be produced on machines that work with a wide faceplate, on which the workpiece is mounted. Work is carried out only on the front part of the part. The rest of the revision will be done manually.
- round-sticks process wood, giving it a shape with a round cross-section. When working on this equipment, the workpieces do not rotate or move. The only moving parts of the machine are the heads with the cutters. There are also machines in this group for processing long products. Then they will feed the workpieces with rollers under the cutters.
Shaping wood occurs by rotating the material being processed and using a cutting tool.
Purpose and types of wood turning tools
Wood cutter – designed for manual processing of rotating parts on a lathe.
Design features
To have an idea of what wood cutters for a lathe can be made from, you need to familiarize yourself with its design, which is formed by two main parts: the working part (metal) and the handle (usually wooden).
In this case, the working part is divided into several elements and consists of:
- cutting part (blade) - sharpening is performed through it, it is the main element involved in processing the workpiece;
- body - represents the main structure that is necessary for the tool turner to regulate;
- shank - a narrowed part that smoothly connects to the body. The handle is attached to the shank.
The handle, in turn, is also divided into two parts and consists of:
- base - the large part that is necessary to hold the turner tool;
- neck - a small cylindrical part with metal fastening rings that prevent the handle from breaking during the process of stuffing it onto the working part.
When making cutters with your own hands, the standard dimensions and configuration must be correctly maintained. For certain processing, special wood cutters are used, which can be cutting, scoring, boring and shaped. Each master can have his own special, exclusive, highly specialized turning tools that are designed for specific tasks.
However, often craftsmen and turning enthusiasts use only two main types of cutters - reyer and meisel.
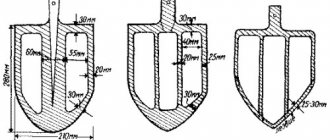
Rayer - used for rough, rough, initial types of workpiece processing. A design feature of these types of tools is the presence of a semicircular blade. To make it, a thick plate or groove with a semicircular cross-section is used. With the help of a rayer, it is easy to give wooden blanks an approximate outline similar to the finished product.
Meisel - used for finishing types of processing of workpieces, giving them final shapes. It can also be used to cut the product from the rest of the product. The meisel is similar in shape to a tool such as a jamb knife (somewhat reminiscent of a plate with an oblique blade with two edges sharpened at the same angle).
Other types of wood turning tools are shaped. The most popular among them include:
- chisel-scraper - allows you to level cylindrical surfaces on workpieces. It has a similar shape to a straight chisel, which has a one-sided sharpening;
- comb - used when making carvings and applying decorative designs (patterns);
- hook - allow you to grind planes in the workpiece;
- ring - used for the same operations as hook ones;
- for rough types of processing - they look like a triangular blade. Allows you to give the workpieces a cylindrical shape. These types are the safest among others, since they have the smallest area of contact with the surface of the workpiece.
Scraper Hook
General sharpening rules
Before you start sharpening a chisel, it is worth considering several general rules for performing this type of work:
- It is necessary to accurately determine the sharpening angle. This requires correct fixation of the chamfer in the sharpening device. The correct slope is selected for the longitudinal and transverse directions.
- Initially, you need to decide on the type of frame. One is designed to perform work on an automated grinding wheel. The second is for manual sharpening using whetstones and sheet abrasive.
- For work, an abrasive with a stone grain of 300-400 microns is used.
- At the end of the work, an abrasive with a stone grain of 50 or 80 microns is used for manual finishing.
Sharpening semicircular chisels for wood carving is carried out according to the same scheme as flat ones. The only difference is the number of stages - with a semicircular blade, all sides and parts of the blade are sharpened separately.
General rules on how to sharpen a semicircular chisel:
- First you need to dull the cutting edge. This will align the end.
- Next, an angle of 20-25° is selected for the semicircular blade profile and processed. Sometimes you have to divide the plane of a metal part into several parts and sharpen each one in turn.
- Next, additional processing is carried out using coarse-grain abrasives.
- The last stage will be finishing.
Often the same pattern is used for chisels and plane knives. This is the wrong decision, since the tools themselves (and, accordingly, their components), their operating principle and structure are completely different.
In order not to make mistakes when processing the cutting part of the tool, you need to know exactly how sharpening a chisel differs from a plane knife. To more accurately determine the differences, it is worth considering the following table:
Comparison of sharpening a chisel and a plane knife
| Processing the chisel | Planer knives |
| First, an abrasive wheel with a fine grain is used, and finishing is done by using a coarse abrasive. | Primary processing is carried out with a large abrasive, correction of defects is carried out with a fine one, and fine-tuning and final polishing are carried out using a leather belt or leather strip. |
| The procedure can be carried out manually or using an automated circle. | Sharpening is carried out only on automated wheels with different abrasive grain sizes. Otherwise, the procedure will take a long time. |
| The sharpening angle usually varies from 25° to 35°. | The angle for the plane knife when sharpening can be 25° - 45°. |
| The inclination of the chamfer is determined in accordance with the thickness of the metal of the chisel. | The inclination of the knife blade when sharpening is selected in accordance with the thickness of the wood with which you will have to work. |
After such comparisons, it immediately becomes clear how sharpening a chisel differs from a plane knife. The difference is quite striking and should be taken into account in the process of preparing a particular tool for working with wood.
DIY making
When making these tools, you cannot do without an electric sharpening machine (electric sharpener) with a set of abrasive wheels of different grain sizes. In most operations, it can be successfully replaced by a grinder with cutting and grinding discs.
Wood cutter blade
To make a tool blade, any used high-quality steel products are suitable - springs, drills, scalpels, rasps and even bearing rings.
For knives, the easiest choice is a hacksaw blade. Manufacturing consists of cutting it into pieces of the required length, forming the desired blade shape and sharpening.
The best option for chisels is a circular saw blade, the thickness of which is very suitable for this purpose. The carbon steel from which it is made holds an edge for a long time, even when processing hard wood. Cutting strips of the required size and grinding them to obtain the required blade shape is done using a grinder or an abrasive disc of an electric sharpener.
An old punch is perfect for a semicircular chisel - it already has the desired shape. It is enough just to cut off the excess metal from it and sharpen it.
During intensive grinding, the metal heats up, which causes a tempering, making it softer and unable to maintain an edge for a long time. Therefore, after giving the blade the desired shape and sharpening, hardening is required. To do this, you need to heat the cutting part using a gas or kerosene burner until it turns crimson and lower it into a container with machine oil.
Lever
Oak is considered the most suitable wood for the handle. Well, where it does not grow, it can be quite successfully replaced by birch, which, being burnt black with a gas burner and sanded, does not require any coating and is very comfortable to work with.
For wood knives, the handle can be made in the following way:
- cut two bars about 12 centimeters long and 12x22 millimeters in cross-section;
- attaching the shank of the blade to the block, circle it with a pencil;
- Use a chisel to select wood to the depth of the blade thickness;
- apply wood glue (PVA or EDF can be used) on the surface of the bars, connect the structure and tighten it with clamps or clamp it in a vice;
- After the glue has dried, plan the handle or grind it on an electric grinder and sand it.
For chisels, the handle can be turned on a lathe or cut from a whole block. Then drill a hole to the size of the shank and, having first put a crimp ring on the handle, which protects the wood from splitting, carefully place it on the blade.
Sharpening wood cutters
The final stage in the manufacture of wood cutters is the formation of the cutting part and sharpening. The main part of the metal from the cutting edge can be removed on the abrasive wheel of an electric sharpener or with the sharpening disc of an angle grinder.
The sharpening angles of the chamfers of all types of cutters are approximately the same and lie in the range of 18-25°, and the length of the sharp part is about 20-35 mm, depending on the total length of the cutter. During the processing process, it is necessary to constantly cool the blade in a container with water.
Further work is performed manually in the following sequence:
- sharpening on an emery block, which is recommended to be periodically moistened with water;
- sharpening on a thinner block or on sandpaper placed on a hard, even substrate;
- final editing and polishing of the cutting edge on a leather belt rubbed with GOI paste.
During the operation of a cutting tool, its blade inevitably loses its sharpness. Regular thorough sharpening of wood cutters is a necessary condition for comfortable work of the carver and high quality of the carved product.
Using a wheel and sandpaper
When forming a chisel chamfer, various sharpening stones are used: both round ones on an electric sharpener, and flat ones in the form of sharpening and grinding stones, as well as sheet sanding material on a fabric and paper basis.
To sharpen the bevel of a chisel on a sharpening machine, you need to make sure that its speed and the sharpening wheel installed on it will not cause the metal of the chisel to overheat and loosen. The rotation speed of the spindle of the electric sharpener should not be higher than 1800÷2000 rpm, and the sharpening stone should be viscous, medium soft and with a grinding filler (for example, aluminum oxide). In order to sharpen and polish a chisel blade efficiently, it is necessary to use abrasive products that combine both grinding and polishing qualities. Sharpening water stones are best suited for this role. Before starting work, they must be soaked in water, which rises to the surface during sharpening, mixes with abrasive dust and creates a viscous grinding suspension. Fine-grained sheet abrasive material is also well suited for such work. During the sharpening process, it must be wetted, so it is advisable to use waterproof sandpaper. You can sharpen the chamfer and edge of a chisel using this material by securing it to a flat surface or wrapping it around a wooden block.
What do you need to make a homemade cutter?
To sharpen the cutting area, you will need an electric sharpener or sharpening machine. The production of some types of cutters involves sharpening using abrasive discs of different configurations.
You also need to prepare steel blanks according to the number of tools being made. The best wood cutters (chisels) for a lathe are made from R6M5 steel. Parts from old bearings, files, and taps are also suitable. You can use any suitable size product made from hard grade steel.
The tool is equipped with a wooden handle. You can buy it ready-made or make it yourself. In order to save time, it is better to buy, especially since there are handles of different sizes on sale, and they are inexpensive.
Before making wood cutters, you need to decide on the configuration and purpose: whether they will be used for finishing or rough processing, turning bowls or other purposes.
Sharpening scheme
Valery Prostyankin gives a free theoretical lesson on sharpening in what is called “on-the-finger” language. Watch the video carefully!
The sharpening method proposed in the video was called “Razor” among professionals by analogy with a straight razor. Valery Alekseevich schematically shows in the figure what the chamfer of a chisel should look like after sharpening and what advantages this gives. The point of the theory is that a correctly formed working part of the tool will make it possible in the future to easily bring it manually to the required sharpness using an emery block and will eliminate the need to sharpen the chisel each time on a sharpener.
How to make meisel?
In skillful hands, using this chisel you can make a pattern of any complexity. Typically this tool is used for finishing the part.
Most often, the meisel has a straight blade. They are convenient for making square, triangular and rectangular notches and cutouts. The angles of the cutter vary from 22 to 450, the width of the cutting edge ranges from 0.4 to 4 cm. When working, the tool can be held at different angles, which one is determined by the characteristics of the pattern and the preferences of the craftsman. Understanding all the intricacies of the process comes with time, as experience is gained.
Meisel with a straight blade is done like this:
- Take an old file or any suitable flat-shaped workpiece with a rectangular end. If necessary, give the working edge an even shape.
- Grind the blade with an abrasive wheel, making sure that it has the same thickness across its entire width.
- Harden the metal.
- They put a handle on it.
This is the easiest tool to make, and you can start assembling a set of turning tools for handmade work with it.
It is almost as easy to make a wood cutter (meisel) for a lathe with a beveled blade. They are convenient for processing ends, cutting round workpieces and forming curves.
Manufacturing procedure:
- The workpiece is given the shape of the future cutter.
- Bevel the blade at an angle of 70-750.
- Perform final sharpening.
- Attach the handle.
Other cutters with a beveled blade are made in the same way. The main thing to remember is that the final sharpening of cutters for a wood lathe is carried out only after measurements.
Sharpening equipment
To sharpen by hand you will need the following tools:
- abrasive for rough processing;
- grinding tool;
- frame for fixing the position.
For machining, a sharpening machine with replaceable grinding wheels should be used. Spindle rotation speed from 1.8 to 2 thousand rpm. You can use a sharpening stone with a special filler (aluminum oxide or other similar properties) that has a medium or low level of hardness.
To obtain a perfectly flat, smooth surface of the cutter, you need to sharpen the chisel or chisel with polishing equipment. A water stone is used, the surface of which is wetted in abrasive dust or suspension.
To perform finishing, exclusively hand tools are used. This is due to the need for precise control of the geometry of the cutter and chamfer relative to the blade.
To manually sharpen a semicircular chisel, you will need the following tools:
- silicon block;
- abrasive powder;
- thick plywood;
- leather;
- a set of sandpaper with grit from 400 to 2000.