Types of dowels
There are many types of fasteners, but they are conventionally divided into groups according to material and shape. Let's consider this issue in more detail.
Material of manufacture
Two types are actively used:
- Wood. Most experts strongly recommend using a wooden tenon when constructing wooden structures. The main advantages when choosing such fasteners are given:
- Even drying. The beam and dowel should be approximately the same humidity. This will allow the shrinkage process to go through with virtually no visible changes;
- Not affected by temperature changes. The tree practically does not change its linear dimensions at different temperatures, so the fastening element will always be in place;
- No rust. Metal rusts over time, which leads to rotting of wooden surfaces in contact with it;
- There is no condensation. With a sharp change in temperature, moisture forms on steel, which is completely useless inside a load-bearing wall.
- The dowel fuses with the wall. After a certain time, the house will become monolithic, the wooden surfaces will be soldered together.
- Metal. This option also applies to a budget fastening method; waste materials (pipes, fittings) are often used. Although experts prefer the previous method, the metal dowel has its advantages:
- The top layers of wood are protected from torsion;
- Durability of the structure.
Form
There are also several main forms:
- Round section. Taking into account the fact that the holes for fastening in the log are made with a drill, the round dowel will provide the maximum contact area, guaranteeing the reliability and durability of the structure;
- Square. It is easier to make such an element; it also costs less. But that's where the positives end. When entering the hole, the edges of the tenon are deformed, and the total contact area remains minimal. Building a house this way is dangerous;
- Narrow rectangle. The easiest option to manufacture. A board of a certain thickness is taken and cut into rectangles. The only advantage is the very small thickness. Suitable for narrow timber, but installation is extremely difficult.
DIY furniture jig: drawings with dimensions to help
The principle of this equipment:
- Angular housing. It is superimposed on the planes of the parts, which will then be connected to each other.
- Guide bushings. The drill will go through them.
- Clamping devices. They fix the conductor and are made from the end part.
Designing your own jig should be based on the fact that with the help of this equipment it is possible to do most of the work performed related to various types of fasteners.
Important! If you need a universal assistant - this applies to professional furniture makers, then it would be better to purchase industrial equipment that is made more accurately and with high quality. It is this kind of device that will be preferable and will quickly pay for itself, especially if you also take into account the fact that this device often comes with many different templates, stops and other little things that are also necessary in the work. They are much cheaper than buying at retail.
And yet this device, if necessary, can be made with your own hands.
Such equipment may not be needed very often in any given industry, and even more so for a home craftsman. So for many users it will be much more profitable to do it themselves.
If the design of such remains relevant, then you need to prepare materials for the manufacture of a homemade conductor for drilling for confirmation:
- Corner. Your choice should be made on the unequal type of this rental - its possibilities are wider. The corner shelf must be chosen with the greatest thickness, which can reach up to 8 mm. This is quite justified, since then it is possible to insert guide bushings with an outer diameter of up to 6 mm. Based on this, you can use drills from 3.5 to 4 mm. Even if that diameter is not enough, then the material is drilled out with a large drill, without using any other devices.
- Guide bushings. Here, stainless steel pipes will be preferable, which are selected primarily by internal diameter. Example: a 6×1.5 pipe is suitable for a drill no larger than 2.7 in diameter. Explanation: its internal hole will be 3 mm, and a small gap along the entire internal diameter is taken into account due to thermal expansion of the material. The length of the sleeve is the depth of the hole in the corner, multiplied by two or more. The fit of the bushings is either transitional, or with an interference fit, or according to the shaft system. The latter is the most appropriate.
Read also: Should a resistor ring?
Instead of pipes, of course, you can use ready-made bushings used in wire drawing machines - these are available, for example, in mechanical engineering. Such parts (even used ones) come in handy: they are made of alloy steel and have an almost unlimited service life.
Choosing a mounting method
- Fixation using self-tapping screws. They are screwed into the part, which prevents the device from moving due to friction. This is convenient because these marks will be needed for subsequent drilling of other holes.
- Spring stop. It will securely fix the jig to the part. For such a stop, a flat spring with an appropriate clamping force is suitable.
- External clamps. Rubber pads must be placed under them. Corrugated rubber is ideal as a material. This, of course, slightly increases the weight of the equipment, and the elasticity of the pads can negatively affect the perpendicularity of the bushings. To prevent this from happening, the drill is inserted into the sleeve to mark the hole, and only then the clamps are clamped.
Plugs and heels for chair legs using improvised materials
In order to avoid damage to the floor in the kitchen or in another room, when using wooden chairs, you should insulate those parts that can do this, that is, the legs. To do this, you can go to the store and buy special heels, or you can save money and make them yourself. The following materials are suitable for making heels for table legs:
- an old carpet, parts of it can be cut out to the desired size and glued to the legs;
- rubber, also cut out to the required size and secured with nails or glue;
- felt insoles;
- linoleum;
- leather.
You can also make plugs for the legs; the most common material for their manufacture is wine corks.
When working with wood, most craftsmen have long been making various tools on their own; for their manufacture it is possible to use improvised means. Thus, you can save a lot of money on your family budget.
Benefits of use
Essentially, such a jig acts as a template for making holes so that they are made as accurately as possible. They can be used for those holes whose axis is perpendicular to the surface of the workpiece, as well as for working at an angle.
This tool is an excellent alternative to sketches and manual measurements. You can place the drill strictly at the desired angle in relation to the workpiece and will not allow any deviation. The result will be especially noticeable when it comes to making deep holes.
If you use such a high-quality device for working with chipboard, then it should have the following characteristics:
- facilitate quick assembly of furniture without the need to use complex tools;
- make it possible to make several holes simultaneously without manual marking;
- significantly improve the quality of work with the drill.
Conductors are made from different materials; there are models based on plastic or organic glass. However, the best option is considered to be steel, which has such advantages as:
- minimal likelihood of deformation;
- the drill is directed as clearly as possible;
- no heating during operation.
Very often, overhead models based on lightweight materials that are easy to manipulate are used as furniture jigs. Many people use factory or homemade tools.
And the most qualified and experienced craftsmen no longer use a jig, since they can easily make a hole in structures on their own as accurately as possible. But not everyone can do this.
The key advantage of such a device is that the work can be performed as accurately and efficiently as possible, even by a person who does not have the proper experience. You don't have to do markings and complex preliminary calculations. You will save a lot of time and produce furniture much faster.
Application
These products have been used for a long time and are widely used in metalworking. Thus, many machines are equipped with conductors. The need for templates for dowels in the woodworking industry is due to the prevalence of closed furniture joints. In this industry, the devices in question are used both in mass production and during assembly. In the latter case, furniture jigs are used to drill holes for dowels.
In addition to the above-mentioned areas, such devices are in demand in construction, mechanical engineering, and household work.
The scope of application is determined by the type of conductor. Thus, overhead devices are used for processing flat parts, chipboard and MDF boards. Corner ones are applicable both for furniture and for chipboard and MDF boards. Rotary products are designed for making holes in cylindrical parts. Universal models are suitable for small-scale furniture production. Tilting options are designed for simultaneous processing in several planes. Clip-on and sliding jigs are most suitable for home use. In addition, the latter are incompatible with single-spindle machines.
Rigid models are designed for making holes in objects with an uneven surface, such as pipes. In this case, they are secured using a clamp, but this method is not suitable for furniture, since deformation of the surface is possible.
The use of conductors simplifies and speeds up the work due to the fact that it eliminates the need for manual measurements and calculations.
Classification
According to the characteristics of their use, conductors are classified into the following types:
- Invoices. These are simple and mobile devices that do not require fixation, but are held by hand. In view of this, drilling using these jigs has to be done with one hand. They are used mainly when processing chipboard and MDF boards. The devices in question are easy to create yourself.
- Rotary. These conductors are equipped with brackets. Designed to perform drilling in two adjacent planes in one pass.
- Sliding. These devices are designed to create multiple holes without changing settings. They belong to professional equipment requiring appropriate skills.
- Angular (at an angle). They are presented in highly specialized versions, designed for making holes at different angles. Often made according to an overhead scheme.
Classification of tools
Before you buy a ready-made conductor or make it yourself, you need to decide what problems you will solve with its help and only then you need to select the appropriate option in terms of design and functions.
There are a number of categories of devices that differ in their design and functional features. Here are some of them:
- overhead - such devices are applied to a part that can be processed, then it is attached to it or simply fixed manually. With their help, holes are made in various flat parts, MDF boards or chipboard;
- rotary - these templates are used when processing cylindrical parts. They are equipped with horizontal and vertical axes of rotation, so holes can be made at different angles;
- universal - such devices are suitable for small serial furniture manufacturers, where sometimes quick readjustment of the equipment used is required, they have all the functions necessary for this;
- tiltable - used when the technological procedure is carried out in several planes at once;
- sliding - such conductors do not need to be attached. Simply attach them to the surface area of the workpiece where you want to make a hole;
- fixed - they are more convenient to use, but they limit freedom of action, which is very critical when working with machines where there is only one spindle.
Need for an assistive device
A do-it-yourself drilling jig helps both in domestic conditions and during industrial processing. This product is a thick metal strip. It has several holes, inside of which there are special bushings - sleeves.
Template makers can be manufactured in different versions, but the task for all is the same - marking for drilling
A step-by-step algorithm that involves using a jig to drill holes in workpieces consists of the following steps:
- determine the drilling location;
- apply a conductor to it;
- fix the device in a convenient way;
- We put sleeves in the holes;
- drill in the indicated places.
Classification of markers
A jig for drilling holes with your own hands is used in various areas of production activity. Based on similar characteristics, similar auxiliary devices are usually divided into several groups:
Jig for drilling holes
An overhead jig with a turret head is suitable for drilling standard holes for dowels of any size
The group is called this way because of the way it is operated. The product is usually installed on top of the intended workpiece and fixed using screw clamps. Less often, at home, it is based on an emphasis on any plane. This way you can mark holes for furniture screws.
Rotary jig for drilling holes
Rotary adapted for working with corner surfaces
This jig is used for drilling at an angle. Comfortable processing is achieved due to guide bushings.
Tilting jig for drilling holes
Tiltable for use on multiple surfaces
The group is involved in drilling on several surfaces located at an angle to each other.
Sliding jig for drilling holes
Universal slider type marker for drilling holes for confirmat and dowels
They are in demand in areas where it is not possible to fix the marker. The guide bushings are mounted on folding bars.
Not only jigs are widely used for drilling holes for confirmation, but templates are also used in mechanical engineering, when it is necessary to make many of the same type of drills in workpieces.
This device has many advantages:
- it is possible to achieve maximum accuracy in finished products;
- ease of operation;
- the ability to repeat the center distance on any surface at a convenient time;
- affordable cost of the finished product;
- You can make a homemade jig for any workpieces and different center distances.
VIDEO: How to make a self-centering jig for drilling holes for furniture dowels
Scope of application
During the furniture assembly process, some drawings indicate where to drill holes where the pins will be located inside. In such a situation, you cannot do without an accurate tool. It will not be possible to align the mates on the parts being connected as clearly as possible with simple markings, so a furniture jig will be useful for drilling holes.
Even a simple device in the form of a strip with a stop greatly facilitates and speeds up the process of making holes of the same type
In addition, the templating engine facilitates quick detection of the required points after the marker is located. In addition to holes for dowels, cavities are also needed for mounting door hinges. They can also be made using a rigid stencil.
Marking and drilling multiple holes at an angle or perpendicularly, at the end or on the main surface in a pipe without help is always problematic. This is due to the special geometry of the workpiece. You can also save time and get the desired result thanks to the conductor. The set of auxiliary devices can be supplemented with an installation that ensures perpendicularity of the drill entry.
The difference between store-bought and homemade
The importance of this equipment, which performs an auxiliary function, cannot be overestimated. Some people prefer to make it themselves so that the product has the necessary functionality and is suitable for a specific job. Other experts strive to choose the most comfortable product from the products offered in online stores.
Eccentric coupler
An eccentric coupler is often used in the factory production of furniture. The reason for this is the difficulty of drilling holes. An eccentric coupler consists of two parts: a pin and an eccentric. The pin is installed in one part, and the eccentric in another.
Increase
Fig.7.
The main advantage of this type of fastener is that this fastener is hidden and therefore does not spoil the appearance of the furniture. In addition, this type of fastener, unlike confirmat, allows you to repeatedly assemble and disassemble furniture, which is important, for example, when moving. Also, using an eccentric coupler, you can connect parts at different angles.
When making furniture yourself, it is not often used due to the difficulty of drilling holes and the inability to correct the joint during assembly. The main difficulty in drilling holes lies in the hole for the eccentric. This hole is not through and requires the use of a special drill - a Forstner drill.
Increase
Fig.8.
Increase
Fig.9.
Increase
Fig. 10.
In this case, the sampling depth is about 12 mm, and the thickness of the chipboard is 16 mm. The remaining wall thickness is only 4 mm. There is a risk of drilling more than necessary, thereby damaging the piece of furniture. Therefore, when drilling holes for an eccentric tie, it is necessary to use drilling depth limiters.
This tie is a screw and nut with which two sections of furniture are pulled together, for example, two cabinets. To tie cabinets, 2 - 4 intersectional ties are used. Depending on the thickness of the chipboard, there are intersection screeds of various sizes.
Increase
Fig. 12.
Considering that the intersection screed is used to tie cabinets, and the cabinets, in turn, are made of laminated chipboard with a thickness of 16 mm, an intersection screed with a length of 32 mm is most often used. However, there are ties up to 50 mm long, which are used to tighten parts of greater thickness.
Increase
Fig. 13.
Homemade conductor for dowels
When manufacturing cabinet furniture, there is a need to be able to accurately and quickly drill into the end of parts. As a rule, this need is due to the use of euroscrews (confirmations), in which holes with diameters of 4.5-5.0 mm (depending on the density of the plate) are drilled into the end of the parts to a depth of 35-55 mm (depending on the length of the euroscrews).
Of course, there are special drilling and attachment machines for such purposes, but they are not readily available to private furniture makers or small organizations due to their high price, plus, the machines are not convenient due to exclusively stationary use. To simplify the work of a furniture maker, jigs were invented - small devices for precise drilling with a conventional hand-held electric drill. Today there are several manufacturers on the market; by paying quite a price, you can buy a ready-made conductor. This article will discuss how you can make a good homemade conductor from available and easily accessible material in a couple of hours. We use ball bearings to guide the drill bushings. The bearings are made of durable steel and will last a long time. In order for the drill to be well oriented in the jig, two bearings are used for each working distance (the bearings are located coaxially one under the other).
To make a conductor (for three working fixed distances) we will need:
- A piece of MDF board 16mm thick.
- A piece of MDF board 10mm thick.
- Six pieces (a pair for each working distance) of any ball bearings with an internal diameter of 5.0 mm, an external diameter of no more than 16 mm. The height of the bearing should be as small as possible and no more than 8mm.
- A dozen self-tapping screws 4×25 mm.
- PVA glue, “Superglue”.
- Furniture foot with internal thread M6 (see photo).
- Screw M6x50. Nut M6. Grover washer 6mm.
Manufacturing of the conductor body.
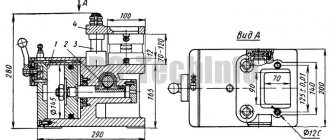
First, you need to make the case itself. There is no need to explain anything specifically about the body, everything is elementary. The cross-section of the body is the letter “P” with one end (closed) wall. This wall will be used as a stop and will set the zero point, the starting point for drilling. When drilling, the stop is pressed against the end of the part. Main dimensions:
- The external size of the conductor is arbitrary.
- The upper part, in which the bearings will be seated, is made of 16mm MDF, the remaining parts are made of 10mm MDF.
- The distance between the two sidewalls (where the workpiece will be placed) is 16.5 mm, which corresponds to the actual thickness of the plate plus a small gap for ease of installation and removal of the jig.
- The distances between the centers of the bearings and the stop: 50, 70, 100 mm are the most common in furniture practice.
We carry out calculations
Depending on the chosen fastening technology, it is possible to determine with sufficient accuracy the number of dowels and calculate their correct characteristics.
Deciding on the sizes
There are many scientific works that will help determine the diameter of the dowel. But in the professional environment of carpenters and builders, certain rules have already been formed:
- for timber with a thickness of 20 centimeters or less, a dowel with a diameter of 25 millimeters is used;
- a thicker beam is fastened with a tenon measuring 3 centimeters;
- timber thicker than 0.2 meters can be fastened with a 2.5 cm dowel, but subject to the step being reduced to a meter.
Counting the quantity
Even a small sauna will require quite a large number of spikes that need to be purchased or made, which can take a long time. Therefore, it is better to know the number of fasteners in advance.
There are fastening rules:
- the first dowel is inserted at a distance of 20 to 70 centimeters to the corner;
- the step is from one and a half to 2 meters;
- It is necessary to fasten two adjacent logs in height.
Knowing these tricks, the height of the structure, the diameter of the timber, you can easily calculate the number of dowels needed for construction.
Spikes for fixing timber: which ones to choose and why?
The most popular are dowels made from hard wood. The most durable options are spikes made of oak or birch. It is not possible to deform, bend, or break them. However, there is one condition. They must be properly secured. What are their shape and sizes? The optimal solution is details with rounded contours. Their length should not exceed 25 mm. Wooden dowels must be smooth and even not only at the point of installation, but over the entire surface. It is these nails that guarantee the longest possible service life.
Installing dowels in timber is a mandatory rule for timber and log structures. Birch thorns are the most common option. Such dowels cannot become an analogue of self-tapping screws or primitive nails. If they are used, it is impossible to guarantee the stability and reliability of the structure. It is also worth abandoning the use of reinforcement. Metal versions can lead to a number of negative consequences, which is explained by the direct interaction of materials with different thermal conductivity parameters. What can the use of metal dowels lead to? It could be:
- condensation formation;
- coating the surface of the spikes with rust;
- rotting of the entire layer of wood.
Areas of application
Conductors, with the help of which furniture is made, are considered especially in demand.
When creating any item to firmly fix furniture boards and panels, it is very important to hit the part at the correct angle, and jigs help ensure this accuracy. Any modern furniture production cannot do without additional high-precision drilling equipment, since wood, MDF, chipboard and other types of products can be damaged during drilling
A jig for furniture dowels allows for straight drill insertion and eliminates defects.
Common use cases:
- installation of structures with mandatory perforation for fasteners and fittings - in these cases, confirmat and jig for dowels are relevant;
- drilling at a certain angle, when work is carried out with thin sheets and panels made of finishing and furniture materials such as particle board and finely dispersed wood fiber board;
- the device is in demand in the serial production of furniture - the use of templates speeds up and simplifies the production of holes, regardless of their location and size of the part.
It may seem to some that dowels, these plug-in threadless tenons or rods, are outdated fasteners, but they are still considered the most reliable fasteners in the production of various furniture designs
In addition to being used in the manufacture of furniture products, jigs are used in other industries, and with the help of this important part, perforation is possible even in pipes with a minimum internal diameter. Ease of use and versatility allow you to use these useful devices in the following areas:
- construction industry - many structures require precise execution of holes for reliable fastening;
- the area of creating various communication systems for public and home use, mainly for the installation of pipelines for various purposes;
- mechanical engineering sphere - here conductors are used for workpieces made of any materials of various dimensions.
Drilling templates come in different sizes, simple and complex in design. In some cases, it is better to buy ready-made models, but it is also possible to make simple modifications yourself. This is quite justified when the required conductor has a high price.
Builder mistakes: typical and gross
As Alexey Markin notes, the most common mistake when making a log house from chopped logs is the small areas of contact between log and log (small width of the inter-crown groove). The thermal characteristics of such a house will be low. The head of the Domostroy-SK enterprise, Oleg Valuev, adds that in some cases the crowns may not be adjacent to each other at all (photo 1). Huge cracks will have to be caulked regularly, which will require considerable additional costs. However, the appearance and thermal characteristics of the house cannot be radically improved.
Photo No. 2
– The log house cannot sit properly due to incorrectly placed racks.
It happens that builders build a house in such a way that it simply cannot sit down.
As Oleg Valuev explains, if you plan to make a veranda under the roof, then between the upper end of the post and the upper crown you need to install a special jack for shrinkage (photo 3). This will allow the log to sit evenly. Instead of a jack, you can put several planks that will need to be knocked out periodically. By the way, shrinkage jacks are clearly visible in the first illustration (Fig. 1) to ours.
Photo No. 3
– Jack for shrinkage (photo by Domostroy-SK).
Another mistake that prevents the shrinkage of a log house is an attempt to fasten adjacent crowns with nails. The log lies unevenly on the nail head, and an inter-crown gap appears. Due to a loose fit, the log may begin to “spin” during the drying process.
The problem of poor-quality waterproofing of the lower crown of a log house has somewhat lost its relevance. As a rule, the installation team performs this operation efficiently
However, the customer should pay attention to how the foundation and wooden walls are connected. If the foundation is strip or grillage, then the surface of the strip should be leveled, and between the foundation and the lower crown there should be 2-3 layers of roofing material, or a waterproofing layer of similar effectiveness
However, excess moisture can enter the wood not only through the foundation. If you lay floors and hang ceilings in a house before the frame has settled and dried, this will impede air circulation and lead to “steaming” of the house - mold or mildew may appear on the internal walls.
The head of the Domostroy-SK enterprise, Oleg Valuev, notes that in the washing room there is also no need to make baseboards on the floor. Moisture collects under them and the process of rotting also begins.
Photo No. 4
– Mold on unventilated wooden structures.
What is it used for?
When manufacturing and assembling elements of furniture structures, specialists have to carry out many similar actions related to both marking locations and drilling future holes. The furniture jig allows you to optimize both of these processes.
According to their functional purpose, furniture jigs can be marking and drilling. The first, as their name implies, are intended to simplify the marking of the locations of future holes. Drilling jigs used in the production of furniture structures exclude the use of marking devices.
Drilling jig for confirmations
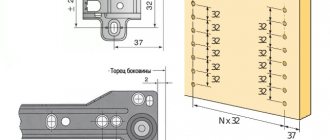
Many people purchase a furniture template, designed for preliminary marking of the locations of future holes, in a factory-made version. However, you can make a jig for assembling furniture with your own hands. The easiest way is to make a furniture jig from a metal ruler, to which the crossbar is screwed strictly perpendicularly. This furniture template is a multi-purpose marking device that is easy to make and use. The holes through which the drilling sites will be marked are made in a metal ruler at a certain distance. So, if holes are drilled for a minifix, then the distance between them will correspond to 32 mm, and for shelf holders - 100, 200 or 300 mm.
You can make a simple furniture marking template using a regular carpenter's square as a base, in which holes are also drilled at the required distance. Such a marking device, although more functional, is less stable on the surface of the workpiece. This is its most significant drawback.
The simplest furniture template for handles is a plate with calibrated holes, on the reverse side of which a stop strip is fixed
Using a similar principle, using available materials, you can make highly specialized marking devices (for example, a jig for furniture hinges or for marking holes intended for fixing furniture handles or any other furniture fittings).
Of course, if you have your own serious furniture production and the volume of assembly operations performed is quite large, you should pay attention to professional equipment for furniture assembly. However, the cost of such furniture jigs and templates, especially if they are produced under well-known brands, is quite high
Types of connection
When connecting wooden parts, you need to remember an important point - a thin part is always attached to a thick one, but not vice versa.
According to the relative arrangement of the elements, the following methods of connecting wooden parts are distinguished:
- extension - increasing the height of a part;
- splicing - elongation of the workpiece;
- consolidation—increasing the element’s width;
- knitting - joining at an angle.
The most commonly used methods for joining wooden parts in furniture making are:
- gluing;
- "dovetail";
- end-to-end;
- grooved;
- overlap;
- deaf on spikes;
- through tenon.
Let's look at the technologies of some connections in more detail.
Features of application in the furniture industry
Conductors and templates are needed when assembling furniture. These things will prevent you from having a common problem that occurs during drilling—the drill hitting the part at the wrong angle. Correcting such an error will take an extremely long time, in some cases it will even be impossible.
A jig for making holes will not only allow you to correctly orient the working tool, but will also prevent it from straying from the desired trajectory.
In the furniture industry, jigs and templates are used in the following cases:
- in mass production;
- when assembling structures, when it is necessary to make holes for fasteners in the parts being connected. In this case, a jig for drilling holes for dowels or confirmat is suitable;
- a jig for drilling holes at an angle is used both in such cases and when working with thin boards, for example, MDF or chipboard.
When using such a device, the assembly process will be much easier and faster; you will be able to make the necessary holes regardless of how far they should be located from the edge of the part and how wide it is.
When assembling furniture yourself, you often have to connect parts end-to-end using dowels. Holes for dowels are best made using a special jig. The peculiarity of dowels is that despite the fact that such fasteners, although outdated, are still relevant in furniture production.
The difficulty in their use lies in the fact that the axes of the holes that are made in the parts when connecting must have a right angle with each other. Accordingly, they must be placed strictly perpendicular to each other. It is difficult to do this without a special device. Therefore, if you want to achieve high quality performance, it is recommended to buy a dowel jig.
Homemade conductors
First of all, it should be noted that the simplest models of jigs are very inexpensive, so making a template for dowels with your own hands is not always advisable. In addition, you need to take into account that models for confirmations are the easiest to make. Options for dowels have a more complex design.
To independently create such a device, you need drawings that are easy to find in open sources. There are also instructions in different forms. They describe the creation of various types and variants of templates for dowels: with one and several holes, from different materials, etc. The starting materials can be represented by improvised raw materials such as wooden blocks, fragments of reinforcement and plates, etc. So, a square one will do reinforcement 10x10 mm. In addition, you will need plumbing tools and equipment such as a drill and grinder. To create more complex jigs, a welding machine is required.
Creating a template for dowels yourself involves several stages. At the first stage, the reinforcement is cut into fragments, the length of which is determined by the dimensions of the product. Next, holes are made for drilling, for which you need to know their parameters. They have a diameter of 5 mm and are 8 mm from the edge of the jig and 32 mm from each other. To increase ease of use, it is possible to equip it with a stop. It can be a plate bent at a right angle and fixed to the product. The parts are fixed using a clamp and fastened with threaded connections. In addition, sometimes homemade conductors are equipped with trays for chips in the form of fragments of plastic bottles.
If you find an error, please select a piece of text and press Ctrl+Enter.
Source: stankiexpert.ru
Workflow Description
Let's consider the basic rules for carrying out work; they are quite simple, so almost anyone can cope with them, the most important thing is to do everything carefully and use high-quality materials and tools.
Making dowels
Of course, you can buy ready-made elements, but their price is quite high, and the DIY process is not very difficult.
The work is done as follows:
When making dowels, neatness and attractiveness are not important, what is important is accuracy and compliance of the elements with the holes
- First, you need to choose a manufacturing method; if you have at least a simple lathe, then you can make round versions that are no different from the ready-made ones that are sold in the retail chain. If there is no equipment, then you can get by with rectangular elements, there won’t be much difference anyway;
- The length of the blanks should be 2.3 times the thickness of the timber. This is due to the fact that the correct location involves an option in which each fastening element passes through three beams, and in the upper and lower crown it should be located approximately 2/3 of their thickness. As noted above, the dowel must be recessed by at least 20 mm so that deformation does not occur when the structure moves;
This diagram clearly shows all the basic rules for fixing crowns; this option has been used by professional carpenters for more than two centuries
Advice! You can simplify the manufacturing work by purchasing a block of the required size; its cost is low, but you just need to round the corners a little - and the fasteners will be ready.
- You don’t have to cut the elements right away, but do it as you work, it all depends on which option is preferable for you.
Fastening the timber
It is important to carry out the work correctly, since this determines how securely the structure will be fixed; the list of measures is as follows:
- First you need to choose a high-quality drill for dowels for timber. Too weak options are often used, so cases when a power tool burns out while drilling are not uncommon. Low-speed modifications with a three-stage gearbox with a power of 1300 watts or more are best suited; they do the job well, as they are designed for high loads;
Choose modifications with a handle on top, it will be much more convenient for you to carry out work on drilling timber
- As for the drill, select a screw version of the required length; it is better not to save money and purchase a product from a well-known brand, since cheap analogs are usually not durable and can fail almost on the first hole. The length depends on how thick your timber is, and the diameter varies depending on the width of the walls; most often, products from 20 to 30 mm are used;
Drills with a diameter of 30 mm are among the most popular
- Drilling is carried out starting from the third row, and it is very important to maintain the vertical position of the equipment when working, because the dowel will serve as a guide, and if it is located at an angle, the surface may bend over time. The work should be entrusted to a physically strong person, as the drill sometimes jams and can turn the tool, which is unsafe when working at height;
When working, you need to hold the drill very tightly
- Remember a simple rule - the hole should be 1-2 mm larger than the size of the dowel, this will ensure its sufficiently tight location, and the fastening will not interfere with the shrinkage of the structure. That is, with a drill diameter of 30 mm, the dowel should be 28-29 mm;
- The distance from the edge of the beam must be at least 300 mm, the distance between the attachment points is from one and a half to two meters. Sometimes you can increase the number of dowels by placing them in places that may become deformed;
- Driving in the dowels is done using a heavy hammer or sledgehammer weighing 2-3 kg; in order to drown the elements, stock up on a spacer in advance.
As you can see, the instructions for carrying out the work are not complicated; it is important to have a reliable tool on hand and use fasteners of the right size.
How to make a conductor with your own hands
Since there are many varieties of conductors, we will therefore consider an unusual design and an analog based on this. And so we begin.
Jig for perpendicular drilling
Its main purpose is to make holes in thick workpieces at an angle of 90. Essentially, it is a set of bushings connected in one body. In most cases, these are overhead conductors, which are widely used in furniture assembly.
Just attach the device to the surface and start drilling right away, without punching. There is one drawback: the device must be held firmly, and even more so at the beginning of work. Because vibration may cause the device to move.
This type of conductor can be made by hand.
- As a base, you can use a block of wood, a piece of textolite, or reinforcement with a square section of 10 x ten millimeters.
- We finish the surface perfectly, clean it and begin marking.
- It is necessary to take into account that the center of the holes should be 8 mm. from the edge of the workpiece. This is due to the fact that 8 mm. this is half the thickness of a chipboard sheet.
- According to the standards, there should be exactly 32 mm between the centers of the holes.
- Then we make holes with a diameter of 5 mm in these centers.
Handmade conductor
can be used, however, for more comfortable use, you should build a stop; to do this, use metal with a width of 23-25 mm. and 1 mm thick, after which the sheet is bent at an angle of 90 and attached to the jig. Also, bushings of different diameters can be inserted into the base of the conductor.
Conductor for pipes and cylindrical blanks
Everyone knows that making a hole in a sloping surface is problematic; the end of the drill regularly jumps off. This type of jig is mounted in a given position and makes it possible to work very accurately.
This type of conductors can be done quickly and on your own.
- For this we need a block of hardwood, running along the diagonal. And we attach a piece of plywood to the edge of the block using screws.
- Then we make holes of the required diameter in a block of wood.
Now we can say everything conductor
ready for work. To make the holes less likely to break, they can be improved with iron sleeves, which are made from round pipes of various diameters.
Jig for drilling holes at an angle
This type of drilling is rarely used.
Suitable when it is usually impossible to hold a drill or screwdriver at the required angle.
Here it must be said that in metal products this type of hole is made only with a milling cutter. As for wood products, there are ready-made solutions in the form of kits.
It’s easy to use these jigs; we press the workpiece tightly to the base, set the specified height and, as a result, we get smooth and beautiful oblique holes at an angle. Yes, if we need a non-through hole, then don’t forget to put a stop ring on the drill itself.
Making this type of device on your own is difficult and problematic. There are quite simple methods and options, but they are not particularly accurate. So, for example, a drill is placed on a prepared inclined surface and our workpiece is drilled at the resulting angle; as we understand, the accuracy suffers too much.
Jig for drilling holes for dowels
Their main purpose is to ensure the alignment of the holes into which dowels will be installed in the future. In other words, when you apply, the conductor
to both sides of the product, you get a wonderful joint.
As you understand, this type of conductors can be made with your own hands. If you have a flow of workpieces with the same geometry, you will be comfortable using an overlay template. It is best to use hardboard or other light-transmitting material (plastic) as a template.
We mark and drill holes. It would be better to hammer brass or copper tubes into the holes so that the drill does not break the calibration hole.
Universal device
When you use workpieces of different sizes and shapes, you will need a universal device. The most interesting thing is that this device can be made from materials that are always at hand.
- For this we need plywood approximately 15 mm thick.
- We make three equal blanks.
- We make holes along the edges into which dowels are installed as legs.
- We make one hole in the middle, which we reinforce with an iron tube.
- We make three metal slats with symmetrically placed holes; they will act as a shoulder. These shoulders are responsible for the linearity of the holes of the future conductor.
- We make cuts in the plywood blanks and install iron shoulders, fastening everything. Our multifunctional self-centering jig is ready.
Marking drilling locations
In order to perfectly fasten two parts, it is necessary to mark the places of their fastenings as accurately as possible.
On the part that will be applied to the end (the one on which there will be a through hole), you need to make two measurements - along the length (usually 5-10 cm) and from the edge - exactly 8 mm (this is if the thickness of the plate is 16 mm).
On a part that lies perpendicular, mark the drilling point at the end. Here you need to maintain the same distance in length (5-10 cm from the beginning), and in width - strictly in the center (8 mm from the edge).
Markings must be done as accurately as possible, especially along the length, because If the markings are incorrect, your parts may have extra gaps or protrusions when joined.
It is better to make a through hole in the first part, attach it to the second - and immediately use a drill to mark the drilling location at the end of the second part. And then, separately, calmly drill the hole.
Other uses
Hole jigs are used not only in furniture production. Quite often they are used when you need to make a hole in a pipe or other cylindrical part. Thanks to them, you can make a high-quality hole even in a pipe with a small diameter.
Read also: Selecting cutting modes when milling
Such devices are universal and easy to use, so they are also used in the following industries:
- mechanical engineering - drilling holes in different-sized workpieces based on different materials;
- construction - drilling holes in building structures;
- home communications - as already mentioned, pipe drilling and more.
Modern drilling jigs can be of different sizes and have different operating principles. Some of them are complex, so they are easier to buy. And some modifications can be made independently, especially since some serial furniture models, especially those with universal purposes, are expensive.
Making a tap for wood carving with your own hands
To cut carvings in wood, you may need a wood tap; this tool will most likely not be cheap, and it can be quite difficult to find. But don’t be upset, because such a part is quite easy to make yourself. To do this you will need:
- angle grinding machine;
- sharpening machine;
- drill;
- Next, you need to select a bolt or screw that will have the required thread.
When using a bolt, first cut off the hex head, then use a sharpening machine to make a small part for entry, this is done by rotating it by hand or by securing the end in a drill. Next, you will need to grind out 3-4 grooves and clean the threads from any debris that got into it during grinding; this can be done with a nut.
Secure the tap in the chuck and, while the drill is running, make sure that it rotates smoothly along the axis. I did not notice any unevenness left on the chuck from the threads. But if you want to avoid possible damage, grind off the threads at the clamping point.
wood carving tap
DIY furniture conductors and templates
How conductors are made is now clear, as is their necessity for furniture production.
Not only conductors, but also templates are needed in furniture production. The simplest template will sometimes save a lot of time and allow drilling to be no less accurate than a jig.
For example, the simplest metal prefabricated template, consisting of two sheet blanks measuring 130x70 mm and a steel square with a cross-section of 20 mm. They are connected to each other by screws at the top of the structure - this is how they are attached to the square. The square is drilled for the bushings, where the latter are pressed. Such a device for drilling holes in the end of a part made of chipboard will make it possible to drill without thinking about marking and perpendicular drilling. And the price of this equipment is below any idea of savings.
Instead of metal, you can and should use those materials that are inexpensive and easy to process.
- Plywood.
- Textolite or fiberglass - preferably thick.
- Hardwood.
- Hardboard or its equivalent.
It must be borne in mind that these materials are short-lived, and so that the devices do not have to be made every day, it is quite reasonable to press metal tubes into them.
In conclusion, it is worth summing up what has been said. Making a conductor or template yourself or buying it in a store is a matter for everyone individually. If a home craftsman needs to make some furniture in a single copy and there is material for a conductor, as well as the possibility of making it, you can use this. It is possible that such equipment will never be useful to the master again.
But if even a small furniture workshop is engaged in the production of mass-produced furniture, and it employs enough people, it is probably easier to purchase something ready-made, especially since they will need these indispensable assistants to the craftsmen in several copies.
In the latter case, it makes sense to purchase more expensive, accurate and wear-resistant jigs instead of making homemade ones, which are less accurate and durable.
Advantages and disadvantages
Like any other fastening element, the dowel has a number of positive aspects, as well as disadvantages.
Advantages:
- The spike provides reliable grip and prevents the crown from sagging;
- Provides long-term reliability under bending loads, which nails and bolts cannot boast of;
- Promotes uniform shrinkage of the house. The fastening element moves freely along a vertical plane, preventing horizontal deformations;
- The wooden product is not subject to the formation of moisture and corrosion, excluding the process of rotting;
- Extremely cheap. Even buying ready-made dowels won’t put a big dent in your pocket, allowing you to minimize your budget.
But there are also disadvantages:
- Difficult to install. Absolute vertical position, ideal selection of diameter, implies the presence of decent construction skills;
- Serious quality requirements. The presence of knots or heterogeneity of the material can lead to disastrous consequences;
- Excessive force when driving often leads to cracks in the timber. After which it needs to be changed.
Tags
under the dowels follows wooden dowels wooden dowels subdivide furniture dowel dowels wooden dowels blanks furniture dowel dowels Buy similar dowels for dowels availability of wooden dowels. under dowels drilling holes in drilling holes under deep holes large making holes. drilling holes in drilling holes large area holes Next is the hole made. As a result, the hole is drilled. The diameter of the holes will accept a jig. No jig. Kind of jig templates. Multifunctional jig for a Multifunctional jig for a multifunctional jig for this jig. the jig is applied with pins. Then the jig is turned. How to drill a beam. Techniques for drilling holes. Drilling with feather drills for confirmation. for confirmations. better than confirmations hold. with confirmat you
Jig for drilling holes
Precision drilling, used to connect wooden, metal and other elements with each other, is the key to the fact that the product will be of high quality, without backlash, durable and will be used effectively for a long time. When processing chipboard, OSB, MDF and other materials, it is recommended to use a drilling jig to achieve successful results.