Design features and types of conductors
The drilling jig is actually a template of holes that allows you to make them with maximum accuracy. They can be divided into two types:
- when the drilling axis is at right angles to the surface of the material;
- when the axis passes at an acute or obtuse angle relative to the plane.
Conductor device
The tool has such versatility that it is used in various fields of industry. For several decades it has been very actively used in the engineering and construction industries. After all, it allows you not only to drill holes in the required workpieces at different angles and with excellent accuracy, having different configuration features. With its help, holes can be easily drilled in various building structures, as well as pipes made of any material, etc. The jig is often used in the furniture industry, as it greatly simplifies the process of fastening fittings and assembling its various parts. In fact, this is only a small range of tasks that a conductor can solve.
Types of drill guides
Conductor
The device is a plastic housing in which guide bushings for different drill diameters are rigidly fixed. By limiting deflection, drilling can be performed with acceptable accuracy on a variety of materials.
The conductor is held with one hand, and the other holds the drill. There is no need to constantly monitor the slip angle. In addition, the device allows you to accurately start drilling at a given point. No punching is required.
Almost all guides with an angle of 90° allow you to work on rounded surfaces (pipes). For this purpose, a special groove is provided on the lower support heel.
There are also simpler designs (if a clip of several diameters is inconvenient to use). For example, a mandrel into which bushings of various sizes can be inserted.
In addition to standard guides with an “attack” angle of 90°, there are specialized jigs in which the bushings are located at a different angle.
Advantages:
- low cost.
Flaws:
- low accuracy (there is a slight play in the guide sleeve);
- wear effect on the drill.
Guides with sliding carriage (household version)
They represent a support frame on which vertical posts are fixed. The carriage moves freely (but without distortions) along the guides, in which the drill body is secured. The simplest designs cannot change the angle of the racks.
As a rule, fixtures are equipped with a 45° cutout for fixing cylindrical workpieces (for example, pipes). The support is equipped with a handle for holding and has a non-slip coating. With its help, you can start drilling with high precision and under visual control and maintain a given angle.
Application can be limited only by the area of the workpiece: if it is smaller than the size of the support area, use is impossible.
Due to the fact that the support is fixed by the hands of the master, the placement of the guide can be anything: even on the ceiling.
Advantages:
- affordable price;
- high positioning accuracy.
Flaws:
- Works only with certain drill diameters, and with the only possible shank.
Semi-professional drill guides
Semi-professional guides can be equipped with various fastening devices for the frame, drilling depth regulators, the angle can be set both along and across the plane of the tool’s swing. Due to this, the equipment turns out to be more bulky.
Professional drill guides
As a rule, guide posts for professional use are equipped with their own drill chuck. Why is this being done?
Even the most accurate drill clamp has a serious error. In addition, the drill gradually wears out, the bearings on the shaft give a slight play. All this affects the drilling accuracy.
The stock guide chuck mount is less susceptible to wear because it is used less frequently. Plus, it doesn't matter to you which drill is connected to the chuck. It's just a source of rotation.
Advantages:
- high accuracy;
- thoughtful fastening on the workpiece;
- ability to perform work with high intensity and load.
Flaws:
- high price;
- narrow specialization.
Classification of tools
Based on functionality and design functionality, drilling jigs are divided into types:
- invoices. The name comes from their functional way of working, that is, they are applied to the workpiece or the surface being processed, attached to it with special clamps or held by hand. This device is suitable for drilling flat surfaces, such as boards, MDF boards and chipboards. It is called a furniture jig for drilling holes. Thanks to the use of a jig, the holes themselves are very neat and precise;
- rotary. Such templates are ideal for drilling round or cylindrical surfaces. Thanks to this design, the axis occupies a horizontal, vertical and inclined position to the surface. This is possible thanks to bushings that can guide the drilling line;
- universal. Products of this design are widely popular in small industrial production, where quick adjustment to the existing surface plays an important role. Due to their uniqueness, they are also in demand in the household, when it is necessary to work with different materials, planes and surfaces; tipping. In terms of functionality they are somewhat reminiscent of universal ones. They are necessary when you need to make a hole in different planes and at different slopes. This is very convenient for carrying out some repair work when you need to drill a hole in the wall without a lot of time and at a specific angle;
- sliding. According to its name, such a conductor does not have to be attached to the surface where it is supposed to be applied. It should be noted that such a conductor is inconvenient to use, since it requires constant hand holding;
- fixed. Unlike sliding jigs, they are attached to the place where they are intended to be used. They are much easier to attach, but due to their design they limit the scope of human work. This can be clearly seen when working on walls or vertical planes with only one spindle.
Jig for drilling overhead holes
Universal drilling jig
Jig for drilling holes, fixed
Rotary hole drilling jig
Design and types
So, we figured out that a jig is a template strip, the main purpose of which is to ensure accuracy when drilling holes in a variety of materials.
There are two types of conductors:
- A jig designed for drilling holes located perpendicular to the surface of the product.
- A jig made for drilling holes at an angle. It allows you to make a hole at the desired angle.
But this is a very rough and generalized classification. In fact, there are more types of conductors, differing in their design and purpose. In particular, the following types of these devices are distinguished.
Invoices
As you can easily guess from their name, such jigs are applied to the surface of the part or workpiece to be processed. They can be secured with special clamps or simply held with your hand while working.
Rotary
These are specially made templates that are intended for processing cylindrical workpieces. With the help of such jigs, it becomes possible to make not only perpendicular holes, but also to drill holes at different angles, since the rotating devices are equipped with special bushings that allow the jig to be installed at different tilt axes.
Universal
Here too the name literally speaks for itself. These drilling jigs are suitable for most types of work (except for specialized ones), so they are loved by workers in small industries, and even by those who do work at home.
Sliding
This type of jigs does not require their attachment to the surface in which the hole needs to be drilled. You just need to hold them with your hand (which can often not be very convenient).
Pinned
Unlike the previous type, such jigs are rigidly attached to the workpiece being processed. Although it is more convenient to work with, this type of device limits freedom of action.
Tiltable
And the last type of conductors is quite similar to the universal type. They are used when it is necessary to drill in different planes or at an angle.
Scope of application
It should be noted that the drilling jig is used almost everywhere where there is a need to regularly drill holes. These areas could be:
- furniture manufacture. When making furniture, it is very often necessary to drill holes for fastening materials, fittings and accessories. The further appearance of the furniture, its presentability and marketability depend on the accuracy and correctness of the hole made;
- construction. When carrying out construction and repair work, it is often necessary to drill walls, pipes and other surfaces. Without templates, this is very difficult to do, and correcting subsequent errors will take a lot of time. Thanks to the templates, all drilled holes will have the desired shape and be at the desired angle;
- mechanical engineering. Working without templates here is also quite difficult, since all blanks and parts undergo standardization, that is, they all must have the same dimensions, the same position of some parts, including holes;
- mass production. Stamp production also requires the unification of some components. Templates simplify tasks in this regard. You can be sure that all holes drilled will be the same size and the same slope, or will be directly perpendicular to the surface;
- household. You often have to repair something at home, so the need arises to drill holes in walls, parts or some workpieces, where the particular accuracy of the holes is very critical.
Nowadays, conductors are produced both universal and specialized for specific areas of work. Some are inexpensive, so there is no need to make such products yourself.
Furniture templates and jigs for fittings
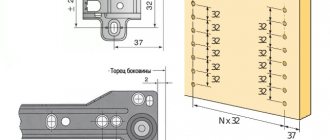
To install lifting and sliding mechanisms, as well as four-hinged furniture hinges, handles and other fittings, the principles of system 32 are also used, which implies an initial distance from the front edge of the edge of 37 mm, followed by fastening with screws in increments of 32 mm.
Markings for installing handles
Any handle is installed either in one hole (handle-button) or in two holes, which are located relative to each other at a distance that is a multiple of 32mm. Furniture jigs for handles allow you to quickly mark the holes for handles, with a selected distance from one or two edges of the facade (if the handle is installed in a corner).
Here it is necessary to take into account the decorative design of the handle. It often happens that a handle is installed in a standard 96, 128 mm base, but at the same time it takes up much more space due to protruding decorative elements.
Marking for fastening furniture hinges
Regardless of what type of furniture hinge, the scheme for attaching its arm to the side of the cabinet and installing the bowl on the facade will be carried out absolutely the same way. The only exception, perhaps, is special hinges for thick facades, which is understandable. For all other overhead, semi-overlay, inset, corner and other furniture hinges, you can use a standard furniture template. As a rule, it has additional markings for internal hinges, which are installed deeper along the body, taking into account the thickness of the facade.
The furniture hinge jig should be applied to mark the fasteners taking into account the thickness of the edge. However, the standard hinge adjustment play of 2 mm, if necessary, allows you to press the facade against the body or move it away if necessary.
There is one important nuance when implementing a push-pull opening system: when installing pushers on the facade, it is necessary to take into account the technological gap of 3-5 mm between the body and the facade. It is due to this that the push to open push mechanism is activated. This means that when marking fasteners on a furniture jig, the loops should not be “planted” so deeply.
I advise you to always take into account the peculiarities of installing mechanisms on all facades in the general range of furniture. For example, when combining swing and pull-out elements, the push-pull opening on drawers is most often set with a gap of 4 mm according to the manufacturer’s recommendation.
This means that furniture hinges on hinged facades must also be installed taking into account a gap of 4 mm, to make it easier to align all doors in one plane.
Marking for drawer guides
Taking into account the above-mentioned nuance of installing retractable mechanisms that are activated by pressing, the standard markings according to system 32 are the same for almost all guides. Furniture guides for drawer guides can be reversible, but most often they are offered as a set of two rulers for the left and right sides or one double-sided ruler.
To mark the fasteners for the guides, you can use ordinary furniture squares, which are a universal assistant in marking holes for confirmations, shelf holders, and eccentric tie rods on the front surface of the workpieces.
Drilling jigs with measuring bar
Hettich, Blum and other furniture fittings manufacturers sell universal, so-called rod templates. They are a measuring ruler onto which the marking conductors necessary for the work are placed.
The presence of a measuring ruler for the height of the workpiece eliminates the need to manually measure the position of guides, hinges, and lifting mechanisms along the sidewalls.
You can also purchase templates as needed. For example, for installing specific retractable systems such as tandemboxes, legraboxes, etc.
Other furniture jigs and templates according to system 32
Furniture jigs are also used to assemble sliding doors with drilling of aluminum and steel profiles. As well as for folding doors, various lifting and sliding mechanisms.
Various jigs are also offered for sale for installing minifixes, dowels, for installing into the end at an angle, “oblique screw”, etc.
But when making furniture with your own hands in a one-piece copy “for yourself,” they are unlikely to justify their cost. Therefore, it is worth thinking about purchasing when there is an urgent need to facilitate and automate similar actions in marking blanks for fasteners and installing fittings.
Conductor for cylindrical blanks or pipes
For cylindrical surfaces, rotary or universal types are most suitable, since when drilling a pipe or any other object that has a spherical shape, the drill can move, causing the hole to be of irregular shape.
Conductor for cylindrical blanks or pipes
Such templates allow you to maintain perpendicularity between the pipe or sphere and the drill itself. It is very important.
Furniture jigs for drilling holes deserve a separate description.
In furniture production, it is practically impossible to do without jigs or similar templates, especially when assembling all the structural elements of future furniture. First of all, they correct such an error as an incorrect angle of entry of the drill into the workpiece. As you know, correcting such an error is very difficult, sometimes even impossible, and if possible, it takes a lot of time. The jig not only allows you to position the drill relative to the part, but also allows it to move away from the intended drilling direction during work.
Furniture jig for drilling holes
They are used when you need to drill holes for fasteners. In this case, a conductor for confirmants or dowels is used. Without them, drilling such holes is simply impossible. And how often does it happen that when assembling furniture, a shortage of a certain number of holes is discovered that is necessary for final assembly.
Jig for angled holes
A jig for drilling holes at an angle is used for assembling furniture. It is often used for drilling not too thick MDF boards or chipboards, plywood. Also used in production. They can be manufactured either in a specialized design, for specific operations, or in a more universal form. They reduce the time required to make inclined holes. Moreover, it will not be possible to make them exactly the same by eye.
At home you don’t often have to drill at an angle, but the need arises. This kind of conductor can be made independently, or you can buy it. The reason is that if you do not engage in mass production, then preparing templates for non-standard holes will most likely not justify the costs. It will be easier and cheaper to try to drill the hole as needed, but with small deviations, than to make templates. It may never be useful again. It's up to the owner to decide.
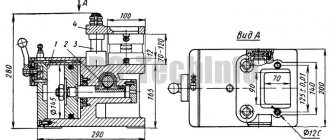
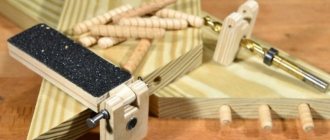
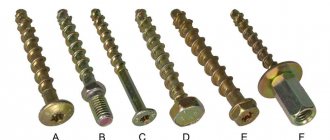
When manufacturing cabinet furniture, there is a need to be able to accurately and quickly drill into the end of parts. As a rule, this need is due to the use of euroscrews (confirmations), in which holes with diameters of 4.5-5.0 mm (depending on the density of the plate) are drilled into the end of the parts to a depth of 35-55 mm (depending on the length of the euroscrews).
Of course, there are special drilling and attachment machines for such purposes, but they are not readily available to private furniture makers or small organizations due to their high price, plus, the machines are not convenient due to exclusively stationary use. To simplify the work of a furniture maker, jigs were invented - small devices for precise drilling with a conventional hand-held electric drill. Today there are several manufacturers on the market; by paying quite a price, you can buy a ready-made conductor. This article will discuss how you can make a good homemade conductor from available and easily accessible material in a couple of hours. We use ball bearings to guide the drill bushings. The bearings are made of durable steel and will last a long time. In order for the drill to be well oriented in the jig, two bearings are used for each working distance (the bearings are located coaxially one under the other).
To make a conductor (for three working fixed distances) we will need:
- A piece of MDF board 16mm thick.
- A piece of MDF board 10mm thick.
- Six pieces (a pair for each working distance) of any ball bearings with an internal diameter of 5.0 mm, an external diameter of no more than 16 mm. The height of the bearing should be as small as possible and no more than 8mm.
- A dozen self-tapping screws 4×25 mm.
- PVA glue, “Superglue”.
- Furniture foot with internal thread M6 (see photo).
- Screw M6x50. Nut M6. Grover washer 6mm.
Manufacturing of the conductor body.
First, you need to make the case itself. There is no need to explain anything specifically about the body, everything is elementary. The cross-section of the body is the letter “P” with one end (closed) wall. This wall will be used as a stop and will set the zero point, the starting point for drilling. When drilling, the stop is pressed against the end of the part. Main dimensions:
- The external size of the conductor is arbitrary.
- The upper part, in which the bearings will be seated, is made of 16mm MDF, the remaining parts are made of 10mm MDF.
- The distance between the two sidewalls (where the workpiece will be placed) is 16.5 mm, which corresponds to the actual thickness of the plate plus a small gap for ease of installation and removal of the jig.
- The distances between the centers of the bearings and the stop: 50, 70, 100 mm are the most common in furniture practice.
To assemble the case, it is necessary to accurately cut all four parts (top, two sides and one end), it is recommended to take measurements with a caliper. Next, holes are marked and drilled for the screws that will fasten all the parts together. The housing is assembled using PVA glue.
The distance between the side walls of the conductor is 16.5 mm (for laminated chipboard with a nominal thickness of 16 mm).
Bearing seating.
After the glue has dried, we proceed to marking and punching the holes for the bearings. We try to perform this operation very accurately! To drill holes for the bearings, we will need a drill press or drill mounted in a rack. It is very difficult to perform precise drilling by hand, but with some skill it is possible. We mark the centers of the bearings with a pencil and punch them. Using the core, we drill three through holes with a diameter of 2 mm. We clamp a feather drill (punch) into the drill chuck; the diameter of the punch should be equal to the outer diameter of the bearings. We drill two blind (non-through) holes for each bearing on each side of the previously drilled through hole. The depth of drilling with a hammer (the penetration depth of the central tenon is not taken into account) should be approximately 1 mm greater than the height of the bearing. As a result, we should get six mounting holes (three on each side) for the bearings. You can try to insert the bearings into the seats; the bearings should fit freely, but without noticeable play. After fitting, you need to lubricate the outside of each bearing with glue and seat it in its place until it stops. If “Superglue” is used (it quickly absorbs and dries), then this operation is performed using a rubber mallet.
Conductor on top. Distances between bearing centers and stop.
Making an adjustable stop.
To be able to drill at any arbitrary distance from the stop (not only 50, 70, 100 mm), it is necessary to supplement the jig with a simple adjustable stop - a long screw. We drill a through hole in the center of the end stop with a diameter 0.5 mm smaller than the outer diameter of the furniture fitting (see photo). Screw in the foot. We screw a long screw into the foot, not forgetting to first screw the nut onto the screw and put on the Grover washer. Now, by changing the screw screw depth, you can set any drilling distance from 0 to 100 mm.
Furniture footwear. To screw the fitting into the conductor body you will need a hex wrench.
The adjusting screw of the jig is screwed into the furniture fitting.
Conductor. Side view.
Conductor. Inside view.
Drilling a hole in the end of the chipboard using a homemade jig.
Drill overhang. Drilling can be done to this maximum depth. The length of the drill used and the depth of its attachment in the drill chuck must be selected taking into account the thickness of the jig (that is, almost the total height of the two bearings).
If desired, the surface of the jig can be sanded with fine sandpaper, primed and painted (for example, with spray enamel). Practice has shown that the accuracy of drilling with a jig is no worse than +/-0.5mm and largely depends on how much the actual thickness of the material (chipboards) differs from the calculated thickness. In any case, an error of a maximum of half a millimeter is not critical for end drilling in the manufacture of cabinet furniture.
Similar articles:
- Application of “Cheron” conductors. Connection with confirmat and dowel
Dowel hole jig
The jig for drilling holes for dowels is one of the simplest templates in its design. However, you should know that such templates should simplify the work of the master, and not complicate it when he is forced to use complex instruments.
Dowel hole jig
Used for assembling furniture. Should allow simultaneous drilling of holes without changing the device. For manufacturing, different materials are used that have different strength characteristics. The most durable unit can be considered a steel unit.
Conductor to confirm the variety and the possibility of manufacturing
Also the simplest jig for drilling a hole for confirmation. Such a conductor can be assembled at home without much difficulty. It makes sense to assemble it yourself if you are engaged in professional furniture manufacturing. It is not practical to drill one or two holes.
Conductor for confirmation
More complex drawings can be taken from any sources on the Internet. As the design of the device becomes more complex, its range of uses expands. In order not to bother with structurally complex devices, you can make them from readily available materials, such as metal plates, wooden beams, fittings or corners. To work with metal, you may need welding materials, although you can attach the fixing elements to threaded bolts.
Drilling furniture templates and jigs for marking the body
In its simplest design, a furniture jig for marking for confirmation and other connecting fasteners is a flip ruler with holes for drilling holes with a diameter of 5 mm in increments of 32 mm.
Moreover, in confirmed joints, a distance from the edge of 37mm is absolutely not critical. Many furniture makers also retreat 32mm to add holes for assembly. In kitchen furniture you can find a gap of 50mm. But all subsequent holes are made in 32mm increments.
For kitchen and other modular furniture with identical sidewalls of a “mirror” assembly, to speed up the assembly process, it is important to make additive cards in such a way that they are absolutely symmetrical in terms of fasteners. And the master did not have to “throw” the part. System 32 with the same distance from the edge for through holes on both sides contributes to this.
Advantages and disadvantages
According to its functional purpose, the jig acts as a template according to which it is necessary to drill a hole in the required material with maximum accuracy to the original. This template greatly facilitates the work of the master when he needs to drill a strictly vertical, horizontal or inclined hole.
The master no longer needs to make sketches and measurements, having such a tool with him. The drill is positioned strictly at the required angle, which is necessary during the work process and cannot deviate. This improves the accuracy of the work, which can be seen in deep holes.
To work with furniture, the conductor must meet the following requirements:
- it should help and speed up the furniture assembly process and not require the use of complex equipment;
- allow you to make several holes at once without the need for manual markings;
- improve work with a drill;
The materials from which conductors are made have different strength characteristics. These are mainly plastic and glass made from organic raw materials. But the strongest ones are made from metals, namely steel. Therefore, when choosing, you should pay attention to the following characteristics:
- minimal deformation under heavy loads;
- clear drill direction axis;
- no heating during operation.
In furniture production, lighter conductors are used that are easy to handle. Factory or homemade options can be used.
It should be noted that a real master has a trained eye, so often he does not need all these devices to make the hole correctly.
A clear advantage of such tools is ease of use. With their help, even an inexperienced person can perform all the work at the level of a skilled worker. Here you don’t even need to do any complex calculations or have enormous experience. Its main purpose is to speed up the work process many times over.
General information about conductors
Today in our article, we will talk about the types of conductors, their scope of application and the ability to make them yourself.
Types of conductors
It should be noted that these devices are used not only for drilling holes, but also when milling, turning and trimming are performed.
Let's look at the main types of devices.
Invoices
This type of jig is placed on top of the workpiece. It can lie either freely or be pressed using bolts or clamps. They are valued for their simplicity of design and low cost.
Rotary
The device body is equipped with bushings that adjust the rotation axes in horizontal, vertical and inclined planes. These models of jigs are designed for drilling cylindrical products.
Sliding
The name speaks for itself, the jig is not attached in any way, it is simply placed where the hole needs to be made.
Tiltable
Capable of making holes in several planes.
Stationary
They do not have rotating elements and are capable of moving the part and processing workpieces of the same type.
Universal
These conductors have a function such as readjustment. This allows small businesses to quickly and conveniently switch to the production of a new product.
Description of conductors
Let's start with the concept of a jig - this is a so-called template, the use of which allows for comfortable and ultra-precise drilling.
Moreover, you can drill either perpendicular to the surface or at any angle. If you use a conductor, then you do not need special qualifications, make complex calculations, mark where the holes will be, which saves a lot of time.
Areas of application
As we can see, due to the versatility and simplicity of their design, conductors are widely used in various fields of activity.
Mechanical engineering
In the mechanical engineering industry, they are used for drilling holes in various workpieces made from common materials. Conductors are used that repeat the drawing with exact observance of all dimensions. Also used when drilling holes of mixed type is required.
Furniture manufacturing
The most widespread use of conductors is in furniture production. Furniture conductors are used for installing fittings, assembling furniture and many other technological processes.
At the same time, furniture assembly is neat, precise and fast. A large amount of furniture contains dowels, which must be installed very precisely and there is no need for a conductor.
The most common jig for dowels is doweling. They mainly use overhead conductors made of lightweight materials.
Construction
Another area in which jigs are widely used for drilling holes is construction. They are used to drill technological holes in building structures, for example, when installing sandwich panels.
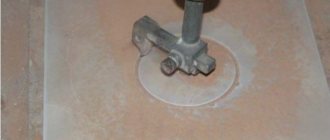
Solves a wide range of problems, especially in drilling metal pipes. Allows you to clearly maintain perpendicularity when drilling. Also used when drilling holes in tiles.
Main advantages of use
You can buy a conductor or make it yourself.
But before choosing a model, you should decide for what tasks it will be used and, based on all this data, you should choose the type and design of the tool.
So why should you use jigs for drilling holes:
- Intuitive use that does not require professional skills.
- Low price of the device, as well as the possibility of self-production.
- Saves a lot of time.
- There is no need to mark the surface to be treated using building levels.
- Maintain precision when drilling.
A jig for drilling holes is an integral part not only of production, but it will also be useful in home life.
Homemade conductor devices
A DIY jig for drilling holes is an excellent alternative to store-bought options. Because the store does not always have exactly the option that is required at the moment. You can assemble it yourself at home.
Let's consider a more popular and standardized option, suitable for more frequently performed work, such as furniture assembly.
Diagram for assembling the conductor
Diagram of a conductor device for drilling holes
Reinforcement with a diameter of 10 mm or more will be required. Using a cutting tool, such as a grinder, cut into pieces of the required length. Clean the workpieces with sandpaper. According to the standard, all drilled holes have a distance of 32 cm from each other. Make marks and drill holes. The next stage involves creating reference points for our blanks. A plate made of any metal is perfect for these purposes. Thickness from 1 mm. It is unwise to use a thicker plate, since it only increases the weight of the entire device. They are connected together and then places for threaded fastening are outlined. They are connected and secured to each other. That's all, the device is ready to use.
The main purpose of the jig, which is also the most important thing, is to simplify the work with the drill and reduce the time of assembling furniture. The difference between a purchased device and a home-made device is its adjustment to the specific needs of the master.