Electromagnet
An electromagnet is an electrical device that creates a magnetic field when an electric current passes through it. Electromagnets (EM) are used in almost all areas of human activity.
Story
In 1824, the scientist Sturgeon created the first electromagnet. The design was a horseshoe-shaped iron rod with 18 turns of copper core. When the ends of the conductor were connected to a galvanic battery, the device acquired the properties of a magnet. Weighing about two hundred grams, the prototype electromagnet was capable of attracting metal objects weighing up to 4 kg.
Operating principle
To understand how electromagnets work, we need to look at their design. A simple device explains the principle of operation of an electromagnet. When an electric charge flows through the body of the winding, magnetic field radiation occurs, penetrating the magnetic circuit.
Magnetic flux formula
Inside a metal or ferromagnet, in accordance with the laws of physics, microscopic magnetic fields called domains are formed. Their fields, under the external influence of the winding, are arranged in a certain order. As a result, the magnetic forces of the domains are summed up, forming a strong magnetic field, giving the magnetic circuit the ability to attract massive metal objects.
Important! To stop electromagnetic induction, it is enough to disconnect the EM from the current source. In this case, a particle of the magnetic field will remain. This effect is called hysteresis.
Device
An electromagnet is a simple structure consisting of an electromagnetic coil with a metal or ferromagnetic core. An additional detail is the anchor. This element is used in relays. Attracted to the magnet, it closes the terminals of the electrical device.
Classification
EMs are distinguished by the methods of creating magnetic fields. There are three types of electromagnets:
- AC electromagnet;
- neutral DC device;
- polarized DC EM.
Magnets operating on alternating current change the direction of the magnetic flux along with twice the frequency of the electric current.
Neutral EMs connected to a direct current source create magnetic fluxes that do not depend on the direction of the electric current.
In polarized devices, the orientation of the magnetic flux is tied to the direction of the electric current. Polarized EMs consist of two magnets. One of them directs a polarizing magnetic field flux to the second electromagnet to turn it off.
Advantages of using electromagnets
The main advantage of an electric magnet over a constant source of magnetic field is that it is brought into working condition under the influence of electric current.
That is, when it is necessary to exert a magnetic influence on a certain part of space, the current is turned on.
This allows for rhythmic operation of the EM, which is successfully used in various types of electrical equipment, instruments and devices.
An electromagnet can be found in electric meters, separator units, transformers, television and audio equipment and other devices.
Powerful magnets are installed on overhead cranes in the workshops of metallurgical plants and winches of scrap metal collection enterprises.
Lifting electromagnets
One of the first applications of EMs is as speakers. The sound device is based on an electromagnet, which causes the membrane to vibrate in the audio range.
EMs are used in metal detectors to detect metal-containing objects underground, in water and in various areas.
Superconducting electromagnet
Superconductivity is considered the property of materials with resistance close to zero. Electromagnets with practically zero resistance have a super-powerful magnetic field. The force of magnetic influence can cause diamagnetic materials such as pieces of lead and organic objects to float in space.
As physicists have noticed, metals acquire the property of superconductivity at ultra-low temperatures.
To obtain the superconductivity effect, the EM windings are placed in a Dewar flask with liquid helium, which is equipped with a valve to release the vapor of the substance.
Superconducting magnets are used in medical equipment - MRI (magnetic resonance tomography) machines. Experimental hovercraft trains use superconducting magnets.
The most powerful electromagnet
The most powerful magnets are built into the Large Hadron Collider. This is a charged particle accelerator designed to accelerate counter flows of heavy lead ions and protons.
The collider is located on the territory of the European Nuclear Research Center near Geneva (Switzerland).
About 10 thousand scientists and engineers from more than 100 countries of the world took part in its construction and are conducting research.
How to make a 12v electromagnet
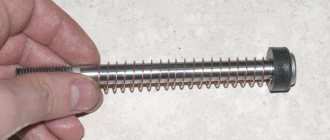
The easiest way to make an electromagnet is to take a regular nail, wire and battery. An insulated wire is wound along the entire length of the rod. The ends of the conductor are pressed against the poles of the battery.
To ensure that the charge is not wasted, one end of the wire is soldered to the positive contact. The other ending should be made in the form of a spring-loaded arc, which is pressed against the battery terminal with a minus sign.
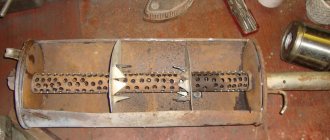
The bottom photo shows how you can make an electromagnet at home.
DIY electromagnet
Note! When making an electromagnet with a battery, you can use a contact block from an old device. To turn off the magnet, it will be enough to remove the battery from the contact box.
Calculations
Before you start assembling an electromagnet with your own hands, make a preliminary calculation of its parameters. Structural elements are calculated separately for DC and AC EVs.
For DC
Before making calculations, the required value of the magnetomotive force (MF) of the coil is determined. The winding parameters must provide the required MMF, at the same time the coil must not overheat, otherwise the insulating layer of the winding wire will be lost. The initial data for the calculation are the voltage in the wire of the electromagnetic coil and the required value of the magnetomotive force.
Methods for calculating DC electromagnets are constantly published on the Internet. There you can also select formulas for determining the MMF, the cross-section of the core and winding wire, and its length.
Additional Information. Mostly on the Internet they look for calculations of 12 volt electromagnets made by themselves. Depending on your needs, you can take different calculation paths. Basically, “recipes” are chosen to determine the cross-section and length of the winding wire powered by a standard “A” or “AA” format battery.
For AC
The basis for EM AC is the calculation of the winding. As in the previous case, they are guided by the initial requirements for the MMF value.
Despite the large number of recommended calculation formulas, most often the “capabilities” of a device are determined by an experienced selection of the parameters of its design parts.
Methods for calculating EM alternating current can always be found on the World Wide Web (Internet).
Examples of using EM
The following devices can be cited as examples of the use of electromagnets:
- TVs;
- transformers;
- car starting devices.
TVs
Modern homes are usually filled with various electrical appliances. Being near a television receiver, they can influence the television screen (TV) by magnetic induction. TV already has built-in protection against screen magnetization. If multi-colored spots appear on the display field, then turn off the device for 10-20 minutes. Built-in protection will remove magnetization of the screen.
In some cases, this method does not provide the desired help. Then a special electromagnet is used, which is called a choke. This is a kind of induction coil. The device is connected to a household power outlet and passed along and across the screen. As a result, the induced magnetic fields are absorbed by the inductor.
Transformers
The design of transformers is very similar to the structure of electromagnets. Both there and there there are windings and cores. The difference between a transformer and an EM is that the former has a closed magnetic circuit. Therefore, the summed magnetic force is nullified by counter magnetic fluxes.
Car starting device
The car starter works as a starting device for the engine. It turns on while the engine is starting. The temporary transfer of starting force to the engine crankshaft is provided by a retractor electromagnet.
When you turn the key in the ignition switch, the EM pulls the gear into the crankshaft teeth. During contact, the starter motor cranks the engine until a fuel combustion cycle occurs in the engine cylinders. The traction relay then turns off the electromagnet and the starter gear returns to its original position. After which the car can move.
Electromagnets have entered the sphere of human activity so tightly that existence without them is unthinkable. Simple devices can be found everywhere. Knowledge of the principle of their operation will allow the home handyman to cope with minor repairs of household electrical devices.
Definition
An electromagnet is a special device whose operation creates a magnetic field when an electric current is applied to it. Most often, electromagnets consist of a primary winding and a core, which has ferromagnetic properties.
The winding is usually made of copper or aluminum wire of varying thickness, always covered with insulation. But there are also electromagnets made of superconducting materials. The magnetic cores themselves are made of steel, iron-nickel alloys or cast iron. And in order to minimize losses due to eddy currents, magnetic cores are structurally made from a whole set of thin sheets. Now we know what an electromagnet is. Let's take a closer look at the history of the creation of this useful device.
How to make a simple electromagnet - step-by-step instructions with diagrams
Such a device is convenient because its operation is easy to control using electric current - changing the poles, changing the force of attraction. In some matters it becomes truly indispensable, and is often used as a constructive element of various homemade products. It’s not difficult to make a simple electromagnet with your own hands, especially since almost everything you need can be found in every home.
What you will need
- Any suitable sample made of iron (it is highly magnetic). This will be the core of the electromagnet.
- The wire is copper, always with insulation to prevent direct contact of the two metals. For a homemade electric magnet, the recommended cross-section is 0.5 (but not more than 1.0).
- DC source - battery, battery, power supply.
Additionally:
- Connecting wires for connecting an electromagnet.
- Soldering iron or electrical tape to secure contacts.
This is a general recommendation since the electromagnet is made for a specific purpose. Based on this, the components of the circuit are selected.
And if it is done at home, then there cannot be any standard - whatever is at hand will do.
For example, in relation to the first point, a nail, a lock shackle, or a piece of iron rod are often used as a core - the choice of options is huge.
Winding
The copper wire is carefully wound onto the core, turn by turn. With such scrupulousness, the efficiency of the electromagnet will be the maximum possible.
After the first “pass” along the iron sample, the wire is laid in a second layer, sometimes a third. It depends on how much power the device requires.
But the direction of winding must remain unchanged, otherwise the magnetic field will become “unbalanced”, and the electromagnet will hardly be able to attract anything to itself.
To understand the meaning of the ongoing processes, it is enough to remember the physics lessons from the high school course - moving electrons, the EMF they create, the direction of its rotation.
After winding is completed, the wire is cut so that the leads can be conveniently connected to the power source. If it's a battery, then directly. When using a power supply, battery or other device, you will need connecting wires.
What to consider
There are certain difficulties with the number of layers.
- As turns increase, reactance increases. This means that the current strength will begin to decrease, and the attraction will become weaker.
- On the other hand, increasing the current rating will cause the winding to heat up.
The operating principle of the electromagnet is described in detail in the following video:
Connection
- Cleaning the copper terminals. The wire is initially coated with several layers of varnish (depending on the brand), and it is known to be an insulator.
- Soldering copper and connecting wires. Although this is not essential, you can twist it by insulating it with a PVC pipe or adhesive tape.
- Fixing the second ends of the wires on the clamps. For example, the “crocodile” type. Such removable contacts will allow you to easily change the poles of the electromagnet, if necessary during its use.
Useful tips
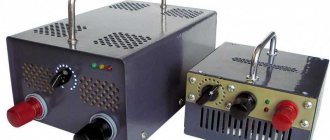
- To make a powerful electromagnet, home craftsmen often use a coil from an MP (magnetic starter), relays, or contactors. They are available for both 220 and 380 V.
It is not difficult to select an iron core based on its internal cross-section. For ease of control, you need to include a rheostat (variable resistance) in the circuit. Accordingly, such an electric magnet is already connected to the outlet.
The force of attraction is regulated by changing the R chain.
- You can increase the power of an electromagnet by increasing the cross-section of the core. But only up to certain limits. And here you have to experiment.
- Before making an electric magnet, you need to make sure that the selected iron sample is suitable for this. The check is quite simple. Take a regular magnet; There are a lot of things in the house on such “suction cups”. If it attracts the part selected for the core, it can be used. If the result is negative or “weak,” it is better to look for another sample.
Making an electromagnet is quite simple. Everything else depends on the patience and ingenuity of the master. You may have to experiment to get what you need - with the supply voltage, wire cross-section, and so on. Any homemade product requires not only a creative approach, but also time. If you do not regret it, then an excellent result is guaranteed.
Main classification
There are three main ways to classify electromagnets. They are determined by the current in electromagnets and the method of its creation:
- Neutral DC e/m is a device in which a magnetic flux is created in such a way that the force of attraction becomes dependent only on the size and speed of supply of direct current, and its direction in the winding does not affect anything.
- Polarized DC e/m is a device in which 2 independent magnetic fluxes are placed: polarizing and working. The second is created using a working winding. Polarizing flows owe their formation to constant magnetic fields, less often to additional electromagnets. These flows are necessary to create attractive forces in the magnet. The activity of such a device is determined by the direction and/or magnitude of the electric current in the winding that performs the work.
- AC electric motor – devices whose windings are powered by an alternating current source. The flow of a magnetic flow can periodically change in its direction and dimension (magnitude). The potential of the unidirectional force responsible for attraction can only change in its magnitude, which leads to a pulsation of this force in the amount from zero to the maximum limit values with a frequency twice as high as the frequency of the feeding current. Most often used in household appliances.
Tips on how to make an electromagnet with your own hands
Regardless of why a person needs a magnet, it can easily be made at home.
When you have such a thing at hand, you can use it not only to have fun picking up various small pieces of iron from the table, but also to find a useful use for it, for example, to find a needle dropped on the carpet.
In this article you will learn how easy it is to make an electromagnet with your own hands at home.
A little physics
As we remember (or don’t remember) from physics lessons, in order to convert electric current into a magnetic field, we need to create induction. Inductance is created using an ordinary coil, inside which this field arises and is transmitted to the steel core around which the coil is wound.
Thus, depending on the polarity, one end of the core will emit a field with a minus sign, and the opposite end will emit a field with a plus sign. But visual magnetic abilities are not affected in any way by polarity. So, when you are done with physics, you can begin decisive action to create a simple electromagnet with your own hands.
Materials for making the simplest magnet
First of all, we need any inductor with a copper wire wound around the core. This can be a regular transformer from any power supply.
An excellent way to create electromagnets is to wind them around the narrowed back of picture tubes of old monitors or televisions.
The conductor threads in transformers are protected by insulation consisting of an almost invisible layer of special varnish that prevents the passage of electric current, which is exactly what we need. In addition to the indicated conductors, to create an electromagnet with your own hands you also need to prepare:
- A regular one and a half volt battery.
- Scotch tape or tape.
- Sharp knife.
- Hundreds of nails.
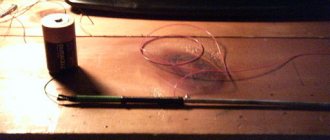
The process of making a simple magnet
We start by removing the wires from the transformer. As a rule, its middle is located inside the steel frame. You can, after removing the surface insulation on the coil, simply unwind the wire, dragging it between the frames and the coil. Since we don't need a lot of wire, this method is the most acceptable here. When we have released enough wire, we do the following:
- We wind the wire removed from the transformer coil around a nail, which will serve as a steel core for our electromagnet. It is advisable to make turns as often as possible, pressing them tightly against each other. Do not forget to leave a long end of the wire at the initial turn, through which our electromagnet will be powered to one of the poles of the battery.
- When we reach the opposite end of the nail, we also leave a long conductor for powering. We cut off the excess wire with a knife. To prevent the spiral we wound from unraveling, you can wrap it with tape or tape.
- We strip both ends of the wire coming from the wound nail from the insulating varnish with a knife.
- We lean one end of the stripped conductor against the positive of the battery and secure it with tape or tape so that the contact is well maintained.
- We wind the other end to the minus in the same way.
The electromagnet is ready for use. By scattering metal clips or tacks on the table, you can check its functionality.
How to make a more powerful magnet?
How to make an electromagnet with more powerful magnetic properties with your own hands? The strength of magnetism is influenced by several factors, and the most important one is the electrical current of the battery we use. For example, by making an electromagnet from a square 4.5 volt battery, we will triple the strength of its magnetic properties. The 9-volt crown will give an even more powerful effect.
But do not forget that the stronger the electric current, the more turns will be required, since the resistance with a small number of turns will be too strong, which will lead to strong heating of the conductors. If they are heated too much, the insulating varnish may begin to melt, and the turns will begin to short-circuit to each other or to the steel core. Both will sooner or later lead to a short circuit.
Also, the strength of magnetism depends on the number of turns around the magnet core. The more there are, the stronger the induction field will be, and the stronger the magnet will be.
Making a more powerful magnet
Let's try to make a 12 volt electromagnet with our own hands. It will be powered by a 12-volt AC power supply or a 12-volt car battery.
To manufacture it, we will need a much larger amount of copper conductor, and therefore we should initially remove the internal coil with copper wire from the prepared transformer.
A grinder is the best way to extract it.
What we need for production:
- A steel horseshoe from a large padlock, which will serve as our core. In this case, it will be possible to magnetize the pieces of iron at both ends, which will further increase the lifting capacity of the magnet.
- Coil with copper wire in varnished insulation.
- Insulating tape.
- Knife.
- Unnecessary 12 volt power supply or car battery.
The process of making a powerful 12-volt magnet
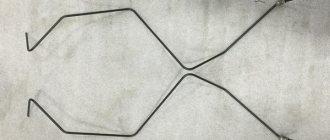
Of course, any other massive steel pin can be used as a core. But a horseshoe from an old castle will do just fine. Its bend will serve as a kind of handle if we start lifting loads of impressive weight. So, in this case, the process of making an electromagnet with your own hands is as follows:
- We wind the wire from the transformer around one of the horseshoes. We place the coils as tightly as possible. The curve of the horseshoe will interfere a little, but that's okay. When the length of the side of the horseshoe ends, we lay the turns in the opposite direction, on top of the first row of turns. We make a total of 500 turns.
- When the winding of one half of the horseshoe is ready, wrap it with one layer of electrical tape. The original end of the wire, intended for recharge from a current source, is brought out to the upper part of the future handle. We wrap our coil on the horseshoe with another layer of electrical tape. We wind the other end of the conductor to the bending core of the handle and make another coil on the other side.
- We wind the wire on the opposite side of the horseshoe. We do everything the same as in the case of the first side. When 500 turns have been laid, we also remove the end of the wire for power supply from an energy source. For those who don't understand, the procedure is clearly shown in this video.
The final stage of making an electromagnet with your own hands is recharging to the energy source. If it is a battery, we extend the ends of the stripped conductors of our electromagnet using additional wires, which we connect to the battery terminals.
If this is a power supply, cut off the plug going to the consumer, strip the wires and screw a wire from the electromagnet to each one. Insulate with electrical tape. We plug the power supply into the outlet. Congratulations.
You have made with your own hands a powerful 12-volt electromagnet that is capable of lifting loads over 5 kg.
Other types of classification
There are other ways to classify electromagnets. For example, they can be distinguished by the field of the electromagnet and its status: variable and/or constant.
There are also classifications based on the methods by which the winding is turned on (series and parallel connection), on the performance and its characteristics (capable of working for a long time, intermittent and short-term) and different in the speed of task completion (slow and high-speed).
What do we need
In order to create an electric magnet, we will need: an iron nail, a coil of copper wire, a power supply or battery, a switch, scissors and a soldering iron. Let us immediately note that you should not take too thick wire; it is better to choose products with a medium diameter. As for the size of the nail, there is no fundamental difference; it all depends on your ultimate goals. Moreover, if you don't have a nail, you can find something similar. For example, some kind of metal rod. We also draw your attention to the fact that the main thing in a rod or nail is its shape. Curved products are not suitable for us.
Industry
Probably everyone has seen at least once a variety of such a device as a lifting electromagnet. This is a thick “pancake” of various diameters, which has a huge attractive force and is used to carry cargo, scrap metal and any other metal in general. Its convenience lies in the fact that it is enough to turn off the power and the entire load is immediately unhooked, and vice versa. This greatly simplifies the loading and unloading process.
The strength of the electromagnet, by the way, is calculated using the following formula:
F=40550∙B^2∙S.
Let's look at it in more detail. In this case, F is the force in kilograms (can also be measured in newtons), B is the induction value, and S is the working surface area of the device.
Assembly sequence of a simple electric motor
The main thing is to carry out the sequence accurately and carefully, otherwise the result may not be entirely expected and the engine will not work correctly.
Electric motor assembly sequence:
- Wind several turns of copper wire around the battery. This is an improvised coil of a future electric motor, so the turns should fit tightly one to the other and retain their shape after being removed from the battery.
- Fix the turns of the coil with two pieces of wire and make short, even leads from the same pieces. It is necessary to remove the enamel at the ends of the terminals; a mechanic’s knife or a simple stationery knife is suitable for this purpose.
- From two short pieces of wire, make 2 clamps for the coil, with two small rings at the ends.
- Insert the battery into the socket.
- Insert the clips on both sides of the battery, where the “+” and “-” terminals are located. Make sure the latches are securely clamped.
- Insert the coil leads into the clamp rings.
- Place a magnet on top of the battery and lightly push the coil.
If the design is done correctly, the coil will begin to rotate rapidly until the battery charge lasts. Of course, such a motor will not bring tangible benefits at home or on the farm, but it is a direct example of the action of natural magnetism and in practice allows you to experiment with the basics of electrical engineering.
Speaker magnet, copper wire and lamp for making a lamp
The easiest way to bring a fluorescent lamp into working condition is to place it in the electromagnetic field of an ordinary magnet, which is used to work in old Soviet speakers.
The device consists of:
- Round magnet;
- Copper wire.
To make this device, you first need to remove the magnet from the speaker. Next, using a hammer, without using much force, knock the metal plates off the magnet with light blows.
After the plates are removed from the magnet, it is necessary to clean it of dirt. To do this, use a regular rag or rag.
Next, the winding is manufactured. To do this, take a piece of copper wire insulated. The wire should be long enough to fold it in half and wrap the magnet with five turns. The double end of the wire is threaded into the resulting wire eye.
After the magnet is wrapped, a regular fluorescent lamp is inserted into the central part of the magnet. This design can be equipped with decorative materials and used as a stand-alone lamp.
The principle of operation of an electric motor made of a battery and a magnet
The coil, made of several turns of wire, is also a segment through which reverse current flows, and has both positive and negative charges on its sides. Which are attracted to the magnet placed below.
In order for the structure to rotate, it is necessary, firstly, to correctly calculate the distance from the magnet to the coil, and secondly, to make sure that the conductors are in good contact with the battery terminals. These same conductors must also be properly cleaned so that the enamel of the wire does not interfere with the passage of direct current.
Unique application of anti-stress balls
This electric motor can be used as a unique and interesting addition to the interior of a room or office. You can always buy such a toy in a store, but it is much more interesting and educational to make it yourself, using available materials and tools.
A little from school physics
This is taught from school. Objects that can “magnetize” are of two types - hard magnetic and soft magnetic. The difference between them is not in density, but in the ability of the latter to quickly lose their properties. If you rub an iron object or move it over a strong magnet, it will “learn” to attract small objects. And if you quickly rub the halves of the scissors, they can easily “pick up” the needles.
An electric current flowing in a wire creates a magnetic field around it. In order to concentrate it in an electromagnet, you need to wind the wire around a coil. The magnetic field of the wound wires, passing through the coil, will strengthen the strong magnetic field in it.
AliExpress - Products from China at wholesale prices - Opt-aliexpress.ru
Luminous stickers Decals for Skoda Fabia 2 Octavia A5 A7 Rapid Roomster Yeti Kodiaq Superb |
Sale
LJHYDFCNB SpongeBob TPU Soft Silicone Phone Case for iPhone 11 pro XS MAX 8 7 6 6S Plus X 5 5S
Sale
Women's knitted sweater dress with open shoulders and long sleeves on
Sale
Washing granfest Standart S-605 Frost Kitchen sink for bowl tools stainless steel above counter or udermount vegetable washing basin |
Sale
Ballroom Sexy Modern Long Sleeve Latin Dancewear
Sale
Men's T-shirt with Vikings print cotton top short sleeves vintage
Sale
10 pieces. micro USB adapter DIP 5pin Female Connector | Electronic components and
Sale
White Marker Black Genuine Leather Car Steering Wheel Cover
Sale
plus size clothing men's fat guys t shirt men 7xl 9xl 10xl Patchwork cotton short-sleeve turn-down collar T-shirt hiphop tees | Men's
Sale
Women's sheepskin coat autumn jacket genuine women's clothing 2020
Sale
Multifunctional Camping Tent Pegs Hammer (Red) | Sports and
Sale
DIY Diamond Painting 5D Embroidery Leopard Cheetah Painting Rhinestone Mosaic
Sale
New Kaiya Angel Dress for Girls Cute and Beautiful Party Style Clothes
Sale
Front/Rear Disc Brake Rotor for YAMAHA Fjr 1300 A Fjr1300 2013 - 2015 |
Sale
Girls Polka Dot Dresses Children Long Sleeve Blouse Princess Clothes
Sale
Treadmill motor controller AL708D circuit card lower control board for general treadmill | Electronics
Sale
Remote Controlled Submersible Candles Waterproof LED
Sale
Ceramic loom uxcell ceramic loom with one
Sale
New 2 pcs/set Cute ob11 doll clothes dress with fruit + elastic band for
Sale
Pettigirl Christmas Dress for Girls Princess Costume Fancy with
Sale
For HTC One M8 M8s Case For M8/M8S Soft TPU Back Cover M8/M 8/M 8 Silicone Soft
Sale
high quality quilted maple electric guitar ready in store immediately shipping | Sports and entertainment
Sale
Baby Boys Casual Cotton 2 Piece Sets with
Sale
Flower Girl Princess Cute Dress Kid Baby Girls Clothes Party Pageant Wedding Dresses Eelegant Ginger Yellow Summer 2022 | Baby clothes
Sale
How do surface grinding machines work?
The vast majority of parts made of metal undergo a technological operation such as grinding. To perform this with high efficiency and accuracy, surface grinding machines are used.
A rather difficult to manufacture banding machine with excellent functionality
Surface grinding machines of serial models can process both flat and profile parts. The surface processing accuracy that can be achieved using such devices is 0.16 microns. Of course, it is almost impossible to achieve such a result when processing on machines made by yourself. However, even the accuracy that homemade machines allow to obtain is quite sufficient for many metal products.
The load-bearing structural element of the machines of this group (as well as any other equipment) is the bed. Its dimensions directly determine what size parts can be processed on the machine.
The most common material for manufacturing beds of surface grinding equipment is cast iron, since this metal, due to its characteristics, perfectly dampens vibrations, which is especially important for devices of this type
Work table and controls of the 3G71M grinding machine
The structural element of surface grinding machines on which the workpiece is fixed is a work table having a round or rectangular shape. Its dimensions can vary significantly depending on the specific model of surface grinding equipment. The workpieces can be fixed on such a work table due to its magnetized surface or using special clamping elements. During processing, the work table makes reciprocating and circular movements.
In mass-produced surface grinding machines, the work tables are driven by a hydraulic system. In self-assembled equipment, mechanical transmissions are used for this.
Grinding a steel workpiece fixed on the working surface of the machine using a magnetic field
Important elements of the design of surface grinding equipment, which ensure the accuracy and smooth movement of the work table, are guides. In addition to high precision manufacturing, the guides must have exceptional strength, since in the process of almost constant movements of the desktop they are subject to active wear.
To achieve high processing accuracy, the guides must ensure accurate, smooth (without jerking) movement of the worktable with minimal friction of the contacting elements. That is why high-strength steel is used for the manufacture of these structural elements, which is hardened after the guides are made from it.
Option for manufacturing guides using angles and bearings
The working tool of a surface grinding machine, which can be a grinding wheel or an abrasive belt, is mounted on the spindle of the headstock. Rotation of the working tool, for which the main electric motor is responsible, can be transmitted through a gearbox or belt drive.
For do-it-yourself surface grinding machines, you can choose a simpler option: select the diameter of the grinding wheel so that it can be mounted directly on the electric motor shaft. This will eliminate the need to use a gear or belt drive.
Stages of the experiment
- We bend a heart-shaped figure from copper wire; the ends of the wire should not connect.
- Using pliers, make a small dent on the positive terminal of the battery.
- We place the battery with a minus on the magnet, and put the “heart” on top of the battery. The free ends of the wire should lightly touch the magnet.
For a basic electromagnetic motor you need an AA battery, two paper clips, an enameled wire with a diameter of 0.5 mm, glue or tape, plasticine for attaching the structure to the table, a small magnet, which should not be too large and not too small. The size of the magnet should be approximately the diameter of the coil. Buy them in this store.
How to make a simple motor
Bend the paper clips. Make a basic coil of 6-7 turns from enamel-insulated wire. Secure the ends of the wire to the spool with a knot and strip one end of insulation along its entire length, and the other along its entire length, but only on one side. Secure the battery clips with glue or other material. Place a magnet on top of the battery. Place the entire assembly on the table and secure it. Place the spool so that the ends of the spool are touching the paperclip with their stripped sides. When current flows through the wire, an electromagnetic field arises and the coil becomes an electromagnet. The magnet should be placed so that the poles of the magnet and the coil are the same, then the permanent magnet and the electromagnet coil will repel each other. This force turns the coil at the very beginning of the rotation due to the fact that one end is stripped along the length of only one side, it momentarily loses contact and the magnetic field disappears. By inertia, the coil turns, contact is restored again and the cycle begins again. As you can see, making a simple motor with your own hands is quite simple! it describes in more detail how to make a simple motor, which was discussed above.
The entire assembly of the magnetic motor on video