Lately there has been a real boom in blacksmithing. Young people are becoming blacksmiths. The knives and axes made by their hands are real works of art.
Active advertising on social networks, photos of how to make a beautiful ax, fuels not only the desire to own such a thing, but also to try to make it with your own hands.
Nothing is impossible
Looking at the work of blacksmiths, the thought comes to mind that there is nothing difficult in making an ax. But in practice, this turns out to be much more difficult.
In addition to a piece of metal for forging an ax, you need: a forge, an anvil, holes for the eye. Not everyone has such a set of tools. Of course, you can make a forge and punches, but you can also try to make an ax in a different way.
How to make a battle ax
Not all axes can be purchased in the store; for example, it is impossible to buy a battle axe. And therefore, if you want to get such a product, it’s easier to make an ax with your own hands.
You can take an ordinary construction tool as a basis, see Fig. 2, and use it to make a combat blade.
It has certain disadvantages:
- It has an irrational form.
- It has excess mass, which will interfere with manipulations during the battle.
Viking battle ax
It should also be noted that the upper ledge will create difficulties during chopping and striking. That is, it gives the ax an unnecessary torque directed counterclockwise, thus causing increased wear on the ax handle. It won't hurt to grind off the protrusion located below. In addition, straight sharpening is not entirely suitable for a battle axe.
Making an ax using the metalwork method
Ideas on how to make an ax outside the forge lead to the metalworking method. The ax consists of three parts:
- ax blade
- ax handle
- wedge
If everything is clear with the materials for making an ax and a wedge, then the question of what, and most importantly how, to make a canvas is puzzling. Knowing that the blade consists of a blade and a butt, you understand what is needed to make an ax:
- metal strip for blade
- piece of pipe for butt
What types of axes are there?
First, let's look at the types of axes. It may seem like they are all the same, but they are not. The location of the center of gravity and sharpening depend on the shape. Some species are better suited for cutting wood, while others are better suited for splitting firewood. Therefore, we will consider them separately.
Lumberjack
Good for cutting down trees. Its center of gravity is strongly shifted towards the blade, so the main blow is concentrated at the beginning. For this reason, it is held with both hands. The ax is relatively long to increase the swing and force of the blow.
Cleaver
It has a wide, short and narrow blade. From the name it is clear that it is designed for chopping wood. The butt of the ax is thick to effectively penetrate the fire. Medium length handle. A photo of the ax can be seen below.
Plotnitsky
A carpenter's ax has a relatively short shaft to make it easy to use with one hand. The blade, on the contrary, is wide. Indispensable for preparing logs for building a house.
Srednerus
Also called taiga axe. It is considered a universal-purpose tool, as it was often taken along on expeditions. They can chop firewood and butcher an animal carcass.
Combat
These include Viking axes, axes and other tools related to edged weapons. It is worth noting that the production and sale of such products is controlled by government agencies, so it is not worth doing. Or you will have to register with an examination.
Sturdy
A beautiful ax with a short handle and a large blade. It makes no sense to buy it for home, as it is inconvenient, but is indispensable for hiking. It weighs almost nothing, is compact, but is not suitable for regular chopping of firewood and felling of wood. For hiking, such an ax is often made from rebar.
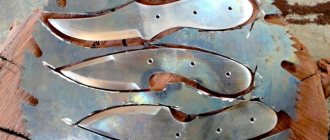
Blade
The full size drawing will show the amount of material needed. The blade requires a hard metal, such as a car spring.
We transfer the outline of the drawing to the spring and saw off all the excess. We also make descents using a grinder. It is important here not to overheat the metal so that the edge remains hard and holds an edge well.
Assembly of the canvas
The blade and butt are connected by welding. It is important to weld the metal thoroughly so that the ax does not crack during operation.
Then we grind the seam with a grinder, if necessary, boil the shells, and grind again. For additional strength, you can rivet the butt and blade with strips of metal.
Fundamentals of forging technology for three-layer axes.
Fundamentals of forging technology for three-layer axes.
1. It is necessary to select the correct size blank for each ax model. The larger the axe, the larger the size of the hole for the ax handle. The workpiece consists of three layers of steel. The outside is st. 45. The workpiece is folded in half, and a 65G steel power wedge is inserted into the center.
2. The next operation is forge welding. A three-layer billet is heated in a furnace to 1000 degrees, sprinkled with flux (borax or sand), which fuses with the scale formed on the inner surface of the product and turns into liquid slag. The flux-treated workpiece is heated to 1300 degrees, this temperature corresponds to white heat. When the steel reaches a semi-liquid state, the blacksmith, with gentle blows of a hand hammer, begins to squeeze out liquid slag from the surface of the parts being welded, and then performs forge welding with stronger blows. . For better surface weldability, this operation must be repeated twice from opposite planes. A successful result of the work is the integrity of the ends of the workpiece. If defects in the seams in the form of delaminations are visible, it is necessary to repeat the entire welding cycle.
3. During forging, the temperature cannot be exceeded above 1100 degrees; in the semi-liquid state, the structure in the metal is destroyed. As a result, chips may appear during use of the finished product.
4. After forging, the product must be annealed. The forging is placed in coals at a temperature of 750-900 degrees, after which it cools slowly, thanks to which the stress resulting from forging is removed from the product. The likelihood of chips and cracks becomes much less. This process is called annealing-normalization, after which the metal acquires a fine-grained, even structure.
5. The annealed product must be checked for defects in the working edge. After sharpening the ax, a careful inspection of possible damage (lack of penetration or burns) takes place. If the edge is clean, the product is subject to further processing.
Fundamentals of metalworking technology for three-layer axes.
1. The primary operation is to peel off the outline of the ax on a coarse-grained stone.
2. Next, the ax hole for the handle is processed. Initially, the wedge contains a cone of the incoming hole of the handle in height and width 2 mm less than the outgoing hole. Due to the cone, the ax handle is wedged. (inlet hole size: width-28mm height-49mm, outlet size: width-30mm height-51mm. Size is for a medium axe.)
3. After processing the hole, the outline is polished using fine sandpaper and the ax is sharpened. Then the product is given to the blacksmith for hardening.
4. The product must be heated in oil at a temperature not exceeding 830 degrees. IN
As a result, the hardening zone acquires a hardness of 60-61HRC.
5. After hardening, the product must be kept in a muffle furnace for two hours at a temperature of 220 degrees. In this case, the hardness of the ax will decrease to 58-60 HRC, but at the same time the stress resulting from hardening will disappear. The likelihood of chips appearing on the working edge will be significantly lower.
Toporische
A good ax requires the presence of a properly made ax handle. To the question - what can an ax handle be made from, there is a simple answer - from hardwood.
The most common wood for making ax handles is birch. But, if you make an ax not only for chopping wood, but for the soul, then you should look for a type of wood with a more expressive texture.
How to protect against rotting
Any wood that can be used to make an ax handle can rot if exposed to moisture. To reduce the risk of destruction of the ax or to extend its service life, you can use anti-corrosion compounds.
May be interesting Feeding plants with ashPlanting pine trees: planting time, time and place, further care, photos Decorating a garden plot with your own hands, interesting ideas with photos and descriptions
You should not use varnishes or paints for such protection - the surface will become slippery and uncomfortable. Recognized means for protective impregnation of the handle - oils:
- linen;
- sunflower;
- drying oil
In some cases, before working with the material, it is soaked in kerosene and then additionally dried. When using oils, you need to remember the need for periodic application - to renew the impregnation and restore the protective film.
Some craftsmen add red, yellow or orange pigment to the composition of such a product.
This component will not only make the ax beautiful, but will also increase its visibility in the snow or grass.
Wood for an ax
An ax handle made of ash, elm, or hornbeam will look very beautiful. It’s just difficult to buy boards made from such types of wood in some regions, especially in the outback. Of course, you can use online trading.
The wood for the ax must be well dried and free of knots. At home, the wooden board is dried at room temperature for six months
The longer the wood dries, the stronger the ax handle will be. According to custom, wooden blanks were dried for years in the attics of houses.
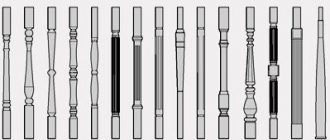
Sequential creation of the wooden part of the ax
All work on turning the ax is carried out starting from the stage of making the template. It is created on paper (cardboard). As an auxiliary part, a ready-made ax handle is often used, which is placed on a sheet of cardboard and the desired contours are obtained by tracing the laid part with a pencil.
The resulting template is cut out and placed on the beam, again tracing with a pencil. A centimeter is left at the front, and nine centimeters are added to the back.
When cutting out an ax from a block, make sure that the section parameters of the part of the workpiece that is machined for the eye are exceeded by two or three millimeters.
Fitting a metal part onto a wooden part is done with a mallet. The metal is clamped in a vice to perform a rigid joining with greater comfort.
When there is no doubt that the wood will fall out or crack, carefully sand the surface of the ax with sandpaper.
The final stage is to bring the product to perfect condition. The smoothness and strength are checked, all unnecessary roughness and sagging are eliminated.
To give the ax a beautiful appearance, the handle is covered with stain and varnish.
If desired and if there are available means, anyone can make an ax on their own. For an experienced craftsman, creating such a tool is not a question.
For a beginner, we can recommend turning to video materials with the appropriate titles for help. Such as “making an ax handle at home step by step” or “how to make a new one from an old blade.”
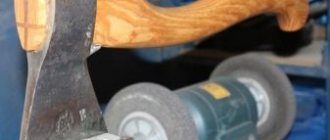
Roughing
Using the template, we outline the outline of the handle on the wood and cut out the blank. Give the handle a more rounded shape. For these purposes, you can use a plane, chisels or a small hatchet.
Fit
The next stage in making an ax handle is adjusting the shape and ergonomics. We grind the wood to give it the correct shape and comfortable grip.
A large rasp, as well as a power grinding tool, are perfect for these purposes. The main thing here is not to loosen the place where the ax fits on the ax handle.
Note!
- Why do people consider healing fasting?
- Required distance of the septic tank to the well
Do-it-yourself garden beds: the best arrangement ideas and step-by-step placement instructions (110 photos)
Landing the ax on the handle
Before planting the butt on the ax handle, you need to remember that the exit side of the hole is wider. This feature is needed so that after wedging, the head does not fly off during cutting. When adjusting the dimensions of the handle to the butt, you need to place it on paper with the output side and trace the inner diameter. It should be smaller than the size of the head of the axe. Further work on making a wooden ax handle consists of the following steps:
- We adjust the dimensions of the end part of the handle to the output side of the butt along the entire length.
- We determine the difference between the input and output parts of the head and make a cut closer to the handle in size.
- We give the attachment part of the ax the shape of a champagne cork - widening towards the edge.
- We process the end of the handle with a rasp, chamfering it - you need the ax handle to fit into the butt.
- We make cuts - crosswise. They are needed to adjust the wedges when fixing the head.
- We drill out the bottom part of the cuts so that the handle does not split - the diameter of the drill is 1 mm larger than the width of the cut.
Additionally, you need to prepare wooden wedges and epoxy glue. The head of the ax should be planted with light blows, leaning the head against the ax handle with the entrance side. When it takes the correct position and does not dangle, the edges protruding beyond the limits are cut off, and then the wedges are driven in with a hammer. They must first be coated with adhesive.
Attention!
When attaching the butt of a homemade ax, you should not hit it with hammers - the metal may weaken and crack. For this purpose, place a small block or use a mallet.
Finishing
The assembled ax is carefully polished with fine sandpaper. The wood can be covered with stain or left as is. The protective layer is applied with oil or varnish.
For greater exclusivity, the ax handle can be decorated with carvings, inlays or wire notches. A pattern etched in a saline solution will look beautiful on the ax blade.