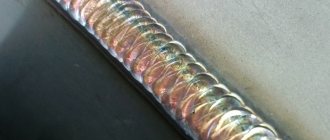
Today we will look at the process of obtaining an ideal weld, the quality of which even an experienced welder will envy. However, the article was written specifically to help beginners in electric welding.
Unlike previous articles, this one is written in a slightly different style. Here I tried to avoid long prefaces and long descriptions of the welding processes themselves. I hope that the article will be useful to all novice welders, and they will be able to learn something new from it.
Electrode tilt
Welding seams are classified according to several criteria. The types and types of welding joints must be considered sequentially, delving into the intricacies of the process. The seam is affected by the location, direction and trajectory of the electrode.
After fixing the selected electrode in the clamp, setting the current, connecting the polarity, the welding process begins.
Each master has his own preferred angle of the electrode. Many consider the optimal value to be 70° from the horizontal surface.
An angle of 20° is formed from the vertical axis. Some work at a maximum angle of 60°. In general, most training guidelines include a range of 30° to 60° from the vertical axis.
In certain situations, when welding in hard-to-reach places, it is necessary to orient the electrode strictly perpendicular to the surface of the material being welded.
You can also move the electrode in different ways, in opposite directions: away from you or towards you.
If the material requires deep heating, then the electrode is directed towards itself. Following him in the direction of the welder is the working area. The resulting slag covers the fusion site.
If the work does not involve strong heating, then the electrode is moved away from you. The welding zone “crawls” behind it. The depth of heating with this type of weld is minimal. The direction is clear.
Pipeline welding
Using electric arc welding, you can make a horizontal seam that runs around the circumference of the pipe and a vertical seam that runs from the side, as well as top and bottom seams. The most convenient option is the bottom seam.
Steel pipes must be butt welded, welding all the edges along the height of the walls. During operation, the electrode must be installed at an angle of 45 degrees - this is done in order to reduce sagging inside the products. The seam width should be 2-3 mm, height - 6-8 mm. If welding is overlapped, then the required width is 6-8 mm, and the height is 3 mm.
Immediately before starting work, you need to carry out preparatory procedures:
- The part needs to be cleaned.
- If the edges of the pipe are deformed, then straighten them or cut them off with an angle grinder, or simply with a grinder.
- The edges where the seam will go must be cleaned to a shine.
After preparation, you can start working. It is necessary to weld all joints continuously, completely welding. Pipe joints with a width of up to 6 mm are welded in 2 layers, with a width of 6-12 mm in 3 layers and with a wall width of more than 19 mm in 4 layers. The main feature is the constant cleaning of pipes from slag, i.e. after each completed layer it is necessary to clean it of slag and only then weld a new one. Particular care must be taken when working on the first seam, it is necessary to fuse all blunts and edges. The first layer is carefully checked for the presence of cracks; if they are present, then they must be melted or cut out and welded again.
All subsequent layers are welded while slowly turning the pipe. The last layer is welded with an even transition to the base metal.
Mistakes of novice welders
To learn how to cook with electric welding correctly, you need to consider the main mistakes that beginners make:
- Moving the electrode too quickly, resulting in an uneven seam.
- The seam moves too slowly, resulting in holes and burns in the metal.
- The seam is too uneven and flat. The main mistake here is the angle of the electrode.
- Lack of welding of metal. This happens because the 5 mm gap between the metal and the electrode was not maintained, i.e. the gap was too small.
- Otherwise, when the gap is too large, the metal is not welded.
All of the above mistakes are just the most serious ones. There are many more nuances that can only be understood with experience.
When welding thin-walled metal or profiles, a careful approach to work is required. Thin parts can be welded by applying a cleaned electrode and welding directly on top of it.
Welding on non-ferrous metals is strikingly different, as it requires different electrodes. A special protective environment is also required. Now you can buy universal machines that cook almost any metal.
There are also semi-automatic devices for working with thin-walled metals. Its essence lies in fusing a special wire.
Today, in the age of innovative technologies, a beautiful electrode welding seam remains a popular method for joining metal structures of various parts. But in order to know and be able to perform high-quality welding, you will need to study the question of how to make a beautiful welding seam using electric welding. On the Internet, as well as in scientific and technical literature, there is a sufficient amount of information that can help create a beautiful and durable seam for any surface of the product.
Read also: Features of semi-automatic aluminum welding
Trajectory of movement
The trajectory of the electrode has a particular influence on the seam. In any case, it has an oscillatory character. Otherwise, it will not be possible to sew the two surfaces together.
Oscillations can be similar to zigzags with different steps between the sharp corners of the trajectory. They can be smooth, resembling movement in an offset figure eight. The path can be similar to a herringbone or a capital letter Z with monograms at the top and bottom.
An ideal seam has a constant height, width, uniform appearance without defects in the form of craters, undercuts, pores, or lack of penetration. The name of the possible flaws speaks for itself. Having mastered your skills well, you can successfully apply any seam and weld a variety of metal parts.
Standards and the concept of leg
The weld begins to form in the working area when the metals are molten, and is finally formed after solidification.
The existing classification groups seams according to various criteria: the type of connection of parts, the resulting shape of the seam, its length, the number of layers, orientation in space.
The types of possible welded joints are shown in the standard for manual and arc welding GOST 5264. Connections made by arc welding in a shielding gas atmosphere are standardized by the GOST 14771 document.
GOSTs have a designation for each welded joint, as well as a table containing the main characteristics, in particular the values of the leg of the weld.
It’s quite easy to understand what a leg is by looking at the drawing of the parts being connected. This is the side of a speculative isosceles triangle of maximum dimensions that will fit in the cross section of the seam. A correctly calculated leg value guarantees the strength of the connection.
For parts of uneven thickness, the cross-sectional area of the part in its thinnest part is taken as a basis. You should not try to unduly increase the leg. This can lead to deformation of the welded structure. In addition, the consumption of materials will increase.
Checking leg dimensions is carried out using universal reference templates presented in specialized literature.
Cleaning seams
After completing all work, it is necessary to clean the weld from slag, otherwise there is a chance of corrosion. There are 3 main ways:
- Heat treatment . Removes residual stress from the material that forms during welding. There are two types: local (the seam itself is heated or cooled) and general (the entire seam is processed).
- Mechanical restoration. Removes residual slag from the part. The cleaned seam must then be checked for strength by tapping it with a hammer or pliers.
- Chemical processing . A special anti-corrosion material is applied.
Thermal stripping Source gidpokraske.ru
You can use many tools for stripping, the main thing is to choose them correctly. You can use a metal brush, a special grinder or an angle grinder with an abrasive wheel.
For mechanical processing, the easiest method is manual, since its use only requires a metal brush. But the presence of the special machines indicated above will speed up the process. With this cleaning you can remove burrs, oxides, scale and traces of tarnish. It is also important to remember that for high-quality processing it is necessary to choose the right grinding disc.
Chemical cleaning is considered effective if combined with mechanical cleaning. Can be processed by etching or passivation. For the first option, a special composition is used that forms a homogeneous layer, which after a certain time can be removed mechanically. Corrosion does not form on the material after this.
Corrosion on the connection Source otoplenie-gid.ru
Types of connections
Depending on the relative position of the parts, welding joints occur:
- end-to-end;
- overlap;
- in an angular way;
- in a tee way.
When butt welding, the ends of two parts located in the same plane are welded. The joint can be made with a flange, without a bevel, or with a bevel. The shape of the bevel may resemble the letters X, K, V.
In some cases, welding is done with an overlap, then one part is partially mounted on another, located parallel. The combined part is an overlap. Welding is done without bevel on both sides.
Often there is a need to make a welded corner. This connection is referred to as the corner type. It is always done on both sides and may not have bevels or have a bevel on one edge.
If the welded parts result in the letter T, then a T-joint has been made. Sometimes parts welded with a T-seam form an acute angle.
In any case, one part is welded to the side of the other. Welding is carried out on both sides without a bevel or with bevels on each side.
Preparation
A significant point in how to make a beautiful seam when welding is the correct implementation of preparatory work. Since the process is accompanied by the appearance of fire, it is necessary to carefully prepare the workplace of the welder performing the work. Provide him with protective clothing and a mask. There should be no flammable objects or materials near the work site.
The product to be welded must be cleaned of dirt, dust, paint stains, grease and oil residues on its surface. In addition to mechanical impact, the use of solvents or alcohol is permissible.
If welding equipment is used, you should first check its functionality. Then select a mode and set the necessary parameters. If the device malfunctions, its operation is strictly prohibited.
Shape and extent
The shape of the seam can be convex, even (flat). Sometimes it becomes necessary to make a concave shape. Convex joints are designed for increased load.
The concave areas of the alloys withstand dynamic loads well. Flat seams, which are made most often, are characterized by versatility.
The length of the seams is continuous, without intervals between the fused joints. Sometimes interrupted stitches are sufficient.
An interesting industrial variation of the intermittent seam is the joint formed by resistance seam welding. It is done on special equipment equipped with rotating disk electrodes.
They are often called rollers, and this type of welding is called roller welding. Continuous connections can also be made using such equipment. The resulting seam is very strong and absolutely airtight. The method is used on an industrial scale for the manufacture of pipes, containers, and sealed modules.
Layers and spatial arrangement
A metal seam can consist of a bead made in one pass. In this case it is called single-layer. If the parts being welded are thick, several passes are performed, as a result of which beads are sequentially formed one on top of the other. This welding joint is called multilayer.
Considering the variety of production situations in which welding occurs, it is clear that the seams are oriented differently in each specific case. There are lower, upper (ceiling) seams, vertical and horizontal.
Vertical seams are usually welded from bottom to top. The trajectory of moving the electrode along a crescent, herringbone or zigzag is used. It is more convenient for novice welders to move the crescent.
When welding horizontally, several passes are made from the lower edge of the parts being joined to the upper edge.
In the lower position, butt welding is carried out or by any angular method. A good result is obtained by welding at an angle of 45 °, “in a boat”, which can be symmetrical or asymmetrical. When welding in hard-to-reach places, it is better to use an asymmetrical “boat”.
The most difficult thing to do is weld in the ceiling position. This requires experience. The problem is that the melt tries to drain out of the work area. To prevent this from happening, welding is carried out with a short arc, the current strength is reduced by 15-20% compared to normal values.
If the thickness of the metal at the welding site exceeds 8 mm, then several passes must be performed. The diameter of the first pass should be 4 mm, subsequent ones - 5 mm.
Depending on the orientation of the seam, select the appropriate position of the electrode . To make horizontal, vertical, ceiling connections, and weld non-rotating pipe joints, the electrode is directed at an angle forward.
When welding corner and butt joints, the electrode is directed at an angle backwards. Hard-to-reach places are welded with an electrode at a right angle.
Fillet Welding - How to Make the Correct Welding Seam
The technique of making welding seams (they are also called roller welds) involves choosing a mode and method of manipulating the electrode. The video on our website will show you everything in detail and in an accessible manner on how to make a welding seam correctly.
There are two types of fillet welds: T-welds (for T-shaped joints) and lap welds, both types are very common in welding. Let's look at each one separately.
Welding technique for T-joints
To get the correct welding seam, you need to place one plane horizontally and the other vertically. Welding a fillet weld must be done strictly at a right angle. If the vertical welded product is no thicker than 12 mm, then it does not require additional processing. The only thing you need to ensure is that the bottom edge of the vertical product is cut as evenly as possible, and that the joint gap does not exceed 2 mm.
In the welding structure of T-joints, all parts are important, more precisely their thickness. So, for example, if a vertical product has a thickness from 12 to 25 mm, then you need to make preparation in a V-shape
If the vertical sheet is from 25 to 40 mm thick, then the bevels of the edges need to be cut in a U-shape on only one side. And if the thickness is more than 40 mm, then a cut is made on both sides of the V-shape.
It is dangerous when a seam has one side unwelded or a corner unwelded. Therefore, in the process of welding a fillet weld, the electrode must be positioned so that it is in the plane that divides the corner in half. And the end of the electrode performs oscillatory movements so that the edges of the metal melt. It is necessary to determine in advance that the length of the welding seam is commensurate with the angle between the products.
How to apply a corner seam correctly
Welding a fillet weld depends primarily on the correct ignition of the electric arc. Ignition of the electric arc is a very important and fundamental point in welding work. The arc must be ignited immediately before starting the welding process, and re-ignited only if it breaks during the process.
The arc is excited on the lower horizontal sheet at a distance of 3-4 mm from the top of the corner, then the arc must be brought to the top of the corner and held there in order for the corners to melt better. Next, the arc needs to be raised to the height of the seam leg along the vertical product and smoothly moved back. Then, a little faster, you need to lower the arc down onto the horizontal product and bring the thickness of the seam on it to the size of the leg.
The biggest mistake is to start welding a seam from a vertical piece being welded, since the molten metal from the electrode will float onto the lower unmolten metal and block the top of the corner. In this case, penetration will not work, and it can only be detected by breaking the metal.
When the welding process is carried out with thickly coated electrodes or with increased current, a large area of molten metal is formed, which makes fillet welds impossible, because the molten metal flows onto the horizontal product, and the seam will simply turn out incorrect.
To avoid this, the products to be welded must be positioned tilted to the horizontal at a 45 degree angle, and welding must be done with a boat. See clearly how to make a welding seam - a video on our website that shows all the equipment, as well as practically how to properly clean the seams after welding.
Lap joint welding technique
This type of welding is used mainly in sheet structures. The ends of the sheets that will be welded are overlapped by a certain amount, equal to approximately 3-5 sheet thicknesses. They need to be welded along the perimeter or along the edge of the corner seam, which was formed by covering the sheets. The positive thing about this type of welding is that there is no need to process the edges. The negative point is that excess material is wasted and the structure becomes heavier. However, lap joints are often used.
Share a link to this material with your friends on social networks (click on the icons):
Weld joint processing
When welding, slag is formed. If slag inclusions get into the weld, its quality deteriorates. All slag deposits must be cleaned off.
If welding is performed in several passes, then the seams are cleaned after each welding stage. In this case, any methods are used. First, the welded parts are hammered and cleaned with a stiff brush.
Then a rough cleaning is carried out. Small parts are cleaned with special knives or grinding wheels. Large blanks are cleaned on machines. At the final stage, the welded joint is polished.
Often a fiber wheel of a grinding machine is used for this. There are other ways to polish welded joints.
Welding is constantly evolving. New materials are appearing and technology is improving. It is necessary to follow the news in welding to learn a lot of new and interesting things.