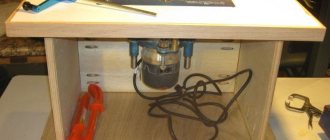
A hand router is a universal device that every home craftsman should have in his arsenal. The versatility of this power tool lies not only in the ability to perform various technological operations with its help, but also in the fact that, using the appropriate equipment, you can work with such a router not only on wood, but also on plastic, glass, natural and artificial stone, colored metal. In order for a manual router to effectively cope with all the tasks assigned to it, you should know how to choose the right device, as well as have an idea of its design features, technical characteristics and types of equipment that can be used with it.
It is very easy to get confused in the variety of milling cutter models on the market. Our task is to understand the nuances and make the right choice
Manual electric router - when do you need such a tool?
Having an electric hand router at your disposal, you can easily apply grooves to wooden parts with your own hands, create holes of various kinds, process edges and cut wood panels. With this tool it is easy to install fittings on furniture and even engage in artistic processing of the material.
In production, as a rule, all these tasks are performed by a bulky machine, which is clearly not suitable for domestic use, so for a long time the listed operations were only a dream of a home craftsman, although some could be done manually using other tools (hole punches, chisels, etc.) etc.) The peculiarity of the manual version is that such a device has small dimensions and relatively light weight, which means you do not need a spacious workshop to implement your plans .
In addition, the range of work often covers not only the processing of wooden parts; some mechanisms can handle plastic and even metal. Of course, a manual metal milling cutter will cost you more, because all accessories for it must be made of durable alloys, and the motor must have increased power. After the appearance of the tool itself, they immediately began to expand its functionality through additional devices and attachments. Now some manual milling machines can do more than industrial designs.
Tools for a hand router - what are they useful for?
Among the additional devices for the operation of the router, there are both commercial and home-made options. Sometimes your ideas are so intricate that the manufacturers did not provide a suitable auxiliary structure, then you will have to get creative and make it yourself. Popular devices include a parallel stop, which holds the cutter strictly at a certain distance from the surface, and a guide bar, which can do the same work, but also at an angle. Also, sometimes you may need copying rings, with the help of which you can guide the cutter along the desired curved path without errors; templates are also used for this.
A special device exists for creating elliptical and, as a special case, rounded grooves. They are called compasses, and they themselves are divided into different types. It is not difficult to guess that this mechanism will help cut out the correct circle. Those who have ever made a groove on the end of a door for a lock know that this process is not quick. This is true when using a chisel and an electric drill, but a milling cutter can do this in a few minutes if there is a special device that is quickly attached to the base of the machine. For such narrow surfaces, most often, a small auxiliary part is made by hand.
You will also have to make your own device for creating grooves and grooves in rotating bodies, for example, balusters or posts, then you will not need a lathe, which usually performs such a task.
You're lucky: there's no warping
If the selected board falls into this category, you can consider that the deal is in the bag. Regardless of the length of the board, you can quickly get a straight edge using a planer and jointer. If you don't have one, use a circular saw to file down the rough edges of the board.
A straight edge on this type of board can also be achieved using a router. If the face of the board is not planed, use a guide board that has a smooth face and a straight edge, attaching it to the top of the workpiece, as shown in the photo below. Use a guide cutter with a top bearing. Install the guide board with a slight indentation from the edge of the workpiece - this distance corresponds to the volume of material that will be removed during processing. If necessary, make two passes.
When using this method, press the straightest edge of the board against the rip fence to avoid kickback. Having filed the opposite rough edge of the board (photo on the left), move the longitudinal fence, turn the board over so that its new edge faces the fence, then file the second rough edge (photo on the right).
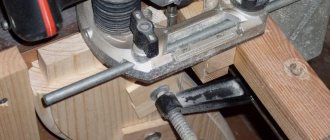
If the sides of the board are planed, fix the guide (it can be a flat board or a homemade or purchased tire) on the workpiece so that when moving along it, the router removes a layer no more than 1.5 mm thick in one pass (photo below) Make as many passes as required to obtain a straight edge.
With the router sole on the guide board, guide the cutter bearing along its edge. Remove no more than 1.5 mm of material in one pass. Use a cutter with an upward or downward helix, or a straight cutter whose blades are longer than the thickness of the workpiece.
Grind a small chamfer on the edge of the face facing the cutter - this will prevent the workpiece from getting stuck when it is fed.
A straight edge can be made on a router table, but it requires a little more advanced setup. First, clamp a straight or spiral cutter into the collet of a router fixed to the table and set the cutter overhang to be slightly larger than the thickness of the workpiece. Adjust the front of the rip fence so that no more than 1.5 mm of material is removed in one pass. Place the back of the rip fence flush with the cutter blades. If the rip fence does not have separate front and back parts, use a clamp or double-sided tape to attach a piece of laminate plastic to the back half of the fence with a thickness corresponding to the layer of material being removed (photo on the right).
Choosing a manual router - how not to get lost in the characteristics?
When purchasing a tool for your own use, you should keep in mind some features of your choice. First of all, let's look at the technical specifications. Power is considered the most important indicator, and the more it is, the better. But in tandem with it, you should also look at the speed of the cutter; if these parameters do not correlate, then the tool will not meet your expectations. High power at low speeds makes no sense and vice versa. It is important to pay attention to the accuracy of the device; an error of about 0.5 mm is quite enough for good quality work in everyday conditions.
It is quite difficult to answer the question of how to choose a good quality hand router at a low cost. It is impossible to do this in any product category; it is better to look for the “golden mean” option, then the price will not be too high, and the material of the cutters and devices will be of good quality. Mandatory functions for high-quality and convenient operation are soft start and speed control. It wouldn’t hurt to evaluate the cutter fastening mechanism and the locking device; reliability is important here, first of all, for your own safety. And the ideal choice would be a hand router with a stop bar, an elevator regulator and a nozzle for a vacuum cleaner.
Setting up the device + (Video)
Before starting the tool, it is necessary to set its depth correctly. To do this you should:
- Install the tool on the part.
- Install the turret stop next to the end of the stop.
- Loosen the locking screw to move the router in the desired direction.
- Lower the engine to the surface to be treated.
- The depth limiter is set at the required level.
- The locking screw is tightened.
- Depth adjustment is complete.
The choice of cutter rotation speed must be determined based on the density of the surface being processed and the diameter of the cutter itself. Typically, for processing wooden products, a speed of about 10,000 revolutions per minute is used, which allows you to obtain an even and smooth cut. A very high rotation speed of the cutter can cause charring of the surface being processed and lead to breakage of the part.
Very hard surfaces are processed with cutters at low speeds, and from time to time it is necessary to run the engine without load at maximum speed, which will allow it to cool.
The choice of the linear speed of movement of the cutter is based on its diameter; the larger it is, the lower the applied speed, which is set by the regulator. When installing a cutter, you must follow the instructions of its manufacturer, which will necessarily indicate the rotation speed and recommended linear speed.
https://youtube.com/watch?v=WAK02CtG6Us
Wood carving with a hand router - step by step diagram
Step 1: Assembling the tool
Inspect the place where the cutter is mounted in your machine; most often, a collet chuck is used for this, so we will discuss this option. First, select the required cutter; it must match the diameter of the chuck. If deep processing is required, an option with an extended shank is suitable. It is also possible to replace the chuck itself (hand tools often offer 6mm and 8mm options) if necessary.
The shank is inserted into the chuck hole and tightened with a special key. This does not require a lot of force; you can accidentally pinch it, which is not the norm for using the tool. However, do not be afraid to reach a good stop so that the cutter does not dangle. Then tighten the spindle lock and the mechanism is ready for use. Start the instrument to feel the start and get used to the sound, because sometimes it is the unexpected that causes defective parts for beginners.
Step 2: Adjusting the Depth
Wood carving with a hand router should begin with setting the milling depth limiter. To do this, we apply the machine to the part from the edge so that the cutter does not yet come into contact with the material. Press it down until it reaches the depth you plan to work on and hold it in place. A more precise value is set using a step-by-step limiter; its step is indicated in the manual for the instrument; turn the knob to the required number of degrees.
Step 3: Milling
Determine the required speed from the table in the instructions, based on the material being processed and the size of the cutter. It is advisable to start working on a draft version in order to try out the operating style of your particular mechanism if you are turning it on for the first time. If his tactics are familiar to you, then the draft version will help you set the necessary parameters directly in the operating mode; right now you need to bring the milling depth to the exact value.
Also, if you haven’t tried working on your tool yet, compare the results after moving the router away from you and toward you, clockwise and counterclockwise. When processing a part around, the correct direction is counterclockwise, and on the flat side, away from you. Next, you can proceed to milling the main workpiece.
Manufacturers
Slab leveling cutters are supplied by various companies. But you should choose not so much a supplier as a specific model. CMT PRO 901.3206 has a good reputation. This product is equipped with replaceable knives. The manufacturer positions it as the best option for inexperienced milling operators.
The technical parameters are:
- outer diameter – 3.175 cm;
- the shank has a cross-section of 1.2 cm;
- height of the cutting part – 0.57 cm;
- total length – 6 cm.
The CMT PRO Z2 also deserves attention. This cutter is equipped with soldered knives. Selected tungsten carbide is used to produce them. The cutting product is suitable for leveling:
- general large-area blanks;
- slabs;
- shields
This property, which in technology is called the shaving angle, allows you to maintain smooth edges and the same bottom in any groove. The main materials processed are wood of varying strengths, particle boards and MDF.
Main parameters:
- length – 10 cm;
- height – 7 cm;
- width – 7 cm;
- weight – 0.15 kg;
- cross section – 3.175 cm;
- torsion rate – RH.
Dimar 1601045 can also be considered an attractive alternative. This leveling cutter has replaceable knives. The manufacturer positions its product as suitable for low-power milling cutters. With a cross-section of 4.2 cm, the height of the cutting part is only 0.6 cm. The cross-section of the tail is 0.8, and the total length is 7 cm. Weight is 150 grams, and there are also as many as 6 working teeth versus 2 in the previous model .
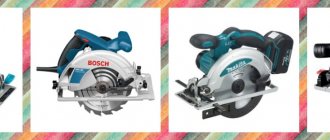
But the list of models can go on for a long time, but it is still worth approaching the matter differently: through a description of their manufacturers. Among the many companies in this area, European suppliers occupy a very good position. We are not just talking about the already mentioned CMT brand.
Many alloys for tools of this kind have been patented in Western European countries. The Bosch corporation alone holds at least 5,000 active patents alone (not counting expired and pending patents).
The production of cutters in the USA also deserves attention. We are talking about brands such as:
- Jet;
- SGS;
- Ondrud;
- Micro100 and a number of similar companies.
The American approach is to use particularly strong alloys. But even against the general background, Best Carbid milling devices stand out. Products under this brand are coated with special coatings, which allows them to work successfully with various materials. There are options for:
- non-ferrous metals of all types;
- nickel-based alloys;
- titanium;
- various grades of steel.
Japanese concerns provide solid competition to firms from the EU and the USA. We are talking about the following brands:
- XEBEC;
- Kyocera;
- NS Tool;
- Mitsubishi
- Dijet.
Japan also boasts an abundance of specific grades of metal. As for South Korean products, they are cheaper than the products of the three leading centers mentioned, but the quality is quite comparable to them. We cannot discount domestic suppliers, such as Globus, Corvette, and so on. Yes, the technology is mostly outdated, but the quality of the materials themselves is quite decent. With Chinese products everything is much more complicated.
Mostly in China, cutters are made from budget alloys with a hardness level of no higher than 55 HRC. There are also harder options, but the raw materials for them are imported. It is recommended to purchase milling equipment from major manufacturers. Firms Jtol, Djtol are distinguished by excellent production equipment. Their products are at the same price and quality level as products from Europe.
Working with a manual wood router: features and video tutorials
Those who love carpentry, i.e. woodworking, should definitely know how to use a hand router. With the help of such a device you can create real masterpieces without any effort at all. However, this will require work skills and knowledge of what this tool consists of, how to assemble and disassemble it. Using a hand-held wood router, you can create a beautiful door, decorative furniture or other original objects. You can even open your own business making a variety of wood products.
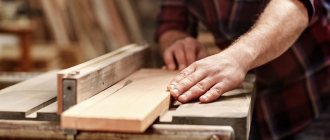
Cutter with support bearing
The most elementary and compact device that sets the position of the machine is the cutter itself, if it is supplemented with a miniature ball bearing.
It is located under or above the cutting knives and, accordingly, rests on the upper or lower edge of the edge. With the help of such equipment, shaped edges are obtained or grooves are cut for a connection, edging, seal, etc. The advantages of the method include the ease of preparatory operations (you only need to adjust the vertical position) and the ability to accurately process rounded and curved edges (a typical example is a tabletop). The disadvantages follow from the advantages - it will not be possible to make a curve straight.
Types of milling work
The milling cutter is a unique device that makes a large number of rotations per second, while creating holes of the required diameter and shape. The work performed is divided into several categories . The holes that are created by a router are almost always part of a detachable or one-piece structure that decorates the product.
It is necessary to consider in more detail the work carried out using a router.
- Profiling of products such as cornices, platbands, skirting boards, glazing beads, etc. is carried out using an edge. Such work is suitable for furniture manufacturers. This is a great solution for decorating wood products.
- Decorating the edges of complex products using a router helps create an exclusive product. A professional can even create a masterpiece. For beginners, a video will help in this case. This process is necessarily carried out using templates. They help create identical patterns over large areas.
- Using a wood router, simple everyday problems can be solved. For example, it is necessary to make recesses for locks or for awnings. A special milling cutter is used for this, but for home work you can also use hand tools.
How to choose cutters
All woodwork is carried out with special cutters. They are selected based on the type of work that will need to be carried out and the type of wood that is milled. On the Internet you can find a large number of videos that explain in detail and clearly show what a cutter looks like and how to choose it correctly.
The cutter is a component of the router and consists of a shank and a working element with a cutting edge. They are distinguished by:
- cutting edge shape;
- the type of material from which they are made;
- size;
- designs.
Thus, for working on soft wood, lightweight materials for the cutter are needed. And for making an object from hard wood, preference is given to “hard” cutters.
The cutters are:
- cone-shaped;
- V-shaped;
- disk;
- Swallow's nest cutters;
- profile;
- rectangular grooved;
- moulding;
- folded;
- fillets.
How to choose a wood milling machine
Hand tools used for processing wood and wood products at home include a wood router.
This tool has an extremely wide range of applications and is used for various manipulations carried out with wooden products or parts. However, to successfully work with such a tool, you need to choose the right model for a certain type of work and choose the right attachment. The types of wood processing machines, as well as various attachments for performing work, will be discussed in this article.
Purpose and scope of application of manual milling cutters
The main purpose of hand-held wood routers is to process small wooden parts of any installation. Basically, such machines are used for work at home, and they are designed in such a way that you can work with them even without special skills and experience. The scope of application of such a machine is very wide. So, they can be used for:
- trimming or grinding off excess layers of wood;
- creating holes in wooden parts (including holes for door locks and handles);
- turning wooden parts, including various planks, bars, boards;
- installation of wooden windows;
- door installations;
- processing wooden baseboards and so on.
A manual wood router is designed for small parts only and cannot be used for large pieces of wood or large installations.
Universal router device
To make maximum use of a hand-held device, the master must be familiar with the design of the device and the purpose of its main parts.
The main part is an electric motor hidden in the housing. Holders with collets are inserted into the body. Collets are adapters for using cutters of various sizes.
The cutters are inserted into the collet and secured with a special button or a clamping bolt.
The body is placed on the platform by two rods. The platform is made of metal and is quite massive and stable. Attached to the bottom of the platform is a smooth sliding plate that allows the tool to move smoothly across the part.
The body also contains a “Start” button and a tool lock button. The operating mode is selected using:
- Knobs and adjustment scales that can be used to adjust the milling depth. They allow you to adjust the depth with an accuracy of 1/10 mm.
- Speed switch. For those who are just starting to get acquainted with the tool, it is recommended to work at medium and even low speeds.
Some modifications have a parallel stop that allows you to move the cutting part to the left or right. This is very convenient for some types of wood milling work.
According to their intended purpose, hand-held devices are divided into the following types:
Top type milling cutters are either stationary or submersible. In stationary devices, the cutting part cannot move along the body. Therefore, to adjust the processing depth, the master is forced to move the entire tool, which requires certain skills and experience.
When choosing a unit, preference is often given to plunge cutters. In them, the motor is located on guides along which it can move along with the cutting part. In addition, in the submersible type of devices there is a spring, which is responsible for raising the nozzle at the end of work.
Milling wood with a manual edge milling machine involves chamfering and processing the edges of workpieces. When using different attachments, you can process not only straight, but also shaped surfaces: for example, make skirting boards or process shaped door panels.
The lamella type is used to create various grooves. Of all the types of hand routers, it is the most highly specialized.
Types of milling machines and their brief description
All machines are divided into several groups:
- depending on engine power;
- by type of impact on the material.
These characteristics affect the scope of application of the device. Depending on the engine power, all wood milling machines are divided into:
- heavy;
- moderate severity;
- lungs.
If we talk about specific numbers, then in heavy machines the engine power reaches 1200 W. However, such devices are most often used for professional work, and not for home manual work. Much depends on the desired scope of application of the device, the frequency of its use and the specific type of work performed.
Medium-heavy machines have motor power from 750 W to 900 W. Such devices are most often used for home wood processing. They are quite functional, this power is enough to perform almost any household work in which it is necessary to use a wood router. Using a machine with an engine of this power, you can engage in decorative wood processing and furniture assembly.
Important Specifications
Main technical parameters that matter during operation:
- Electric motor power. The powerful milling cutter easily, without overload, performs shallow sampling and copes with deep ones. Costs – higher energy consumption, weight and cost. There are milling cutters on sale with power ranging from 500 W to 2,500 W.
- Speed. The higher the speed, the cleaner the processing. The downside of the advantage is that the higher the speed, the less the rotational force of the cutter, the greater the load on the spindle bearings. The maximum speed of modern milling cutters is from 20,000 rpm to 33,000 rpm.
- Weight . For hand tools, this is important, since it is more difficult to work with a heavy tool. It is less maneuverable and your hands get tired. There are milling cutters on sale weighing from 1.2 kg to 6.5 kg. Weight depends not only on power. High-quality models use expensive, lightweight and durable magnesium-aluminum alloys, while cheaper ones use heavy ferrous metal.
Choosing a cutter
The processing of a wooden part is carried out directly with a knife-mill. Different knives are used for different types of processing.
Choosing the right cutter for a manual wood router is the key to successful wood processing.
In general, all cutters can be divided into several categories:
End mills are one of the simplest in design. Outwardly, they resemble ordinary drills, but at the end of the working length they do not have a conical part. One of the main features of such cutters is that their end part also has cutting teeth. This means that end mills can be used for:
- cutting wooden blanks;
- quarter samples;
- edge processing;
- creating a through-type groove;
- drilling.
These knives are also used to process the contours of wooden parts and stepped surfaces.
The purpose of groove cutters is consistent with their name - they are used to create grooves of various shapes and sizes on a piece of wood being processed. However, groove cutters for a wood router can be divided into several categories:
- Direct. Used for making grooves in rectangular profiles.
- Shaped. With their help, it is possible to create a groove of a certain shaped configuration, depending on the cutter.
- With dovetail configuration.
- Cutters for creating T-shaped grooves.
- Cutters with a cone-shaped working part (used to create V-shaped grooves and for performing engraving work).
- Fillings (for decorative processing of wood products).
Cutters, called edge cutters, have the largest number of subtypes and divisions. They are the ones most often used when working with a wood milling machine. They can be:
- straight;
- curly (or profile);
- fit;
- cone type;
- moulding;
- fillets;
- microspike.
Straight cutters are also called copy cutters. Most often, they are equipped with special bearings that guide the actions of the knife. Thanks to this, it is possible to create perfectly smooth edges on the surface of a wooden product.
A profile or shaped cut is designed to give the edge of a wooden product a certain shaped design.
Cutters called figurine cutters are used mainly for making skirting boards.
Cone cutters are used to process a product at a specific angle. It is possible to achieve this processing format due to the fact that such a cutter knife is equipped with a guide bearing.
Moulders are used to round the edges of wooden beams. Most often they also have a guide bearing.
Fillet, like molding, are intended for processing a cut in the shape of an arc. However, their main feature is that they can give the product not only a convex, but also a concave shape. If you compare molding and fillet cutters, you will notice that they are a mirror image of each other.
A micro tenon cutter is used to create tenons. The thin triangular tenons created with this tool are used to join two pieces of wood together. With the help of these spikes the joints are strengthened.
Precautions and safety precautions when working with manual milling machines
Basic safety rules when processing wooden products with your own hands using a wood milling machine are described in the operating instructions supplied with this device.
Before you start working with a new tool, you must read its operating instructions. This will protect the person working with the machine from injury, and the machine itself from damage and early depreciation.
Moreover, when working with such a tool, it is recommended to wear safety glasses and a respirator, due to the formation of large amounts of dust. These precautions should not be neglected. Moreover, it is necessary to wear headphones or earplugs on your ears, which will protect your hearing from the negative effects of noise of this level.
In the absence of special protective equipment, you can get by with ordinary cotton wool, which is plugged into the ears.
As can be seen from the material described in this article, when choosing a machine for manual wood processing, you should pay special attention to the functionality of the machine and its intended purpose, as well as the scope of application. For processing wood products at home, manual wood milling machines are quite suitable, but the modern market also offers many models of CNC (computer numerical control) machines. Is this machine functional? Yes. However, it is not suitable for small-scale work at home as it requires great operating skills and knowledge of numerical programming to operate this machine.
Hairiness of wood
There are also nuances associated with the structure of the tree itself. Because Since wood consists of very small fibers, during milling some of them fluff up and a pile forms on the surface. This pile is quite difficult to remove, and sometimes it can even ruin the entire product, this is especially pronounced when working with soft wood (alder, linden, pine). Its processing is carried out manually, the product is brought to the desired roughness by the modeller. The same goes for tree rings. The selection of tools also depends on the type of wood. In general, it is much easier to work with hard woods such as oak, beech, and ash. Products made from them are more durable.