How to make a rope yourself?
Sometimes you need thick or decorative rope, which is not so easy to find in stores. It can be used for decoration, in construction, for clothing, bags and so on. You can knit this lace yourself. Depending on the length needed, the amount of materials is selected. The choice of yarn for this purpose is also up to you. For example, for decorative rope, yarn made from materials such as:
- mohair;
- wool;
- wool mixture;
- merino;
- acrylic;
- cotton.
It will take little time to make a clothes rope, because its length usually does not exceed two meters. This accessory is used as a belt or as aran patterns on clothes. Separately, you can tie original knots and then decorate a sweater or cardigan with them. Such creative clothing items will be appreciated by handmade lovers. In addition, the demand for handmade items is very high abroad and you can make it to order, the main thing is to find a sales channel on the Internet.
If you are interested in unusual jewelry, then pay attention to thick knitted yarn. It is from this that non-standard neck jewelry is obtained. They can be made either according to standard patterns, or you can come up with patterns yourself, because this will only benefit the product. Spaghetti knitted yarn resembles a T-shirt cut into ribbons, but looks much neater. The thickness of the knitwear is the same along the entire length, so the accessories made from it have a dense, uniform structure.
Such ropes are easy to make at home. As a rule, they are knitted very quickly and require a minimum of additional fasteners to give the product a finished look. Necklaces are in greatest demand. Despite their massiveness, they look very gentle and original, and fit almost any style. By adding beads to such a necklace, you will get an expensive-looking and stylish decoration.
Making balls as decorative elements
- Inflate the balloon to the desired diameter.
- Lubricate the string with glue. To do this, apply drops of glue at a distance of several centimeters from each other, and then rub over the surface of the rope, without smearing it along the entire length. An end that is too long, smeared with glue, may dry out while it is not yet wound onto the ball. Starting from the middle of the ball, wrap the entire surface with twine greased with glue, without adhering to any order in winding. In this case, there should be gaps between the individual threads, as well as a hole for removing the ball.
- Leave the ball to dry. Drying time depends on the amount of glue used. After proper drying, the ball should retain its shape when pressed on its surface.
- Carefully coat the dried product with varnish.
- Puncture the balloon and remove it from the finished product.
Such crafts can be of different sizes and colors. As an independent decoration, these interesting products can transform the interior of a room. Similar ideas can be used when making decor in the form of a vase for dried flowers or flowerpots.
How to make a rope from plastic bottles with your own hands?
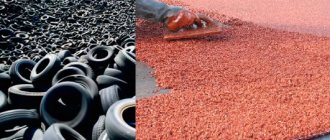
In order to weave a strong thread, it is not at all necessary to choose expensive yarn. Sometimes scrap materials that can be found in every home are quite enough. Even seemingly useless items such as plastic bottles are quite suitable for this purpose. Weaving a rope from a bottle is quite simple. First you need to cut it into thin long strips and gradually weave it together. Plastic weaving is done manually or using ordinary cosmetic tweezers.
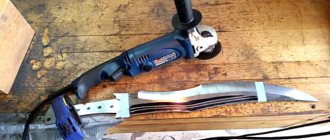
To make a rope from plastic bottles, for convenience it is better to make your own machine. This is a simple design that anyone can do.
We will need:
- wooden block of any size;
- blade;
- 2 nails.
Manufacturing of the machine
So, take a wooden block and drive 2 nails into it (5-6 cm from the edge), not too deep. Cut off the heads of the nails and bend the nails to the sides.
After this, carefully saw the block at a distance of 4-5 cm from the edge, but not all the way. We process the cut with sandpaper. Then we make another cut - across the first cut. It should be as deep as the width of the blade.
We insert the blade into the cut and clamp it with nails.
How to use this machine? We insert the bottle into the through cut, do not forget to cut off the bottom first. We rotate the bottle around its axis. As you can see, the bottle is cut into a thin strip.
Once you have cut your plastic bottle tape, you can make it more durable. To do this, you need to hold it over a hairdryer or gas burner, twisting it a little. After this treatment, the tape will become shorter, narrower, but several times stronger!
In childhood, weaving laces and wreaths from grass was common. For this purpose, plants of a special variety were chosen: hard and sharp, they could very easily cut you. Blades of grass woven into flagella also made a fairly strong rope. Typically these are used in the construction of small rafts or boats. This fun is probably familiar to everyone from childhood. In the modern world, grass fibers have been replaced by cotton fibers and are successfully used to make natural products. Particularly strong threads were obtained from nettles. This procedure had to be carried out wearing protective gloves, otherwise the fingers would quickly turn red and begin to itch. However, the result was worth it, and the rope came out strong. After drying it in the sun, it was possible to weave a small string bag. Nettle ropes are widely used in authentic style. They are completely environmentally friendly and even have some healing properties.
Of course, the most common are thread ropes. In terms of strength, nothing can compare with them. It's all about the number of individual threads, because the more there are, the stronger the product will be. Often, for this purpose, floss threads are used, immediately divided into fibers. There are many techniques for creating round or flat ropes from embroidery thread.
As for purely decorative items, paper ropes can be used for this purpose. First, the material is prepared, namely, the creation of paper tubes. Take a regular sheet of newspaper, roll it into a thin tube and carefully seal it so that it does not unfold. The workpieces must dry for some time, after which they are completely ready for work. By making a long rope, you can use it to knit baskets or organizers for small items.
There is a whole manual on how to weave a reliable rope from twine. Three-strand weaving from such a dense material will help make a strong rope. after all, in appearance it resembles an ordinary woman’s braid. To prevent the twine rope from unraveling, it is advisable to singe the ends before starting work. They will be securely fixed, and you can safely get down to business. Weaving a rope is a very exciting process that develops fine motor skills, attention and concentration.
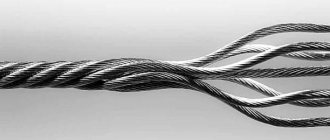
Production of steel ropes (cables)
Steel ropes or cables are designed for lifting and moving loads, for use in block-transfer devices or for earth-moving mechanisms. Galvanized materials are used to protect against moisture and corrosion. There is a classification of metal ropes.
By type of fiber lay:
- Spiral - consist of one strand containing several strands of wire.
- Double - twisted from several strands, usually up to six.
- Triple ones are the most durable, as they are made from several double ropes.
According to the method of lay placement and direction:
- Combined;
- Spot;
- Strip;
- Linear.
The production of cables begins with steel wire with a diameter of 0.6 to 8 millimeters. The first step is to curl several threads together to form a strand. All cables have different purposes and characteristics of elasticity, stretching and strength, so the number of threads varies.
The wire is wound onto a wheel and then sent to the twisting machine. A strand can contain up to 60 wires, but the standard twist is from 19 to 30.
Next, the threads enter the drawing ring, which sets the diameter of the strand and is responsible for uniform winding. A lot of lubricant is used at this stage. It is necessary for twisting and mobility of the wire inside the bundle - this allows you to increase the elasticity and service life of the cable. After twisting, the grease is removed with a round rubber spatula.
The next stage is rolling between large rollers. This allows you to remove internal tension, align the cable horizontally and avoid unwinding of the bundle. After all the work, the finished product is wound onto a round blank. To get a very strong cable, for example, for construction equipment, you need to twist several strands together. For this purpose, a rope-twisting machine is used. She gives the bundles a spiral shape and directs them into a nest, where they are wound onto exactly the same bundle - a core, which adds strength. To avoid errors in diameter, the cable is calibrated on horizontal and vertical rollers. After this, the cable is wound onto a steel reel and it is ready for shipment.
To ensure quality, the laboratory conducts random testing. Using a machine, the cable is stretched until it breaks and its breaking force and maximum load are measured. Mining operations require cables that are protected from corrosion. To do this, they are coated with plastic in two layers, heating the plastic in an extruder and squeezing it onto the cable through a pulling device, and then cooled in water. This coating additionally avoids friction of the wires against each other and extends the service life by 1.5 times.
How to make a rope weaving machine with your own hands?
Making ropes is an activity that seems simple at first glance. Often, having started a task, many are faced with the fact that the work is progressing too slowly and the result does not live up to expectations. To make things go faster, you can make your own machine for twisting threads. The creators of Lego sets managed to modernize even such a thing, and now you can already find a real machine that twists ropes.
For twisting, five coils are taken at once. The threads are connected together, secured, and the machine begins its work. Moreover, it is electronic, which helps save a lot of time and effort. The creators note that you can make such a unit yourself from Lego parts that you have at home. It takes up little space and can twist ropes of completely different diameters and densities. The developers offer to modify it according to your wishes and diversify the functionality of the actions. In this case, rope weaving turns into a real exciting process, interesting not only for adults, but also for school-age children.
Personal organizer
This device is very useful for storing and conveniently using office supplies.
To make it, in addition to the materials listed above, you need to prepare cardboard boxes of various sizes and decorative details: beautiful ribbons, sequins, beads, rhinestones, etc.
- You need to find it on the Internet or draw a sketch of the future product yourself. In this case, you should indicate the location of the design parts and their decoration.
- A layer of glue is applied to the boxes in small strips, and then rope is wound around them. For convenience, the rug with the craft rotates, and the spool of twine remains stationary. Each next turn is slightly pressed against the previous one. With strong pressure, a soft row of glue-impregnated twine may lose its intended shape and become deformed.
- The bottom is covered with rope from the periphery to the center in a similar way.
- While the first part is drying, you can start wrapping the next elements of the craft with rope. Then you need to wait for the design blanks to dry completely.
- Glue the elements into a single structure according to the sketch and decorate with available decorations.
- After drying, the craft is varnished.
Such an organizer does not require large financial expenditures, and its uniqueness is guaranteed, since it is made by hand. Such leisure often becomes a family activity, and time spent with children will benefit them by developing their teamwork skills and the ability to finely coordinate the work of their hands and fingers.
How to make a clothesline on rollers?
Weaving rope at home, of course, should have a practical side. Typically, such products are successfully used as clotheslines on the balcony for drying. When you have ready-made rope at hand, it is very easy to replace it in time, so it is better to prepare it in advance. Despite the enormous popularity of metal indoor dryers, most housewives prefer to dry clothes outdoors. This way it dries faster and has a natural, pleasant aroma of freshness.
It is best to dry clothes under a canopy. To make it convenient to remove and move, they came up with clotheslines on rollers. The mechanism is very simple: rollers are installed on the supports, and the rope is pulled over them in a closed ring. Thus, an elongated circle is obtained. The rollers rotate, and at this moment the laundry moves along with the rope. A similar design is installed not only under a canopy, but also on open balconies of multi-story buildings.
A clothesline on rollers is a universal tool that is suitable for drying clothes on a balcony, loggia, street, or under a canopy.
This is especially true for structures installed behind the railing of a balcony or window. This can often be seen in hostels. This is a universal system that makes life much easier for housewives. At the same time, the laundry looks smooth and fresh, and it can be dried in much larger volumes due to the double rope.
Preparatory process
To work, you should purchase the following materials, tools and accessories:
The most widely used twine is made from jute fibers. You can purchase it in most hardware stores on spools or in reels. They also indicate the length of the twine. The thickness of the thread also varies - from 2 to 10 threads per twist.
The choice of thickness depends on the creative intent of the author. For jute filigree - no more than 2 threads, small crafts - 4 threads, for large crafts you will need a thin rope of 5-10 threads.
The price of a rope, other things being equal, depends on the number of knots and impurities in the source material. Rope shades vary from very light brown to darker colors. However, jute is easy to dye.
The easiest way to paint the finished product is with acrylic paints. It is also permissible to color the string before starting work. Having previously discolored the rope, painting is done with vegetable or food compositions.
Adhesive compositions
The most commonly used are various modifications of the adhesive compositions “Athlete”, “Titan” and “Master”. Convenience of working with them is ensured by easy absorption into the jute base of the craft and removal without a trace from plastic surfaces.
It is recommended to place the glue in a container with a small outlet to facilitate accurate dosing of the amount of substance applied. Beginners are advised to use polyvinyl acetate glue (PVA).
To cut the rope at the very base, use small scissors with rounded ends. Regular cleaning of scissors from dirt will preserve their cutting properties for a long time.
Protective gloves
To avoid the risk of contamination by adhesive, especially if you are allergic to the materials used, the use of rubber gloves is strongly recommended. If there are no contraindications to the glue, before starting work, you should cover your hands with a layer of nourishing cream.
Work mat
To protect the table surface from contamination, including glue, plastic mats are used. If you don't have one, you can lay a plastic file.
After completing the work, the craft is coated with acrylic varnish. It is sold both in aerosol packaging and in cans. The last option is more economical. A layer of varnish is applied with a brush, and it covers the entire surface of the craft.
During the application of varnish, a creamy layer is formed, which disappears after drying, turning the surface into a glossy one.
Due to the toxicity of varnish vapors in cans, it should be used outdoors.
After acquiring everything necessary for making crafts from twine, you can begin to master the technique of work. You should start with the simple ones.
How to make a twisted rope?
The strongest strands are those twisted several times and consisting of many thin threads. The more such threads there are, the better. A twisted, strong rope is best made from twine. Only then will it last a long time and perform its function 100%.
For added strength, braid several braids and then join them into a single rope. This rope can be used in construction, repairs or other household issues.
Crochet
This knitting method allows you to make a rug, a stand for dishes, a napkin, a cover for a chair, a vase, or a flower pot from twine.
Help in mastering the necessary skills can be provided by photo and video master classes posted on the world wide web.
The jute fibers from which the rope is made are environmentally friendly, and in addition, they can easily withstand washing and do not lose their original elasticity after washing.