The device of a carpenter's vice
This device is very simple in design, reliable in use and can greatly facilitate the work. Its advantages:
- Possibility of installation anywhere in the workshop: on a workbench or on a self-made support.
- If its use is not required, it can be dismantled before the need arises.
- Ensuring the safety of work - the workpiece cannot slip out.
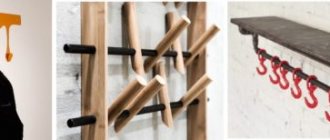
Working principle of a vice
The carpenter's vice consists of the following components:
- support including stationary parts;
- movable jaw for clamping;
- two scenes that ensure the movement of parts;
- lead screw;
- a knob that transmits torque to the lead screw.
The support of the device is fixedly attached to the surface of the workbench or a separate rack using long self-tapping screws or bolted connections. Many serial models of bench vises involve the use of replaceable bars on movable and fixed jaws.
Components of a carpenter's vice
They depend on what workpieces are supposed to be clamped. To increase versatility, these strips are made from steel or polymers. They allow you to protect clamped parts made of soft material from deformation.
Many bench vices have a spring device that makes it easier to clamp large wooden workpieces. It is also possible to install a similar unit on a device assembled independently.
With its help, it is easy to pre-fix the part, but by clamping it with a lead screw. If this mechanism is absent, the product must be held manually under its own weight until it is fixed, which significantly complicates the work.
Assembling a carpenter's vice with your own hands
Vice assembly diagram
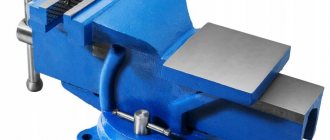
A vice is a simple device, easy to purchase in a store; there are various models on the market, but most often they are made of steel. And cast iron is sometimes used for the bed.
Many models have holes for fastening to a table; a vice of this type is quite convenient to use, but home craftsmen cannot always afford unplanned expenses. Often standard devices are not suitable for the conditions of a particular workshop or the work being performed.
An acceptable option that does not require significant financial investments is to assemble a carpenter's vice with your own hands. At the same time, a homemade workbench will cost even cheaper.
To make this possible, at the first stage it is necessary to develop a sketch and prepare the necessary components. Clamping jaws can be made from wooden beams. A piece of metal, serving as a fixed jaw, is attached to the upper bench plate and will serve as the load-bearing support of the device.
One of the important components in the design is the clamping screw. Its diameter must be at least 20 mm. The greater the length of the element, the larger the parts it will be easy to clamp with a vice.
You will need two steel scenes; any rods with a diameter of at least 10 mm are suitable for their manufacture.
Machine tools
As stated above, it is most profitable to make a machine vice with your own hands. They greatly simplify drilling work, and the material for the machine vice is suitable for almost any available material: from a channel, see video:
to plywood, see story:
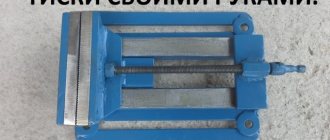
And again sponges
The strength and stability of the jaws for a machine vice is even more important than for a bench vice: if a drill (cone, cutter) turns a part out of them, this can lead to serious injury. And so, we return to the question above: what are the vice jaws made of? From a corner from 40x40x4. In this case, the entire sponge will work not for shear, but for bending, to which the metal resists much more strongly. This is the case when less iron turns out to be stronger.
But not every corner of the same size is suitable. A drawn and cold-rolled corner (pos. A and B in the figure below) is unsuitable - the metal is rather weak. The jaws of both homemade and metalworking and machine vices must be made from hot-rolled angle (pos. B). Firstly, it is much stronger. Secondly, the range of its standard sizes is wider: if the thickness of the flange of a cold-rolled general-purpose angle is up to 0.1 of the width of the smaller one, then for a hot-rolled angle it is up to 0.2b. That is, you can find a hot-rolled angle, say, 60x60x12 - the vise jaws from it will be quite reliable.
Types of steel angle
A hot-rolled angle is easy to recognize by the type of cut: the entire edge of the outer corner is always sharp (shown by the arrow on the left in the next figure), and inside it there is a fillet larger than that of a cold-rolled angle. If the vice is assembled by welding, both equal and unequal angle angles will do. If you assemble them with bolts, it is better to use an unequal shelf with a shelf width ratio of (1.5-2)/1 (a/b = 1.5...2/1). In this case, the large shelf is laid horizontally!
Angle steel machine vice
The design diagram of a homemade machine vice from a corner with bolts is given in the center in Fig. on the right are drawings of their general appearance. The slider and bracket for the clamping screw are bent from a steel strip with a thickness of 1.5 mm. The screw in it can be fixed with a groove, because its fixation works only when the movable jaw is retracted and is loaded negligibly. On the clamp, the tail of the screw rests directly on the sponge; the screw itself is M16-M20. For more information about homemade machine vices from a corner, see the video:
The importance of the collar
The carpenter's vice is controlled by means of a crank that transmits torque to the lead screw. This is also true for a homemade device. The driver can be a steel strip or tube of the required length, inserted into the groove or hole in the head of the threaded screw.
Vise parts including knob
The size of the groove being made or the diameter of the hole must correspond to the thickness of the strip used or the diameter of the rod. The amount of force applied when clamping the workpiece depends on the length of the driver.
It is permissible to use a regular wrench for this part, into the socket of which the head of the threaded screw is pressed. It is easy to fix the nut to the required size on the screw. But you need to securely fix the key so that it does not come off at the most crucial moment.
But it is better if the knob is made of rod, with free sliding through the hole in the threaded screw; this approach will make the work as easy as possible.
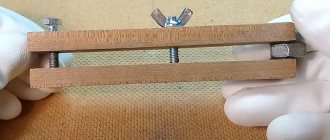
Wooden fixtures
Drawing of wooden jaws for carpentry vices
To make the movable and fixed jaws of a bench vise, you will need two blocks of wood. It is recommended to use pine wood; this material is characterized by the required softness and strength at the same time.
Holes of the required diameter are drilled: two for the scenes, one for the clamping screw. To ensure a fit for both holes, it is recommended to drill simultaneously by pressing the two jaws together. Considering the nature of the material used, nails must be used for this purpose; they are removed after drilling.
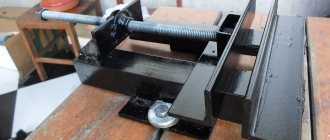
Installation procedure
When all the preliminary work is completed and the parts are prepared, you can begin directly installing the vice. We fasten the slides coming out from the rear edge of the frame with nuts, having previously cut the threads. The nut should also be screwed onto the screw. To ensure its fixation, a corresponding groove is made on the surface of the frame, in accordance with the dimensions of the nut.
Mounting a carpenter's vice
After installing the fixed frame, screw and slides, a movable jaw is installed. A nut and locknut are screwed onto the edge of the threaded screw, extending beyond the front surface of the moving jaw, with an inserted washer, to ensure fastening.
After all the elements are secured, the knob is installed.
The carpenter's vice is ready for use. When turning the knob, the screw enters the nut on the stationary frame and attracts the movable jaw.
Making a wooden vice yourself is quite simple. In addition, they can be made according to the dimensions of the parts being processed. The location of the scenes and the length of the lead screw depend on this. The jaws can be extended and two clamping screws can be made to allow longer parts to be clamped. Here everyone must independently determine the required dimensions, depending on what work the vice will be used for.
Project and drawings
When developing the design of a carpentry workbench, the most important criteria are height, configuration and equipment. In addition, it is necessary to take into account who will use the desktop - left-handed or right-handed.
Considering that you will have to work at a carpentry bench for a long time, the closest attention should be paid to the height of the future structure. For people of average height, experts recommend making a table no higher than 90 cm
Drawing of a carpentry workbench
When determining the distance from the floor to the tabletop, it is best to focus not on average parameters, but on the features of your own anatomy. It is optimal if the upper cut of the legs is at the same level as the hands. If you calculate this parameter taking into account the thickness of the tabletop, then you will be able to work tirelessly at such a workbench for several hours.
The machine cover can be made of boards, solid wood or plywood and is a composite structure. It is not recommended to use chipboard or OSB for these purposes. Professional carpenters have long determined the optimal size of the tabletop - a maximum of 2 m in length and 0.7 m in width. On such a workbench, you can make both a prefabricated wooden door and a small window with equal convenience.
When designing a structure, do not forget about the strength of the supporting frame. For supporting elements of the structure, timber with a cross-section of at least 100x100 mm is used. As longitudinal and transverse reinforcing elements, it is allowed to use slats and beams with a smaller cross-section - from 50 - 60 mm or more. The joints of the parts are mounted on tenons or dowels; furniture corners and other fittings are used for strength, and all connections are made using bolts and self-tapping screws. Nails will not be able to provide the required stability and fundamentality of the structure.
Carpentry workbench. View from above
Next, let's look at a project for a carpentry table made from plywood, or more precisely from two plywood sheets 1.8 mm thick glued together. The dimensions of the lid are 150x60 cm. The edges of the tabletop are reinforced with plywood strips, which increases its thickness to 72 mm. By the way, the presented dimensions are not a dogma and can, if necessary, be adjusted in accordance with the needs and characteristics of the specific room used as a workshop.
Vise with pressed nut
This type of workbench vice is simpler in design than the one above. The device is distinguished by the vertical arrangement of movable and fixed jaws.
The movable jaw is attached at the bottom to the stationary installation by means of a steel bracket. A threaded screw is placed in the middle of the parts. For fixation, the nut into which it is screwed is pressed into a steel U-shaped profile, attached with self-tapping screws to the rear surface of the stationary jaw.
To prevent the nut from popping out, pressing is done using a hot method - with pre-heating of the profile, which will make it easier to clamp the nut. The collar is attached similarly to the previous model. Steel angles are mounted on the clamping surfaces of the jaws. These vices are not intended for massive products, but are quite compact and easy to use.
Instructions for making a vice: option No. 2
Homemade vices do not require complex design developments and calculations. You can use numerous photos and drawings of such devices, which are easy to find on the Internet. A fairly simple, but at the same time very effective design is created on the basis of metal pipes.
As is known, pipes used for the installation of water and gas pipelines are manufactured in such a way that a product of a certain diameter fits tightly into a pipe of a subsequent standard size. It is this feature of the pipes that allows them to be used for such a device as a homemade bench vise. A visual drawing, photo and description of the manufacturing process will help you make this vise yourself.
Drawing of a homemade vice. Below are two photos of the finished product.
The structural elements that will make up a homemade vice are:
- a piece of metal pipe that will act as the internal moving part of the device;
- a piece of metal pipe of the following standard size, which will serve as an external fixed part;
- running nut with thread diameter M16;
- lead screw with thread diameter M16;
- a knob through which rotation will be imparted to the lead screw;
- front and rear supports, due to which the stationary pipe will be fixed to the base;
- pieces of rectangular pipe (future clamping jaws of a vice);
- two lock nuts with thread diameters M16 and M18.
Two main parts of the vice (movable and fixed)
To make such a vice with your own hands, you begin by welding a flange to the end of a section of a larger diameter pipe, which will act as a stationary element. A nut with an M16 thread must be welded into the central hole of the flange. A flange with a central hole into which the lead screw will be passed is also welded to the end of a section of a movable pipe of a smaller diameter.
At some distance from the edge of the lead screw, an M18 nut is welded to it (it will become a fixing element). After this, the end of the lead screw, to which the nut is welded, must be passed through the inside of the movable pipe and inserted into the hole in the flange. In this case, the nut should press against the flange from its inside.
Vise assembly (in the photo there is a hammer clamped in it)
A washer is put on the end of the lead screw protruding from the outside of the flange and an M16 nut is screwed on, which is then welded to the screw. A washer must also be installed between the inner nut and the flange surface, which is necessary to reduce the friction force. To correctly perform this stage of making a homemade vice, it is better to focus on the corresponding video.
After the movable vice assembly is assembled, you should insert it into a fixed pipe of a larger diameter and screw the second end of the lead screw into the nut of the second flange. To connect the lead screw with the knob, a nut or washer can be welded to its end protruding from the side of the movable pipe, into the holes of which the knob will be inserted.
The clamping jaws of such a vice can be made from sections of rectangular pipes, which are welded to the moving and fixed parts. To give the structure stability, two supports are welded to the bottom of the fixed pipe, for which corners or rectangular pipes can be used.
The inner tube can also rotate during the rotation of the lead screw, which makes the use of such a vice very inconvenient. To prevent this from happening, a longitudinal slot can be made in the upper part of the stationary pipe, and a locking screw can be screwed into the movable pipe, which will move along this slot and prevent rotation of the movable part.
Many photos of homemade vices of a similar design show devices whose moving and fixed parts are made of square or rectangular pipes. The use of such pipes also avoids rotation of the moving part of the vice.
The vise of the described design, authored by V. Legostaev, is a reliable and effective clamping device, easy to maintain and repair, which makes it very popular among home craftsmen.
If you do not plan to heavily load the vice, then it is quite possible to make it from wood according to a simple scheme
Carpentry tools from auto parts
With some creativity, it's easy to make a vice out of old scrap parts, such as car shock absorbers. You should also choose:
Homemade bench vise
- steel corner profile;
- M20 nut;
- hairpin;
- rod from the gas stop for the knob.
The vice is attached to the workbench through holes drilled in the corner parts of the shock absorbers. Bolts with conical heads are used; if the car parts are annealed, their movement will become easier.
Any non-professional can make this simple but very effective device on his own, if he has never had to do plumbing or carpentry work before. But the benefits for the economy will be significant.
Using old mechanisms and scrap metal at hand
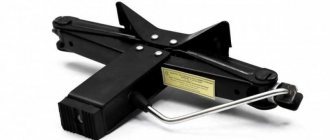
A high-quality new channel, angle, plates are not the only suitable material for making your own vice.
An old jack will work as a basic mechanism. For ease of work, a support plate is made (or pipes with a rectangular profile, as shown in the illustration) and clamping jaws are welded - also from a pipe or channel, angle. Do-it-yourself jack vices are no less convenient than industrial ones.
Another budget option is a rail vice. Considering the load capacity of this rolled metal, the model turns out to be very powerful. It can also be used as an anvil, the main thing is to securely fasten the product to the workbench.
For those who work primarily with wood, a wooden vice would be a good solution; making them with your own hands is easier and faster - no welding is needed, the parts can be sawed off by hand. The main thing in this model is to select suitable threaded elements.
The option shown in the photo is designed to be permanently attached to a workbench. To make a quick-release version, it is better to make the base part with a plate that is bolted to the workbench.
For milling and carving, models with double-sided clamping are convenient - this design allows you to center the workpiece and/or move it during operation without removing it from the vice.
If the clamping force required is not very large, but you often need to change the position of the parts or the parts themselves in the jaws, you can look for a cam mechanism and make a quick-clamping vice. In this version, the screw clamp is replaced with a small cam; the clamp can be loosened or strengthened by slightly turning the lever.