Most modern synthetic cables used in yachting have a structure that is a braid enclosed in a braid (English term double braid). They have a number of advantages over cables of other designs, the most important of which are high resistance to torsion under load and softness with unchanged strength characteristics. In this lesson I will tell you how to splice such a cable. In principle, there are two main ways of splicing a braided cable with a core, and each of them has its own advantages and disadvantages. The advantages of this method are ease of execution; it can be performed on cables with different ratios of core and braid volume, but the disadvantages are that the connection increases the diameter of the cable (which must be taken into account when it passes through blocks and stoppers) and is not used on cables of other designs.
So to make the connection we need:
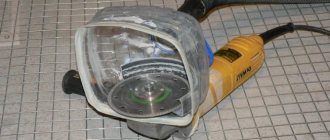
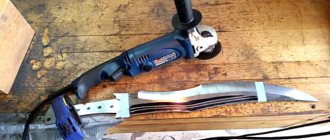
Two pieces of cable one and a half meters long, or one three-meter long as in my case (then you will get a closed loop), a pile of suitable diameter, a knife, adhesive tape, a marker, well, and something on which you can cut the cable without causing significant damage to property :) )
To begin, as usual, prepare the ends of the cable to be connected by wrapping them with adhesive tape and cutting off the welds if the ends are melted. Then let's start marking the braid:
From the beginning of both connected cables, set aside the length of the pile and mark this place with a marker and call it point R.
From it we will step back the length of the short part of the pile and also mark it as point X. For convenience, it is better to make marks on both ends being connected at once.
Stepping away from it another five lengths of the pile, we will tie a knot. Let's repeat the same with the second end. Then, using a pile at points X, carefully remove the cores from both ends, trying not to damage them. Secure the ends of the cores with adhesive tape.
Now let's mark the cores: We wrap the braid on both cables starting from the knot to the end and mark its exit from the braid by drawing a ring line with a marker. This is "point 1".
From it towards the node, having previously moved the braid towards the node, set aside the length of the short part of the pile and mark the place with a double ring line. This is point 2.
Let's move the braid further and put the length of the pile and its short part on the core. This is “point 3”. Let’s mark it with a triple ring line. Let's repeat what we did with the second cable.
Let's move on to the braid again: From point R towards the end, count 8 strands and mark this place. This is Point T. From it towards the end, mark 6 pairs of strands every other, as shown in the photo. Let's repeat the operation on the second braid. The markings are done.
Carefully remove the marked strands from the braid.
And we will cut them, narrowing them, thus ending the braid.
Let's repeat the same with the second braid. Now let's proceed directly to the connection:
Fix the end of one of the braids in the pile and insert it into the opposite core at point 2.
Let's bring it out at point 3.
Let's repeat the operation with the second braid.
The T points on both braids should remain outside. Let's grab the ends of the braids brought out at the point where they exit to the opposite cores.
Now let's deal with the cores: Let's fix the end of one of them in the pile, insert it into the opposite braid at point T and bring it out at point X.
Let's repeat on the second core.
Remove the tape and carefully smooth out the joints of the braids and cores from the connection points to the sides. The ends of the braids will “hide in the cores.
Let's move both braids from the nodes towards the connection. The joints should go under the braid.
All that remains is to tighten the connection, trim the outward ends of the core,
And once again, after tightening it well, finish. Thus obtaining a reliable, equally strong mold. Thank you for your attention and see you again.
How to braid a cable: diagram and step-by-step instructions
Any rope or cable, although it is made of good quality and strong steel, can unravel or even break at any moment. Despite the apparent complexity of the repair, it can be done by anyone, even those without special skills. The most unpleasant thing in the current situation is the possibility of a collision with it anywhere and precisely when such an accident is absolutely not expected.
Therefore, it will be useful to know how to properly braid a steel cable. Moreover, this does not require any special tools or special skills. In the future, it will be possible to weave both a hook and an earring into the cable. At the same time, the structural strength will be at a high level, and it will serve you for many years. It is advisable to wear protective gloves before starting work, as the sharp ends of the steel cable strands can seriously injure your hands.
Towing by muffler
What to do if the car is no longer new and the bracket has long been lost? Drivers usually try to find an alternative to attaching the cable to the intended location. In this case, it is right to be careful.
If you attach the cable to the suspension elements or weak parts under the bottom and pull strongly, then it is not surprising to completely immobilize the car. And if a section of the exhaust gas exhaust system is damaged or a lever is bent, expensive repairs will be required.
In addition, the cable is applicable in this case with the smallest maximum load, so that during sharp impacts it breaks and does not “bend” the metal. These tow ropes are similar to long and wide stripes of bright color. Their markings can be found in the manufacturer’s technical description.
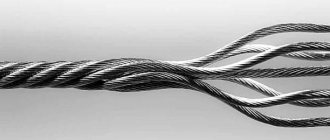
General information about cables
In the field of agricultural and transport engineering, in the construction, oil and coal industries, in the areas of river and sea transport, ropes and cables made of stainless or ordinary, but at the same time reliable and durable steel are used. They are usually used as the basis for various transport, lifting and road mechanisms. If you look closely at a steel rope, you will notice that it is a flexible metal product consisting of strands of steel wire twisted together. The number of strands in each individual cable can be different, as well as the number of wires from which each of them is twisted. A zinc or aluminum coating is often applied to the cable over the strands, which improves its anti-corrosion qualities. A galvanized pipe (or a stainless steel equivalent) coated with such a special compound will last much longer than without it. If you don't know how to braid a steel cable, the diagram below will definitely help you.
Inside a steel rope there is usually a core, the main task of which is to prevent transverse deformation from developing in the product and preventing twisted strands of wire from falling toward the center. This is a mandatory attribute of any rope or cable made from organic, metal, natural or synthetic materials. In other words, the core is the internal framework for its strands. Knowing the structure of steel ropes or cables will help you understand how to properly braid a cable yourself.
Main functions
Steel cable is the main load-bearing element of lifting mechanisms. It is used in all industries, from agriculture, mechanical engineering, construction, shipbuilding, to the oil refining and coal industries. Based on thickness and endurance, power and possible load-carrying capacity, steel cable is divided into several types. The choice depends on the goal and the need to perform certain tasks. The main component of choosing a product is the ability to withstand a certain mass of cargo.
The main area of use of steel edges is their use as traction mechanisms. The rope is used for drilling rigs when stretching for all objects that require a certain fastening. In addition, steel ropes are necessary for the movement of goods. They are also needed for the lifting mechanisms of freight and passenger elevators.
Reinforcing steel rope is used for reinforcing reinforced concrete products. In addition, the cable is used as load-bearing and auxiliary elements of various structures. Its use ensures reliability, which is achieved due to the basic characteristics of the element, which can withstand any load. The cable is especially needed in construction when there is a need to supply reinforced concrete slabs to the required height.
Rope slings are made from metric steel ropes - a special type of steel cable, which differs from all main types in its special flexibility, strength and ability, due to its flexibility, to grab a load for suspension by a hook in order to deliver the load to its destination. Steel slings are used during unloading and loading, in transporting the heaviest, most voluminous loads, which for this purpose are provided with loops, brackets, and eyes to provide a strong, reliable grip.
Types of cables by degree of flexibility
There are steel cables:
1. With increased flexibility. In them, 24 wires are twisted around each core. There are 144 such thin wires in total.
2. With standard flexibility. Twelve wires are located around the core. There are a total of 72 wires in such cables.
3. Low-flexible cables. Only 42 wires are used in their production.
Types of construction
There are three types of steel cable designs:
- Single rope. The design of this type differs from the others in that it consists of only one strand, where all the wires around the central core have the same diameter, twisted in several or in one layer in a spiral around the core.
- Double cable. This design consists of a double lay, one or two layers of wire in strands wrapped around a central metal core.
- Cables with a three-strand construction, when three-strand ropes are twisted into one element. This type of steel rope components is also called strands. It consists of two or three twists of wire strands with the same or different diameters.
Types of cables according to lay direction
1. Cross - strands are twisted into a cable in the direction opposite to the direction of laying of the wire. 2. Unilateral - the direction is the same. 3. Triple - type 1 lay is used, but the wires and strands are twisted in different directions. 4. Combined - in such products, left- and right-hand directions of lay are simultaneously used.
In addition, cables are divided into rotating and low-twisting. The material from which the core is made also divides them into organic, single strand or steel wire.
Now you can consider in detail how to braid the cable yourself. Tools needed to complete the job:
- screwdriver;
- pliers;
- wire cutters;
- metal scissors;
- wire;
- gloves.
Important nuances
Before you start tying the cable, you need to pay attention to the elements of the fastening itself:
- The best models of cables are those that are equipped with a carabiner or hook - hook with latches - clamps.
- For the most reliable fixation, it is better to choose cables made from ship rope.
- Cables with a carabiner are attached to the eye, on the left from the towing vehicle and on the right from the towed vehicle. With this towing option, the cable will be placed parallel to the axis of the car and will not interfere with movement.
It is clear that attaching a carabiner does not require any special skills, but if such a part is missing on the cable, you will have to tie the cable to the car yourself.
How to braid a rope?
1. We cut off the ends of the cable as evenly as possible, and if the ends of its strands are bent or uneven, then we unravel each strand a little and cut off the defective areas with scissors or wire cutters. It is convenient to chop off the ends by placing them on a metal rail or on a sledgehammer and striking the same place with the sharp edge of a hammer. As a rule, after 10-15 such blows, the ends of the cable are cut off. 2. Unravel the cable into strands at least half a meter from the edge. 3. We determine the diameter of the future loop we need and, measuring this distance from the edge of the unbraided cable, take 2 strands. You need to add 3-5 cm to the diameter of the future loop, since it will definitely decrease in size when weaving. We make a loop from the selected strands, wrapping them. 4. Either end of the thread is untwisted and wound into intertwined strands. The other one needs to be wound in the opposite direction. If the length allows, then from the resulting three strands you can weave a pigtail, alternately weaving the threads. 5. The third strand is twisted around the braid, then a loop is woven into it, and a turn is made around the braid again. During the weaving process, the wires are passed in such a way that the previous one always goes towards the next one. 6. Then all the ends of the wires are hidden inside the pigtail, and the resulting two strands are hidden inside using a screwdriver or pliers. 7. It is advisable to tighten the resulting braid with clamps in two or three places. You can use ordinary wire, which is tightly wrapped around the cable and then pulled tightly with pliers. The protruding ends of such a clamp are also hidden inside the pigtails so that they do not interfere.
At the end of the work, it is advisable to isolate the location of the operation, for example, with insulating tape. It will help to fasten the ends of the steel wires together and will prevent future damage to the hands of the person who will use this cable.
When talking about how to braid a cable, you should remember: in order to get a strong and reliable connection, during laying it is necessary to lay the strands symmetrically and apply even pressure on them. Periodic crimping of the twisted strands will be an additional guarantee that the entire structure will receive sufficient strength.
Weaving technology
We prepare the cable - we make a mark at the end from a couple of turns of masking tape and cut off the protruding parts of the strands. We measure three or four hoses from the end of the cable (full turns of any strand) and make another mark in this place. Up to this point the cable will unravel into strands. After this, we try on the thimble to the cable, roll it along the cable and find the place of the top mark in the middle of the thimble.
We securely fasten the middle of the thimble to the cable with nylon. To do this, it is convenient to use strands of scrap nylon ends, which are always available on the boat.
Securely (!) fasten the cable to the thimble. The appearance of the product will depend on this. I use a nylon heel folded in half, drawn in a figure of eight, tightening the cable loop around the thimble. Once again, this must be a really tight and reliable fastening that does not allow the cable to move relative to the thimble.
We fix the thimble in a vice so that the “tail” is on the left. This is the “front” side of the future fire. We are looking for the first strand, it is shown by the arrow. We weave this strand up to the thimble and punch it under two strands of the cable on the other side of the fire “along the descent” - from left to right. In the same place, but under one strand, we break through the strand adjacent to the first on the left (the second). The braided strands are numbered clockwise.
It will look something like this.
The ends of the braided strands must be secured with marks made from a couple of turns of masking tape.
We turn the fire to the other side, or approach it from the other side :).
In the depths of the fire there is strand number six, adjacent to the first, unravel it and punch it under two strands so that it comes out adjacent to the first. On this side, the punches go “against the descent,” that is, from right to left. This is easier to do if you punch the cable with piles and insert a strand into the punching hole at a higher level, then push it into place.
The next strand, number five, goes in the same place, but under one strand.
Again we return to the “front” side of our fire.
Strand number three is inserted in the same place where the first and second ones made their way, but “against the descent.” The photo shows how this is done using a pile. Under the same strand where the third was pierced, a fourth is drawn, but on the other side - “along the descent”, and UNDER the third. The core (it can be distinguished in the photo and in life by the different direction of the lay) breaks through in the same way as the fourth strand, and comes out side by side. Options and personal creativity are possible here; the core can come out beautifully to the first strand :).
This completes the first fire punching. We check the correct location of the strands, tighten the slack, cut the core, and push the strands into place with a hammer.
We suggest you familiarize yourself with the porosity of bread.
Second punch
In order for the “crane” fire to gain the necessary strength, three or four punches are enough. The second and subsequent punches are made against the descent - from right to left, through one strand under two. It is necessary to monitor and eliminate an unpleasant feature by tightening the strands - the strands collected in the first punching slide quite easily relative to each other, and come out of their places with further punchings, the fire “swells” and becomes loose.
We consistently punch the strands counterclockwise and complete the punching with a “lock”.
The completed punching looks like this - all strands come out through one, all are on the same level.
We hammer the fire with a hammer and make a third punch, repeating the technology of the second.
After wrapping, we cut the strands and tape the place where they exit the cable with black electrical tape.
After installing the cables and tightening them under the working load, it makes sense to tightly wrap the entire fire with the same electrical tape or nylon heel.
This activity requires some skill; the first fires usually turn out unsightly, but each subsequent one is more beautiful than the previous one. So it makes sense to practice on scraps. When working with piles on a dense cable, the core wires are often affected; this must be monitored when punching and corrected.
Making a loop on a steel cable
Often, in addition to solving the problem of “how to braid a cable,” the need arises to form a loop at its end. For example, when repairing a guy wire on a tow rope or on an antenna, it becomes necessary to lower something to a depth, such as a submersible pump. Since the steel cable or rope is quite rigid, simply tying it with a knot at the end will not work. In this case, there is nothing else left to do but braid the cable into a loop. And there is nothing complicated about this either. The same goes for braiding a cable with steel wire.
Basics and features of the device
Before you start making the fire, you need to secure the ends of the product with a stamp, after which the remaining part of the end is dissolved into strands. The next step is to lay out the unbraided part of the cable with a loop of the required size and punch the running part of the strands. There are many methods to weave a wire rope.
It is important to do the first punching correctly if the bent side of the fire is turned towards the working part, and the running parts of the cable strands are located on the right. In this case, you need to take the first running strand, pass it into the cable against the descent in the direction from right to left under the 3 main strands. The second and third strands are broken under two and into one, respectively.
When the punching of the first three strands is completed, the fire must be turned over so that it is possible to punch the fourth and fifth running parts of the strands. And so on until the end of the cable. The remaining ends of the running strands need to be cut off, and the product itself must be calcined with wire.
Work process
1. The ends of a regular seven-strand cable are cut evenly with a grinder or chopped off with a hammer (its sharp part). 2. Unravel the cable by 50-70 cm and use a screwdriver to divide it into two parts. One produces three strands, and the other four. 3. We twist the strands of both parts together. 4. Make a loop with a diameter of at least 10 cm. 5. Bend the first four-strand part towards the other, which we place in the bends of the main cable. 6. We twist the ends of the woven threads one by one around an improvised handle. 7. Then we twist each free strand in turn around the handle, weaving it into a loop, and repeat the process. 8. After this, placing the next one on the previous one, we cover the ends of all strands. As a result of such manipulations, we get two threads that need to be placed between the loops using a screwdriver. In this place it is better to seal it with pieces of pipes, flattening them, or use insulating tape. This will help avoid injury in the future.
Option 1
Well, congratulations on purchasing a synthetic rope. Now all that remains is to fix one end of the cable on the winch drum, and hang a hook on the other end. And if the first task is quite easy to cope with, then the second puzzles many and forces them to tie all sorts of knots and tighten the ends of the cable with metal clamps. This is wrong and unreliable. Below is a description of the braiding technology...
We cut the end of the cable at an acute angle, wrap the cut end tightly without creases with tape so that it does not become shaggy.
Next, we take the thimble and place the cable in its groove. The free end of the cable should be about 30-35 cm.
To seal the first loop, squeeze the cable crosswise and pass the sealed end into the resulting hole.
We make the second loop in the same way. The distance is about 5 centimeters. We braid the remaining end. The length of the stitches is about 5 centimeters.
We fold a little more cable and pass it inside. We remove the rest of the cable inside the braid...
We fold a little more cable and pass the embedded end of the cable inside. Preferably without folds.
Now you need to pull the embedded end of the cable out. You can help yourself with pliers. All that remains is to remove the tape and tighten the cable. The free end will hide inside.
The cable is ready!
Fire on a rope or cable
Speaking about how to braid a cable - steel or from another material, we should also mention that you can make a fire. It's a little more complicated. At some distance from the end of the cable, a durable temporary mark is made, and the ends of its strands are secured with the same marks. After this, you should unravel the end of the rope.
In the form of a loop, the cable is laid on a surface (preferably hard), and all its strands are broken through. Several punches are made, but special attention is paid to the first one, since it is the most important of them. The reliability and strength of the fire is ensured mainly by the first punching. This is also an acceptable way to braid a cable. The scheme will not cause any difficulties.
What is it made of?
Here, too, everything is simple: the cables are metallic and non-metallic. Steel certainly deserves respect, but not everyone can use such a cable. Yes, it is strong, but it hardly softens the jerks that are inevitable when towing.
At the same time, you are almost certainly guaranteed splinters and abrasions due to the thin steel wires that make up the body of such a cable. Such a cable will not stand on ceremony with the body either: it was ideal for the ZIL-130, but not so much for soft-bodied modern passenger cars.
Compactly placing such a product in the trunk is very problematic: a large rusting bay is not a gift. Finally, due to the same rust, the cable may simply burst under load.
With non-metallic cables everything is simpler: compact, lightweight, aesthetically pleasing, and do not rust. These are the cables that are mainly sold today. However, here you cannot miss the load: it must be selected based on the weight of the towed vehicle, and with at least a double margin. Let's say, if your car weighs about two tons, then the cable should be designed for about 5 tons.
How to tie a loop on a rope?
If for some reason you decide to try tying a loop, rather than unbraiding the cable and twisting the strands, as discussed above, then you can use an old sea knot, the simplest one - an oak one. The algorithm for this method of how to braid a steel cable is presented below:
- Fold the end of the cable in half and wrap it to form a ring.
- Thread the loop that has formed at the end into the ring and tighten tightly. The result is a strong and very reliable knot. Its main drawback is that when tensioned it tightens very tightly and then it is quite difficult to untie it.
Now you can repair the steel cable yourself, since you know how to braid the cable into a loop, and such a breakdown will not cause you much trouble in the future.
Introduction
Factory mounting option
Unlike rope, steel cable is very difficult, almost impossible, to tie to the attachment point. For this purpose, special hooks, carbines and other devices are used.
But in order to attach them to the cable, the latter must have a loop at its end. The issue can be resolved as follows:
Action No. 1 Marking the cable
Marking the end of the loop with tape
First, you need to estimate the approximate dimensions of the loop by bending the end of the cable and marking the place of its contact with the cable. This can be done using tape or insulation.
Action No. 2 Unraveling the end of the cable
It is necessary to separate three threads using a screwdriver
1
The cable must be unbraided from its end to the mark made using a screwdriver. This is quite easy to do. Typically, the cable consists of 6 woven threads.
And begin unraveling the cable by rotating one of the groups of threads in a clockwise direction
2
The process continues until the point marked with tape is reached.
Unraveling the cable until it reaches the point marked with tape
3
The process continues until the point marked with tape is reached.
Cable unbraided to the required length
Action No. 3 Formation of a loop
Cable prepared for loop formation
1
One of the resulting groups of threads remains in a straightened position, while the other is bent until its end touches the marked point.
Connecting the woven threads at the midpoint
2
Approximately halfway from the end of the cable to the marked point, two groups of threads are connected so that they fit into the free spaces on each other.
Relatively long section of reconnected cable
3
Since the bundles of three threads are symmetrical, they fit into each other perfectly: the places where there is steel on one bundle fit into the voids on the other and vice versa.
Continue laying the cable along the entire length of the loop
4
In the same way, continue to lay the cable along the entire length of the loop.
The loop is ready, all that remains is to complete the braiding of its fixation point
Action No. 4 Fixing the loop
Loop formation
1
A screwdriver is inserted into the loop.
Scroll counterclockwise towards the taped point
2
And it is scrolled counterclockwise towards the point marked with tape.
Braided rope into a thicker one
3
In this case, the cable is independently woven into a thicker one, consisting of 12 threads.
The screwdriver is reinserted into the loop
4
Then the operation is repeated: the screwdriver is again inserted into the loop.
And again scrolls to the point marked with tape counterclockwise
5
If necessary, the procedure is repeated 1 or 2 more times.
The loop obtained as a result of weaving the cable is securely fixed
6
To prevent the ends of the threads from unraveling, they are fixed with electrical tape.
Secure with electrical tape
7
For more reliable fixation, a steel clamp is used.
A steel clamp is used for fixation
How to QUICKLY make a LOOP ON A STEEL ROPE with your own hands
How to beautifully and securely braid a rope into a loop: step-by-step schematic instructions
10 Total Score
How to braid a rope into a loop
Did you like our Lifehack?
10
Customer ratings: Be the first!
Eight
This is a traditional knot used whenever you need to attach something to a rope. It is easy to knit, it can withstand heavy loads, and later such a knot can be quite easily untied to free the rope.
The Figure Eight knot has two options. The first is used in cases where you have one free end. It looks quite complicated, but once you figure out the sequence of actions just once, everything will work out by itself.
The second option can be used when both ends of the rope are free. This knot is so simple that you can tie it with your eyes closed, and at the same time it is completely secure.
Driver node
A truly legendary knot that has many different names and even more practical applications. This knot is used in construction work, during transportation, in tourism and other cases when you need to secure something tightly and tightly.
For those readers who find it difficult to navigate the animated drawings, there are additional instructions containing static photos of each step. You can find it at this link.
What other nodes do you consider practically useful and necessary to master?