This operation can be performed either with or without welding. But in any case, such work must be carried out by qualified specialists if they have special permission and a formalized permit to carry out the connection.
Obtaining permission to carry out work
Considering the importance of the water main as an object for providing a vital product, permission to make a tie-in must be obtained from the local water utility department. The method of execution is not important - with or without welding.
A connection made without permission is considered illegal and is followed by administrative measures with financial penalties.
An approved copy of the site plan is issued by the Federal Center, which registers land ownership, and the technical conditions for connection are formulated by the Vodokanal department. They must contain the following information:
- place of insertion;
- main water pipe size;
- data that may be needed when making inserts.
Such a document can be executed by a specialized design organization, but this does not negate its approval by the water utility.
The document for the production of the insert will be registered at the local sanitary and epidemiological station office. The set of documents submitted to the SES is accompanied by a statement about the need to connect to the central water supply network.
Taking into account all sorts of restrictions, it is obvious that saving money by applying your own efforts is only possible when performing excavation work. The rest can only be performed by specialists with special permits.
Connecting to a water supply under pressure is prohibited under the following conditions:
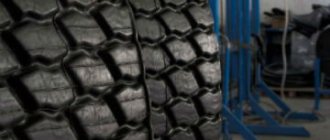
- the pipeline is made of large diameter pipe;
- in the absence of a connection to the central sewerage system;
- if the tie-in does not provide for the installation of water flow metering devices.
Device for tapping into water supply under pressure
Crashing into a pipeline system and stopping pumping is associated with significant material losses. To perform such an operation, you must:
- Relieve the pressure in the water supply and drain the water in it. This is due to a significant interruption in water supply to all facilities involved in this pipe.
- Make a hole in the pipe wall using an accessible method.
- Install the outlet pipe and mount a tap or valve on it.
- Install a connection unit from the outlet to the internal wiring in the house and on the site.
- Check all connections for leaks.
- Fill the pipeline with water, remove any air pockets, and increase the pressure in the system to the required value.
It is obvious that the time and energy costs of this connection technology are very significant.
Therefore, a technology has been developed and used to install bends on pipes under pressure without stopping the functioning of the water supply system.
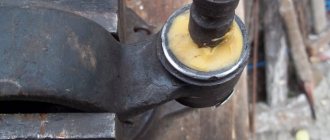
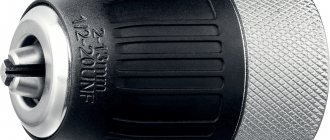
Before making a tap into a water supply under pressure, a special saddle clamp, the so-called “saddle,” should be installed on the pipe. It is a split coupling that is tightened with screws.
A rubber gasket is used for sealing. At the coupling half, a flange or piece of pipe is made for inserting a drill. The rubber seal option is used when making inserts into plastic pipes.
When drilling pipes made of cast iron or steel, a saddle is used in the form of a covering layer of plastic material applied along the inner surface of the coupling.
Currently, universal transactions made from metal strip are widely used. Their design is reminiscent of a car clamp.
Taking into account the constant improvement of the tool, we pay attention to the device in which the cutter is installed and a tap installed on the side is used to drain water when passing through the wall.
When cutting into a plastic water pipe under pressure, built-in heating elements are used, which allow the wall to be melted without cutting.
For use with large diameter tubes, three-piece saddles are used.
Installation of the saddle
This structural element is fastened with screws.
In this case, tightening must be done by tightening the screws alternately so that the halves of the coupling converge evenly, without distortion. On steel pipes, careful surface preparation is required, including treatment with a wire brush or emery cloth.
When drilling to insert into a cast iron water pipe under pressure, the axial force on the tool must be applied with less pressure to avoid breaking the wall, since cast iron is fragile.
Connection to metal pipes
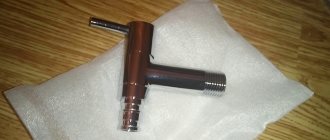
Using a saddle clamp with drilling, it will be much better to insert into a metal water pipe. There are several types of its design . It is necessary to clean the place where the pipe is inserted from all contamination and corrosion before installing this element. There is a shut-off valve on the top of the clamp, in addition to the usual semi-circle. It has a hole that you will need to drill through. The kit includes a corresponding drill bit. Bolts are used to attach the two parts of the clamp to the pipe.
Sealing rubber bands ensure the tightest contact between the pipeline and the clamp. You can start drilling the hole when the clamp is securely fastened; after drilling, it should be closed with a cap screw. The clamp will then be used as a shut-off valve. There are clamps on sale into which the valve is screwed initially. The valve closes after removing the drill from the hole.
It is possible to install a machine on a metal clamp , which has in its design such elements as:
- flush tap;
- shaft with drill;
- locking bolt;
- handle with ratchet.
These elements are metal and connected to the device through rubber seals. A special coupling allows you to guide the drill.
Methods of cutting into a pipeline
Connection to the pipeline is made in different ways. The simplest of them is as follows.
Watch the video
How I make a pressure tap into a water pipe
Let's consider the simplest method
It consists of installing a transitional locking element before drilling the wall on the pipe. For this purpose, a ball valve mounted on a saddle is used. In the open position, it passes the drill through the through hole.
To protect against water splashing onto it, the top edge of a plastic bottle is put through the hole in the lid. After passing through the pipe wall, the drill is removed from the hole and the ball valve is closed.
If the tap into the water pipeline is made into a steel pipe, you can do it even simpler - just weld a branch with a threaded end to the pipe and install the same ball valve on it. Further actions are performed according to the specified scheme.
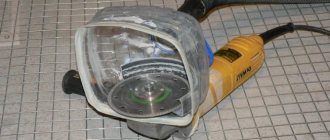
Built-in cutters
Such tools are equipped with a core drill to make a hole and a safety valve to contain the back pressure of water.
The tool is rotated manually by acting on the handles. The professional tool operates using an electric drill drive. The end of the pipe is equipped with a locking device through which the tool is inserted inside.
In the non-working position, the pipe is locked with a valve, which opens when you press it. A rubber seal in the shape of a ring is installed around the circumference of the pipe.
Devices of this design are most often used for inserting into polyethylene pipelines
Once drilling is complete, there may be a small amount of water leaking through the nozzle. The cutter is moved in the opposite direction until it touches the valve, it closes and stops the leak.
The side outlet must be in the closed position and opens only after the installation of the water supply system in the house and on the site is completed.
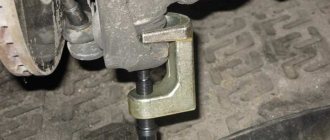
Using Drill Clamps
Quite often, drilling clamps are used for tapping into pipelines under pressure. The sales package for such products usually includes attachments and rotary connectors.
Structurally, such products can be made in several versions and are used to connect pipes with a diameter of 80 millimeters or more. When drilling, be sure to deep core the pipe to avoid the drill slipping along the inclined surface.
Other insertion methods
You need to pay attention to the standard tapping device, popular among water utility workers. It looks like a pipe with multilayer seals. It is put on the main pipe and secured with long pins.
Watch the video
The tightness of the device is so perfect that no leakage occurs when the drill passes through the wall. This device is equipped with a pressure gauge, a change in the indicators of which indicates the completion of drilling.
Construction of a well for the construction of a site
To simplify the installation into an existing water supply system, it is convenient to use an inspection well. The diameter of the structure should be about 70 cm. This space is enough to place shut-off fittings (in the form of a valve or gate valve), as well as perform all the necessary manipulations for insertion.
In the future, during the period of operation, the presence of such a structure will facilitate the work of repairing the home water supply system.
To construct a well, a new pit of the appropriate size is dug. The bottom of the pit is covered with a gravel “pillow”, forming a layer 10 cm high.
To make a reliable foundation, sections of roofing material are spread over the leveled gravel fill and a concrete screed 10 cm thick is poured. When creating the fill, concrete grades M150 and M200 are used.
After three to four weeks, when the concrete has acquired the necessary strength, a shaft is erected above the slab. To do this, the walls of the pit are lined with bricks, cement blocks or reinforced concrete rings. The neck of the structure must reach zero level.
If the well is to be installed in an area where the groundwater level rises to one meter during the flood period, it is necessary to construct a waterproof structure.
It is most convenient to purchase a ready-made plastic container for this purpose. From below it is anchored to a concrete slab, from above this structure is covered with a cast slab equipped with a hole for installing a hatch.
Rules for determining the insertion location
Typically, the connection to the water supply is made in the nearest inspection well on a straight section. The basic rule is that the outlet pipe must be laid below the freezing level of the soil.
For middle latitudes it is 1.2-1.5 meters. But the trenches should be about half a meter deeper, since a drainage layer of sand and gravel will have to be constructed.
In some cases, the pipeline is additionally insulated with foam plastic materials, and a heating cable is installed with automatic switching on at a temperature of 0-+2 degrees.
The water supply branch is equipped with a drain valve installed directly behind the tap.
Before you start digging a trench, you need to make sure that it does not intersect with other communication systems - communication cables, power supply or sewerage.
How to choose materials for insertion
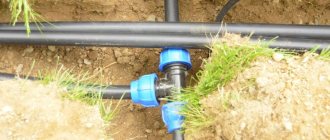
Connection to the main water supply is made using pipes made of various materials - polyethylene, cast iron, steel, including those with protective coatings.
When using cast iron materials, its properties should be taken into account, especially such as increased fracture capacity. It is necessary to choose pipes made of spheroidal graphite cast iron, which is more ductile, and during the processing process do not apply significant force to the tool.
The pipe used for tapping must be smaller in diameter than the main pipe.
Watch the video
5-2 Insertion of cold water into the city water supply network
The connection is made with pipes measuring 50 millimeters or more.
When connecting to a plastic pipeline, products with built-in heating elements are used that can thermally make a hole, while at the same time a calibrating cutter is installed to obtain an accurate joint.
At pressures up to 1.6 MPa, saddle clamps are used in the plastic line, creating uniform pressure over the entire contact area, which prevents deformation of the plastic product.
The use of saddles with a built-in cutter and check valve allows welding in the connection, after which the service life of such an insert increases to 50 years.
Purpose of the procedure
The purpose of the procedure is to connect the branch to the main pipe or main.
New wiring needs to be done inside the house.
Connection to a common pipeline occurs during the construction of an individual house or other capital construction project, or when organizing a diversion to another direction. At the same time, water intake is calculated, the diameter and material of secondary pipes are selected. Outlet pipes are selected based on the pressure values in the main line.
General rules for recusal
The insertion is made using one of the described methods. In this case, the front end of the pipe is connected directly to the embedded element, and the second - through a water flow meter - to the distribution of the internal water supply.
Thus, the installation location of the meter is the gap between the valve/valve of the insert and the valve connecting to the internal water supply network. When installing the device, it is also necessary to use a reverse valve to prevent the formation of reverse flow of liquid.
For cases where the introduction of water supply into a house involves crossing a wall or foundation, the hole in them should be larger than the diameter of the pipe itself, approximately 200 millimeters.
Once installation and necessary testing have been completed, it must be sealed using resin strands or a waterproof seal. The finishing of the surface is done with cement mortar.
Testing and adjusting water pressure
Pressure tapping into plumbing equipment is the final stage of its installation. The purpose of such an event is to check the quality of the connections made during assembly.
To do this you need to perform the following steps:
- Fill the water supply completely with water. To do this, you need to open all several taps in the house so that you can bleed air from the system. In addition, an automatic valve must be installed in a normally designed water supply system to remove air.
- Measure the water pressure at the location where the outlet pipe is inserted. For water supply in areas with low-rise buildings, it is maintained within 1.5-2.8 atmospheres.
- It must be taken into account that some types of household appliances and plumbing equipment can only operate at a minimum pressure of 4 atmospheres, otherwise they either do not turn on or quickly fail. Obviously, the inside of the house water supply must reliably withstand a load of at least 4.5 atmospheres.
- After filling the water supply network with water, the supercharger is connected, and the pressure in the system increases to 6 atmospheres. At the same time, all connections are inspected to identify leaks at its connections. The load continues for at least an hour.
The pressure in the system is a decisive factor for the successful operation of the water supply system. If it is insufficient, the consumer is plagued by failures of household appliances, and its excess can damage the entire system. In this case, threaded connections are the most vulnerable.
One atmospheric unit can lift a column of water to a height of 10 meters. For normal operation of a massage shower or Jacuzzi, the minimum pressure is 4 atmospheres. A dishwasher or washing machine needs a pressure of 2.5-3.0 atmospheres, and in this article you will learn how to connect a washing machine to the water supply and sewerage system.
We suggest you read the article on how to connect a dishwasher to the water supply and sewer system yourself.
Watch the video
The pressure in the water supply system is an unstable indicator. It depends not only on the settings of the system itself, but also on the level of fluid intake from the system at a given time. At maximum flow, it can decrease all the way to zero, and then suddenly disappear.
At the same time, it must be remembered that excessively high pressure in the range of 4-10 atmospheres contributes to the rapid failure of ceramic valve inserts and breakdown of control equipment of household appliances. The critically high pressure is 6.5 atmospheres.
A decrease in pressure to 1-4 atmospheres leads to the shutdown of most models of household appliances and low water pressure in the taps.
The pressure value is checked instrumentally using a standard device - a water pressure gauge. It must be installed during the installation of the water supply network.
The pipeline owner has the right to make any decision on setting pressure in its own network. But professionals recommend treating this process very carefully, taking into account the number of water withdrawal points and the characteristics of the pump to increase pressure, especially the boundary conditions of its operation.
How to increase water pressure
This is the most pressing task for owners, which arises for everyone from time to time.
The problem can be solved in several ways:
- install a pressure booster;
- introduce reserve storage capacity into the system.
The first method is preferable for apartment water supply systems, since in a standard room it is difficult to find a place to place a reserve tank. But they are widely used in summer cottages and country houses.
An additional pump can be installed at the entrance to the building. During operation, such a device additionally saturates the water with oxygen.
The traditional way to increase pressure in any conditions is pumping stations with a hydraulic accumulator. The volume of the additional capacity is 24 or 50 liters, and the pressure can be stabilized within 1-5 atmospheres.
A reserve tank installed in the attic, in addition to stabilizing the pressure in the system, allows you to always have a supply of water for drinking and cooking, even during interruptions in the water supply.
What documents need to be collected and prepared?
The basis for drawing up a cold water supply contract is an application on behalf of the customer or his representative acting by proxy, or an offer from a water supply service chosen by the customer.
The application must include the following information:
- Subscriber details:
- For individuals – postal address of registration or place of residence, full name, passport details or other identity document, contact information.
- For legal entities and individual entrepreneurs – registration number in the State Register and the date of its entry, location indicating the postal and registration address at the place of residence, individual tax payer number (TIN), bank details and documents confirming the subscriber’s right to sign business documentation.
- The name and location of the object in respect of which the contract is being drawn up.
- Information about other sources of water intake, indicating the volume and owners through whose networks water is supplied.
- If standards are established for the customer for the disposal of sewage water in cases where there are no septic tanks for dachas and country houses on the site, their composition and properties are indicated in the dynamics of changes over the year.
- The area of the customer’s individual plot with the objects located on it and its characteristics.
- Data on the type of activity in the case of regulated spillways.
The list of papers submitted with the application includes the following documents:
- A photocopy of the certificate of property rights to the object or device connected to the water supply line, necessary for connection to the system.
- A copy of the passport or other document confirming the subscriber’s identity. Power of attorney for drawing up business papers, if the customer is acting as his authorized representative.
- Standard documents established by law for organizations, partnerships, housing cooperatives when drawing up agreements with resource-supplying authorities.
- Information necessary for calculating consumed volumes - the area of irrigated land, housing and auxiliary premises, the number of storeys of buildings, the number of residents.
- Photocopies of documents and previously concluded contracts for connecting the subscriber to the water supply main.
- Photocopies of reports on connection, washing and disinfection of lines and equipment on the customer’s territory inside the house and on an individual plot when connecting to the water supply main.
- Photocopies of papers for water meters to verify compliance with their legal requirements, installation diagram and information about their readings at the time of drawing up the contract. The norm does not apply to consumers with a intake volume of less than 0.1 cubic meters per hour and when the installation of meters is optional.
- Sampling site diagram.
- Photocopies of documents confirming ownership of an individual land plot.
- Balance of maximum consumption indicating the intended use and load according to needs (for household needs, fire protection, filling swimming pools, periodic water consumption for irrigation).
- A positive expert decision from a federal or private examination in cases where it is required by law.
- Documentary photocopies of papers about other sources of water supply, contracts with water supply services and their licenses for the use of subsoil, indicating the volume of supply.
Rice. 3 Plumbing diagram in a private house - example