About chamfering
First, the middle is marked on the workpiece. The line outlines the location for the future cutting edge. Then, after tightening the peeling disc more securely, turn on the grinder. The processing surface should be perpendicular to the edge of the knife. There is no need to put much pressure on the disk; on the contrary, it should barely touch the workpiece. First, a small chamfer is carefully removed along the edge along the marked line.
It is important that a distance of 0.2 mm is maintained from the line to the middle of the knife. At this stage you should be as precise as possible
The grinder can be moved along the entire length of the cutting edge being processed. To prevent the metal from overheating and losing its original properties, it should be periodically cooled during operation. For this purpose, the surface of the workpiece is generously watered. Some beginners often ask questions: why chamfer the workpiece and what will it give? According to experienced craftsmen, it will be much easier to make a descent with an existing chamfer, since it will be a clearly visible lower boundary that cannot be crossed. It is important that the chamfer is cut along the entire cutting edge.
View gallery
How to make a chamber for hardening metal
It is clear that when making such a camera, it is better to take the process seriously, since you will not be making it for one day or once. Let's try to briefly describe the manufacturing process of such a chamber; it is also called a muffle furnace.
- The main thing is to correctly manufacture the “body” of such a camera; here they resort to a simple process. The future neck is made from any hard paper material (such as cardboard) and coated with a thick layer of fireproof clay. Don't forget to make a thin layer of paraffin between the form-building paper material and the clay.
- In the second stage, the future chamber is dried for at least a day, and then placed in the oven and calcined at a low temperature of about 90-110 degrees Celsius. After this stage, the paper component can already be removed.
- The final firing of the structure occurs over an open fire at a temperature of about 900 degrees, then it is cooled under natural conditions. You need to wait until the camera cools down completely.
- After the workpiece has cooled, it acquires the properties of stone and becomes very hard, like a brick. Doors that open horizontally are attached to it.
- The final stage can be called wrapping the future furnace with nichrome wire, with a cross-sectional diameter of about 0.75 mm. The entire structure will require about 18 meters. To prevent short circuits during winding, it is better to immediately coat it with raw clay. We make two holes in the housing, one for a thermocouple (to measure temperature), and the second for visual control.
A self-made chamber for hardening a knife. At this point, we can say that the furnace for heating metal is ready. As you can see, there is nothing difficult in making a muffle furnace for your home.
Hardening methods
There are essentially 2 types of hardening methods. On an open fire and in the oven. But, unfortunately, in an ordinary fire it will not be possible to raise the temperature above 900 degrees. Then the oven comes to the rescue. You can make it yourself. This is a rather difficult process, but once you make it once, it will serve you for a long time. Moreover, if you are a beginner master, you simply need it.
In the cell
Next we will talk about how to make your own muffle furnace for proper heat treatment of workpieces, and now we will simply and briefly describe the hardening process in it; the blade steel will be used 50Х14МФ:
- We heat the oven to the desired temperature, in this case 1070 degrees, and immerse the blades in the oven.
- Having loaded the blade into the oven, we heat the oven again to 1070 degrees, and at this temperature the countdown begins. The principle is simple: 1 minute 40 seconds for every millimeter of blade thickness.
- After the required time has passed, the blade is pulled out and cooled in air for 15 minutes under light pressure.
- Then the metal is tempered in the oven at 200 degrees.
Hardening a knife in a chamber made at home.
With this process, the steel gains a hardness of 56 HRC.
On an open fire
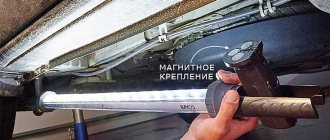
The method, one might say, was tested by our ancestors and has been around for many years. To properly harden steel, without any precise measuring instruments, so to speak “by eye”, you need to be attentive and patient. The only way to check is with a magnet. When a metal reaches a certain incandescent point, the so-called Curie point, it stops interacting with the magnet.
And one more sign is the color of the workpiece itself, it should turn dark red. But you also need to make sure that no blue or black spots appear during the process, this indicates overheating. The workpiece should be placed in the coals when the color of the flame from them is crimson.
What you will need:
- mineral oil in a container (can be worked off);
- bucket with water;
- well prepared coals;
- long metallurgical pliers.
Hardening a knife over an open fire.
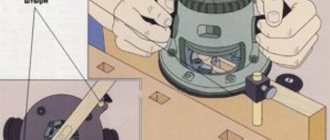
Belt grinding machine for making bevels
In addition to the expensive grinder, you can find small grinders on the market that also use a belt. To make descents using such a device, you will need to additionally build the structure yourself.
It will allow you to firmly fix the machine in a vertical position, thus creating a miniature grinder. But these machines use a wood processing tape. You should find a suitable steel tape or tinker with the one you have available.
Belt grinder.
Types of knives for machines
- straight for straight-line processing of wood. The products allow you to remove the top layer of material as evenly as possible. They are necessary to level the surface for subsequent processing;
- figured for forming shaped surfaces on workpieces and making original patterns and contours. Similar knives for machine tools are distinguished by the presence of grooves and notches.
Specialists of RemMechService LLC recommend paying attention to the length and width of the blade of the machine knife, since this determines the area of the surface being processed. For processing coarse rocks, it is recommended to use products of greater thickness
You may also be interested in the following information:
Description:
type of cutting tool
Materials:
- tool steel
- structural steel
- stainless steel
- alloy steel
Investments: from 290,000 rubles
Payback: from 4 months
A knife is the oldest cutting tool. Despite its centuries-old history, its appearance has remained almost unchanged. The basis is still the blade and the handle. At the same time, the scope of application of the tools is varied: housekeeping, hunting, fishing. Therefore, the business related to the production of knives will always be relevant.
Folding knives
The structure of a folding knife allows you to hide the blade in the plane of the handle.
Some products are equipped with an axis of rotation of the blade perpendicular to the plane. According to experts, such models look much more efficient than classic ones, but are less reliable. In general, in folding knives, in the open position, the spine of the blade is in line with the handle.
Special structural elements secure the blade. In the first models of folding knives, fixation was carried out with a special protrusion on the butt of the blade.
Structurally, the products were similar to a straight razor. Today there are several types of locks. The most common among them are three versions:
- back up, the knife blade is equipped with a lock;
- liner lock, lock in the form of a strip;
- axis lock, folding device with axial lock.
Folding knives.
Basic forms and characteristics of triggers on homemade knives
Beginners, as a rule, having a blank and all the necessary tools, cannot decide which trigger is the most versatile. At least for a kitchen knife. But don't worry, there are a few of the most common types of descents that we will now look at:
- The most common, and is made from the butt itself, is wedge-shaped. It is usually used in the kitchen.
- Another quite popular type is also wedge-shaped, it comes from the butt itself and goes into the cutting edge. But if you sharpen it, it will automatically go into type number 1; during sharpening, a cutting edge will be formed separately from the trigger. Or sharpen the entire trigger, which is quite problematic.
- Quite a characteristic shape for many knives. The blade is flat, and the descent begins from the middle or slightly higher to the butt. Sharpening is quite easy.
- A very interesting option, and quite often used wedge-shaped bevels and cutting edge, the knife is quite durable and the cut is good. The slopes and edges are very harmoniously located.
- The cutting edge is formed by a double wedge. The slopes are wedge-shaped, but the material between them and the cutting edge is removed. It cuts dense materials very well, but is difficult to sharpen, one might say, for professionals.
- Lenticular concave slopes. The cutting edge is like a continuation of the edge between the blade and the bevel towards the tip. They can start almost from the butt itself. The second name for sharpening is “razor”, it is used for straight razors.
- One-sided sharpening acquired the name - chisel sharpening. Sharpening is quite easy. A knife can only be wielded with one hand. In this case, the bevel should be on the side of the working hand.
- The shape resembles trigger number 3, but there are none as such, a straight blade and an immediate cutting edge. More suitable for chopping products.
- Convex lens-shaped slopes, smoothly turning into the cutting edge. There are two names for sharpening: “bullet-shaped” and “ogive”. It is difficult to cut with a blade, it gets stuck in the material, but it has excellent cutting characteristics. Difficult to manufacture, also an option for professionals.
Basic forms of triggers on knives. To begin with, you can try on any unnecessary workpiece, make descents No. 1 and No. 3. They are simpler than others and will find use in your home, as an option in the kitchen. And once you’ve gotten the hang of it, you can begin to tackle more complex types of sharpening.
Anatomy of a knife
Among knifemakers there is their own terminology for parts of products. There are various patterns and names that even knife enthusiasts should know. Let's look at the structure of a knife in more detail and find out how its parts are correctly called:
- The strip is the shank together with the blade, no matter what type of installation.
- Blade length is the length measured from the tip to the point where the handle begins.
- The blade is one of the main parts of the knife that makes the cut. Here we mean the entire visible part of the strip, excluding the part that is under the handle.
- The shank is the part of the strip that is hidden in the handle.
- The butt is the unsharpened edge of the blade that is located on top. May have a longitudinal rib for crushing various products.
- The thumb rest is located on the butt of the blade near the handle. Often it has a notch for convenience so that your finger does not slip off.
- The bevel of the butt is the line of transition of the butt to the tip. In European versions, the bevel is mostly straight or slightly concave.
- A sharpened butt bevel is an additional cutting edge that is formed by two narrow slopes on the butt bevel. This increases the effectiveness of piercing blows, the blade becomes like a dagger.
- A false blade is a part of the butt formed by two narrow slopes; in some cases it is sharpened.
- Golomen is the flat side surface of the blade from the butt to the beginning of the descent line.
- Dol - its incorrect name is blood flow. It reduces the weight of the blade and serves as a longitudinal stiffening rib.
- Toe/point – the point where the butt and cutting edge meet.
- The descent start line/sharpening edge - it happens that it forms a single plane with the descent itself if they are made from the butt.
- The slopes are two sides of the blade that converge on the blade, formed during forging or grinding; they form a wedge-shaped cross-section.
- The muzzle is a small semicircular notch that separates the cutting edge from the heel. It protects the heel from damage when sharpening.
- The cutting edge is the line formed at the intersection of two leads.
- Leads are two narrow side edges that are sharpened along the cutting edge.
- Lifting of the blade - at this point the leads, together with the cutting edge formed by them, begin to rise to the butt.
- The combat/working part – often coincides with the length of the blade; this is the entire cutting edge from the unsharpened heel to the tip.
- The working part is near the heel - on some blades this part is sharpened at a large angle for rough work.
- Serrator is a serrated blade that can be used for cutting slings.
- Ball 2 – separates the cutting edge from the heel part, a semicircular radius notch.
- The heel is the unsharpened part of the blade, which makes the knife more grippy; you can rest your index finger there.
- The toe radius is a small notch at the heel, also serves for additional grip on the blade.
- Heel 2 – it is thickened and can serve as a stop if you press something with a knife.
- Shoulders are small notches on the blade at the point of transition to the shank; they serve as a kind of limiter.
- Mounting holes – through holes on the shank and dies to form a one-piece handle structure.
- Shank screw/thread – the end part of the shank; a thread is cut on it for the nut.
- Tightening/fastening nut - it is screwed onto the thread of the shank.
- The handle is one of the main parts of the knife that holds the blade.
- The back of the handle is the part of the handle on the butt side of the blade.
- The belly of the handle is the opposite side of the handle from the back.
- The handle is a solid part of the handle by which the knife is held by the hand.
- Handle pads/dies – these parts are used for overhead mounting of the handle.
- Pritins are metal parts mounted when mounting the handle on the shank.
- Bolster/limiter – also called a guard, it prevents the hand from slipping during a stabbing blow.
- The end of the bolster is the part of the bolster facing the blade.
- The front stop is the protrusion of the limiter, the lower part of the guard.
- Clip/clamping ring – a special ring used for mounting the handle on the side.
- The stopper/crosspiece is the part of the handle that fits against the heel.
- Forging – used for mounted mounting of the handle, an oblong metal cap.
- The finger groove is an additional support for convenience when pulling types of cutting with a knife.
- Pinch – used to increase the reliability of the grip of the handle.
- Butt plate/pommel - this part is not always present on the knife; it is a kind of plug used when mounting the handle on the side.
- Back rest – used on chopping type knives, rest under the little finger.
- The end is the back part of the pommel.
- A hole for a lanyard is found in many products and is used to thread a special cord through it.
- Decorative rivet – handle fastening, decorative element.
- Screws/Rivets – tightening fasteners of handle dies, used for overhead mounting of handles.
- Spacers can be a decorative element, but they increase the grip of the palm on the smooth handle.
Pay attention to the picture below. The numbering of the names corresponds to the numbers on it.
The structure of the knife.
How to make bevels on a knife using a grinder
The topic is quite sensitive, and frankly speaking, controversial. The whole problem is that if you are new to this matter, all the “hardened” masters recommend starting to do it only by hand and nothing else.
The Internet is full of various tools for sharpening the correct trigger. Various craftsmen make them with their own hands and demonstrate how to use them. But real masters, all as one, claim that first you need to learn to “feel” metal.
Of course, no one denies that these devices will help save time, but for a beginner they will only serve as a hindrance.
And in order to achieve the best cut, you need to achieve harmony in the interaction of the cutting edge and bevels. But in this case, we will analyze an option for more or less professional craftsmen, how to make descents on a knife using an angle grinder or simply an angle grinder.
Removing slopes using an angle grinder.
Preparatory stage
One of the most important moments for work is to collect all the necessary items, closer, so that later you don’t have to run around the workshop and look for the right tool. Check the readiness of the angle grinder, and most importantly, do not forget about safety precautions.
A seemingly harmless “grinder” can cause so much trouble that it doesn’t seem like much.
In addition to this you will need:
- directly the preparation of the future blade;
- “grinder”, we have already talked about it, preferably with a speed switch, and it should not be very bulky;
- a vice firmly attached to the workbench;
- template for a future knife made of cardboard;
- screw clamp;
- metal corner;
- bucket with water.
The main tool of work will be an angle grinder, let’s add a few words about it. Choose it in small sizes, maximum 125 disc, otherwise you will simply get physically very tired holding it in weight.
There is no need to chase power; 1000 W is more than enough. Carry out all work wearing protective glasses and gloves. Are you prepared? Let's go further.
Expert advice
Quite useful tips to avoid making mistakes while working. They again relate to our main tool. It has long been noted that to cut a metal workpiece according to a drawing from a template, you only need to use an abrasive wheel with a thickness of at least 7 cm.
If you use a cutting disc, the metal often overheats, splits and small grooves appear. Roughing wheels behave quite decently, especially from “promoted” brands, and their price is low.
A simple device for releasing knives.
Having gradually learned to use grinding wheels, you can move on to cutting wheels, but their thickness should not be less than 2 mm. The disadvantages of a thin cutting disc include the fact that under lateral loads it begins to vibrate.
As a result, the entire instrument moves. Which can lead to disc destruction and cause various injuries. And as practice shows, newcomers who do not listen to this advice, sooner or later still return to roughing circles.
Cutting the workpiece
After reading the useful tips, you need to continue working. Cutting out the workpiece looks quite simple, taking into account the above tips:
- From the cardboard template you need to transfer the sketch to the metal from which the blade will be cut.
- The next step will be cutting out the workpiece itself; this must be done clearly in accordance with the line of the template. And one very delicate feature: at this stage the butt is not cut out. This is due to the fact that problems may arise during grinding; the tip of the blade may end up with “collapsed” edges. Experts say that this part of the blade is the most problematic.
- Direct drawing of the butt lines, this should not be done with a thick line, but clearly visible.
- The metal corner that has been prepared is clamped in a vice, and the already cut workpiece is pressed against it using a clamp.
A small addition to point No. 4, experienced craftsmen advise using two clamps to clamp the tip of the knife. If there is only one, then you need to gradually move it to the processing site, and the workpiece blade should be pressed very tightly against the corner. The processing area should be facing the master.
Chamfering
After all the preparatory work, you can begin cutting the chamfer. Why it is needed will become clear later. We position the abrasive wheel so that it is strictly perpendicular to the workpiece. If there are irregularities on the workpiece, then we do not deviate from the original position.
You don’t need to put in much effort, but rather try to slightly touch it and remove a small chamfer along the blade along the cutting edge. A very important point, you need to maintain a distance of 0.2 mm from the line to the middle of the knife.
Making a knife bevel.
Everything needs to be done slowly and carefully. We move the angle grinder along the entire length of the cutting edge. At the same time, do not forget to cool the part by pouring plenty of water. Overheating threatens to damage the workpiece. The chamfer is removed for the convenience of future manipulations; it will be a clearly visible boundary that cannot be crossed. You need to remove it along the entire cutting edge.
Descent work
After finishing work with the chamfer according to the RK, you can start working directly with the trigger. The direction of movement of the stone will be towards the butt, up to the outlined line. It’s not difficult to control the process; don’t forget to mark the beginning of the descent near the heel of the blade. Smoothly moving the angle grinder left and right in increments of 15-20 mm, we gradually peel off the surface.
The main thing is to make sure that the stone is perpendicular to the cutting edge.
Don't forget to cool the workpiece. When viewed from above, the stone will be turned vertical to the plane of the knife. Do not allow deviations from the specified parameters, otherwise the disk may stand on its edge and this can become a considerable headache for the master in the future.
But due to the fact that the blade is processed step by step, it will not be possible to spoil it with one wrong movement. There is no need to put pressure on the grinder; its weight, as a rule, is enough for normal handling of the descent.
Handle types
An important element of any knife is the handle. For a good cut, you need to hold the blade comfortably in your hand. The shank, which is located inside the handle, is made by knife makers in accordance with future installation. Let's look at what types of handles there are:
Horseback
A very common type of installation, especially from well-known manufacturers. Considered very reliable. The blade shank is inserted into the handle to the middle of its length.
Through
The most reliable installation option, but quite labor-intensive. The blade's tang runs through the entire handle.
Overhead
The shank itself serves as a handle; other materials are applied to the side surfaces and secured with rivets.
Welded
This method is used when installing metal handles, which become a monolithic structure with a shank.
Where to start forging knives
Like any product, forging a knife must begin, firstly, with choosing a model, secondly, a drawing, and thirdly, selecting the right material.
Model selection and drawing
For a beginner in blacksmithing, it is best to practice forging the simplest types of knives. You shouldn’t immediately plan to make some kind of super survival device of the most complex form, with fullers, serrators and other attributes.
The easiest to manufacture will be the forged type of blade - Finnish. It does not have complex shapes or other excesses that would cause difficulties in manufacturing for a novice blacksmith.
The second type of knife that you can try to make is the Yakut one. Today there is a lot of information on the Internet on the manufacture of such blades. The difficulty of forging it is that it has a convex part on one side and a concave part (full) on the other. However, the peculiarity of this knife is that traditionally it was not hardened for easy sharpening on any suitable stone. Three types of Yakut blades are made according to size.
Having sketched out a drawing diagram of the future product, we begin to select the necessary material.
Material
- Hardness and ductility.
- Corrosion resistance.
- Hardening properties.
The best choice for making a blade will be grades of tool alloy steel, for example: R6M5 (used for the manufacture of blades for hacksaws, drills, cutters), 9ХС (files), ШХ15 (bearings) and other samples.
How to understand at home what grade of steel you have? Typically, most products according to GOST have markings indicating the brand of material or its composition.
It is worth considering that during the forging process, some of the metal will be lost (it will go away as scale), so you need to take a workpiece with a volume exceeding the final parameters of the blade. The easiest way to get enough material to forge a knife is to use a file or a bearing.
Having selected the desired type of material, we begin to process it and form the product. How is a knife forged from a file?
Where to begin? Preparatory stage
For those who do not know how to make descents on a knife, experienced craftsmen recommend following the following sequence of actions:
- First, using a template, you need to transfer the outline of the blade onto the workpiece.
- Cut the knife with a grinder. This must be done clearly along the marked line. At this stage, experienced craftsmen do not cut out the butt, otherwise difficulties may arise later when grinding the slopes: the tip of the blade will end up with blocked edges. According to experts, this part of the blade is the most problematic.
- Apply a bevel line to the workpiece. This must be done on both sides. The line itself should be as thin as possible, but clearly visible from any angle.
- Clamp a rectangular pipe or angle in a vice. The workpiece will be pressed against it using a clamp. Experts recommend using two clamps. In this case, the master will be able to press the tip of the knife. If there is only one clamp, then it will have to be moved closer to the processing site. The entire plane of the workpiece should be pressed as tightly as possible against the support.
At the preparatory stage, it is not advisable for the clamp screws to be too tight. It is enough just to prevent the workpiece from moving. It will be more convenient to work if the clamping devices are placed on the opposite side. The places in the workpiece where the slopes are machined should, on the contrary, be closer to the master.
Trims with a grinding machine
The sharpening machine is a fairly simple design. This is an electric motor with an abrasive wheel mounted on a shaft. Surely many have seen him in workshops. But some points should be taken into account when making descents on such a device.
There are different circles, you should not take the first one you come across. To perform descents, we recommend a circle marked 25A, this indicates its composition of white electrocorundum. This wheel is inexpensive and works great on hardened steel.
It is advisable to have a tool rest on your sharpening machine. This is a small area in front of the circle; it will allow you to use various devices for proper work.
It is recommended to use the machine with good speed.
Otherwise you will have to suffer for a long time. If the machine is low-powered, the circle may stop when the blade is pressed hard against it. The process will thus slow down greatly. Choose a machine with a power of 450 W or more.
Examples of sharpening machines.
How to sharpen a hunting knife correctly?
You can use a variety of tools to sharpen hunting knives. So, usually knife manufacturing companies offer to purchase an additional special sharpener when purchasing. Often, special sheaths for hunting knives have convenient compartments for storing such sharpening devices. In field conditions, mechanical pocket sharpeners are the best choice. They come in a variety of sizes and shapes, but are always made from only the best materials so that you can restore the sharpness of your instrument with just a few simple movements.
What is the sharpening angle of a knife
Often, this value is rarely indicated in the technical specifications for a particular tool when purchasing it, although it is one of the important criteria that affects the cutting property of the tool. The lack of relevant information may cause some difficulty for the owner in understanding at what angle to subsequently sharpen the tool. To avoid this, you can use the table below for sharpening angles of knives. However, before that, let's figure out what this value actually is.
The area where the slope on the blade smoothly meets the edges of the cutting edge is called the approach. The angles of convergence of the approach on the two sides of the knife blade are called the “sharpening angle.” Ideally, the blade may have no leads; in such cases, sharpening angles are called trigger angles. But instruments with such a design can be found quite rarely. These mainly include products such as professional Japanese kitchen knives.
The sharpening angles are directly responsible for the purpose and type of work for which the knife was created. The smaller the sharpening angle, the easier it is to cut and the knife becomes sharper, but it quickly becomes dull and needs to be sharpened again. The greater the sharpening angle, the more similar the blade becomes to an ax and the longer it keeps its sharpness.
A little theory
There is no one perfect solution for all types of knives. Descents are performed for blades with specific tasks.
You can try to find a middle ground, but the thickness of the blade and the thickness of the blade will not give the knife ideal parameters.
To understand the principle of cutting a knife, you should take a closer look at the process. First the cutting edge comes into play, and then the trigger comes into action. Thanks to its qualities, it pushes the material that is being cut apart. It turns out that the thinner the bevel, the faster the cut will be.
But due to this, the strength of the blade suffers. With a more massive descent, the strength of the blade increases, but the cutting speed decreases. When making a blade, you have to sacrifice something. The purpose of the knife plays a role here.
Blade descents.
Types of sharpening
There are several types of knife sharpening:
| Types of knife sharpening | Description |
| Lenticular | The edge of the blade is sharpened, and the bend of the blade can also be processed. With such sharpening, blades are distinguished by a high level of cutting ability; they are able to “work” even on thick material, and, if necessary, serve as a chopping or piercing tool. Lens-shaped sharpening is carried out exclusively by hand, therefore it is used only in the production of professional knives - kitchen, hunting, tactical. |
| Razor sharpening (flat) | It is carried out at a minimum degree (10-20) and is suitable for processing only surgical instruments, razor accessories, and blades for fine cutting. In everyday life, such sharpening is done for hunting knives for special purposes - for example, skinning knives, fishing knives. |
| Wedge sharpening | It is rarely used, because after it the cutting ability of the tool increases, but the strength of its blade decreases. During the process, the side surfaces of the blade must be grinded and polished, but at home this is quite problematic. |
| Pentagonal sharpening | It is widely used for kitchen and travel knives; even household devices for this process often perform just this type of knife sharpening. After it, the blade slightly loses its tactical abilities, but its service life does not decrease. |
| Double-sided asymmetric sharpening | Combines enhancing the tactical and physical abilities of knives. The result will be ease of cutting even the hardest products, flawless chopping of material without any effort. This type of sharpening is often used in the manufacture of Japanese kitchen knives, which are of high quality. A special feature of knives with double-sided asymmetric sharpening is that the edge of the blade does not enter the cut on the product, but is constantly held on top. |
There are many ways to sharpen knives, they will differ depending on the tool used for this.
Side profiles of blades
There are many types of side profiles. The following are considered the main ones:
- The blade intended for cutting and stabbing has a straight spine.
- Blade with a lowered spine line (drop-point). This product cuts and stabs well, the tip is located on the axis of force application. It is slightly lighter in weight than a blade of the same length with a straight spine. A false blade is often made on this part.
- Blade with an increased trailing point. This shape provides a long cutting edge, which is quite convenient when cutting durable materials.
- Bowie wedge (clip-point). The shape is very similar to a wedge with a lowered butt line, but the tip is thinner. A special bevel of the blade brings the tip closer to the line of application of force during a piercing blow. This bevel is sometimes sharpened; this type is popular in America.
- Goat leg type blade. The product is designed for thin and precise cuts, which is facilitated by a straight blade. The knife is quite safe and cannot be used to stab.
- Tanto type blade. Many historians claim that this shape originated from Japanese knives. But in reality it was invented in America. And classic tanto knives had a straight line of the spine. The product is convenient for cutting actions, and with a forceful injection, the tip is less likely to chip.
- Spear-shaped wedge. Most often these are double-edged products with the tip located on the midline. These knives are more suitable for stabbing. Most often, daggers are made this way.
Blade profiles.
How to sharpen high-speed cutters
Rapid grades of steel have a hardness of up to 62-64 units on the Rockwell scale. By observing the manufacturing conditions of the product, it will be preserved. It is a well-known fact that the greater the hardness, the greater the sharpening angle. But there are no restrictions, you need a larger angle, do as you please.
Sharpening a knife from a quick cutter.
Sharpening of rapid alloys, lasts a long time. But remember that if the blade becomes dull, it will be difficult to sharpen it. It is better to entrust this function to professionals. We decided to do it ourselves - there are no differences in sharpening from a regular knife.
Previous Making a knife from a crutch with your own hands Next Making How to make a knife from a saw
Business concept
The business idea is related to the opening of an enterprise for the production of knives of various shapes and purposes. The main buyers will be individuals purchasing household appliances, as well as fishing, hunting and other stores.
Production always starts with a blank. You can make it yourself or buy it ready-made. After the type of future knife is determined, steel is selected, and a pattern is made from a piece of metal.
But first, the source material is put under a roller weighing 80 tons. The result is a flattened plate on which the contours of the workpiece are traced. Steel for production is sold in sheet form.
Blade sections
The functionality and convenience of a knife is determined primarily by the profile of the blade, which is specified during its manufacture. The main components and concepts of the blade are:
- 1 – cutting edge;
- 2 – descents;
- 3 – ribs;
- 4 – golomen;
- 5 – butt;
- A – blade width;
- B – web width;
- C – width of slopes;
- D – inlet width;
- E – butt thickness;
- F – Thickness of slopes at the inlet.
All these parameters can be seen in the picture below.
Blade cross-section diagram.
Knife cutting edge angle - possible options
The geometry of the blade is obvious - it is a long wedge (and its variations) with a thin cutting edge. The thinner the blade and the smaller the sharpening angle, the more successfully the knife pushes the layers of material apart, the less effort is required for this. There is such an approximate classification of blades according to the sharpening angle:
- up to 20 degrees - surgical instruments, razors, blades for delicate cutting;
- 20-25 degrees - chef's knives;
- 25-30 degrees - hunting, utility, tourist knives;
- 30-40 degrees - knives and tools designed to withstand impacts.
Based on the external features and sharpening of the blade, the following types of knife cutting edge are distinguished:
- With one-sided sharpening. Another name is chisel. Used in the production of working tools, samurai swords and Japanese kitchen knives. The blade is sharpened on one side, while the other remains flat, which ensures an ideal thinness and sharpness of the cutting edge.
- With double-sided sharpening. It can be symmetrical (kitchen knives) and asymmetrical (hunting varieties). The most common for the average user is the symmetrical double-sided sharpening of chef's knives.
- With serrated sharpening. This cutting edge consists of fine, sharpened teeth. Most often used on vegetable and types of kitchen knives.
- With wave-shaped sharpening. Unlike serrated teeth, the teeth are larger, as is the distance between them. Bread knives, tourist and hunting models have this sharpening.
- With combined sharpening. In this case, part of the blade has a smooth cutting edge, and the other has a serrated or wavy edge.
Classification of knives by purpose
The meaning of the classification is clear from the name, let's figure out what purpose knives can have:
Materials for making the handle
According to the method of fastening the handles of knives, they are divided into:
- Invoices . The handle is assembled from two parts, fastened with rivets. Most often, this fastening method is used for products with a wide shank, the shape of which often determines the contours of the handle. In addition, in this case it is easy to balance a massive or long blade.
- Horsemen . The method is used for knives with a narrow shank. A solid handle is lighter and stronger than a riveted handle, so the knives can be used for labor-intensive operations.
- Solid cast . In this case, the handle is integral with the blade.
The following materials are most often used to make handles today:
- Hardwood with high viscosity (birch, maple, walnut) is not lower than second grade with a moisture content not exceeding 12%.
- Polypropylene, for example, grades 04P-01010, 05P-01020.
- Impact-resistant polystyrene grades UPM 0503, UPM 0508.
Handles can also be made from other materials, for example, various metal alloys, supplemented with various decorative elements, covered with leather, etc.
For the manufacture of washers, rivets and other fittings, it is allowed to use steel grades 12Х17, 12Х18Н9Э, copper-zinc alloys L63., L68, LS59-1, aluminum alloys AD, AD0 or their analogues.
At the initial stage of activity, it is possible to arrange supplies of ready-made handles, but in the future it is advisable to establish your own production.
Made by hand
Now we get to the most interesting part. The conversation about manual sharpening was raised at the very beginning, it’s worth returning to it, since it is really, really necessary for the most novice craftsmen.
As already written above, this magical and grueling action is necessary to understand steel itself. You need to feel it. It takes a lot of sweat to learn how to do this manually. This procedure is done with files, and, in the end, “caught up” with sharpening stones of different grain sizes.
How much do you need to grind? You will answer this question for yourself when you sharpen a dozen other blanks. And if you are not lazy and do it manually, you will be called a true master of your craft.
Yes, sometimes you should resort to special mechanical “assistants” in exceptional cases. Feeling the steel manually can be called “aerobatics.” Moreover, the blade will always feel the warmth of your hands, and perhaps you will put a piece of your soul into it.
Previous
Knife sharpening Japanese water stones for sharpening knives
Next
Making knives Hardening a knife at home
Getting to know the element
Making a homemade knife is actually quite a labor-intensive process, but home craftsmen are not afraid of this. The main reason is to satisfy one's creative potential. Using available tools, you can make any type of knife.
And often, handicraft production is in no way inferior to factory production, and in some cases can even surpass it. Among other things, this is a good cost savings. Making a knife at home will require the master to strictly adhere to order and rules.
The most important stage in making a knife is the formation of slopes on the blade. These elements are made by milling flat blanks. They will greatly influence the piercing and cutting properties of the finished product.