How to unscrew a regular bolt
Difficulties often arise not only in the process of dismantling an anchor bolt, but also a regular threaded one. For example, when the fastener does not have a head or deformation has occurred. In such cases, other methods are used that differ from the methods of removing the anchor bolt.
To start rotating a bolt with a missing head, you will need to use a sharp core. The tool is placed at a certain angle to the hardware.
It is also possible to use a grinder, with which a suitable slot is made. Then a screwdriver is inserted into the resulting groove and the fastening element is removed. If all else fails, try using a tap or a screwdriver with a conical blade. To do this, a tap with a left-hand thread is installed in the prepared threaded hole.
Another option for removing a bolt is a right-hand thread tap. In this case, the part is screwed into the fastener head and secured by welding. A less common, but radical method is drilling. You will need to select a suitable drill bit that matches the cross-sectional diameter of the bolt.
Types of fasteners
Pull out a broken bolt using an extractor
There are different types of concrete anchor bolts, each of which has its own purpose.
Photos and features of fasteners are presented in the table:
| Anchor type | Peculiarities |
| This bolt is used for fastening fairly heavy structures to concrete. Before installing it, a hole is drilled for its installation. The main difference between the screw is that the fastening is carried out without a jacket. There is a small wedge in the center of the bushing that expands when screwed in. After driving the anchor, be sure to tighten the nut securing the anchor after enlarging the plug. This is a durable and reliable element for fastening objects. |
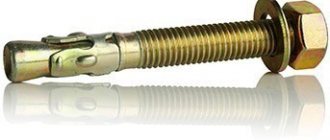
| Spacer | This is the most popular type of concrete anchor. The length of the bolt ranges from 20 mm to 120 mm, and the diameter from 4 mm to 20 mm. The design includes a sleeve with an internal thread running along the length of the rod. The head on it pushes the sleeve apart. Such a simple device securely fixes the fasteners. When installing, you need to pre-drill a hole in the concrete, just like for a wedge bolt. |
| Inside the expansion anchor there is a petal sleeve and a nut. These are practical bolts that can be easily removed if necessary. This may be necessary when you need to cut a reinforced concrete structure with diamond wheels. Before using the bolt on surfaces with metal particles, they must be pulled out to prevent damage to the tool. |
| Drive-in anchors secure structures to a concrete surface most reliably. They consist of a bushing, a wedge, and there are cutouts on the surface that allow the bolts to expand when struck. In this case, you need to hit the anchor itself, so that the wedge can rest against the bottom of the hole. Bolts can be: metal, polymer, nylon. The main difference between the latter is the presence of a thread in the form of a shark tooth. But it is not recommended to use it on old, crumbling surfaces. |
| Typically these anchor bolts are used to bond the material to the concrete. In this case, the package with glue is placed in a pre-prepared hole. The composition contained in the bolt is pressed outward when pressed, and this ensures reliable fixation. But the price of the product is quite high, which does not make it popular. |
| This is a more reliable anchorage. The bolt has two or even three split bushings, which, when installed, open all their fastening edges. They are made with standard pins or with ends with loops or hooks of various shapes. |
| Hairpin anchor | This is a fastening device that is made of high-strength steel with various anti-corrosion coatings. Produced according to European standards - HAS and HST. Unlike other anchor structures, the product has a shorter sleeve length, and can withstand shock loads along and across the axis. |
In addition to the listed types, there are such products as:
Concrete anchor with ring
Eyebolt for concrete
Metal
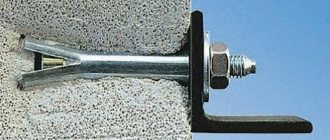
The configuration of metal dowels usually differs from plastic ones - metal fasteners are made in the form of sleeves with 3 petals, which, during installation in a concrete monolith, open and work like an anchor. The expanding element is usually a screw - ordinary or with a removable cone. The dowel can cling along its entire length, have antennae, spikes, etc.
Simple expansion dowels are removed by knocking out or unscrewing the screw/bolt. The edge is caught with pliers or pliers, the tool is rested against a wall or stand (if the wall is fragile), rocked and pulled at the same time.
"Molly"
Dowels of this type work according to the following principle: they are compressed with special pliers or a screw so that the middle is flattened and opens in the wall in the form of petals. This makes it possible to achieve optimal load distribution and significantly increase the strength of the fasteners (which is especially important in hollow walls). And it is precisely because of this design that it is almost impossible to dismantle the dowels.
At the moment of unscrewing the screw and pushing it, the so-called fastener petals do not straighten completely and tear in half. Therefore, the fastener is dismantled with force, and then the hole is cleared of remnants of fasteners and sealed.
Remove the dowel for the construction gun
Dowels look like a nail with a washer welded to it. The fasteners are installed with a construction gun and usually do not involve dismantling, so experts do not recommend using it for installing plumbing fixtures, radiators, windows, doors, etc.
Methods for removing dowels:
- 2-4 hits on the head with medium force (the dowel will loosen), then you need to grab the head and pull it out, swinging it.
- The fasteners can be heated with a torch, allowed to cool (the fasteners will expand, push the concrete apart a little, then return to their previous dimensions), and pull them out.
- Using drill 6, get as close to the fastener as possible, squeeze a narrow tool (for example, a crowbar) under the head, and knock out the pin into the slot nearby.
Let's work with wood
Anchor bolt with hook: application and installation features
Today, most people use plastic dowels, but some prefer wooden dowels. The difference in their extraction is not particularly large. The cap can also be pulled out using a self-tapping screw, which is screwed into a wooden product, then the removal process is carried out using pliers. If you don't have them at hand, a nail puller or other construction tool will do.
Another method that is especially popular is pulling it out in parts. To do this, you will need a chisel and a hammer, with the help of which the dowel is divided along the fiber. Then the resulting fragments are removed with a knife or screwdriver. You can also use a drill. This option is provided for dowels made of soft wood. The drill can be replaced with a hammer drill
It is necessary to carry out the procedure carefully to avoid large-diameter holes in the wall
In most cases, wooden dowels are used for installing wooden windows. To do this, take 3-4 fasteners with which to fix the window sill, and several pieces for installing the window frame.
Metal dowels are not as widespread as plastic ones, because their use implies the presence of special equipment. There are two options for removing such fasteners.
One way is twisting. The second is loosening with a hammer. If you can’t carefully unscrew the dowel, you can try to loosen it with a hammer. When the fastener is flush with the wall, it can be removed; to do this, you will need to make several small holes located around it. Then the actual extraction occurs.
Removing a dowel from a concrete surface is not an easy task, but using the right method, you can quickly remove the fastener with minimal loss to the surface. To complete the procedure in the shortest possible time, you only need to prepare the necessary tools and choose the right extraction method.
How to quickly remove a dowel from a concrete wall? updated: November 11, 2016 by: Artyom
Few people know how to properly remove an old dowel from a wall. The main thing is to try to choose a simple, reliable and economical method. Skills in installing and dismantling fasteners will help you achieve results; experience in using electric and hand tools will come in handy.
Several types are available specifically for concrete; they always use a nail as a rod. Reliable operation can be guaranteed if you are able to choose the right version based on the dimensions of the plane and the massiveness of the suspended structures, and perform high-quality installation.
Before starting work, you need to evaluate the quality and thickness of the surface. The presence of hidden electrical wiring and metal fittings is the basis for changing the location. Sometimes it is not easy to hammer in a dowel carefully without damaging the adjacent part of the wall.
The most commonly used options are:
- Expandable, suitable for solid walls. It will establish itself inside it due to the expansion of the plastic casing. The plastic bushing is made with a cone-shaped metal core or with a threaded thread.
- Universal. The built-in nail fits tightly to the walls of the hole. Suitable for loose, hollow partitions.
You can insert the dowel using a drill with a hammer or hammer function, a concrete drill, or a hammer. Correctly perform the work in the following sequence:
- using a hammer drill, punch a hole with a diameter similar to the bushing and a depth exceeding the length of the fastening element by 0.5 cm;
- clean the resulting recess from dirt and dust;
- fix the dowel body with a hammer until its edge aligns with the wall surface;
- hammer the nail into the body until it stops.
If you follow all the installation rules, it will be difficult to get it.
Radical methods
In addition to “intelligent” methods of removing hardware from a wall, there are also more radical ones.
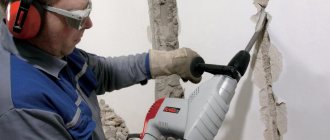
Most often, in order to remove the anchor without hassle, it is simply drilled out. For this purpose, metal drills made of high quality steel are used. As a rule, by destroying the threaded spacer mechanism of the product, you can easily remove it from the hole. The second, rougher method is the most “traumatic” for the structure. To remove the bolt, the pin is hammered back into the cage, after which the concrete around the anchor is destroyed with a hammer drill or chisel and hammer to a depth of about 1 centimeter. After the clip protrudes above the concrete surface, you need to grab it with pliers and try to pull it out of the wall. Using the last two methods for removing expansion anchors, you must be prepared for damage to the wall or ceiling around the fastener. Therefore, when starting such work, do not forget to stock up on putty and a spatula.
How to pull a chopstick out of the wall?
Anchor bolts with ring and hook
Nowadays, plastic dowels are widely used, which are considered stronger, more durable and reliable. However, some people still use wooden dowels instead of plastic dowels the old fashioned way.
The difference in dismantling plastic and wooden dowels is not so great. You can also try screwing a self-tapping screw into it and pulling it out with pliers, a nail puller, or another suitable tool at hand.
Another popular way to get rid of a wooden dowel is to break it apart and pull it out piece by piece. Using a chisel and hammer, divide the dowel along the grain into several parts, then pick out the fragments using a knife or screwdriver.
You can also try drilling out the cap using a drill. However, if the chopik was made of hard wood, this process will take quite a long time. Instead of a drill, you can use a hammer drill if you have one. However, do not overdo it, otherwise you will end up with holes in the wall that are much larger in diameter than you would like.
Types of anchor fastening
Anchor bolts can be wedge, expansion and driven. Having understood the features of these structures, you can quickly remove them from the wall if necessary.
Drive-in anchors
Such fasteners consist of a cylinder-shaped sleeve. It has several slots located longitudinally. There are usually notches on the outside that improve adhesion to the concrete surface. If there are no notches, this indicates that the anchor can be chosen not only as a fastener, but also as a decorative element.
Since such anchors are reliable and relatively cheap, they are often used by both professional builders and home craftsmen.
To install anchor bolts into the wall, a hole of a certain depth is first drilled. The diameter is selected so that the product is placed in the channel only with force. It is worth considering that placing the anchor in the wall occurs only after the drilled hole is completely cleaned. After this, the firing pin is inserted into the cylinder and hit with a hammer until the longitudinal slots spread to the maximum possible width.
Expandable design
Such products consist of several segments, each of which has the shape of a cylinder. All parts are connected together according to the following scheme: spring – spacer – ring. After a bolt is placed in the outer element, the anchor is wedged.
Thanks to the features of this type of fasteners, the slots open to their maximum width. That is why such anchor bolts are used for brick walls or foam blocks.
The advantages of fasteners include:
- possibility of placing the anchor at a shallow depth;
- high load-bearing capacity;
- no need to create holes that correspond to the parameters of the anchor with high accuracy.
Wedge design
If you need to secure heavy objects, wedge anchors are chosen. Their peculiarity: wedging of the cylinder occurs while tightening the nut. Anchors of this type are more difficult to dismantle, but they are the most reliable as they can withstand heavy loads.
Radical methods
In addition to “intelligent” methods of removing hardware from a wall, there are also more radical ones.
Most often, in order to remove the anchor without hassle, it is simply drilled out. For this purpose, metal drills made of high quality steel are used. As a rule, by destroying the threaded spacer mechanism of the product, you can easily remove it from the hole. The second, rougher method is the most “traumatic” for the structure. To remove the bolt, the pin is hammered back into the cage, after which the concrete around the anchor is destroyed with a hammer drill or chisel and hammer to a depth of about 1 centimeter. After the clip protrudes above the concrete surface, you need to grab it with pliers and try to pull it out of the wall. Using the last two methods for removing expansion anchors, you must be prepared for damage to the wall or ceiling around the fastener. Therefore, when starting such work, do not forget to stock up on putty and a spatula.
How to remove an anchor from a wall?
In the field of construction and repair, new, more reliable types of fastening elements, which include anchor bolts, have been quite actively used for a long time. In this regard, the question of how to quickly remove an anchor bolt from a floor, ceiling or wall is quite relevant. The difficulty of removing a bolt of this type is due to the fact that it has a complex design.
How to remove an anchor bolt
Anchor bolts, which provide the highest reliability of fastening, are used in cases where it is necessary to fix heavy structures on the surface of a wall, ceiling or floor - massive chandeliers, door and window frames, suspended ceiling modules.
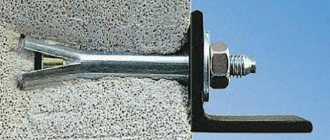
The main structural element of the anchor bolt is a thin-walled metal sleeve, on the side surface of which longitudinal cuts are made. The bolt itself is screwed into the sleeve, thereby drawing a cone-shaped nut into its inner part, which opens its walls and ensures reliable fixation of the entire structure inside the previously prepared hole.
Anchor bolts, due to the peculiarities of their design, allow you to securely fasten elements weighing more than 100 kg to the surface of the wall, floor and ceiling.
First of all, you need to try to loosen the anchor in a circular motion, if you can get caught on the protruding parts
To use an anchor, you must first drill a hole of the appropriate diameter into which the fastener shell will be inserted, and a bolt or threaded rod is screwed into it. If problems with how to use such a fastening element most often do not arise, then the question of how to remove the anchor is quite relevant. The high reliability of fixation of such a bolt often leads to the fact that it has to be literally broken out of the wall, floor or ceiling, and the hole formed as a result of such manipulations must be sealed with cement mortar or putty.
The conical part can move deeper if there is a hole to spare along the length
Meanwhile, there are several simple ways to remove such a bolt from the wall with minimal damage to the condition of the surface.
- First of all, you should unscrew the nut on the stud and try to drive it deeper so that it stops pushing the cage apart. If you managed to do this, then you can easily pull out the clip, and then the stud bolt itself.
- The threaded connection of the nut with the stud can be drilled out, and then, if the distance at which the stud protrudes above the nut allows, it can be driven deeper so that it stops pushing the cage apart. After this, as in the previous case, it is necessary to remove the clip from the wall, and after it the anchor bolt itself.
- You can also drill a hole in the central part of the stud bolt, in which a thread is cut using a tap. A bolt is screwed into the resulting threaded hole, which must be locked. While holding the screwed-in bolt, you must try to twist the nut on the main stud so that it turns together with the cage. When the additional bolt is fixed, you need to remove the lock nut from it and unscrew it. Then you can cut the main nut off the stud using a grinder and drive the stud into the hole. Once you have freed the clip, you can remove it using pliers or other clamping devices, and then pull out the pin itself.
- Without doing anything, you can try to hammer the stud into the cage as much as possible along with the nut screwed onto it. After performing this manipulation, you need to break the concrete surface around the head of the anchor bolt, going 1 cm deeper. After this, you can try to pull the fastener out of the wall using ordinary pliers.
- If the anchor bolt is made of metal that is not too hard, you can simply drill it out of the wall. However, even with such a careful approach to removing the anchor bolt, you should be prepared for the fact that the section of the wall, ceiling or floor on which such a fastening element was located will have to be restored to its original form using putty or cement mortar.
Anchor. Types and work. Application and features. Installation and dismantling
An anchor is a fastener that combines the design features of a bolt and dowel. It is used for fixing into stone, brick, concrete and other hard and porous materials. The use of anchors allows you to achieve high fastening strength, which significantly exceeds the capabilities of a dowel or screw.
Classification of anchors by size
The name anchor is translated from German as “anchor”. Indeed, this fastener provides reliable fixation. It is used when you need to attach a horizontal bar or other sports equipment to the wall.
It is used when installing air conditioners, for fastening balcony elements to the facade, for fixing plumbing fixtures, etc. Anchor bolts can withstand large dynamic loads, vibration and other mechanical impacts.
These fasteners are divided into groups by size:
- Small – diameter up to 8 mm, length up to 55 mm.
- Medium – diameter up to 12 mm with length up to 120 mm.
- Large ones reach a thickness of 24 mm and a length of up to 220 mm.
In construction, the choice of anchors depends on the requirements of GOST. For certain purposes, clear parameters for the fasteners to be used are established.
Classic anchor designs
The design of the anchor bolt may differ in the method of installation, as well as the connection of various elements to them. The most popular types of this fastener are the following designs:
- Spacers.
- Hammers.
- Wedges.
Spacers
Expansion anchors are the most common design. It is a bolt or pin, the nose of which is made in the form of a cone. A sleeve with a longitudinal cut is placed on this rod.
Since its internal diameter is smaller than the cone on the spout, it cannot come off the pin. A special nut on the top of the anchor, protruding from the wall, when screwed on, drags a pin towards itself, which cannot pass through the sleeve and unclamps it.
As a result, the latter is deformed, fitting tightly to the walls of the hole and holding the entire anchor fastener as a whole.
Expansion fasteners provide effective fixation only in materials that have a dense internal structure. This is primarily concrete. If such anchors are installed in hollow materials, then special strength cannot be achieved.
The expansion anchor comes with:
- Nut.
- Crochet.
- Ring.
- Double-spaced.
- Hex head.
Anchors with a nut are a pin that is tightened with a regular nut.
It uses a long sleeve, which provides a large contact area inside the hole. The peculiarity of using such an anchor is not only that you can use a nut to press a certain structure against the wall, but also makes it possible to screw another nut onto its stud.
This can be a ring nut or a special welded tip of any shape.
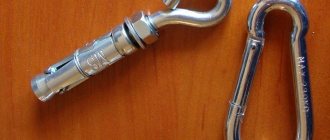
Anchors with a ring or hook are almost identical in design to those with a nut. They use a pin with a fastening ring or hook at the end. The deformation sleeve itself has a dense top with a knurled thread.
When the pin is unscrewed, the sleeve expands because it has longitudinal through slots that make the central part more flexible. This fastener is used in cases where it is necessary to hook a cord, cable or rope. You can also use it to connect a chain to a wall.
In everyday life, they are usually used to securely hang a chandelier from the ceiling. Children's swings in apartments are also attached to them.
Double-expansion anchors have a special design. The main difference between this fastener is that when the stud is unscrewed, one spacer sleeve fits into the second. The expansion is carried out close to the end of the anchor, which is especially important if it is necessary to secure it in a porous material. Due to the fact that the fasteners are fixed deep in the wall, the maximum possible fixation is ensured.
An anchor with a hex head has almost the same design as with a nut. The only difference is that instead of a stud and nut, it uses a regular bolt.
This design can be designed for a wrench, and also for a screwdriver. Such anchors are rarely made large, and usually their diameter does not exceed 12 mm.
Wedge
Wedge anchors are a long metal pin with a deformation sleeve at the end. When screwing the pin, the small petals expand. This occurs deep in the wall far from the front part, so cracking of the material is eliminated.
Drivers
The driven anchor bolt is fundamentally different from other designs. To ensure its opening, it is necessary to first seat the sleeve itself, and only then screw in the pin.
In order to use such fasteners, you need to prepare a hole, and then place the anchor sleeve in it. After this, a pin is placed into the installed sleeve, which must be hit with a hammer.
This allows the sleeve to be deformed and pressed tightly against the walls of the hole. Next, the pin is removed and the bolt is tightened, to which the fixation is carried out.
Chemical anchors
Chemical, or adhesive, anchors are very reliable fasteners that provide strong fixation. This fastener is a set of a regular pin and glue.
To use such fasteners, a hole is drilled, which is cleared of dust and subsequently filled with adhesive. After this, a pin is inserted into it and left until it hardens.
The disadvantage of such fasteners is that it takes a long time to gain maximum strength. In the case of conventional anchors, the fasteners can be used immediately.
Chemical fasteners are used in cases where it is necessary to fix in a soft or porous material that cannot withstand heavy loads. In order to achieve the maximum possible holding force for the stud, it is necessary to properly prepare the hole.
First, the drill deepens to the required distance, after which a cone-shaped void is sampled using circular movements. It is necessary to make sure that the bottom of the hole is significantly wider than its neck. This will allow you to pour in more glue.
After hardening, it will not only hold the pin by sticking to the walls, but it will also physically not be able to escape from the hole, due to the narrow exit.
How to use a regular anchor correctly
In order for the anchor to work to its full potential, it must be installed correctly. First of all, you need to choose a drill that will match the diameter of the anchor.
It is not necessary that it be a fraction of a millimeter thicker, since when drilling with a drill , hammer drill or screwdriver , the resulting hole will always be slightly larger due to the rattling of the tool in the hands.
It is worth controlling the depth so as not to overdo it, as this will reduce the performance of the fastener. Next, be sure to blow out the hole to remove crumbs and dust from it.
To increase the reliability of fasteners when working with porous materials, some builders prefer the additional use of adhesives. In particular, liquid nails are used. A small amount of mass is squeezed into the hole, after which an anchor bolt is driven into it. In fact, after tightening the spacer, rigid fixation is ensured not only by the ribs, but also by glue.
Usually, when installing an anchor, it is quite difficult to drive it into the prepared hole. If there are no problems with this, then the hole is too thick and you cannot count on a reliable connection. If this happens, you will have to choose a thicker anchor.
In order to drive the fastener into the prepared hole, it can be driven in using a hammer . In this case, you need to use a soft lining. If the fastener is fixed with a hook or ring at the end, then you can hit directly.
In the case where the tops of the anchor are a threaded connection, impacts can damage it. You need to align the tip of the stud and the side of the nut at the same level. After this, a wooden block is applied and blows are made with a hammer.
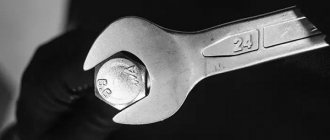
Once the fastener is fully seated, you can tighten it using a wrench .
How to remove an anchor bolt
The connection obtained by the anchor is very reliable, but there are times when the need for it ends. In this case, it is necessary to remove the fasteners from the wall. This is quite difficult, but quite doable.
To work, you will need a wrench, as well as a chisel , hammer and pliers . First you need to unscrew the pin so that it no longer pushes the sleeve apart. This procedure differs depending on the anchor device.
Once the sleeve is released, it can be pulled out. In most cases, you won't be able to get a hold of it with pliers, so you will need to destroy a little of the wall around the hole in which the anchor is seated. To do this, place a chisel near the anchor sleeve and make a groove about 1 cm deep. After this, you will be able to grab the sleeve with pliers and pull it out.
How to remove a whole, broken or rusty anchor bolt from a thread
Anchor fastening is considered the most reliable and is usually designed to last for many years. For example, this is how water tanks and even parts of walls are hung during construction.
But what if the element needs to be completely removed? Removing an anchor bolt from a concrete wall is quite easy if it is in good condition and has been installed correctly.
If the installation was carried out with errors or the bolt was damaged during operation, you will have to work hard.
How to remove a working anchor
Installation rules:
- the hole for the anchor must be equal in length to it;
- the sleeve should protrude from the wall so much that it can be picked up with pliers (for further dismantling);
- hammering an anchor by hitting a nut, bolt, hook is highly not recommended - it is better to lay a wooden block or the like. shock absorber to avoid damaging the thread;
- In order not to tear off the bolt slot, you need to use a high-quality and clearly suitable screwdriver, as well as medium speed screwdriver.
Important When placed outdoors or in damp areas, the anchor fasteners require anti-corrosion protection. https://www.youtube.com/embed/i5WAzE9O1nU
Removing a working nut anchor:
- Remove the nut.
- Hit the bolt with a hammer through the gasket so that the expanding element comes out of the sleeve.
- Push the pin deep into the wall so as to free a small edge of the cartridge.
- Grab the sleeve with a suitable tool and pull it out.
Removing a working frame anchor:
- Completely unscrew the anchor screw.
- Pick up and pull out the sleeve.
- Insert a screw into the hole in the wall so that it connects to the removable anchoring part.
- Screw the screw into the expansion element.
- Pull out the entire structure.
Advice It is not necessary to remove anchor sleeves from the walls: they can be driven deeper so that they do not protrude beyond the wall, and covered with a plastic or wooden sleeve or cement.
The sleeve is completely driven into the wall
This is the most common case. If you need to remove an anchor from a concrete wall, we are usually talking about an indoor space. The best recipe is to break the plaster around so that the pliers catch on the edge of the sleeve.
If you need to remove the anchor without damaging the adjacent surface (primarily tiles or plastic window slope):
- Remove the nut, knock out the bolt or loosen it (for a frame structure).
- Screw a thin self-tapping screw between the bolt and the sleeve until it jams.
- Place something for support (for example, a hammer).
- Grasp both studs and pull out the structure.
If the first option doesn't help:
- Remove the nut and knock out the stud or unscrew the bolt.
- Use a thin nail or self-tapping screw as a wedge to tear and bend the edge of the sleeve.
- Grab the cartridge by the bent edge (it’s convenient to first pull it with narrow- or round-nose pliers; when the edge is released enough, take pliers) and pull it out.
- For a frame anchor, insert it into the concrete passage and screw the bolt into the spacer and remove everything together.
The anchor is rusty
A slightly rusted anchor bolt can be restored with automotive rust converter, machine lubricant, or WD-40 remover.
Procedure:
- Remove the top layer of dirt and, if possible, rust.
- Treat the head and nut, if possible, spray deep into the converter.
- Maintain the time specified in the instructions for the product.
- If necessary, repeat the procedure.
- Try to carefully unscrew the bolt.
Advice On the forums they suggest treating oxidized parts with kerosene or VD-40 and leaving for half a day for the product to take effect.
The slot on the bolt is torn off
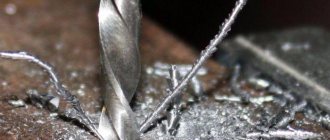
Broken splines are a fairly rare occurrence on anchor fasteners. However, if this happens, it is not necessary to dismantle the wall.
Try drilling out the head, or the rod if there is no head, to remove the bolt from the threads. An “extractor” for screws and screws copes well with this task.
This is an inexpensive device with attachments that are suitable for both a screwdriver and a drill. You can buy it on AliExpress for little money.
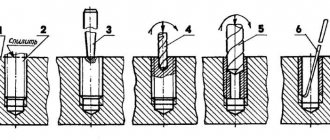
How to use the extractor:
- Attach and secure the bit with the drill (curved cross) facing down.
- Drill a hole in the stud or bolt head.
- Turn the extractor over with the wedge-shaped end facing down and screw it into the stud.
- Engage reverse and release the broken bolt using the extractor.
With proper installation and operation, the anchor bolts are removed with force, but quite simply.
In rare cases, when it is impossible to hook the sleeve (for example, bad steel, the edge breaks) or the fastener is “stuck” tightly, the only option remains is to cut off the head or cut the anchor itself with a Bulgarian saw. If the anchor held a Swedish corner or etc.
heaviness on the wall, perhaps the best option is to drive in a stud and cover everything with a wooden bobbin or cement and just put finishing plaster on top.
Removing old and rusted fasteners
How to remove a dowel from a wall if it has been in the damp environment of the bathroom for a long time and is covered with rust and hard layers of dirt? In this case, you will need WD-40 penetrating liquid or a solution of food grade acetic acid. First you need to pour a vinegar solution over the rusty fasteners to be dismantled. This will help dissolve the oxides and free the threads on the screw. If this does not help, then after rinsing the dowel with plenty of water and letting it dry, treat the fastening area with WD-40. Judging by the reviews, it easily penetrates cement building materials and softens them, and also facilitates the removal and rotation of the screw in the sleeve.
How to remove a dowel from a wall? Treatment with soap is also effective. It will help dissolve fatty deposits and penetrate into the pores of the wall. Also, being a good anti-friction agent, the composition will allow you to unscrew the fasteners.
Installation instructions
Before attaching the pin, you need to assemble the tools. You will need: a wrench, a car vacuum cleaner, a drill that acts as a drifter or a drifter, a strong gimlet, a hammer.
Drilling
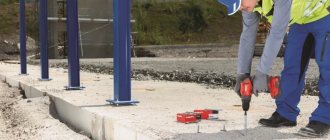
First, the base is carefully distributed under the drilling zones. Next, holes of the required length are drilled in the concrete along the mark (measured using the spacer), placing a stopper on the piping.
The distance from the edge of the wall must be 2.5 times greater than the depth of the hole. After the hole, you need to clean it with a vacuum cleaner. When it is not possible to completely remove the remaining dust, it is possible to make the hole 1-2 cm deeper.
Installation of anchor with nut
The spacer piece of the pin is inserted into the foundation, hammered with a hammer until it dives deep into the wood concrete (the edges are flush with the wall). Next, the pin is inserted, the nut is tightened, and turning later becomes impossible. Manufacturers specify extreme screwing efforts - a force wrench is required here.
Tightening to the point of use with certain bases (reinforced aerated concrete, reinforced foam concrete) can result in bending and breakage of the substance.
Chemical anchor installation
When collecting chemicals. pin, a slightly different assortment of tools is required: a drifter, a wrench, a construction vacuum cleaner, threaded pins, specials. glue, prefabricated pistol. For the sake of a huge proportion of fasteners, paste is mainly selected.
First, marks are applied to the base, holes are drilled and cleaned. Before pouring the adhesive composition into the concrete, it is necessary to screw in an openwork quill, as a result of which the chemical. the material will be fixed in the body of the base. Afterwards you should fill the holes 2/3 with special. with glue, placing the pin, screwing it in little by little to ensure an even position of the gluing product. After drying, the special glue - screw the nut with a wrench.
Tools and accessories for working with anchor-type fasteners
To remove the anchor, you can use the following tools:
- hammer;
- chisel;
- end cutters;
- drill.
A hammer is used to break concrete around fasteners, as well as to drive in studs to reduce the diameter of the sleeve. A drill is used only in cases where it is not possible to remove the anchor using wire cutters.
Sometimes it is not necessary to remove the anchor completely, since the part that is outside the wall is cut off using a grinder, and the unevenness is then filled with putty.
To speed up the process of removing the anchor, it is enough to understand the structure of the fastener. For example, pulling a bolt out of the wall by pulling it by the pin will not work, since this will only lead to expansion of the sleeve. But if you hammer it in completely and pull the structure out by the sleeve, this will be much easier.
The anchor is a fastening unit made of durable metal. It is intended for securing large-sized structures. Anchors can be of various types, due to which they have a huge range of applications in repair and construction work.
Modern anchor bolts, characterized by high strength, can withstand very heavy loads. Their basis is a thin-walled metal sleeve with longitudinal slits. A bolt is screwed into it and a cone-shaped metal plug-nut is pulled in, resulting in a reliable connection.
In everyday life, anchor fasteners are used to install door and window frames, install chandeliers and suspended ceiling structures. To do this, a hole is drilled in the surface into which the anchor shell is installed, and then the pin is screwed in.
Radical methods
In addition to “intelligent” methods of removing hardware from a wall, there are also more radical ones.
Most often, in order to remove the anchor without hassle, it is simply drilled out. For this purpose, metal drills made of high quality steel are used. As a rule, by destroying the threaded spacer mechanism of the product, you can easily remove it from the hole. The second, rougher method is the most “traumatic” for the structure. To remove the bolt, the pin is hammered back into the cage, after which the concrete around the anchor is destroyed with a hammer drill or chisel and hammer to a depth of about 1 centimeter. After the clip protrudes above the concrete surface, you need to grab it with pliers and try to pull it out of the wall. Using the last two methods for removing expansion anchors, you must be prepared for damage to the wall or ceiling around the fastener. Therefore, when starting such work, do not forget to stock up on putty and a spatula.
Anchor bolts, used to fasten structures and parts to concrete, are made of durable metal. Due to the design features and the material used, this fastener is able to withstand heavy loads, both static and dynamic. There are many types of anchor bolts, but the most common are mechanical expansion type anchors. The principle of operation of this fastening element is based on the movement of a wedge, which opens the spacer sleeve that fixes the hardware in the thickness of the concrete. In construction, anchor bolts are used when installing doors, windows and partitions, installing suspended ceilings, hanging chandeliers and in other cases when it is necessary to create a reliable, permanent connection with concrete.
How to remove an anchor
What is usually inserted into the anchor is not a screw or bolt, but a pin (the same bolt, only without a head) or a hook. A bolt is screwed into the frame anchors, at the lower end of which the expansion element is held using a thread.
In general, the anchor is pulled out using pliers:
- Remove the nut.
- Hit the pin with a hammer and push it deep into the hole.
- Grab the sleeve with pliers and remove.
Frame anchor:
- Unscrew the bolt.
- Use pliers or pliers to remove the anchor bushing.
- Insert the bolt into the vacated hole and turn clockwise to fit the wedge onto the bolt.
- Remove both elements.
If the bolt is rusty
If you cannot remove the bolt because it has oxidized, you should try to revive it. To do this, the parts are well moistened with a rust converter, kerosene or WD-40. Leave for the time indicated on the package or longer (up to half a day). During this time, the oxides should go away. After cleaning the bolt, you need to try to remove the nut or unscrew the bolt.
If the bolt is broken or its spline is torn off
If you tighten a bolt, screw or screw too quickly or with the wrong screwdriver, it is easy to tear off its grooves. Less often, it happens that the head is torn off completely or partially - in particular, in an unsuccessful attempt to pull out the frame anchor without removing the conical “anchor”.
To unscrew a broken self-tapping screw or bolt, it is drilled out and a chopper (extractor: a wedge-shaped screw with a left-hand thread) fixed in a drill, screwdriver or pliers is driven into it. Then the entire structure is rotated counterclockwise.
If the sleeve is installed incorrectly
The most common problem with anchor dowels is that they cannot be hooked onto the edge with pliers or even narrow-nose pliers. To avoid this, it is enough to install the anchor correctly: leaving at least 2 mm above the wall level. This length is enough to pick up the sleeve, but it is easily covered with plaster or any profile.
What to do if it is impossible to hook the sleeve:
- Screw the self-tapping screw between the sleeve and the stud and pull it out, if possible, grabbing the stud as well.
- Remove or push the pin/bolt, drive a self-tapping screw or other tool between the wall and the sleeve, tearing and bending the edge of the anchor. After this, pull the resulting corner of the metal.
- Drill out the top layer of the wall around the dowel to release the edge of the sleeve.
As a last resort, the anchor is cut with a circular saw and its parts are removed separately.
As a rule, metal dowels and anchors are installed where their dismantling is not required, but the load will be significant. In some cases, it makes sense not to pull out the sleeve, but to drive it deeper and cover it with cement or other mortar or a plastic / wooden block. In any case, there are no unsolvable problems: the dowel or anchor is almost always removed, it’s worth applying patience and effort.
Video: Types and purpose of dowels
Plastic dowels
To get a plastic dowel, you may need certain tools and skills. But often the removal of such fastenings is easy and quick. Plastic dowels can be made of nylon, plastic, or other elastic materials. They are produced with different profiles, any depth of studs, and can be made with mustaches that fix the sleeve in the monolith.
The easiest way to remove such dowels is to screw a strong corkscrew into the element: first remove the screw/screw from the plastic shell, then screw the corkscrew clockwise, pull it towards you and swing it, carefully remove the sleeve.
Basic methods for removing plastic dowels:
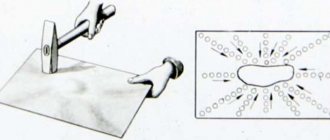
- Hammering into the wall - if the dowel sticks out a lot and it is not possible to pull it out, the element can be hammered in. To do this you will need a hammer and a core, putty and a spatula. The core is placed on the protruding fastener, knocked with a hammer, and the hole is then sealed with putty.
- Removing the dowel using pliers or wire cutters - to do this, you need to secure the tool to the plastic element, and then carefully pull with force and at the same time loosen it.
- Melting with a soldering iron - there is also a method for removing the dowel. Suitable for cases where the plastic element is broken. It is melted with a soldering iron, then removed or hammered into the wall monolith.
- Using a metal tube - find a pipe of suitable size, stuff it onto a plastic rod and simply remove it.
- Screwing in a suitable self-tapping screw 2/3 of the length of the dowel, then sharply pulling it out.
- Using a drill and a drill, the length is equal to the dowel - several holes are made around the element with a drill, then the loose rod is picked up with wire cutters/pliers and all that remains is to easily remove it.
If you plan to remove a plastic dowel from aerated concrete, you need to dismantle it more carefully, since the monolith is very fragile and capricious; the fastenings for it are equipped with special blades running in a spiral. You need to work with such a dowel carefully.
Sequence of removing dowels, basic rules for each method
To remove a dowel from a concrete wall, you need to follow a sequence of actions; if you follow all the rules, you can achieve an ideal result, and the surface will remain unharmed.
- To remove the plastic base for the fastening element, select a self-tapping screw, which is screwed inward and pulled out with pliers. If you don’t have such a tool at hand, you can use a nail puller. When tearing out, it is necessary to take into account that some sections of the wall may be damaged, so the work is carried out carefully.
- A nail puller helps to remove even fasteners that are tightly held inside the concrete. Pressure is applied to the lever, due to which the fastener is removed from inside the concrete surface. The head of the self-tapping screw must be securely fixed to the end of the tool, otherwise if it slips, you can damage the surface of the wall or harm yourself.
- You can remove a wooden dowel with an awl or a knife, but you must first break it and then remove it in parts. When installing new plastic windows, such elements will not reliably fasten them, so high-quality cleaning of the holes will be required.
- The nail fragment remaining inside the concrete wall is pulled out by heating the plastic element with a blowtorch. In this case, the concrete wall is not damaged, but the work is carried out with particular speed, otherwise the plastic will harden and you will have to do everything again.
- Metal dowels are fixed to the wall with a special gun, so they are not easily removed. They need to be loosened for a long time, hitting with a hammer so as not to damage the surface of the wall, it should not break off. After this, you can also use a nail puller; pliers will not cope with this type of task. If this method turns out to be ineffective, then holes are drilled near the element and then removed. If pulling out is unsuccessful, the protruding part can be cut off with a grinder, and the hole can be filled with putty.
If pulling out the dowel takes a lot of time and effort, or all of the above methods are not effective, then you can leave the element inside and cut off its protruding part with a sharp object. The metal element is cut off with a grinder, the rest of the dowel is driven as deep as possible into the wall. Then the surface is leveled using putty material.
Dowel-nail fastening technology
Since many materials have high hardness, this does not allow direct fastening using a nail or self-tapping screw. Driving a fastener into a solid brick or concrete base using a nail gun may damage its structure or appearance. A more gentle way is to install the fastening using an intermediate elastic device called a dowel. It is a liner with a technological hole for screwing in or driving in a metal core in the form of a nail or screw.