Property owners, when deciding to install metal bars on their windows, are primarily guided by the safety factor of their home.
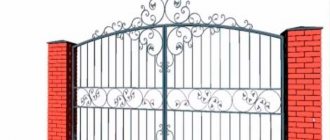
Recently, such a protective structure with forged parts has become a façade decoration for any building. In fact, the price for a beautiful wrought iron grille is quite high, but a home craftsman can save a lot on installation costs by installing it himself.
Is it possible to bet?
Almost all types of windows allow the installation of protective metal grilles over them. However, when planning such work, you need to take into account the design of the window, the material of the frame and the type of sash: pivoting, tilting and tilting. This is important in order to properly secure the structure without damaging the frame material, and also so that after installation you can fully use the window.
The main types of metal grilles that can be installed on windows:
- Blind, rigidly fixed to the wall. Advantages: the most reliable in terms of protection, easy to install and has a low cost of production and installation. Disadvantages - does not allow installation on swing doors that open outward and are prohibited in houses with one fire escape exit.
- Hinged, opens outwards with built-in lock. Advantages: the most popular, good functionality, can be opened remotely, does not interfere with the operation of the window, provides the highest degree of protection. Disadvantages: more expensive to manufacture and install, require the installation of locks.
- Sliding with a shutter mechanism that can be opened inside the room. Advantages: good functionality, does not interfere with the operation of window sashes. Disadvantages: less durable, complex and expensive to manufacture, not for self-installation.
In addition to external grilles, there are also internal ones, which are located between wooden frames and installed indoors.
Window designs and building types
Since the design for all types of metal grilles is the same, they can be used for any model of window systems . This is explained by the fact that a window grille consists of a main element - a frame, onto which protective rods are attached in a certain order and which is firmly fixed to the walls near the window opening.
Important ! The protective grille is never fixed to the window frame.
Considering that the wall material of buildings is different, the methods of fastening such a structure differ from each other:
- Wooden walls . Through holes for installing mounting bolts of the required diameter are drilled in the wall next to the window. From inside the room, a metal “heel” in the form of a square 5 cm larger than the diameter of the mounted bolt is welded to the bolt, which will not make it possible to pull the grille out of the wall. If it is impossible to weld the “heel,” a hole is made in it, inserted into the mounting bolt and secured with a regular nut.
- Brick and block walls . 15 mm holes are drilled through, into which iron pins are inserted with access to the street up to 3 cm. On the inside, the pins are fixed with a “heel”. The gaps between the wall and the rod are sealed with cement mortar, and the base of the structure is welded to the outside of the pins.
- Cinder block walls are weaker, so it is not recommended for them to install heavy forged gratings, which can be torn out along with a piece of the wall. It is also important to correctly calculate the number of fasteners. For the bottom and top there are 2 elements each, for the sides - from 3 to 4 elements.
Suitable garden grilles
Depending on the features and installation options, window elements come in several types.
Removable models are a one-piece option. In critical cases, such a structure can be removed from the window, however, due to the tight twisting of the elements, such manipulations are extremely difficult. The likelihood of elimination does not have the best effect on the strength of the product in further operation.
Stationary type options can be tightly attached to the facade. This type of protection is one of the most durable. It is almost impossible to open this model plan, since they have an impressive thickness and also meet the required fire safety standards.
The disadvantage is that in an emergency, the owners will not have the opportunity to get out of the house through the window opening, so it is better to combine such products with various other grating options.
Hinged grilles have one or a pair of flaps, which can be easily removed if necessary. Installation of products is carried out using high-strength fastening, which goes quite deep directly into the wall surface. The sash closes with a special latch.
If tiny rods are used in the manufacturing process, then it is impossible to open such elements. In this version, the rods are cut with a special tool for working with metal.
Sliding window grilles are the most convenient to use models. Closing and opening them is quite simple, and the unusual placement of the rods gives them the ability to fold like an accordion. This type of element reliably protects window openings and doors.
One disadvantage is the simplicity of design and the impossibility of creating an attractive pattern. In addition, the reliability of protection that such a design provides is average, since for the uninterrupted functioning of the mechanism, rod-plates are used that can be easily broken.
Technical characteristics: weight per m2 and others
The characteristics of the gratings must correspond to their main purpose, performing security and decorative functions and at the same time correspond in weight to the wall material.
Therefore, such metal structures must have strength, reliability, wear resistance, durability and not violate the rules of industrial safety at the site .
Based on weight, the gratings are grouped:
- Lightweight, without frame and decorative elements up to 10 kg/m2.
- Medium-heavy, blind or hinged design made from rods and a corner as a frame, without decorative elements, up to 18 kg/m2.
- Heavy, sliding or swing type, forged decor up to 25 kg/m2.
- Extra-heavy, complex forged structures with several doors and a huge number of decorating elements, over 25 kg/m2.
Important ! Extra heavy metal gratings are not allowed on wood or cinder block walls. Its weight can be determined independently, taking into account the class of metal, D of rods, and frame design.
The maximum distance between the vertical bars should not be higher than 15 cm, and the frame should be attached to anchors embedded in the wall at least 150 mm or to iron embedded elements.
Design
The construction of a terrace or veranda allows you to connect the enclosed space of your home and nature into a single whole and opens up wide possibilities for the design of these buildings.
Fencing. They can be made protective or decorative, for example, in the form of a low, elegant fence or pergolas - canopies of several arches, decorated with vines or potted compositions of bright hanging plants. It is good to decorate the perimeter with ornamental shrubs and flowers.
- Instead of a standard roof, you can use a removable awning, retractable awnings, or a portable umbrella.
- When a terrace or veranda is not attached to the house, but is located separately in the yard, then a path is used as a connecting link between the buildings. To decorate the path, spotlights built into niches on the ground cover or LED lighting plus one or more openwork arches to create the effect of a luminous tunnel are suitable.
For a summer veranda or open terrace, it is advisable to choose plastic in muted dark colors - smoky, tobacco shade, bottle glass color with a grayish or bluish undertone. Being in red, blue or bright green on your porch can be irritating.
c36ac8488e67a8800292fa292c6acd5e.jpe
When the frame is made of wood, then after antiseptic treatment and varnishing the wood acquires a reddish color. In this case, brownish or orange polycarbonate is selected for the roof. Such tones help create a relaxing atmosphere and increase the color temperature of the veranda interior.
What metal alloys are used and why?
For the production of metal window grilles, ordinary, special and reinforcing steel is used . The most effective special steel, but it is usually not used for residential buildings, for the reason that it is an expensive material. It is used more for objects with an increased security system: banks, jewelry stores and commercial enterprises.
Characteristics of materials for window grilles:
- Round steel rods are made of forged steel; they lend themselves well to forging; you can make twisted patterns. It is important to choose rods with a thickness of more than 2 cm so that they cannot be cut through with hydraulic shears.
- Reinforcing bars are stronger than steel and can be used with a thickness greater than 1.4 cm. Their only drawback is that it is impossible to make curved elements from them; the product can only have clear straight sections.
- Special steel is the most durable material, not inferior to reinforcing steel, but at the same time twisted parts can be easily made from it. To crack such a grid, you will need a plasma cutter.
- A square with a side of 1.2 to 1.6 cm. Very durable and attractive rolled metal.
- The strip is 0.8 cm thick, 2.2 cm wide, less durable than square and rod, but has a lower cost and is used in budget protection options.
Purchase of finished products
The easiest way to protect windows with bars is to contact a special company that produces metal products.
In this case, specialists will take the necessary measurements, manufacture and install any structures. The customer is given the opportunity to choose ready-made design options or place an order in accordance with his wishes.
The advantage of branded grilles is the variety of models. However, you should understand that such products can be quite expensive.
Varieties
All metal window grilles are classified into two large groups - stationary and removable , which differ from each other and have different advantages and installation tolerances.
Most of the installed grilles in the housing stock are stationary, which are permanently installed once and for all.
They perfectly handle the protection function and can be solid, hinged and sliding, both simple and forged with a complex shape.
Advantages of stationary metal window structures:
- the highest level of protection against illegal entry into the facility;
- ease of installation process;
- affordable manufacturing process for home production;
- low prices for installation and production, with inexpensive components;
- a huge number of options and a high degree of external design.
Minuses:
- installation restrictions due to fire safety conditions;
- inconvenience of servicing the window structure, especially for blind options;
- low maintainability; in case of failure of some elements, the grille will need to be dismantled and replaced completely.
Removable models do not have the disadvantages of the first option; they are fastened to through studs and secured from the inside with nuts, which allow you to quickly dismantle the protective iron structure. Most often they are made solid, but can be sliding or swinging.
Advantages of removable window metal structures:
- high maintainability, the possibility of partial repair and replacement of damaged parts;
- accessibility for maintenance and repair of the window unit;
- ease of installation and dismantling in case of a fire hazard;
- low cost;
- a large number of external design options.
The disadvantages of this type of protective window grilles include a lower degree of protection and the possibility of dismantling by intruders.
Types of window grill designs
The design of the gratings may differ significantly. This determines not only their cost, but also ease of installation and operation. We invite you to get acquainted with the possible options so that you can make an informed choice in favor of a specific design.
Product configuration may vary
Removable and non-removable: each type has its own advantages
Removable models can be dismantled at any time. They are attached to special studs mounted into the wall. It is enough to tighten or unscrew the nuts for the structure to be installed or dismantled.
Attention! A removable structure can be dismantled not only by the owner, but also by intruders.
Removable structures can be easily dismantled
Fixed models require a rigid frame fixed to the window opening. The grille is welded to the frame, and therefore its dismantling becomes impossible.
Can I do it myself?
The process of producing metal window grilles is not complicated; if you have the necessary tools, a home craftsman can handle it on his own.
To do this, you will need to take accurate measurements of the technological opening , determine the fastenings, the type of structure and its appearance, and carefully make a sketch with dimensions.
In order for it to be strong, it will require stiffening ribs. It is quite possible to make them from profile corners.
What will it take?
First of all, you need to prepare a tool . Difficulties for many performers will arise when making forged products, so it’s easier to order them online, it will be much cheaper than making a completely forged lattice. In addition, you will also need a steel rod, preferably square, at least 12 mm, a corner for the frame and fasteners.
Equipment and accessories for the manufacture of metal window grilles:
- A table with a metal tabletop made of 5 mm metal, preferably larger in size than the window opening.
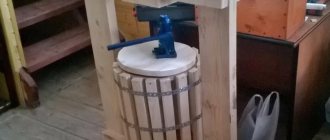
- Vise for fixing parts.
- A bending machine can be made primitively from a pipe D=100 mm, which is fixed on a concrete surface, with a welded pipe with a hook for bending the rod. With this machine you can make a variety of spirals.
- Welding machine.
- Bulgarian woman with various circles.
- Electric drill/hammer.
- Anvil and hammer for making forged parts.
- Forge/forge furnace for hot forging of parts.
- Blacksmith's tongs.
- Wrenches and adjustable wrenches.
- Measuring set: tape measure, ruler and corner.
- Files and brush for metal.
How to cook?
After all the tools and consumables have been collected and prepared, they begin to prepare the components of the structure .
They are cut out according to the drawings using a grinder. If the design is complex and has many decorative elements, they are bent on a special machine.
Technology for assembling a protective and decorative metal grille on a window:
- Welding of structural elements is carried out according to working drawings.
- For the best result and to ensure the quality of work, all elements are put together in the form of a puzzle on a table with a metal surface or on a platform made of non-flammable material.
- The frame is pre-welded. At the same time, it is important to ensure that there is no skew, checking for right angles and equal diagonals.
- When creating a frameless structure, in particularly stressed areas near the lock and steel hinges, reinforcement is carried out by additionally welding sections of iron strips in these places.
- After preparing the working components with a 45° cut, they are first welded using a spot method - tack welding, and only later using a continuous weld.
- Install the hinges and lock on the steel swing sash. They are welded in the opposite direction, as a result of which the structure will not be removable.
- The frame frame is filled with straight lintels and forged parts.
- The welded structure is carefully protected from scale and rust.
- Prime the grate and give it time to dry.
- Apply paint and varnish material intended for metal and external use.
Choosing metal bars for windows
To protect metal-plastic or natural wood windows, many details should be taken into account when choosing grilles. It is worth understanding the manufacturing technology of the product.
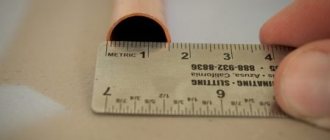
It is also important to know the type of coating on the metal grille. The diameter of the reinforcement bars, the geometric dimensions of the grille and compliance with the window opening can be checked using a construction tape measure and calipers.
You should pay attention to how the ornament and pattern on the grille are made. It should not resemble a ladder.
Preference should be given to structures with welded rod joints. The cost of such products is relatively low with good security characteristics. The strength of the grating structure will be higher when using round and square profile rods.
- Features of electrical wiring installation in houses made of SIP panels
- How to choose a cast iron bath
PPU shell for pipes or PPS
A metal product made by hot forging will look impressive and maintain high strength.
Tools and accessories for installation
After the grille has been assembled and painted, installation begins. To do this, you will need to additionally purchase 10x12 mm mounting threaded rods in an amount of 6 to 8 units, depending on its area. Recommendations for the established fastening scheme: sides 1-2 pcs.; top and bottom 2 pcs.
Equipment and tools you will need: a level, a tape measure, a corner, an angle grinder, a hammer drill and a welding machine .
Important ! The work performer must know the safety rules when handling welding and power tools, and also be equipped with welder’s protective clothing: a canvas suit, canvas gloves, canvas boots, a welding helmet and a cap.
Features of self-installation
There are several options for installing protective grilles on windows:
- Using pins .
To do this, holes are made in the wall with a depth of at least 15 cm and a diameter 2 mm less than that of the pins. The pins are driven in so that at least 3 cm remains on the surface. After this, holes are drilled on the frame at the appropriate points. They put the frame on the pins, cut off the excess material and weld it to the frame. After processing the welding seam, it is painted to match the frame. - Through-wall fastening is considered the most reliable, but unaesthetic type of fastening, since the pins pass through the wall and are fixed from the inside to a washer, which will need to be masked with special decorative overlays.
For this option, initially choose the length of the pins greater than the wall thickness by 40-50 mm, weld them to the frame, drill holes through them and insert them into the wall. On the reverse side, they are fixed for welding or secured with nuts, washers and “heels”, which are subsequently covered with trim or decorative overlays.
It is very important that when fastening the pins do not end up in the areas where the hinges are located , since the latter will not function well.
Possible difficulties
Despite the apparent simplicity of such a protective window structure, in order for it to fully fulfill its protective and decorative functions, it will be necessary to carry out a large complex of complex work, starting from the correct choice of design, consumables and selection of the necessary tools and equipment.
This work should not be started by performers who do not have experience in plumbing and welding and are not familiar with the rules for the safe operation of welding and electrical equipment.
The main difficulties and mistakes that performers make during the manufacture and installation of protective metal window grilles:
- The type of structure was chosen incorrectly; a blind version was installed in places where such structures are prohibited by fire safety requirements.
- The installation was carried out without taking into account the functioning of the hinged sashes, as a result of which the window will no longer open, it will be impossible to maintain it, and the room will lose its only source of ventilation.
- When manufacturing the frame, a fragile material was chosen that is not capable of performing a protective function.
- When making the frame, diagonals and 90° angles are not maintained.
- The distance between the vertical beams of the frame is more than 150 mm.
- The rods were not rigidly secured to the wall surface.
- Metal components were not cleaned after welding.
- Anti-corrosion treatment of metal components and painting of the structure were not carried out.
- The window is not completely covered with bars, only half or 2/3 of the height.
- The number of attachment points is incorrectly selected, less than 6 for small windows and less than 8 for large ones.
- Large gaps are left between the frame and the wall, which can be used by intruders with a burglary tool.
Step-by-step instruction
Measurements. We take measurements from the window opening, taking into account the specific location of the grille. In our case, the structure has an additional frame that is attached to the facade of the building, but if the fixation is on slopes, then you need to measure more carefully, since the fence must fit inside the opening. Typically, the sides of the rectangle of the product frame will be less than its width and height by approximately 1 cm.
If the grille is attached to the facade (overlay), then its edges can extend on the sides to any distance. We choose such that the distance between the fasteners is not too small (it is better that the anchor is surrounded by as much concrete or brick as possible) - 15...20 cm. We make calculations in a similar way if the structure will be directly fixed to the window frame.
In our example there will be an additional load-bearing base , so we will create a slightly protruding lattice. So, its main parts:
- frame attached to the wall;
- directly the fence itself with its frame, which will be welded to the first one.
That is, it is important for us to calculate the dimensions, as we indicated above, primarily for the supporting frame mounted on the wall.
We make a sketch drawing. In our situation, it is undesirable to make do with approximate sketches; it is important to draw a diagram as accurately as possible, indicating the dimensions .
We select the material. Its quantity is determined according to the drawing with dimensions. Now more specifically about rods, metal strips, additional parts:
- The following rods are suitable for the grill itself:
- square (10x10, 12x12 mm);
- reinforcement (10 - 12 mm) smooth (it is advisable to choose them because of the best appearance), corrugated;
- strips are 6x12, there may be other sizes, the main thing is that they are not too thin or flimsy.
- For the frame under the grille:
- the same square or round rod, but a size or slightly larger than that used for jumpers:
- corner 40x40;
- square or rectangular profile 25x25, 30x30, 15x25, 20x30 mm.
- For fastening:
- strip pieces (width 10…12, thickness 6…8 mm) made of metal for eyes;
- threaded rods (12 mm) from anchors, of suitable length for through or other fastening.
Above we indicated what materials a master can choose from for a welded grating. Similar products of other sizes are allowed, the main rule is: the thicker, stronger, the better. But there is also no need to make it too heavy or overload the structure with oversized, frequently located elements.
We make the grille first, and we assemble the second frame, on which it will be attached and then fixed to the walls of the opening, in the second place.
We lay out the material on a convenient work surface: the best option is a metal frame table . You can use one with a tabletop, but it is desirable that it be made of metal or upholstered with it. As a last resort - a flat concrete or cement surface.
In this case, you need to be especially careful that the folded, not yet welded structure does not move, so along its perimeter you can lay bricks close to the rods so that they do not move.
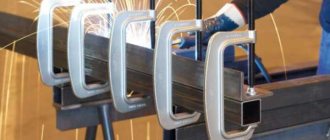
When making window bars, craftsmen use special metal tables with a frame made of a wide thick profile , without a tabletop. This is, in fact, a rectangular frame with thick sides, on which rods are laid according to the diagram, secured with clamps, which is convenient, since you can press the rod from below and from above, reliably stabilizing it for scalding.
As a rule, such auxiliary devices are homemade, welded in the same way as the grille - from rods, a profile, but of a larger size.
The rods can be twisted, simple curly patterns can be made from them on bending equipment , which is actually several thick pins, bars or a small platform with grooves, tightly fixed on the workbench.
Individual parts can be welded, creating the best aesthetically pleasing shapes. But for complex artistic solutions of curls and petals, forging will be required.
Some decorative elements can be attached manually to hide welding seams:
We calculate the length of the shaped elements, rods, weld them, crimp the joints with thick corrugated metal plates, hiding the unattractive appearance.
We lay the structure on the table, secure it with clamps so that it does not move . Once again we check the length, diagonal, other dimensions, if necessary, cut it with a grinder. If any element is shorter, then it is better to replace it, but you can also increase it: weld a piece of the same material to it, and again, if necessary, adjust it. We mark the places where the rods will stand and weld them.
The next stage is scalding.
It must be said that, despite the apparent complexity, the manipulation is extremely simple: turn on the inverter, put on the protection, and work with the electrode. After welding all the rods, you need to lift the grate, place it vertically and weld again, thoroughly welding the parts on all sides, since the initial lying state of the structure did not allow this to be done immediately.
We weld the part that will be attached to the wall .
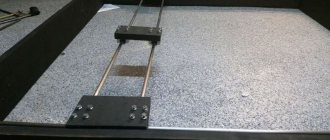
We lay out the rods on the table; it is better to take a larger size, for example, 12x12: the supporting structure should be stronger and stiffer. We fasten with clamps and weld. Next, we place a square profile (pipe) on this frame, the same height at which the grille will be distant from it, it will serve as a stand during installation. We cut the jumpers with a length corresponding to the given gap, which will connect the two frames, that is, one end of the crossbars will be welded to the supporting frame - the second to the one with the grille. You will need several of these twigs on each side - the more, the better, tougher, and more reliable the product will be. We place the grille on the profile, weld the connecting jumpers, connecting it to the load-bearing part.
We get a protruding grille.
The work took 6 hours and 50 meters of rods. You can attach it to the facade (with studs right through the wall) or into a slope (you can make “ears” with holes for fasteners that go exactly into the opening). It all depends on the initial calculations.
Important ! The method of fastening - into the facade or through the “ears” into the slope, onto the window frame - must be decided immediately, since the size of the grille will depend on it.
The product can be polished, but you can do without it . But you definitely need to knock off the scale and clean the joints with an iron brush. It is advisable to paint it.
How to secure?
Let us recall the options for attaching a grill to a window:
- Right through the façade.
- On the side edges of the slopes, inside the opening. Usually, ears are used that go into it parallel to its side edges; these parts have holes for pins.
- On the profile of the glass unit. Here it is highly advisable to fasten only through. More often this method is applied to wooden windows. Its disadvantages: the double-glazed window frame will be damaged by the holes for the studs.
In the vast majority of situations, the structure is mounted outside , although there are fences mounted indoors, but this is rare. This trend does not apply to sliding, swinging grilles, which are more appropriate to be placed only inside the building. The fixation methods are similar.
A guide on how to attach a grill to a window in different ways:
- Not end-to-end .
They use sections of the same reinforcement, but take a larger section, at least 12x12, of sufficient length. The minimum recommended number of such parts is 6 – 8 for standard product sizes. The more, the thicker the better. If the fence has a wide frame, then holes will be drilled in it, if not, then rods will be welded, and they are drilled into the wall for these elements. The deeper the pin goes into the wall, the better, so the depth is from 10 cm. The rods are driven in, the length is calculated so that they protrude by 25 - 30 mm, they should also be inside. Then they bring the grate and weld it to them. - End-to-end. Best Recommended Method. The fixation is much more reliable: the wall is drilled right through. Studs (threaded from chemical anchors for concrete with washers, bolts) are driven into the wall perpendicular to it, through the facade or window frame, that is, in the direction directly into the room.
The length of the rod is selected so that the grille is separated from the façade by a few cm, and the length of the rod extending inside the room is sufficient for a washer or nut. This end does not add aesthetics to the room, so you will need to cover it with a decorative cover, which will also protect it.Weld the studs to the grille, paint over the ends with a marker, place them against the wall, and drill holes for them along the remaining marks. The structure is inserted, a wide washer is placed on the ends of the studs inside the room, and the nut is screwed in (locked).
- With hardware through the “ears” .
Eyelets with drilled holes from a strip 4 mm thick, 40x50 mm, are welded to the frame. The structure is applied to its future permanent location; points for holes for anchors are marked through the eyes on the slopes or facade. Drilling is carried out, then the grille is placed again and secured by driving bolts through the holes in the ears. It can be mounted through the facade, but this method is excellent for fixing into slopes, if the plates are welded to the grille perpendicular to the opening, that is, so that they, together with the frame, enter it, near its ends.
Without frame
Let's consider a modification without a frame (frame), attached to the walls or window frame directly with lattice strips. Welding is used; bending of rods is minimal.
This option has a somewhat modest, laconic appearance . With this method, financial costs are minimal, and the design efficiency is excellent.
We will describe the fastening through the window frame; this solution is perfect for wooden windows in the country (it’s a bit of a shame to spoil plastic double-glazed windows) and it is reliable, since it is end-to-end. But it can also be fixed to the facade, and if you bend the wide edges of the strips, making “ears” out of them, then into slopes. The solution is suitable when no special aesthetics are required.
Materials:
- Metal strips 40 mm wide, 4 mm thick, smooth reinforcing bars with a cross-section of 14 mm. The total length and number of segments depend on the width of the window opening and the density of the arrangement.
- Studs with a diameter of 10...12 cm. You can make these yourself by taking smooth reinforcement and cutting a thread on it with a die. You will need at least 4 pieces, the length depends on the thickness of the window profile.
If a large-sized grid is assembled, an increased number of transverse strips will be required. The number of threaded rods will also increase, since each will require two pieces.
The work algorithm is step by step, along the way we will also consider other materials and tools:
- Detailed sketch with dimensions compared with the parameters of the window frame.
- We take two long steel strips, the length of which is 5 mm less than the width of the opening. The parts were attached to the top and bottom of the window block, creating a horizontal grille base. There may be more such stripes. These elements will connect all or several of the middle rods, which will give the product rigidity, increasing its reliability. In our example, we took another short jumper rod.
- We bend the ends of the strips, or rather, turn them 90°. Edge segments of 10...12 cm are laid on a durable workbench. We secure the strip with two clamps and a vice through a strong metal gasket. We grab the edge with a large gas or adjustable wrench and turn it 90°. We do this on both sides of each plate. It is important that both ends are turned at exactly the same angle, they are the mounting pads.
- Marking with a core on the finished plates for the holes where we will insert the vertical rods. We perforate with a drill, a metal drill, the diameter is 1...2 mm larger than the cross-section of the rods. In our example, 15...16 mm. On each crossbar, the number of holes corresponds to the number of vertical elements inserted into it. Let's make them.
- We boil all the elements. For all connections without exception, we use a continuous seam rather than a point seam - the reliability will increase.
- We weld a short jumper connecting the four middle vertical rods.
- At the wide ends of the strips - the mounting areas formed when they are bent by turning - we mark the places for welding the studs, for them we retreat from the edges about 10...12 mm.
- We select the studs - the length of each is the same, equal to the thickness of the window profile (block), plus 30 mm.
- The studs are welded (solid seam) on the side pressed against the window profile.
- The assembled fence is cleaned with metal brushes and polished. The slag must be chipped off from all welds. Then - wiping with degreasers (solvents), drying, painting with enamel paint (for external work). If you don’t want to carry out all of the above manipulations, then use a special one for metal.
- Marking on the window frame for holes for anchors. The ends of the fastening rods are painted over with a marker, the structure is attached to the profile of the glass unit - marking points are left. Drill through holes with a wood drill, with a diameter larger than that of the studs by 2...2.5 mm, its length should exceed the thickness of the window block by at least 10 mm.
- The structure is inserted into the holes with anchors, they go right through the wall, the ends stick out inside the room - we throw wide washers on them, tighten the nuts.
If these parts turn out to be longer, then cut off the extra segment. We cover the remaining protrusion with decorative caps (you can use any suitable such products, even wrap them with electrical tape and cover them with bitumen). The thread can be knocked down or the nut can be welded to prevent attackers from unscrewing the fastener from the inside, but you must understand that it will be more difficult to dismantle it yourself if necessary.
Options with hinges and sliding
The grille can also be equipped with hinges so that one or two doors can open. The algorithm of actions is as we described. These parts are simply welded according to the markings onto the frame, onto the sashes, then the latter are simply hung. Next, the eyes for the padlock are welded. It is more advisable to install such a grille from inside the room to make it more difficult for an attacker to gain access to the locking segment.
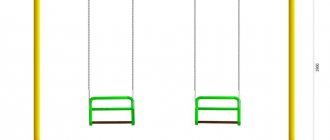
You can also build a sliding modification according to the diagram presented below . It also lists the necessary elements. The creation process is surprisingly quite simple, no more complicated than the options we described: strips are cut, holes are drilled in them, screws and washers are inserted, and connected as shown in the figure. We get articulated joints. The lock can be not only hinged on the eyes, but also hidden in the frame profile.
Sliding window railings are also almost always installed from the inside of the room for the reasons we described above.
Advantages and disadvantages
A grille, manufactured and installed in accordance with all requirements and in places that need protection, carries only advantages, the main ones of which are :
- Highest protective functions.
- Modern design.
- High functionality, the ability to open and remove for maintenance work on the protective structure itself and the window unit.
- Advanced control capabilities, including controlling the operating level of the grille from a distance.
- Good maintainability.
- Long service life of more than 20 years.
- Available consumables for DIY production.
- There is a large selection on the market of ready-made grilles for standard windows from different materials.
The disadvantages of installing metal ones include the unpleasant associations that many users have with window grilles, a significant price, especially for forged and multifunctional grilles, and the need for periodic maintenance to combat rust.
Finishing
The installed structure necessarily requires additional processing - at least painting. It’s better to also treat it with an antiseptic, which will protect the metal from corrosion.
Using paint, you can hide welding areas, this is especially true if you have abandoned decorative elements that can hide them.
The paint also serves as a protective coating that protects the metal from weather and moisture, thereby extending the life of the structure.
In the photo you can see a design option for the grille.
For sliding structures, you need to additionally install runners with which it can move.
Sliding grilles must be equipped with a burglary-proof mechanism, since opening such a structure is much easier than a stationary one.
Runners can also be visually hidden using decorative elements such as flower pots.
Average prices in the Russian Federation
The cost of producing gratings directly depends on the production process, the materials used and the complexity of the design. The cheapest options for welded blind structures made from reinforcement cost the buyer from 800 rubles. per m2 , the most expensive forged gratings start from 4000 per 1 m2. The cost of the finished product is also affected by the quality of the paint and anti-corrosion coating, as well as the presence of locking devices.
The cheapest options are painted with GF primer and HV/PF enamel, the most expensive ones are protected with WS-Plast patination technology. The latter option increases the cost of the finished product by 900 rubles/m2, and swinging grating options will be 1000-1200 rubles/m2 more expensive than fixed options.
Note ! The cost of installation depends on the complexity of the design, the cheapest welded ones from 300 rubles/m2, the most expensive swing forged ones from 1500 rubles/m2.
Average cost for manufacturing/installation of gratings depending on the design per 1 m2:
- welded, reinforcement, rectangular mesh, without frame, blind, 860/300 rub./m2;
- welded, fittings, rectangular, frame, blind, 1130/400 RUR/m2;
- welded, reinforcement, patterned mesh, frame, blind, 1380/400 rub./m2;
- welded, medium-heavy, frame, swing, 1960/550 RUR/m2;
- forged, patterned, framed, blind, 4400/1200 RUR/m2;
- forged, patterned, framed, hinged, 5600/1600 RUR/m2.
The final cost of installation will be influenced by transport tariffs , so within Moscow the final price for delivery increases by 1,500 rubles, and in the region, based on the transport tariff plan, 25 rubles/km. Many companies undertake installation with a minimum order of 3,000 rubles, and the cost of installing gratings on the second floor increases the total by another 200 rubles/m2.
Select an option
To roughly understand how to make a decorative lattice for a gazebo yourself, you need to decide on a specific model that will be discussed in the article.
Decorative lattice for a 3 by 3 gazebo
As an example, let's take a simple square gazebo measuring 3 by 3 meters and cover it with a lattice, leaving only a doorway. The height of the walls will be 2.5 meters. The doorway will measure 2 by 1 meter.
The option used will be a square single-level lattice with grooves. This method results in a more attractive structure that will delight the owners of their personal plot.
This is what the finished model will look like
The cell will be located at an angle of 90 degrees relative to the walls and floor, i.e. will be square. The size of all cells will be 300 mm. This option will allow you to avoid high costs for the purchase of lumber, and will also reduce the amount of time spent on its manufacture.