Build process
How to make pellets for a boiler at home
The homemade engraving machine of the proposed design is a shuttle-type device, one of the moving elements of which is responsible for movement along the Y axis, and the other two, paired, for movement along the X axis. For the Z axis, which is also specified in the parameters of such a 3D printer, the depth to which the material being processed is burned is taken. The depth of the holes into which the elements of the shuttle mechanism of the laser engraver are installed must be at least 12 mm.
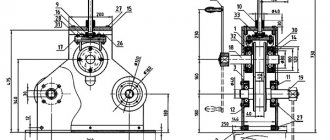
Desk frame - dimensions and tolerances
Aluminum rods with a diameter of at least 10 mm can act as guide elements along which the working head of a laser engraving device will move. If it is not possible to find aluminum rods, steel guides of the same diameter can be used for these purposes. The need to use rods of exactly this diameter is explained by the fact that in this case the working head of the laser engraving device will not sag.
Manufacturing of a movable carriage
The surface of the rods that will be used as guide elements for the laser engraving device must be cleaned of factory grease and carefully ground to perfect smoothness. Then they should be coated with a lubricant based on white lithium, which will improve the sliding process.
Housing assembly
Installation of stepper motors on the body of a homemade engraving device is carried out using brackets made of sheet metal. To make such a bracket, a sheet of metal whose width approximately corresponds to the width of the engine itself, and the length of which is twice the length of its base, is bent at a right angle. On the surface of such a bracket, where the base of the electric motor will be located, 6 holes are drilled, 4 of which are necessary for fixing the engine itself, and the remaining two are for attaching the bracket to the body using ordinary self-tapping screws.
To install a drive mechanism consisting of two pulleys, a washer and a bolt on the electric motor shaft, a piece of metal sheet of the appropriate size is also used. To mount such a unit, a U-shaped profile is formed from a metal sheet, in which holes are drilled for attaching it to the engraver body and for the output of the electric motor shaft. The pulleys on which the timing belts will be placed are mounted on the shaft of the drive electric motor and placed in the inner part of the U-shaped profile. Toothed belts placed on pulleys, which should drive the shuttles of the engraving device, are connected to their wooden bases using self-tapping screws.
Installation of stepper motors
Disassembling the drive
Laser level how to use lessons and training
This process must be performed with extreme caution. If handled carelessly, you can not only damage the device, but also harm your eyes.
The fact is that the laser can blind for some time and negatively affect visual acuity. Therefore, follow all the steps below slowly:
- Open the drive tray (the place where the disc is inserted).
- Turn the device over and unscrew the 4 screws located in the corners.
- Remove the cover.
- Turn the DVD drive over again.
- Remove the aluminum cover.
- Unscrew 2 screws under it.
- Disconnect the cables connecting the drive to the chassis (the one that moves the tray).
- On the chassis, unscrew the only screw on one side and three on the reverse.
- Carefully disassemble the product and remove the board with optical lenses and diodes.
- Remove the protection without making much effort (it looks like a small corner that needs to be turned).
- A diode will be detected.
- The “legs” of the diode (the place where it is attached) must be wrapped with wire - this is a kind of protection against static electricity.
- Using pliers, remove the diode.
- Use a small knife to pry up the diode and carefully remove it from the mount.
Software installation
Your laser cultivator, which must operate in automatic mode, will require not only installation, but also configuration of special software. The most important element of this support is a program that allows you to create the contours of the desired model and convert them into an understandable extension for the laser engraver controls. This program is available for free and you can download it to your computer without any problem.
The program downloaded to the computer that controls the engraving device is unpacked from the archive and installed. In addition, you will need a library of contours and a program that will send data about the created drawing or inscription to the Arduino controller. This library (as well as the program for transmitting data to the controller) can also be found in the public domain. In order for your homemade laser product to work properly and the engraving performed with its help to be of high quality, you will need to configure the controller itself to the parameters of the engraving device.
Materials and tools
| Paragraph | Provider | Quantity |
| NEMA 23 stepper motor + driver | eBay (seller: primopal_motor) | 2 |
| Diameter 16mm, pitch 5mm, ball screw 400mm long (Taiwanese) | eBay (seller: silvers-123) | 2 |
| 16mm BK12 support with ball screw (drive end) | eBay (seller: silvers-123) | 2 |
| 16mm BF12 Ball Screw Support (No Driven End) | eBay (seller: silvers-123) | 2 |
| 16 shaft 500 mm long | (seller: silvers-123) | 4 |
| (SK16) 16 shaft support (SK16) | (seller: silvers-123) | 8 |
| 16 linear bearing (SC16LUU) | eBay (seller: silvers-123) | 4 |
| eBay (seller: silvers-123) | 2 | |
| Shaft holder 12 mm (SK12) | (seller: silvers-123) | 2 |
| A4 size 4.5mm clear acrylic sheet | eBay (seller: acrylicsonline) | 4 |
| Aluminum Flat Rod 100mm x 300mm x 3mm | eBay (seller: willymetals) | 3 |
| 50mm x 50mm 2.1m Aluminum Fence | Any theme store | 3 |
| Aluminum Flat Rod | Any theme store | 1 |
| Aluminum corner | Any theme store | 1 |
| Aluminum corner 25mm x 25mm x 1m x 1.4mm | Any theme store | 1 |
| M5 socket head screws (various lengths) | boltsnutsscrewsonline.com | |
| M5 nuts | boltsnutsscrewsonline.com | |
| M5 washers | boltsnutsscrewsonline.com |
Features of using contours
If you have already figured out the question of how to make a hand-held laser engraver, then you need to clarify the question about the parameters of the contours that can be applied using such a device. Such contours, the inside of which is not painted over even when the original drawing is repainted, should be transferred to the engraver controller via files not in pixel (jpeg), but in vector format. This means that the image or inscription applied to the surface of the workpiece using such an engraver will not consist of pixels, but of dots. The size of such images and inscriptions can be changed at will, focusing on the surface on which they will be applied.
Using a laser engraver, almost all drawings and inscriptions can be applied to the surface of a product, but to do this, their computer models must be converted into vector format. This procedure is simple - special programs Inkscape or Adobe Illustrator are used for this. A file that has already been converted to a vector format must be converted again in order for it to be correctly accepted by the engraving machine controller. Inkscape Laserengraver is used for this conversion.
Sources
- https://met-all.org/oborudovanie/prochee/lazernyj-graver-svoimi-rukami-iz-printera-dvd-player.html
- https://homius.ru/lazernyj-gravjor-svoimi-rukami.html
- https://tpspribor.ru/svoimi-rukami/izgotovlenie-lazernogo-gravera-svoimi-rukami.html
- https://electronicparts.ru/svoimi-rukami/lazernyj-graver-na-arduino-delaem-svoimi-rukami.html
- https://Gistroy.ru/article/lazernyj-graver-svoimi-rukami-1/
- https://tokar.guru/samodelkin/izgotovlenie-lazernogo-gravera-svoimi-rukami.html
- https://VseOChpu.ru/lazernyj-stanok-svoimi-rukami/
- https://SuTime.ru/pro-stanki/graver-svoimi-rukami.html
- https://zetsila.ru/%D1%81%D1%82%D0%B0%D0%BD%D0%BE%D0%BA-%D0%BB%D0%B0%D0%B7%D0%B5% D1%80%D0%BD%D0%BE%D0%B9-%D1%80%D0%B5%D0%B7%D0%BA%D0%B8-%D1%81%D0%B2%D0%BE% D0%B8%D0%BC%D0%B8-%D1%80%D1%83%D0%BA%D0%B0%D0%BC%D0%B8/
- https://3dradar.ru/3dmodels/50714/
- https://instanko.ru/drugoe/lazernyj-graver-svoimi-rukami.html
[collapse]