An ax is a chopping tool consisting of a wooden handle, usually short, and a blade, which is located longitudinally or perpendicular to the shaft. The latter are called Tesla . They cut out grooves during the construction of huts and ships, princely mansions and churches, hollowed out troughs, boats, cut sculptures, toys and other wooden products.
The secret of the durability of products chopped with an ax is that the fibers of the wood are crushed under the blow of an ax and do not allow moisture to pass through. This does not happen when sawing, when the pores of the wood are left open for rot to enter.
Homemade ax for hunting
What product does a hunter who spends a lot of time in the wild need? How can it be made?
Yes, no one argues, in specialized stores you can buy a product for every taste. But not all of them meet the needs of hunters. In order to make the cutting part of a product for hunting, you need to use a solid piece of metal. But somehow it’s more common to hold an ax with a wooden handle. For the manufacture of the blade, grade 1040 steel is used, this is a structural alloy steel, the Russian equivalent is 40G.
Homemade ax for hunting
You can make the cutting part by ordering it from the village smithy. The master is able to forge the necessary blank for the blade. He is also able to make and install a steel handle. If such a handle does not suit you, then you can install a wooden one. When making it, you need to take into account some simple rules:
When choosing its shape, it is necessary to take into account the width of the grip of the palm; it is necessary to make stops that will allow you to hold the ax in your hand.
Final word
There is hardly a man who will not be happy with such a gift. But that's not even the main thing. If a home craftsman once makes such beauty with his own hands, then he will definitely be captivated by the activity, and he won’t be able to stop after that. And with the experience that comes, everything will turn out better and better. For example, you can master the technique of gilding (brass plating). After all, there is no limit to perfection. And if learning brings pleasure, then it will be doubly effective. And regarding such products, it’s not for nothing that experienced blacksmiths say that a beautiful knife or ax is music enclosed in steel...
The Homius editors invite home craftsmen and craftsmen to become co-authors of the “Stories” section. Useful first-person stories will be published on the pages of our online magazine.
Previous STORIES A “floating” heart as a gift to a loved one - original and insanely simple Next STORIES Sleight of hand and a couple of minutes of work: practical ideas for using packaging
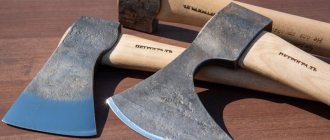
Characteristics of the taiga ax and what it should be like
Since the parameters of the ax and blade are very different from the usual sizes of “household” axes and will seem unusual to many, you first need to decide what problems can be solved with this miracle device:
- Tree cutting. Felling in a sawmill, sanitary felling or preparing firewood for a log house - this is exactly what this ax was made for.
- Rough work with logs (that's right, rough!). Suitable for removing branches, making grooves, removing thick bark and similar work.
- Ax for survival. A lightweight hunting tool, suitable for quickly creating bags and animal traps.
- Construction of huts, decking, wooden “instant” houses. A hut will not be built without an axe, but with its help you can do it 4 times faster than when working with a carpenter's ax blade.
- Working with firewood. If accuracy is a secondary concern, then this tool is perfect for the job.
If you want to make a tool for precision work, then it would be better to consider forged axes with a straight, long blade. They are of little use when cutting down trees, but the accuracy is very high. In addition to the quality of the “cut,” there are many differences between a taiga ax and a regular one.
Rounded blade of shorter length. The ax is much lighter than a regular ax, and the small working surface area allows it to be buried much deeper into the wood; it is suitable for cutting wood across the grain. The tool is much easier to carry (the ax and head together weigh no more than 1400 grams).
Presence of a long beard. Its main task is to protect the wooden part from breaking under strong impacts. Up to 60% of the impact force is absorbed. But it does not protect against impacts against logs - this is a misconception, since the special shape of the blade already performs this function.
Special ax sharpening. The rear edge of the blade is almost 2 times thinner than the front. This is done for the purpose of using the ax as a cleaver (if struck correctly). In a conventional tool, the edge has the same thickness for high precision work.
Special angle of inclination of the axe. The head of the taiga ax forms a much smaller angle with the ax handle. This allows you to increase work efficiency, relieve hand fatigue and increase productivity when cutting trees. The impact becomes much stronger than that of a carpenter's axe, where the head and blade are placed at an angle of 90 degrees. They try to make all handmade taiga axes with an angle of 75-65 degrees - this is their main difference.
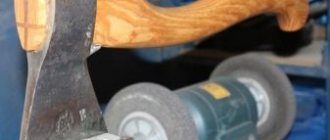
They use ordinary sharpening wheels, since they can be very diverse. The main thing is to observe the difference in the thickness of the leading and trailing edges, since it is this that affects the productivity of the forester.
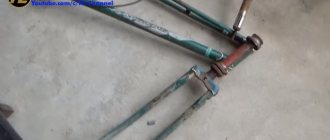
Mechanical method
If you have a sharpening machine at hand, you can use it. To carry out the procedure, you will need the following:
- the device itself;
- ax with blade;
- sharpening stone with two working surfaces;
- finishing paste;
- marker;
- goniometer;
- personal protective equipment for eyes and hands.
The procedure is carried out as follows:
- The machine must be placed on a flat and hard surface.
- The working surface must be free of defects.
- If you need to update the sharpening at an existing angle, mark the desired area with a marker.
- Sharpen with the blade facing away from you.
- If the angle is suitable, fix the result using finishing paste. Lubricate the grinding wheel with it and polish the ax.
- Be sure to apply a product that protects against corrosion.
Why not a sword?
As we have already noted, the ax is often perceived by the average person as a weapon of a lumberjack and owner, but not of a warrior. Theoretically, this assumption has some logical premises: firstly, these weapons are much easier to manufacture. Secondly, even more or less tolerable mastery of the sword required at least ten years, while the ax was with a person constantly in those days, and improvement in the skills of its use occurred, so to speak, “on the job.”
But this point of view is only partly true. Almost the only factor in choosing a weapon was its combat practicality. Many historians believe that the ax was supplanted by the sword due to its great weight. And this is also not entirely true. Firstly, the weight of the Viking ax was only slightly greater than the mass of a battle sword (or even less - the mass of the ax itself was no more than 600 grams). Secondly, swinging the sword also required a lot of space.
Most likely, in historical perspective, the ax gave way to its place due to advances in metallurgy. There was more steel, warriors could be provided with a large number of albeit inferior, but technologically advanced and cheap swords, the technique of combat use of which was much simpler and did not require such significant physical data from the “user”. It must be remembered that the fights of that time were by no means elegant fencing, the matter was decided by two or three blows, the better prepared person had the advantage, and therefore both the ax and the sword in this regard were weapons of equal value.
How to make a taiga ax
Unfortunately, not everyone can forge a new ax from steel. But if the desire to own a real taiga ax is great, and the prices in stores seem too high, you can try making it from ordinary carpentry tools.
Making the tool head
Before you start working with the metal head of a conventional axe, it should be inspected for corrosion. If it is available, then it is better to soak this part of the tool in a container with vinegar. This will take at least a day. Remaining substances are removed using a regular brush.
A semicircle is cut out on the inside of the metal head, this allows you to make the girth comfortable
The rest of the procedure proceeds as follows:
- The front protrusion of the metal part is cut off. This must be done flush with the butt. If there is a protrusion of 5-7 degrees left, then it’s okay, but ideally it’s better to remove it;
- Using a Bulgarian saw or an emery wheel, cut off the back of the blade, giving it a rounded shape;
- A semicircle is cut out on the inner or, one might say, lower part of the head. This will not only make the grip of the instrument comfortable, but also significantly reduce its initial weight;
- You can skip this step, but if you want to comply with all the conditions for the construction of a taiga ax, then it is better to comply with it. Both corners of the butt are cut off. This step increases the maneuverability of the gun;
The metal head of the ax is ready, all that remains is to sharpen it correctly.
Making an ax
It is necessary to pay attention to the manufacture of the ax no less than the metal part. After all, the ease of use of the tool will depend on the correct geometry. This part of the weapon is made of wood
Pine is considered the simplest option due to its ability to be easily sanded and processed. But there is a risk of its rapid breakdown. You should also pay attention to types of trees such as birch, maple and ash. The length is chosen at personal discretion: from 50 to 80 cm. In some cases, a size of 100-120 cm may be more convenient
This part of the weapon is made of wood. Pine is considered the simplest option due to its ability to be easily sanded and processed. But there is a risk of it breaking quickly
You should also pay attention to types of trees such as birch, maple and ash. The length is chosen at personal discretion: from 50 to 80 cm
In some cases, a size of 100-120 cm may be more convenient.
The process of making an ax includes the following steps:
The blank from which the ax handle will be made is determined. Its diameter must be at least 13 cm, and its length must be 20 cm longer than the final version; The workpiece is cleaned. Then they split it exactly in the middle and leave it to dry for a long time, preferably at least 8 weeks.
It is important to consider that the humidity in the room should not be too high, and the desired temperature should be kept within 22-25 degrees; The dried workpiece is processed using a chisel. A small hammer may also come in handy for this matter.
At this stage, it is important to maintain the correct shape of the ax handle, which means it is better to look at the drawings and diagrams.
If this is your first self-made ax, then it is better not to rush to avoid mistakes in the shape. Professionals in this field will need a minimum of time.
Assembling an ax
When both parts of the tool are ready, all that remains is to connect them. To do this, they usually use epoxy resin and a piece of regular gauze or medical bandage. For additional fixation of the metal head on the ax handle, wooden wedges are hammered in.
For additional fixation of the metal head on the ax handle, wooden wedges are hammered in
You won’t be able to use the tool right away; you need to wait at least 2 days. In order to protect the ax from corrosion, after sharpening and polishing it should be coated with a special agent. The taiga ax is ready for use.
Simple technology for making a tomahawk
First, you need to find among household steel scrap a piece of sheet iron with a thickness of 4.7 mm to 6.35 mm, and a size of 10 cm by 12.5 cm. If you do not find anything suitable in the garage, then look either in a salvage store or in industrial goods stores. The steel sheet should not be too heavy, but not too light.
Mark the plate: 8.89 cm high by 12.5 cm wide, with a radius as shown in the picture. You can make the curvature from the blade to the butt arbitrary, it’s not important. In the picture, by the way, the dimensions are indicated in inches.
To save time and effort, cut the tomahawk blade blank using a grinder or a gas cutter. If you have neither one nor the other, then use a vice and a hand hacksaw the old fashioned way.
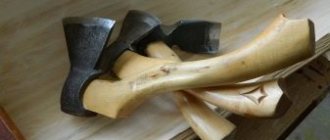
Ax with plastic handle: 8 interesting models
An ax with such a handle is more convenient and is now widely available on sale. Mostly such axes are made in China and they are not particularly expensive. But often axes with plastic handles break and this is their big disadvantage. They also look more attractive and come in different colors and shapes. Below you can see the most interesting models in the world.
The NEO ax is easy to use and can be purchased at outlets and in various stores. This ax weighs 950g and when working with it, your hand doesn’t get particularly tired.
An excellent ax for chopping wood, manufactured by a well-known company - Verto.
A small ax is suitable for tourists on hikes and for outdoor recreation.
Such an ax can often be found in stores, one of the best companies for making tools.
A very light ax with specially cut grooves for the fingers.
A good ax with a plastic handle and a length of 36 cm.
A small ax for outdoor recreation is a great helper for chopping wood for the grill.
This ax can also be used to hammer nails.
Read in full (link)
Main components
When making and choosing a weapon, its future owners are often faced with the question of how to calculate the mass of a taiga ax. To do this, you need to focus on its components and compliance with certain proportions between them. On average, the weight of the product does not exceed 1 kg; its main components are a wooden ax handle and a metal head. The main elements are shown in more detail in Figure 2.
Figure 2. Main components of the product
The weight of the taiga ax handle and its length should be proportional to each other. The optimal value for everyone is considered to be equal to the distance from the wrist to the shoulder joint, provided that the shaft is fully grasped by the hand, in order to avoid injuries. 50-55 cm is enough to work for a long time with one hand or chop something with two hands.
The ax handle should be quite light, since the main weight of the product is concentrated in its head. With a total mass of the specimen of 800-1000 g, the wooden part is approximately 40-60 cm and weighs about 200-400 g.
Materials and tools
Materials:
- Old circular saw blade.
- Hardwood timber (approximately 50 x 40 x 300 mm).
- Epoxy resin.
- Large nails for use as rivets.
- Folding saw blade (I used 200mm).
- Bolt, nut and washer.
Tools:
- Angle grinder (don't forget about safety equipment!).
- Rasp.
- File.
- Sandpaper.
- Drill.
Let's make sparks!
I transferred the outline of the ax and the metal part of the handle to a circular saw and cut them out using an angle grinder with a fine cutting wheel. I then used a sanding wheel, angle grinder and files to finish shaping the pieces. The final shape of the metal part of the handle can be given later.
Features of a homemade ax
An ax is a simple and common tool that is difficult to surprise anyone with. However, thanks to it you can cope with many complex jobs and ultimately get an excellent result. On sale you can find both simple versions of axes, as well as more interesting and original ones, for example, with decorative inclusions. If you don’t want to spend money on a ready-made option or you couldn’t find a suitable one among those, you can make it yourself.
Many home craftsmen, not finding the right tool on sale, decide to make it themselves
Such work cannot be called impossible or extremely difficult, but even here it is very important to act according to all the rules in order to get a good result. It should be borne in mind that there are several types of axes that you can build on your own
For example, there are special cleavers that are very popular today:
- mechanical;
- with electric drive.
Of course, the mechanical option is the simplest and easiest to implement. It is equipped with a manual drive. Making such a model with your own hands is not difficult. The drawings of mechanical tools are quite simple and understandable, and the principle of their operation lies in simple mechanical manipulations. This device consists of the following basic elements:
- metal wedge;
- spring mechanism.
You should also know about other options for axes, which many craftsmen can make on their own.
- Carpentry. This tool is light in weight and size, and has a sharp blade. It is used in cases where the most precise and accurate work with wood is needed.
- Taiga. This ax can also be made with your own hands. It is perfect for cutting down trees, removing knots and bark.
- Tsalda. This tool is made to clear an area of bushes.
- Kitchen. Such tools are made exclusively for chopping bones. A kitchen ax is a small device with a short handle and a large blade.
- Lumberjack. Suitable for cutting down trees only. Made from a long ax and a sharpened wide blade. It also has other names, for example, felling.
The taiga types of axes are recognized as the most popular and practical. They are distinguished by the following features:
- little weight;
- small area of the stabbing area;
- unusual sharpening of the blade (the edge at the back is several times smaller and thinner than the front).
Any homemade ax is distinguished by the fact that it is ideal for the master who works with it. By making this instrument with your own hands, you have the opportunity to adjust it to suit yourself, to suit your hand. The result is the most convenient, practical and easy-to-use devices.
Work process
All work will take place in several stages. Since the Viking ax will be made from an old axe, the essence of the whole process will be the restoration and stylization of the instrument.
cloth
- It is necessary to separate the panel from the handle.
- If there is rust, you need to clean it with a grinder and then remove the scale.
- The blade will have to be treated with a welding machine if it is cracked.
- Give the heel a suitable shape. You can draw the drawing yourself or use a round object that fits in size as a stencil. Trace the template onto the metal and process it with a grinder.
- Then process the resulting cut on a grinding machine.
Etching is the most important stage in hatchet making
For etching, it is best to use an inverter welding machine at a minimum current (30 A). As an electrolyte, a solution of water (3.5 l) and salt (700-750 g). Before starting work, it is better to check the intensity of etching on any piece of metal.
PHOTO: YouTube.com The electrolyte is ready, the welder is in place, you can start
Connecting elements to welding wires
First of all, a hatchet is attached to the positive cable, which is completely immersed in the electrolyte. But the negative contact needs some work. To increase the area immersed in the electrolyte, you can use a mounting plate for a metal profile. It should be curved so that the contacts are on both sides of the hatchet.
PHOTO: YouTube.com The mounting plate is perfect for etching
Etching procedure, inspection, protection of the welding machine
Having lowered the negative plate into the electrolyte, you need to make sure that both its sides are equidistant from the hatchet. Only after this can the welding machine be turned on. A violent reaction will begin almost instantly. It looks as if the electrolyte is boiling. In fact, this is not far from the truth; electrolysis does its job. Unpainted metal is etched away. No harm is caused to the painted surface; it remains untouched.
Etching is carried out in 5 passes. The welder turns off every 2 minutes to allow it to rest. It turns out that the total etching time is about 10 minutes. After this, the ax can be removed from the electrolyte.
PHOTO: YouTube.comThe electrolyte first boils and then turns dark
After the required time has passed, the hatchet can be removed from the container and the result can be assessed. If the etching depth seems shallow, you can continue. If everything is in order, then it’s time to remove the paint.
PHOTO: YouTube.comIf the etching depth is satisfactory, you can move on to the next stage
The final part of working with metal
The ax needs to be washed off the salt under running water and dried, then remove the paint from it. This can be done with fine sandpaper or acetone. Next, the entire surface must be polished. A felt circle mounted on an emery board or drill is perfect for this purpose. Only after polishing can you fully evaluate what the result of the work done is.
PHOTO: YouTube.com We can say that it turned out very well
How to protect against rotting?
The wood from which the ax handle is made, like other similar materials, is susceptible to rotting. Such problems always arise over time or in inappropriate storage conditions for the tool.
It is important to take care of your homemade ax in advance, protecting it from rotting. It is strongly not recommended to use compositions such as varnishes or paints to protect wooden handles
The ban on the use of such compounds is due to the fact that their presence on the handle can lead to it slipping out of the hands during certain work. The reason for this is the glossy smooth texture.
The optimal solution for protecting the ax from rotting would be other suitable impregnations. You can coat the handle with linseed oil or good old linseed oil. There are other highly effective antiseptic agents that will extend the life of natural wood. But we must take into account that they will need to be applied periodically. Don't forget this procedure.
Tools and materials
Creating a Viking ax is not an easy process, but it is possible for all people who have the desire to make it themselves. This activity turns an ordinary gift into a unique gift, and the time spent will be remembered with warmth. A well-designed ax will not only be bright, but also help in business with its functionality.
An ordinary ax can easily be taken as the basis for creating a Viking axe. Even an unnecessary and rusty copy is allowed. The work comes down to restoration and artistic decoration.
In addition to the blanks themselves (metal part and lumber for the handle), you will need:
- an ordinary grinder with cutting and flap wheels for metal;
- sandpaper - in the spectrum of roughness values (from rough to zero);
- varnish brush;
- knife – strong enough for woodworking;
- welding machine;
- drill or small electric drill with small diameter drills.
The equipment you will need are clamps and a bench vice (to secure parts during processing). To complete the artistic part the following will be useful:
- ordinary and masking tape;
- stationery knife;
- pencil or pen, marker;
- wood varnish (or linseed oil).
At the same time, you will need leather, scissors, an awl, needles and threads.
DIY Viking axe.
Weight parameters
The possibility of its use in wood processing depends on how heavy the tool is. The minimum value is considered to be a mass of 0.9 kg. Lighter models are used only for a limited range of household and household purposes when finishing small workpieces, for example, for sharpening wedges.
For standard work with wood, you will need a tool of 0.9-1.7 kg. It will be effective both when cutting medium-thick firewood and when carrying out construction work. Heavier splitting axes weighing 2.2-2.5 kg are used for chopping large firewood. They have a longer ax handle.
Operation and care
When working with a taiga ax, you must comply with all safety requirements and proper handling of the tool.
The blades should always be kept closed and dried after use, otherwise they will rust and become dull, which significantly reduces the efficiency of cutting and the life of the ax. Always remember that axes are not a toy
They can be reliable helpers in difficult survival conditions, but if handled carelessly and frivolously, they cause their owners a lot of trouble. The ax is intended for cutting down trees - this means that it should not be used for digging the earth or working with materials that can dull it or simply break it. The ax should not be thrown into the ground, as this will cause the blade to deteriorate and rust. You should not put the tool into the fire - this leads to a deterioration in the technical and operational characteristics of the steel.
It is important to check the sharpness of the blade in advance; there should be no chips or burrs on the plate. You cannot start cutting if there are strangers in the work area, especially children.
You cannot start cutting if there are strangers, especially children, in the work area.
When swinging strongly, hold the ax handle as tightly as possible - otherwise the tool may slip out of your hand.
For more information about the features of taiga axes, see the video below.
How to make an ax in Minecraft:
Crafting requires the following components: boards (3 pcs.), sticks (2 pcs.)
The first can be obtained from any tree by moving a block of wood to a workbench. Creation of sticks is carried out by filling two pillar-shaped cells with boards of any kind. The procedure can be done in a pocket inventory.
How to get an ax in creative mode:
open chat using the hotkey “T” (Latin) and use the commands:
- /give @p minecraft:wooden_axe
- /give @p minecraft:wooden_axe 10 (the number means quantity);
- /give minecraft player nickname: wooden_axe (indicates the name of the user who will receive the item);
Don't forget to watch the video
, in which there is a visual demonstration of creating an ax, and also leave your feedback.
https://youtube.com/watch?v=7E8MYxY1nmg
Thank you for your attention, enjoy the game!
Classification of axes
In practice, many types of axes are used, which are designed for working with wood. Conventionally, they can be divided into three types:
- cleavers;
- for logging;
- construction or universal.
Accordingly, there are various designs designed to solve specific problems, for example, a firefighter is equipped with a pick, with which you can pull beams and other structures away from the source of fire.
In addition to this classification, we can offer another one - according to the size of the blade, or more precisely, according to the size of the butt:
- wide;
- average;
- narrow.
The first ones are used in logging, the second ones solve many problems in construction and in everyday life, and the third ones have found their application in carpentry. These tools are also distinguished by the length of the ax handle. That is, the larger it is, the stronger the swing and, accordingly, the blow. There is a difference between the width and shape of the blade. That is, if the tool has a direct sharpening, then it is intended for chopping blows. If the cutting part has a curved sharpening, then it can both chop and cut.
Steel, wood, and polymer materials are used to make ax handles. But as experience shows, nothing better than a wooden (birch) handle has yet been invented. Other materials do not always cope with vibration damping.
The list of existing and widely used tools can be listed for quite a long time, the following can be mentioned:
- Tourist, it has small overall and weight characteristics, its weight is just over half a kilogram, and its length is 350 mm. With its help, you can prepare dead wood and perform simple work, for example, put together a ladder or a raft.
- Hunting. It is used for cutting dead wood and butchering harvested carcasses.
- Scandinavian. This tool is intended for professional woodcutters. It weighs 1.2 kg, with a length of 640 mm.
- Cleaver-sledgehammer. Its use allows you to split any log.
GOST 18578-89 normalizes the main dimensions of the product, maximum tolerances, and roughness parameters of the cutting part. According to the requirements of this document, each product must be marked. This GOST defines the procedure for acceptance and shipment of finished products to the consumer.
Useful tips and tricks
Please note that the ax handle should be made so that its cross-section has a characteristic oval shape. Only by observing this condition will you be able to successfully hold it without straining your hand too much. In this case, blows with an ax will be more accurate and easier. It is recommended to make wood blanks for creating an ax handle in late autumn. It is during this period that the movement of sap is reduced to a minimum (almost stops), which means that the tree becomes, as it were, dehydrated.
Many inexperienced craftsmen neglect drying wood to build an axe. As a result, this ends up with the handle changing in size, and the metal part with the butt on it holds very poorly. It is permissible to use undried material only in special situations, when the handle needs to be built urgently, and this spare part is made as a temporary one.
When making a brand new ax handle yourself, you need to draw up a detailed drawing/template of the future tool. If you have a very convenient old ax in your arsenal, then you can remove all parameters from it. This will make it much easier and more convenient. Do not rush to turn the cutting edge of the tool. First you need to make sure the metal is sufficiently hard. If it turns out to be too soft, then it will need to be additionally hardened under the influence of high temperatures.
It is very important to use a ready-made ax (both homemade and store-bought) correctly. Experienced craftsmen strongly do not recommend trying to cut various metal parts with such a device.
Even if you plan to cut wood, it is better to make sure that there are no solid particles inside that could harm the tool.
It is strongly recommended not to throw the finished tool onto hard surfaces, especially from a great height. It is not recommended to leave the ax in the open air. Precipitation or aggressive sunlight can negatively affect the quality of the wooden part. Keep this tool in a dark and dry place. Only under this condition will the ax serve you for many years.
If the ax handle fits into the eye too easily, this may indicate that during the work the master made a serious mistake somewhere (most likely in the calculations). An incorrectly prepared template often leads to this problem. In such a situation, even one more installed wedge will not change anything
This is why it is so important to take your time to do all the calculations and make the template correctly
Do not forget to process the wooden ax handle at the end of all work. Please note that processing of this part must be carried out in several approaches. Each new protective layer should be applied only after the previous one has been completely absorbed. This is the only way to reliably protect wood from rotting and destruction. Stock up on enough wood to make an axe. You don’t need to make just one piece - it’s better to build several pieces. This is necessary because during the work some of them may not work out and be rejected. There should always be at least one more blank in stock.
To make an ax handle, you cannot use a wooden block that has a large number of knots. Because of them, noticeable cracks may form on the material. Over time, the branches begin to dry out, and the entire material loses its strength. Making an ax handle yourself is not at all difficult. If you doubt your abilities, are afraid of making a mistake and translating natural material, then it is better to refuse experiments. Buy a ready-made model or contact an experienced craftsman who will make a good tool for you.
To learn how to make an ax handle with your own hands, see the following video.
Manufacturing process
DIY nunchucks: detailed instructions
So, when all the materials are ready, we can start making the tool. Step-by-step instruction:
- Remove the old handle from the axe.
- Remove rust from metal using a grinder. Don't forget to remove the scale.
- If cracks are found in the metal during work, they must be sealed by welding.
- Give the heel of the ax the desired shape. You can draw a stencil by eye or choose any round object of a suitable size, for example, a jar lid. Trace the object onto the panel and cut it into shape using a grinder.
- The cut needs to be processed on a grinding machine.
Manufacturing process.
Since an old ax was used for manufacturing, the metal needs to be hardened. We will describe the hardening process in detail below. At this point, the production of the panel is completed. Let's start making the ax handle. From a block (with a cross-section of approximately 4*4 cm) you need to cut a simple straight handle. To decorate the handle, we transfer any Celtic ornament onto the wood with a pencil and develop the design with a drill. To protect it from moisture, the handle must be coated with varnish or oil.
Making the handle.
You can see examples of Celtic patterns in the photo below:
Celtic ornaments.
You may also be interested in: DIY country table.
An ax as a weapon of noble warriors
Judging by the chronicles and finds of archaeologists, this type of weapon was very popular among Scandinavian warriors. Thus, the well-known king Olaf the Saint in his time was the owner of a battle ax with the expressive name “Hel”. This is, by the way, what the ancient Scandinavians called the goddess of death. Eirik, the son of Harald Fairhair, had the respectful nickname “Bloody Axe,” which rather transparently hints at his preferences in choosing weapons.
There are frequent references to “axes lined with silver” in written sources, and in recent years scientists have found many archaeological artifacts that testify to the truth of these words. Such, in particular, was the famous Mamennsky axe, on the surface of which amazing and beautiful patterns formed by hammered silver thread are visible. Naturally, such weapons had status and emphasized the high position of the owner in society.
The Sutton Hoo burial also shows great respect for battle axes, as many richly decorated axes were discovered there. Judging by the luxury of this burial ground, one of the outstanding military leaders of the Angles or Saxons was probably buried there. What is characteristic: the deceased himself was buried “embracing” an ax with practically no decorations on it. This is a purely military weapon, so during his lifetime this man clearly preferred axes.
What is a taiga ax
First, of course, we’ll talk about the forged taiga axes we made, and compare them with purchased carpenter’s axes. Then considerations on the recipes for making your own from ready-made axes, which are common on the Internet.
Purpose
A taiga ax is an ax that is convenient to use for hunting, long hikes and work in forest areas. It is intended for collecting firewood, setting up a camp, and, quite often, for cutting up the carcasses of large animals. Therefore, optimal blade hardness, a reliable ax handle, and a convenient case are required.
Buy a taiga ax or make it yourself?
Carpenter's axes are usually on mass sale, but they are not very convenient for working in the forest. A long time ago, skilled people lightened and modified purchased axes for camping use; now a whole industry has emerged for regrinding axes and turning them into “author’s” ones. If everything is done correctly: the shape, the attachment on the ax handle, heat treatment and sharpening, you can get a good tool. But we prefer axes that are completely hand forged and designed specifically for working in the forest. The advantages of such an ax: optimal shape, light weight, more durable blade due to free forging rather than stamping. Therefore, we will first show off our axes, and only at the end of the article will we tell you how to make a taiga ax with your own hands.
Manual method
This method will require a lot of free time, since the matter is quite troublesome. If you approach it with special trepidation, then before sharpening you need to make a special template. To do this you need:
- find a piece of tin;
- choose the optimal and correct sharpening angle;
- make a cutout.
When the template is ready, move on to the main action:
- apply the template to the ax blade;
- see if there is a deviation angle;
- make marks using a marker;
- processing.
If you choose a manual sharpening method, it is better to do it with a medium-grained stone. The final touch can be done in the smallest way. The timber also has its own nuances:
- round shape is preferred;
- material – fine sandstone.
Professionals advise sharpening with the blade facing away from you. It is also noted that if amateurs get down to business, the blade becomes dull, and in some cases the “sharpeners” break.
How to harden an ax yourself
First of all, you need to make sure that the procedure in question is necessary. As a rule, it is carried out in case of purchasing a budget ax model. The following mistakes are typical for unscrupulous manufacturers:
- No hardening. In this case, the material of the ax will be very soft. It will become dull quickly, and if you cut hardwood, it will leave dents and nicks on the surface of the tool.
- Violation of heat treatment technology. It is expressed in the absence of metal tempering after hardening. In this case, the material of the ax will be fragile - during work, cracks and gouges will appear on its surface.
To check the quality of hardening, craftsmen recommend using a flat file with a fine notch
It is important that it is in good condition, without defects in the working plane. If the file slides along the surface of the ax without practically catching it, this indicates the high hardness of the tool.
Otherwise, the working part will be easy to process.
If, as a result of the inspection, it was decided that the ax needs to be hardened, it is necessary to determine what steel it is made of. This is the key to high-quality processing, since each material has its own temperature regime.
All axes that are manufactured in the CIS comply with the requirements of the interstate standard GOST 18578-89.
Before we look at the features of the technological process, watch a video about hardening an ax at home.
https://youtube.com/watch?v=j8sMHguBuYU
Annealing process
Before work, it is necessary to grind the cutting edge to a thickness of 1 mm. Under the influence of high temperature, the sharpening will still melt. After this, you can start heating.
Annealing is a high-temperature operation, which results in a homogeneous metal structure without internal stresses in the crystal lattice. This occurs due to the memory of metal particles being reset to zero under the influence of temperature. The material becomes soft and easy to machine. Annealing can be carried out in a conventional brick furnace.
The procedure looks like this:
- We heat the metal to a temperature above critical. For U7 steel this figure is 760 °C. When working at home, the most important thing is to set the temperature correctly. An experienced specialist can easily determine the degree of heating by the color of the metal, but a beginner is better off using a magnet. This is because steel and iron are not magnetic at 768°C.
- We remember the color of hot metal – red-burgundy. This will be needed during the process of hardening the axe. Colors of heat and tarnish:
- Upon reaching the specified temperature parameters, it is necessary to slowly cool the workpiece to 550 °C. The cooling rate should not exceed 50 °C per hour.
- Leave the workpiece until the oven has completely cooled.
- We clean the ax from scale and proceed to hardening.
Hardening stage
The working edge is dipped into water to a depth of 3–4 cm. The optimal liquid temperature is 30–35 °C. The workpiece must be constantly in motion. Otherwise, the steam cushion will prevent uniform cooling. Duration of hardening is 3–4 seconds. To continue the procedure, you need to prepare the oil and a metal container
Please note: high temperatures may cause it to catch fire. As a safety measure, it is necessary to prepare a piece of thick fabric
In case of fire, the container with oil must be covered with a cloth, blocking access to oxygen. The whole workpiece is immersed in the liquid.
After this procedure, the ax material will be very hard and brittle. To eliminate this drawback, the metal should be tempered. Before this, it is necessary to clean the surface to visually control the degree of heating.
Metal hardening
This process consists of three stages, let’s look at each of them:
- Annealing. First, blunt the tip to 1 mm. To do this, the panel should be heated to a red-burgundy color (about 760°C), and cooled slowly. Removes scale from metal.
- Hardening. It is necessary to heat the metal to a temperature of 830°C. This can be done in any available way, in an oven or even over a fire. Next, you need to prepare two containers: a bucket with warm water and a metal container with oil. You only need to lower the ax blade up to 4 cm into the water for a few seconds. The ax is completely immersed in oil. In case of fire, you should have a thick cloth on hand to cover the container. Remember fire safety rules!
- Vacation. Necessary to reduce the brittleness of steel. The metal must first be cleaned to reveal the tarnish color. You can spend the holiday in a conventional oven at a temperature of 200-300°C for 60 minutes.
Tip: You can check the temperature of the metal by color or using a magnet. Metal stops being magnetic at temperatures above 768C.
Video: how to harden metal.