A forged ax made by a master is of better quality than a cast one. During the forging process, the metal changes its structure - it becomes fibrous and directional. Internal defects, if any, are removed and internal stress is relieved. The product becomes more durable. Any process has its own characteristics. Only masters know about them. This article will help you understand the intricacies of ax forging.
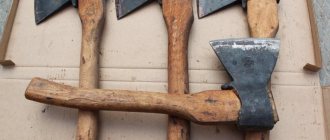
Types of forged axes.
Features of the procedure
Knowing some of the nuances will help you do the job better and faster. Masters share features that need to be taken into account:
- During the forging process, you should not heat the metal above 1100 degrees. This may lead to the destruction of the structure. As you use the tool, the blade will become chipped.
- When forging blades, the metal acceleration technique is used. It makes it possible to have a longer beard.
- After forging, the product is annealed. It is placed in coals with a temperature of 750 to 900 degrees. As the metal cools slowly, it is freed from stress after forging and it acquires an even, fine-grained structure. This effect is difficult to achieve in industrial production.
- The ax is checked for defects in the working edge, and then sharpened and inspected again. Lack of penetration and burns are looked for. If they are absent, further processing is carried out to the final result.
- A sharpened ax with a treated eye is hardened in oil heated to no more than 830 degrees. At the hardening point, the metal has a hardness of 60 HRC. Next, it must be kept for 2 hours in a muffle furnace at a temperature of 220 degrees.
Blade
The full size drawing will show the amount of material needed. The blade requires a hard metal, such as a car spring.
We transfer the outline of the drawing to the spring and saw off all the excess. We also make descents using a grinder. It is important here not to overheat the metal so that the edge remains hard and holds an edge well.
Safety precautions
Work is carried out with hot metal and heaters, where the temperature is from 750 to 1300 degrees Celsius. At this temperature you need to be extremely careful. Severe burns can be dangerous:
- For each action there is a special tool. It is better to use it, as it will lead to a predictable result.
- When using homemade tools, you need to be sure that they are made with high quality, in compliance with manufacturing rules and are safe.
- When working with electric tools and furnaces, safety rules are observed and automatic switches with the required parameters must be installed.
Forged axe.
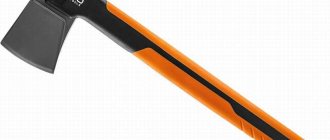
Types of axes
Humanity has been using axes of various shapes and sizes for several tens of thousands of years. Today, store shelves are filled with hundreds of types of beautiful axes for repairs, industrial wood harvesting, and participation in medieval reconstructions.
If desired, you can chop wood and cut down trees with any ax. But only a specialized tool will help you complete the task quickly, using a minimum amount of energy. Before starting work, determine the type of ax you have.
Felling ax
A huge felling ax is the first item that comes to mind when thinking about lumberjacks. The length of its ax reaches 1 meter. The massive butt and wide blade increase the impact force. This tool will be useful for owners who prepare firewood with their own hands.
Cleaver
The cleaver is a classic ax for chopping wood. Without it, this activity turns into a long, exhausting routine. The heavy blade with a dull sharpening is ideal for cutting firewood for future use.
Army hatchet
An army hatchet is a small, versatile, easy to transport and maintain, a tool that is familiar to any military personnel. It can be used both for preparing branches for lighting a fire, and as a hammer for driving in pegs or bladed weapons during battle.
Carpenter's ax
A carpenter's ax is a universal tool for working with wood. Its lightness and sharpness make it an indispensable assistant in the countryside and garden. The weight of such an ax can vary from 0.8 to 1.2 kg, depending on the materials and dimensions. It should fit easily in the hand. The notch (notch above the blade) serves to lighten the blade and improve its cutting properties. Our step-by-step guide will show you how to make this type of ax at home.
Hand forging technology
If you don’t have personal experience, then it’s better to ask an experienced blacksmith to work as an apprentice, since forging requires dexterity, as well as skills. Sometimes a product needs to be forged by two people.
Using forge welding
In this case, 2 pieces of metal are taken:
- steel 45;
- tool steel.
The algorithm for further actions is as follows:
- a strip of steel 45 is folded in half, so that there is a hole for the eye;
- a tool steel wedge is inserted between the ends of the strip;
- the workpiece is heated to 1000 degrees and sprinkled with flux, it forms liquid slag;
- then the metal is heated again, but now to white heat, which is about 1300 degrees;
- First, the liquid slag is squeezed out of the parts with gentle blows with a hammer, and then forge welding is done with strong blows.
You need to hammer the metal on both sides and check for peeling on the seams. If they are, the process is repeated. The work can be considered high-quality if there are no peelings and the product looks uniform.
In the same way, the ax head is welded to the finished blade. But the final processing of the blade will occur after welding.
Forging using forge welding.
How to make a solid forged ax
In manufacturing, this ax differs from the previous one in that it is made of one metal. It does not use a wedge or a ready-made blade made of another steel.
- When the hole for the eye is ready, the cheeks of the future ax are forge welded and hammered to the desired size and shape.
- The blade can be carefully chopped and sharpened.
Such an ax will dull faster than with a tool steel blade.
Hot forging of an ax
It is not technically difficult to make such an ax, but it will require physical work. It is made from a piece of high quality steel. You can take a gearbox axle or a car axle shaft.
The following is all according to the template:
- the steel heats up and a piece of the required size is cut off with a wedge;
- holding with tongs, the workpiece is processed with a hammer, giving the desired contour and appearance;
- using a wedge, the eye is cut out;
- The resulting workpiece is finally processed to the required dimensions, sharpened, hardened, annealed, processed and polished to the final form.
The finished product is mounted on the ax handle.
Hot forging.
Connect the blade to the body with rivets
Alternatively, rivets are used to connect the blade to the ax head.
- In this case, the processing of the head occurs as with forge welding, but the cheeks are not welded. The finished blade is inserted between them.
- Through holes are drilled in the cheeks and blade into which rods for rivets are inserted.
- When processing the finished product, sometimes the cheeks were ground down. But there are products when they stuck out on the sides.
This method allows you to save a lot on materials and in the production process. Their peculiarity is that the blade is completely hardened, in contrast to the zone hardening of a conventional ax. Such products were produced in the Soviet Union in the 20th century.
Ready axe.
Do-it-yourself ax handle
An ax handle can be found in every person engaged in economic activity. The instrument is quite expensive, and cheap copies are of poor quality. Therefore, we will figure out how to make an ax handle yourself.
How to make an ax head?
It is unlikely that you will decide to forge a metal part yourself at your summer cottage. Therefore, it is worth looking for a simpler way to make a head.
- You will need any metal ax head. The optimal weight is 1.5 kilograms (± 100 g). You need to cut down the front protrusion evenly with the butt. An error of 5-6 degrees is allowed, but it is advisable not to allow such errors.
- The back of the blade should be round in shape. Metal - cut down. Otherwise the surface will have corners. For such work, you can use a grinder or a regular emery wheel (not with a large grain).
- Now you need to cut out a semicircle in the inner part of the blade. Without it, the ax grip will be poor. Accordingly, it will not be possible to do any serious work. Due to the optimal shape of the ax, it will be possible to hang it on tree branches, pull up logs, and so on. We will also reduce the weight of the tool element by 100-200 g.
- The upper corners of the butt need to be cut off. This way we will achieve more efficient work with the tool and reduce its weight. But this is an optional step.
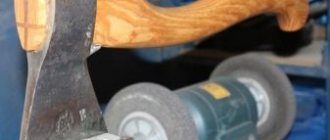
- All that was left was to sharpen the axe. We don’t even consider the Bulgarian! Low speed tool only. An emery machine works great. It should have a large circle and medium grain. You need to sharpen the ax on both sides! You shouldn’t make it too sharp (the tool won’t last long).
How to make an ax handle with your own hands?
It is very important to make a high-quality pen, otherwise you will quickly get tired while working. Excellent geometry, high-quality grinding, balance - this is not only convenience, but also operational safety.
You can safely take pine for the material. It is easy to sand and hone. However, the material is quite brittle. As for birch, it is cheap, easily available and quite reliable. But it is best to take maple and clear. Among the disadvantages is the complex process of making the handle, which is why beginners are unlikely to be able to cope with this task.
The length of the handle should not exceed 70 cm (small deviations are acceptable). If you want a camp hatchet, then 40 cm will be enough, but not for firewood. When planning large-scale work, it is worth making a handle 100-120 cm in size, but working with such a tool is difficult.
Step-by-step instruction
- Let's say we already have a wooden blank. The diameter of the chock is at least 12 cm. Its size is 20 centimeters longer. There should be no defects on the workpiece, not even small knots.
- The wood needs to be dried. But before that, we clear it of bark and split the lump in the center. Exposure time is optimal 2 months. Temperature - 25 degrees. The percentage of humidity is no more than 15 units. Overheating or excess dampness is the cause of rapid deformation.
- Creating a tool shape. You will need a knife that allows you to quickly remove all excess. But, most likely, you won’t be able to do it without a chisel or a small hammer. If you are a beginner, you will have to spend a couple of hours on the third step. For an experienced person, whittling an ax takes half an hour.
- Mounting and fixing the ax handle. Auxiliary elements: epoxy resin, gauze. Next, wait a few days - later you can chop wood. For reliability, it is worth hammering in a wedge (especially if complex work awaits the tool ahead).
- All that remains is to sand the ax handle and coat it with varnish. Use only high quality sandpaper. Anti-corrosion mixtures are needed for the longevity of the ax. Varnish is a visual component. It is important if you plan to give a hand-made instrument as a gift.
It would be nice to make a leather case for a gift. It's quite simple. You will need 30×30 leather, strong threads (preferably nylon) and an awl.
Source: https://jurnalstroyka.ru/toporishche-svoimi-rukami/
Assembly of the canvas
The blade and butt are connected by welding. It is important to weld the metal thoroughly so that the ax does not crack during operation.
Then we grind the seam with a grinder, if necessary, boil the shells, and grind again. For additional strength, you can rivet the butt and blade with strips of metal.
Fit
The next stage in making an ax handle is adjusting the shape and ergonomics. We grind the wood to give it the correct shape and comfortable grip.
A large rasp, as well as a power grinding tool, are perfect for these purposes. The main thing here is not to loosen the place where the ax fits on the ax handle.
Note!
- Why do people consider healing fasting?
- Required distance of the septic tank to the well
Do-it-yourself garden beds: the best arrangement ideas and step-by-step placement instructions (110 photos)
Blanks for gift options
A creative person may get the idea to make a beautiful decorative tool for himself or as a gift to a friend if he suddenly discovers an ordinary old blade in his household.
On the other hand, photos of the best homemade axes seen on the Internet can contribute to this. As you know, the world wide web is today the main source of inspiration.
Having bought a blade of a suitable type at some flea market and found a suitable block, something from which to make an ax handle, a person begins to create.
Roughing
Using the template, we outline the outline of the handle on the wood and cut out the blank. Give the handle a more rounded shape. For these purposes, you can use a plane, chisels or a small hatchet.
Finishing
The assembled ax is carefully polished with fine sandpaper. The wood can be covered with stain or left as is. The protective layer is applied with oil or varnish.
For greater exclusivity, the ax handle can be decorated with carvings, inlays or wire notches. A pattern etched in a saline solution will look beautiful on the ax blade.