This Scandinavian ax is made from an old, unwanted axe. Conventional tools were used to make it.
To make your own Viking hatchet you will need:
- Old ax
- Any saw that easily cuts through curves (bow, band, hair, jigsaw, etc.)
- Angle grinder
- Belt sander
- Bench vice
- Drill and wood bits
- Protective equipment (glasses, work gloves, pants made of thick material, covering the toes of shoes, leather boots)
For acid etching you will need:
- Hydrochloric acid
- Hydrogen peroxide
- Nail polish (any color)
- Nail polish remover
- Electrical tape (optional)
- Beautiful transfer pattern
- Nitrile gloves
- Protective glasses
- Plastic container
- Bucket with water
For the final assembly of the ax you will need:
- New handle
- Wood glue
- Hammer
- Stain (your choice)
- Unnecessary leather scraps and leather lace
The process of making an ax looks like this:
Material selection
The following grades of wood are used for the handle:
- oak;
- birch;
- maple and some others.
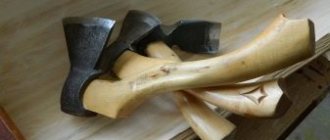
In order for this part to be of high quality, the wood must be harvested before frost. After the workpieces are ready, they need to be dried. They should lie in a ventilated area for about a year. But, some craftsmen claim that the drying period should be about 5 years. In fairness, it must be said that in an emergency, you can use an undried workpiece, but this is a temporary option, the handle will quickly wear out.
Cutting out the template
To obtain an ax of the required size, you must use a template made from cardboard. As a sample, to obtain it, you can use the tool that is convenient to work with. That is, you need to put it on a sheet of thick cardboard and outline it with a pencil.
Ax template
By the way, the size of the ax can be determined based on the height and physique of the person who will work with it.
Making a blank
A block is hewn out from a block that has been dried. Work must be carried out along the fibers. The size of the bar should be 100 mm larger than the size of the finished product. The size of the part where it will be installed, and the blade itself should be 2 - 3 mm larger than the size of the eye.
The template prepared in advance must be laid on the surface of the block. At the same time, leave allowances for processing. From the front its size is 10 mm, in the tail it is 90 mm. This allowance is necessary so that the handle does not crack when pulled onto the ax itself. Upon completion of work, this allowance is removed.
Hewing out an ax
To bring the part to the required dimensions, two cuts must be made in the upper and lower parts of the workpiece, but their depth should not reach the contour of 2 mm. Excess material can be removed using a chisel. After this, using a file with a large notch, the corners, transitions and other surfaces of the handle are leveled. Abrasive sandpaper is used to finish the surface.
Making an ax
Impregnation with waterproof compound
To increase the resistance of the handle to moisture, special compounds are used. But it is permissible to use drying oil or linseed oil. The handle is covered with this liquid until it stops being absorbed into it.
By the way, it wouldn’t hurt to add a coloring pigment, for example, orange, to the waterproof coating. Then the tool with a bright handle will not disappear on the site.
How to choose an ax?
For a long time in Rus', any man had to be able to wield an ax; each owner had his own tool, the handle of which was like an extension of the hand. Modern axes that are easy to use are made from high-quality materials
You should choose your tool carefully and pay attention to details
The weight of the product plays an important role
When choosing Finnish axes and other professional models, you should pay attention to tools weighing from 2 to 2.5 kg. Lighter axes are inconvenient to use, and heavier axes strain your hands.
The type of ax blade depends on the composition of the wood with which the master will work.
The length of the handle is an important parameter on which the impact force when working with an ax depends.
Army photos on Shutterstock: Army and military photos.
Ax size
The parameters of axes differ depending on their purpose and type. The shape of the blade, the length of the ax and the weight of the tool vary. Standard axes for chopping wood are considered large models; the length of the handle can range from 70 to 100 cm, the thickness of the blade is from 3 to 8 cm, and the weight is from 3.5 to 6 kg. Typical ax models have other characteristics:
- ax length: from 40 to 65 cm;
- sharp edge size: from 10 to 17 cm;
- size of the blunt part: from 4.5 to 7 cm;
- ax height: from 16.5 to 22 cm;
- size of the sharpened part: from 1.4 to 2 cm;
- weight: from 0.7 to 1.6 kg.
Ax blade shape
In home tool stores you can find axes with several types of shafts - wide, which is used for cutting wood, medium, which is considered universal, and narrow, intended for carpentry. The shape of the blade of a large ax can be different:
- Direct
sharpening is necessary for tools used to trim logs and split firewood. - Razor
sharpening is suitable for axes used for shaped cutting. - Oval
- ideal for meat axes used to chop bones; with this sharpening the blade does not get stuck in hard structures. This type of sharpening is good for small carpenter's axes.
Ax blade material
The question of which steel to choose an ax from is one that all craftsmen ask. Axes made of alloy steel are considered the most durable, followed by carbon blades in terms of properties. Alloy alloys, widely used for the manufacture of axes, are currently inferior to modern materials. Weak metals require frequent sharpening; such a tool will last less. When choosing a Scandinavian axe, experts advise hitting something metal with the blade and listening. A clear sound characterizes a quality product.
Ax handle
Axes with a wooden handle have proven themselves to work best. Such instruments experience strong vibration, which is transmitted to the hands. An ax handle made of metal or plastic does not extinguish it, and it is more difficult to work with tourist axes of this type. Birch exhibits the optimal balance of hardness and strength. After several years of use, the tree dries out. You can combat this by placing the ax in water, or purchasing a model treated with paint or varnish. The advantages of non-wooden handles are undeniable, such axes:
- do not rot;
- do not crack;
- do not burn;
- fits comfortably in the hand;
- do not slip thanks to rubber pads.
Useful tips
Professionals recommend taking special care when choosing materials for making a homemade axe. For example, it is better to harvest wood for making a handle in the fall and then dry it in a dark place throughout the year. But the future handle will become even more durable if it is dried for five years. Of course, if you don’t have that much time, you can easily wait a year, but then treating the finished pen with water-repellent compounds will become mandatory.
It is better to buy a blade in hardware stores or on the market, and preference should be given to products with GOST markings. This way you will be sure that the steel has undergone the necessary hardening and will not crumble or lose its sharpness when cutting down trees. In addition, when making an ax, you need to decide in advance for what purposes you will use it. The sharpening angle of the blade will depend on this, because axes for cutting wood, carpentry or hunting differ precisely in this parameter.
You can see what making an ax with your own hands looks like in practice in the video.
Final word
There is hardly a man who will not be happy with such a gift. But that's not even the main thing. If a home craftsman once makes such beauty with his own hands, then he will definitely be captivated by the activity, and he won’t be able to stop after that. And with the experience that comes, everything will turn out better and better. For example, you can master the technique of gilding (brass plating). After all, there is no limit to perfection. And if learning brings pleasure, then it will be doubly effective. And regarding such products, it’s not for nothing that experienced blacksmiths say that a beautiful knife or ax is music enclosed in steel...
The Homius editors invite home craftsmen and craftsmen to become co-authors of the “Stories” section. Useful first-person stories will be published on the pages of our online magazine.
Previous STORIES A “floating” heart as a gift to a loved one - original and insanely simple Next STORIES Sleight of hand and a couple of minutes of work: practical ideas for using packaging
Materials and tools for work
To create an ax similar to the one used by real Vikings, you will need the following materials:
- block (approximately 4x4 cm);
- paper;
- pencil;
- brush;
- wooden wedges;
- varnish (can be replaced with flax oil);
- a small piece of leather material or leatherette (for braiding);
- an ordinary ax (it’s okay if it’s rusty).
A properly selected handle should not subsequently become loose during the drying process if the degree of humidity in the environment changes. If such a need arises, the workpiece must be dried in warm and dry conditions.
It is important to approach the choice of wood for an ax with all responsibility. Only deciduous and only hardwood is suitable
It is also very important to pay attention to the level of drying. The humidity level should not exceed 12%
The following breeds are best suited for making an ax handle:
- beech - has all the necessary qualities, but also has a disadvantage - it absorbs moisture from the air. Therefore, before you start making the handle, you need to further process it;
- oak is a hard, durable and very durable species;
- maple is a very elastic and durable material. The finished handle will have a beautiful texture;
- ash is the best option, since this particular species is known for its strength, durability, and most importantly, affordability. The handle will turn out very beautiful.
The following tools will be required for the job:
- welding machine;
- drill;
- Bulgarian;
- grinding machine.
Having decided on the materials and prepared the tools, you can begin to create a Viking ax.
Completion
Step-by-step instructions and detailed photos will help you figure out how to make a Viking ax from a simple ax with your own hands. Making this amazing thing is not difficult. But it is important to know how to use the mentioned tools. This ax would make an excellent decoration or gift for a collector.
The material was prepared by the editors of the website mainavi.ru
To make your own Viking hatchet you will need:
- Old ax
- Any saw that easily cuts through curves (bow, band, hair, jigsaw, etc.)
- Angle grinder
- Belt sander
- Bench vice
- Drill and wood bits
- Protective equipment (glasses, work gloves, pants made of thick material, covering the toes of shoes, leather boots)
For acid etching you will need:
- Hydrochloric acid
- Hydrogen peroxide
- Nail polish (any color)
- Nail polish remover
- Electrical tape (optional)
- Beautiful transfer pattern
- Nitrile gloves
- Protective glasses
- Plastic container
- Bucket with water
For the final assembly of the ax you will need:
- New handle
- Wood glue
- Hammer
- Stain (your choice)
- Unnecessary leather scraps and leather lace
We make a case for storage and transportation
To make the ax convenient to carry, a special case is made of thick leather or canvas (Figure 11). To do this, it is enough to create a pattern for the future cover and firmly sew the parts together. However, if you are going to wield a large ax in the forest, making a special case for it is impractical, and the tool will have to be carried either without additional protection, or to be sewn separately for the blade.
Figure 11. Options for transport cases
Many hunters and outdoor enthusiasts prefer the latter option, as it makes it easier to carry the tool, which is extremely important if you were making axes yourself and the finished product is quite large in size
Distinctive features
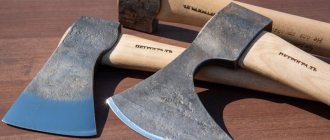
Among the Vikings, axes were in second place after swords in use. It was often a universal tool that could be used in peacetime to cut down trees, chop firewood, and also be used in battle as an excellent weapon. Axes could be one-handed or two-handed, and varied in shape. By the way, this type of ax is similar in design to the domestic taiga one:
Viking axes and taiga ax (right).
- average length of the canvas - 18 cm;
- average width of the canvas - 17 cm;
- the average length of the ax is 90-120 cm;
- canvas weight - up to 450 g.
That is, the width and length of the blade are approximately equal, the blade of such a tool must be thin, the ax itself is quite long to be able to be grasped with two hands (hence the name).
For a better understanding, you can study the structure of the ax in the photo below:
Design.
You may be interested in: DIY forged fence.
Sacred meaning
There is another circumstance that indicates the respect with which the northerners treated axes. Archaeological and written sources clearly indicate that the Viking “axe” tattoo was extremely common in the period from the 10th to the 15th centuries. This weapon, one way or another, appeared in almost all the combat patterns with which professional warriors decorated their bodies.
It is also worth noting that the Viking Ax amulet was no less common. Almost every second neck pendant included a miniature figurine of an axe. It was believed that such decoration bestows the strength, power and intelligence of a real warrior.
Metal hardening
This procedure also consists of several parts at once:
Annealing. First of all, you should dull the edge of the blade by a millimeter. To do this, you need to heat it to about 760 degrees (the metal will acquire a red-burgundy hue) and then slowly cool it. Then remove the scale.
Hardening. You need to heat the blade to 830 degrees and prepare two metal buckets - one should contain just warm water, the other should contain oil. The blade should be lowered into the water for just a couple of seconds and only about 4 cm. And already in the oil - completely
It is important not to forget about safety when working with fire.
Vacation. This stage is important for strengthening the steel
The blade must be cleaned. Vacation should be carried out for an hour at a temperature of approximately 200-300 degrees. Can be done in a regular home oven.
In addition to color changes, the temperature of the blade can be checked with a regular magnet. The cloth will not react to it at temperatures exceeding 768 degrees.
Details of the hardening procedure can be found in the video.
Handle (axe)
- Plane a simple ax handle from a block.
- To decorate it, you can choose any Celtic ornament you like, transfer the drawing with a pencil to the wood and then develop it using a drill.
- To protect the handle from moisture, you need to coat the wood with varnish. As an alternative, you can use flaxseed oil.
Now you can connect the handle to the blade and drive in the pre-prepared wedge.
Braid for ax handle
When the ax itself is ready, all that remains is to make a convenient braid for the handle. It will perform not only protective, but also decorative functions.
How to make a braid:
- Cut a rectangular piece from leather (or leatherette).
- To adjust it to size, you need to wrap the material under the butt.
- It will be easier to work with a piece if you pre-treat it with flax oil - this will soften the fabric.
- Make cutouts according to the shape of the butt for the best fit.
- Make holes for seams closer to the edges of the fabric. You can use an awl or even just a nail.
- Sew the section, securing the material to the ax handle.
- The last step is to treat the braid and handle with oil.
The Scandinavian ax with a Viking Age pattern is completely ready!
Making a form
7 shapes of ax handles. photo
Now we must give the desired shape, also according to the instructions:
- On the blade we draw a contour according to this template. If there is no printer and there is no way to transfer the form, then you will have to work according to calculations. We retreat a centimeter from the top of the butt and put a dot. Now we draw a straight line from the selected place to the toe. We also step back a centimeter from the heel and make a mark. We apply any round object so that it simultaneously touches the selected point and the beard. Let's circle.
- How to make a Viking ax straight? Is it not so easy to cut a circle by hand? We draw rays along the inner circle and cut along them. Now we cut out the circle.
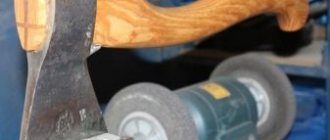
- All that remains is to polish it. We take special grinding attachments for the grinder and polishing pastes. Cheap ones include GOI or diamond pastes.
Hardening
A handmade ax must be hardened and this is best done using technology. The metal can be burned, causing it to become brittle due to carbon burnout. In general, everything consists of 3 stages:
- Annealing. It is necessary to remove the tension from the steel, which is there in any case. This is easy to do - heat it to 760-800 degrees. The metal will be red-burgundy. Then we put it on a brick and let it cool. Next we remove the scale.
- Hardening. A much more complex process. Initially, prepare 2 buckets of water. One contains water, the other contains oil. Anything will do, including working off. Heat the blade to 830 degrees and lower it 4 centimeters into the water for 5 seconds. Then completely lower it into the oil. Don't forget to make circular movements to knock down air bubbles.
- Vacation. After hardening, the steel is hard but brittle, like glass. If it falls, it will simply break and need to be released. You need to heat it to 200 degrees and let it cool slowly with the oven for an hour. Even a regular oven will do.
By the way, you can harden an ax from rails or reinforcement in the same way.
Now the blade can be sharpened. There is no point in doing this in advance, since heat treatment will remove the cut anyway. Moreover, the blade can also lead.
Sharpening an ax is a simple matter. We take a grinder with an abrasive disc and try to maintain an angle of 20 degrees.
Making an ax handle
How to make an ax handle with your own hands? Very simple, you only need a block, a marker or pencil, a bow saw, chisels and sandpaper.
We take the sketch of the ax handle and apply it to the block. Cut out the handle along the contour. We remove sharp corners with chisels and round them with sandpaper.
Now you can decorate it. We apply the design to the ax and cut it out in any convenient way. This could be wood carving or engraving.
Adjusting the ax handle to the blade
There is only one thing left - to connect the handle and blade. How to place an ax on an ax handle correctly? According to the instructions:
- The head of the ax is adjusted to the size of the hole in the blade. To do this you will need a saw and sandpaper. There is nothing complicated about this.
- After fitting, if it fits correctly, it's time to wedge. If we make an ax from reinforcement, the hole is made at our own discretion.
- We make cuts at the end of the planting. A simple option: 1 longitudinal cut and 1 wedge. But it's not that effective. The optimum is a cross. 1 longitudinal and 1 transverse cut. Wedges are cut into them according to size and driven in with a hammer. Professionals say that it is better to make wedges from the same wood.
- We saw off the excess with a saw.
Making a storage case
A handmade ax case is needed for safe transportation. Moreover, you can’t do without it on a hike.
Detailed instructions for PVC bags in the video.
Save time: selected articles delivered to your inbox every week
Etching is the most important stage in hatchet making
For etching, it is best to use an inverter welding machine at a minimum current (30 A). As an electrolyte, a solution of water (3.5 l) and salt (700-750 g). Before starting work, it is better to check the intensity of etching on any piece of metal.
PHOTO: YouTube.com The electrolyte is ready, the welder is in place, you can start
Connecting elements to welding wires
First of all, a hatchet is attached to the positive cable, which is completely immersed in the electrolyte. But the negative contact needs some work. To increase the area immersed in the electrolyte, you can use a mounting plate for a metal profile. It should be curved so that the contacts are on both sides of the hatchet.
PHOTO: YouTube.com The mounting plate is perfect for etching
Etching procedure, inspection, protection of the welding machine
Having lowered the negative plate into the electrolyte, you need to make sure that both its sides are equidistant from the hatchet. Only after this can the welding machine be turned on. A violent reaction will begin almost instantly. It looks as if the electrolyte is boiling. In fact, this is not far from the truth; electrolysis does its job. Unpainted metal is etched away. No harm is caused to the painted surface; it remains untouched.
Etching is carried out in 5 passes. The welder turns off every 2 minutes to allow it to rest. It turns out that the total etching time is about 10 minutes. After this, the ax can be removed from the electrolyte.
PHOTO: YouTube.comThe electrolyte first boils and then turns dark
After the required time has passed, the hatchet can be removed from the container and the result can be assessed. If the etching depth seems shallow, you can continue. If everything is in order, then it’s time to remove the paint.
PHOTO: YouTube.comIf the etching depth is satisfactory, you can move on to the next stage
The final part of working with metal
The ax needs to be washed off the salt under running water and dried, then remove the paint from it. This can be done with fine sandpaper or acetone. Next, the entire surface must be polished. A felt circle mounted on an emery board or drill is perfect for this purpose. Only after polishing can you fully evaluate what the result of the work done is.
PHOTO: YouTube.com We can say that it turned out very well