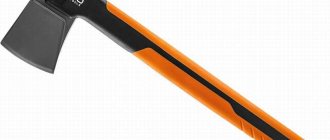
A good carpenter's ax is one of the most indispensable things in a home owner's arsenal. Choosing an ax in a store is not an easy task, but if you wish, you can find a tool there to perform any household task. This option is not always the most profitable for the following reasons:
- high cost of a quality product;
- limited selection in regular stores;
- lack of an element of exclusivity.
Making an ax with your own hands is a difficult, responsible task, but at the same time extremely exciting. You will need patience, perseverance, and strict adherence to the work plan. Don't forget to check that you have all the necessary tools. To work with a metal blade and butt you will need:
- grinder (with cutting, abrasive discs);
- grinding disc;
- welding machine;
- file;
When making a wooden handle, the following will be useful:
- chisel;
- jigsaw;
- mallet;
- sandpaper;
- clamp.
Don't forget about marking tools such as a marker, ruler, and plumb line. Even the slightest flaw can affect the quality of the final product.
Try to find an old, rusty wooden ax in your garage, ask your neighbors. It will make an excellent base for your product. Pay attention to the condition of the butt and blade. If there is no noticeable damage or corrosion on them, then the metal part can be safely left.
The handle of an old ax does not have the necessary strength or appearance. Measure it carefully and enter this data into the table. They will be useful for developing a model of the future ax handle. If you want to make a homemade ax of a completely different shape, then it is better to change the dimensions of the handle in accordance with the type of the future product.
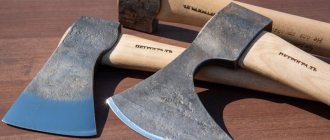
Types of axes
Let's look at the variations of axes:
- A cleaver is a heavy cone-shaped axe. Due to its heavy weight, it is well suited for cutting large, hard wood.
- Carpenter's - light in weight and size, has a pointed blade. Used for careful, precise, careful work with wood.
- Taiga - suitable for cutting down trees, harvesting trees, building a hut, removing bark and branches.
- Tsalda – designed for clearing the area of bushes.
- Kitchen (cook's) - intended only for chopping bones. It is a small hatchet with a short handle and a large “blade”.
- Lumberjack - used only for cutting down trees. Consists of a long ax and a wide, sharp blade.
Of all the above types, the taiga ax is the most necessary and useful.
Distinctive features of the taiga ax:
- Light weight.
- Small piercing surface area (makes it possible to drive it as deep as possible into the wood).
- Specific sharpening of the blade (the back edge is much smaller, thinner than the front.
This feature is made in order to use this type of ax as a cleaver (if the blow is delivered correctly. A regular ax has a blade of the same shape for precise work with wood).
DIY making
You can make any type of ax on your own. It can be simple, hunting, Scandinavian, hiking, intended for throwing (throwing) or simply decorative - there are a great many options. It is also possible to update the tool and build a completely new and convenient tool from an old axe. In order to carry out such work yourself at home, you will first need to make an accurate drawing with all the indicators of the planned tool. It is important to indicate the dimensions of all parts, as they can vary greatly. For example, the handle of an ax is not only quite large, but also medium or small, as is the blade.
Read also: How to add a satellite to the receiver
From a spring
A small hatchet can be made from an old spring. This can be not only a working tool, but also an original decorative tool, similar to a Viking axe. You need to do this thing as follows.
- You need to take an old spring from a car with a width of 10 cm and a length of about 40 cm. Using a previously prepared template, draw the contours of the planned device on the springs using a marker.
- Draw the contours of the ax using a grinder with cutting wheels. Then carefully sand the cut piece, giving it the desired shape.
- For particularly complex metal work, it is permissible to use a drill.
- You can use an old chair leg as a handle. Drill 3 holes in the spring for fastening to the handle.
- Cut a piece of the desired length from the leg. Saw this part into two halves. Drill 3 holes in each of them. After this, you need to assemble the handle, fixing it with bolts and screws. Draw the shape of the part on a grinding machine.
- Finally, sharpen the blade. The result will be a beautiful mini hatchet. It is suitable for outdoor recreation or in a summer cottage.
An ax from a spring can be made independently by a master blacksmith. The handle is made of wood or reinforcement parts. Such axes are not expensive in their own way. Tools made from springs are not bulky; the ax can be made of any modification: a cleaver ax, a tourist hatchet, a mini hatchet for harvesting work. In addition, the master can use his imagination when making an ax. We offer 7 photos of homemade axes.
Do-it-yourself splitting ax made from springs. This ax is convenient for chopping wood.
Welded homemade ax from a spring. The weapon is skillfully welded from separate parts.
An ax is a cleaver made from part of a spring. The most common ax model. And for ease of use, the handle is made of wood.
A mini hatchet made from springs is an excellent option for cutting down forest thicket. Lightweight and compact, it is convenient to take it with you on a walk or quiet hunt.
Spring ax. A lightweight version with a thin handle and a sharp blade.
Homemade hatchet made from springs. It is convenient to take such a hatchet on a hike as an indispensable assistant.
A homemade ax is made from a spring, and the handle is welded from a piece of reinforcement. This ax model can be conveniently stored by hanging it on a hook in the utility room. There is no need to worry that the handle will dry out or the blade will fly out during operation.
Sharpening the piercing part of the taiga ax
Excellent performance of the hatchet is ensured by a properly sharpened blade. The sharpening angle depends on the activity you will perform with the axe.
The taiga ax is sharpened at an angle of 30-35 ̊. If they will be working with fresh wood, then we sharpen it at an angle of 25 ̊.
If you use a sharpening wheel for sharpening, then the ax handle must be held at an angle of 40-45 ̊. We reproduce the sharpening slowly and carefully.
If you have all the necessary tools in stock, a photo of the step-by-step production of an ax, then its creation will not take a lot of time, effort and money, and in return you will receive a high-quality ax made by yourself.
But do not forget that with a piercing part made of high-quality metal, the ax will last much longer and if the handle is treated with linseed oil, it will not rot and deteriorate.
Characteristics of the taiga ax and what it should be like
Since the parameters of the ax and blade are very different from the usual sizes of “household” axes and will seem unusual to many, you first need to decide what problems can be solved with this miracle device:
- Tree cutting. Felling in a sawmill, sanitary felling or preparing firewood for a log house - this is exactly what this ax was made for.
- Rough work with logs (that's right, rough!). Suitable for removing branches, making grooves, removing thick bark and similar work.
- Ax for survival. A lightweight hunting tool, suitable for quickly creating bags and animal traps.
- Construction of huts, decking, wooden “instant” houses. A hut will not be built without an axe, but with its help you can do it 4 times faster than when working with a carpenter's ax blade.
- Working with firewood. If accuracy is a secondary concern, then this tool is perfect for the job.
If you want to make a tool for precision work, then it would be better to consider forged axes with a straight, long blade. They are of little use when cutting down trees, but the accuracy is very high. In addition to the quality of the “cut,” there are many differences between a taiga ax and a regular one.
Shorter rounded blade
. The ax is much lighter than a regular ax, and the small working surface area allows it to be buried much deeper into the wood; it is suitable for cutting wood across the grain. The tool is much easier to carry (the ax and head together weigh no more than 1400 grams).
Presence of a long beard
. Its main task is to protect the wooden part from breaking under strong impacts. Up to 60% of the impact force is absorbed. But it does not protect against impacts against logs - this is a misconception, since the special shape of the blade already performs this function.
Special ax sharpening
. The rear edge of the blade is almost 2 times thinner than the front. This is done for the purpose of using the ax as a cleaver (if struck correctly). In a conventional tool, the edge has the same thickness for high precision work.
Special angle of inclination of the ax
. The head of the taiga ax forms a much smaller angle with the ax handle. This allows you to increase work efficiency, relieve hand fatigue and increase productivity when cutting trees. The impact becomes much stronger than that of a carpenter's axe, where the head and blade are placed at an angle of 90 degrees. They try to make all handmade taiga axes with an angle of 75-65 degrees - this is their main difference.
They use ordinary sharpening wheels, since they can be very diverse. The main thing is to observe the difference in the thickness of the leading and trailing edges, since it is this that affects the productivity of the forester.
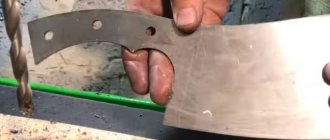
Do-it-yourself taiga ax - making the tool head
It won’t be possible to forge or cast a metal part at home, so let’s take the simplest route and in a few steps make a taiga ax out of an ordinary carpenter’s axe.
STEP 1
: we take an old metal head from an ax, the weight of which is approximately 1400-1600 grams (the best option) and cut off the front protrusion of the blade flush with the butt.
A protrusion of 5-8 degrees is allowed
, but it is better to remove it if you need the right ax.
STEP 2
: we make the back of the blade round, we cut off the metal so that the entire touching surface is without corners. This can be done using a regular grinder or a medium-grit sanding wheel.
STEP 3:
cut out a semicircle in the inner part of the blade. It is necessary for a comfortable grip of the ax when it is necessary to trim something or for more precise work. With this form of an ax you can pull up small logs or hang the ax on a tree branch. In addition, you can reduce the weight of the head by 150-200 grams.
STEP 4
: cut off the upper corners of the butt. This will reduce weight and increase the maneuverability of the tool. This operation can be omitted if you are satisfied with the axe.
Now all that remains is to choose how to sharpen the ax. It is very important to use a low-speed tool (a grinder cannot be used!). A sanding machine with a large wheel and medium grit is ideal. The sharpening must be double-sided and have a moderately sharp edge (a very sharp one will die on the first tree).
Step by step process
Working with metal and wood requires perseverance from the master and strict adherence to the work plan. If you try to do everything by eye, the final product may only last you a couple of hours. Very often lazy owners don’t want to read how to repair a broken tool or how to make an ax with their own hands, which is why high-quality products are replaced with cheap goods from hardware stores.
This is the “grandfather” that unlucky tourists left in the forest.
Before starting restoration, clean the ax and inspect all its components. Try to establish the quality of the metal, the type of wood from which it is made. An old ax can turn into a truly worthy tool.
Ax design
A standard ax consists of two main parts:
- metal blade;
- wooden axe.
This is a standard design, for which it is not difficult to find a drawing on the Internet. Let's take the ax handle out of the butt of the old axe. If the tool has not been looked after, the butt can usually be easily removed from the ax handle without much effort. Pay attention to how it was secured, try to make mental drawings of the axe. The pattern for driving in the wedges may vary.
Head
The head is the most important part of any axe. It is almost impossible to make it at home. If you want an exclusive beautiful blade with a Scandinavian or Slavic ornament, order it from a blacksmith’s workshop. In our case, the rusty butt of an old ax will serve as a blank.
Choosing a blank for the head
On old axes, you can often notice cracks on the metal part (in the place where the butt meets the blade). During the impact, Newtonian forces tend to destroy the blade. Even the smallest cracks will increase with each blow, leading to complete destruction of the instrument.
To prevent this, existing flaws are removed using a welding machine. The only alternative way to deal with this is reforging. Do not spare money and effort; restoring a completely broken blade will be even more difficult.
In our case, the cutting edge became unusable. It was decided to get rid of it, then weld an additional piece of metal to make the shape of the blade more curved and beautiful.
Blade material
Before grinding, carefully inspect the surface of the metal for the presence of characteristic symbols of the alloy from which the part is made. You're lucky if the blade is marked:
- U7;
- 60G;
- 8HF;
- U7A;
- 9ХС;
- CHVG;
- 9HF.
Avoid the following labels:
- OST;
- MRTU;
- THAT.
These alloys are not suitable for making axes. They do not have sufficient strength, ductility, or corrosion resistance. To visually determine the quality of the material, you can cut the edge with a grinder.
Grinding
Start sanding the blade if you are happy with the material. The most comfortable way to do this is with a grinder with an abrasive disc or file. Make light circular movements. Any carelessness may result in damage to the metal. This procedure can take from a couple of hours to several days, depending on the condition of the part. Upon completion, the blade will become beautiful and shiny.
Hardening
You can harden the blade to give it extra strength. The metal is heated until reddened, then cooled in cold water or oil. This procedure is repeated several times. How to harden an ax determines its durability. If you do not have a forge at hand, it is better to contact a specialist. Improper hardening of an ax will only worsen its properties.
Drawing
A beautiful ax is the pride of its owner. Drawing will help give personality to this instrument. There are many different options for applying patterns to metal. In our case, we will use electrochemical etching. This method involves controlled exposure to the surface of the material. We will need:
- degreaser;
- nail polish;
- current source;
- solvent.
Sketch the image on paper. Degrease the part. Apply varnish to the surface so that a pattern is formed from the unpainted part. We connect “+” to the part. Wrap gauze or cotton wool around the negative electrode. Wet the “minus” in a saline solution, and begin to slowly move it over the surface of the part. After completing the procedure, remove the varnish with a solvent.
Making an ax
The manufacture of the handle must be approached thoroughly. It should have high strength, elasticity, look beautiful, pleasant. A wooden ax should sit comfortably in your hand and not slip out while chopping trees. Approach the choice of material for this part with all responsibility.
Entire books are written about how to properly make an ax handle for an ax with your own hands. Work on this detail can take several years. If the log house is fresh, then it needs to be dried for 2-4 years. During this time, the tree will get rid of excess moisture and become denser. Buy wood that has undergone a similar procedure. Old furniture is also suitable as a material for a future ax handle.
Material selection
Handles can be made of any wood. But hard wood is the best way to make an ax handle durable, strong, and beautiful. These include:
- birch;
- oak;
- ash;
- acacia;
- maple.
Select a tree from the root areas of the trunk. The growths can also serve as a good material for a wooden handle due to their special structure, but they are quite difficult to work with. The handle for a shovel is made from them.
Cutting out the template
There are many options on how to make an ax handle with your own hands. Select an ax template. The shape of this part determines the grip, swing technique, and impact force. Choose the length of the ax that matches your dimensions and the shape of the metal blade. The back should be wider than the rest of the part to ensure a comfortable grip.
A quick sketch and a complex, beautiful diagram will help in marking out a wooden blank. Cut it along the contour using a regular or electric jigsaw. If you used fresh wood, then the resulting part must be dried for several years in a dry, warm room.
The following handle was chosen for our ax.
Hewn out the workpiece
The most critical stage during the manufacture of the handle is cutting out the workpiece. This must be done slowly, carefully, constantly looking at the drawing. This procedure is carried out with a chisel or hammer. To remove large amounts of wood, use a plane. It is important to accurately observe the dimensions of the part.
Grinding the ax
Before the workpiece takes on a finished, beautiful appearance, you need to get rid of burrs and chisel marks. To do this, use an electric grinder and sandpaper with coarse and fine grains. Carry out this procedure carefully, there is a risk of damaging the ax handle.
Impregnation with a protective composition
Without additional protection, the handle will need to be replaced after a couple of months of use. Special impregnations provide additional resistance to water, pests, and cold. They are applied to the finished part in several layers. Each previous layer must dry completely before applying the next one.
Refrain from using varnishes and paints. The handle becomes slippery and slippery. This may result in serious injury. But no one forbids adding a little coloring pigment to the impregnation; this will make the ax more noticeable and beautiful.
Placing the ax on the handle
The final part of the work is assembling the resulting parts. Mark with a pencil the depth to which the ax handle should enter the eye (hole in the butt). Next, secure it in a vice. Visually halve the distance from the top of the handle to the marks. Make a cross cut to this depth.
Take the ax in your hand. Place the ax head on the table. Using progressive movements, drive the handle into it a couple of millimeters. Turn the resulting structure over and tap the end of the handle on the table until the blade moves another couple of millimeters. Repeat the action until it reaches the level of the mark.
Secure the ax in a vice. Use a mallet to drive a wood or metal wedge into the cross-cut. Get rid of any protruding parts. Leave the ax for several days in a dry, warm room. After that, your beautiful new ax is ready to be used.
Sharpening
An ax needs to be maintained in working order to ensure it lasts for many years. Inspect the handle and blade for cracks. Sharpen your cutting edge regularly. It is convenient to use an electric sanding disc for this. A regular sharpener will do. Hold the blade at a 45 degree angle. Make smooth, arching movements. For cleavers, the sharpening angle is 30 degrees. A sharpened, shiny ax looks beautiful.