It is difficult to cut a large number of small pieces with a grinder. The cutting disc moves to the side, causing the cut to be uneven. A machine will help simplify the task. Its design is so simple that craftsmen do not want to pay a lot of money for a factory-made product. Having the drawings at hand, you can assemble a cutting machine from a grinder with your own hands without much difficulty.
Why make a machine from an angle grinder
A cutting machine is a useful and necessary thing, not only in industrial conditions, but also in the household. With this useful tool you can make precise cuts of parts and workpieces. This is achieved by securely fixing the cutting disc, into the spindle of which you can install not only abrasive wheels for cutting metal. A stationary machine can be used for cutting tiles, bricks, marble, granite and other similar materials, using special diamond-coated wheels in the design of the tool. If necessary, such a machine can be used for sawing beams, boards and other wood workpieces.
Many people who have repeatedly faced the need to make an accurate cut of a workpiece want to know how to make their own cutting machine from an angle grinder and available materials. Holding the grinder in your hands, you can also make a precise cut, but it is more difficult to do this, since you have to hold the tool exclusively with both hands. Using a homemade cutting machine, you can not only perform, but also simplify the following work:
- Cut sheet material, such as galvanizing, used for chimney insulation and other purposes
- Cut ceramic tiles and tiles - keep in mind that the cut can only be made straight
- Cut materials at different angles
- Cut a metal profile, pipe, wooden beams, boards, etc.
The manufacture of a machine from a grinder requires an appropriate approach. After all, the tool itself is very dangerous, so the slightest miscalculation can lead to the master being seriously injured. The consequences of working with an angle grinder if safety regulations are not observed are known, so first, before building a homemade product, it is worth noting the following:
- Only with the correct manufacture of a stationary cutting machine can you be confident in its reliability and safety
- If you plan to do it, then you need to calculate every step so that no disaster happens during operation.
- Using a machine is in some ways safer than using a tool while holding it in your hands. However, you need to be aware that an angle grinder is a mobile tool, and making a homemade one is already a violation of safety regulations
- For manufacturing, it is necessary to use materials of appropriate reliability, corresponding to the power and size of the main power tool.
Having dealt with the need to manufacture the machine, you can get down to business.
This is interesting!
If you can’t decide whether it’s better to buy a new machine or make it yourself, then the second option is more preferable, since the cost of a factory device will cost at least 10,000 rubles. If you make it yourself, you won’t need any expenses, since the grinder is already on the household, and the components can be found in the garage.
The main purpose of a mini angle grinder
Using a small angle grinder (except for micro angle grinders), you can perform the entire list of operations available for a large tool. The difference here is that because of its lower power, a small device is less effective for larger loads, such as cutting thick steel. Purpose of mini-angle grinder:
- Cutting operations. A grinder can be used to cut steel, other metal, concrete, asbestos, slate, and ceramic tiles.
- Peeling operations. The small device is convenient for cleaning surfaces from rust, oxides, and old paint on metal structures and wood.
- Gating operations. You can make grooves for electrical wires and other communications, remove old grout from the seams of ceramic tiles.
- Grinding operations. A grinder can be used to grind and polish surfaces.
- Sharpening operations. The small angle grinder is ideal for sharpening household cutting and stabbing tools.
Making a homemade machine from a grinder features
It’s not difficult to make your own machine from a grinder yourself. Moreover, there is a wide variety of manufacturing options, which depends on the available materials and imagination. There are two types of stationary cutting machines made from grinders:
- Simple - it received this name for one reason, which is not only the ease of manufacture, but also the minimalism of the device itself. The tool is attached to the workbench using additional materials, and it can be used
- Complex - it is rational to manufacture such machines if you plan to use it often for different actions. In most cases, a simple device is enough for a home garage, the manufacture of which requires little time, effort and consumables.
In order to make a cutting machine from a grinder with your own hands, you will need consumables, which are metal plates, as well as profiles and fasteners - bolts, nuts and washers. The only specialized tools you will need are an electric drill and a welding machine. Let's look at how to make the simplest version of a cutting machine from an angle grinder in more detail below.
We make a machine for cutting metal using high-quality equipment: TOP 3 manufacturers of angle grinders
This list contains brands whose equipment has received high ratings from ordinary users and professionals:
- Bosch. It is famous for its reliability and well-thought-out small design elements. A significant limitation is the high cost even in the basic configuration.
- Hitachi were initially expensive. But these days, part of the production has been moved to China, which has reduced costs. Some models do not have automatic speed stabilization under load.
- Makita - Reasonable combination of price and quality. All new high power models are equipped with effective overload protection, which extends the actual service life.
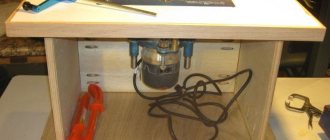
Option 1 - a simple way to make a cutting machine from an angle grinder
A simple way to make a homemade product involves making a base on which fixed connectors for a movable plate are attached. So, in more detail about how to make a machine from an angle grinder:
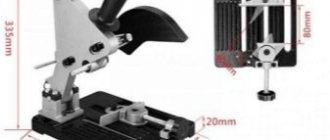
- Take a steel plate measuring 15x15 cm and at least 2 mm thick. Such a large size is needed in order to secure it to the workbench with bolted connectors. If the workbench (table) is iron, then the base can be welded to it, so in this case you can use a shorter plate 10x10 cm
- Weld two rectangular plates perpendicularly to the base, located at a distance of 5-8 cm from each other. The thickness of the plates should also be at least 2 mm. Their length depends on the size of the power tool, but usually small or medium grinders are used for stationary machines, so the length of the plates is 8-10 cm
- At the base of the plates, make a straight hole into which the connecting bolt is installed. The hole diameter is 6-8 mm, which is not so important
- At the next stage, you will need to make a movable base to which the grinder will be attached. To do this, you will need to take a steel plate at least 20-30 cm long, which depends on the size of the power tool. The width of this frame should be slightly less than the distance between the protrusions of the rectangular plates welded to the base
- On the back side of the movable plate, you need to weld a round oblong sleeve into which the connecting bolt will be placed
- It is necessary to secure the tool to the resulting movable plate using clamps, ties and other methods. The number of fasteners should be more than 2, and preferably at least three for greater safety
- Having secured the resulting structure to the workbench, you can test its operation
For ease of operation, you can weld a handle to the movable bar, and also install an auto-return spring, which will return the tool to its original position, that is, move it up. The photo below shows a ready-made installation for cutting from an angle grinder. As you can see from the example, its manufacture will require a minimum of effort and materials, and the result is a stationary device for cutting various materials.
This is interesting!
Finally, you will need to cut a strip of the appropriate size in the workbench, into which the rotating circle in the tool chuck will “go” when cutting materials.
When constructing the device, do not forget that safe operation depends on how to secure the angle grinder. It should be securely fixed in 2-3 points, which will prevent it from moving during work, as well as “flying off” from the movable frame. When installing the tool on a movable bed, it is necessary that the position of the grinder be strictly at a right angle, that is, the circle must be located strictly in a vertical position.
The resulting device is suitable for processing various materials from wood to durable stone. When working with a tool, do not forget to use safety glasses, gloves, and protective clothing. Instead of a workbench, you can use a wooden or steel frame on which to realize your idea.
This is interesting!
Similar simple frames for grinders are manufactured in the factory, so if you have an extra 2-3 thousand rubles, you can purchase a ready-made base and use it right today. However, there are no difficulties in making it yourself, so you need to decide on your own in each individual case which is better.
Instructions for making a frame for an angle grinder with your own hands
At home, the easiest way to make a design is from two frames and a holder
The simplest frame for an angle grinder consists of two frames and a holder. The order of work is as follows:
- We cut profiled pipes and drill holes in them according to the drawing.
- Using welding, we manufacture the lower and upper frames of the future design.
- We cut out a working platform from a sheet of iron or chipboard. If the turbine is powerful, then it is better to use metal.
- We fix the lower frame on the platform and weld the upper one to it.
- We attach the holder to the vertical frame using bolts. It should rotate freely, like a pendulum.
- Install the spring. It is needed to return the tool to its original position. One end of the spring is attached to the upper end of the vertical frame, and the other to the holder.
- For the convenience of working with the device, install a button with switching through a relay, through which power will be supplied to the tool.
- Give the structure a finished look by covering it with paint.
- Finally, equip the frame with a movable ruler with a limiter. This will allow you to cut the products as accurately as possible.
Option 2 - how to quickly and easily make a pendulum saw
If you have a welding machine and consumables, you can make a stationary machine from an angle grinder in a matter of hours. Moreover, you don’t need to buy anything for this, since the necessary tubes, fittings and profiles can be found in a garage or a pile of scrap metal. To build a simple cutting machine using an angle grinder as the main tool, you will need to use the following parts:
- Metal profiles measuring 150-200 mm
- Sleeve 10-15 cm long
- Hairpin 20 cm long and 8-10 mm in diameter
- Washers
- Metal corner
- A sheet of metal 2-3 mm thick, which will act as a base
So, to make a simple homemade product you will need to perform the following steps:
- Cut the stud to the required length, then place the sleeve inside (it should move freely along the stud), and tighten the nuts onto the ends of the protruding stud. Tighten two nuts on both sides, since the second will act as a lock nut
- The nuts should not be screwed in completely; they should not come into contact with the sleeve
- The resulting structure should be welded to a steel sheet. In this case, it is important to grab the nuts, and the sleeve must remain mobile, that is, move freely
- At the next stage, it is necessary to make mounts for the grinder. To do this, you will need metal profiles, as well as washers that will act as brackets
- Cut to the required length (it all depends on the tool used, but for a low-power grinder, the profile length is 15-20 cm). Weld washers to the ends of the profiles. It is recommended to use at least 2 mounts for an angle grinder, but three is better
- The angle grinder has threaded holes for connecting the handle. We use these holes to attach the tool to the movable base using pre-prepared brackets
- First, the brackets are attached to the tool using bolted joints of the appropriate size, and then the reverse ends of the profiles are welded to the sleeve. As a result, we get a ready-made machine that can be produced literally within an hour
The photo below shows the design of a homemade machine made from a grinder with a detailed description of the necessary materials. Using the instructions, or for some, a diagram is enough to make a homemade cutting machine. It is important to take into account that a casing for an angle grinder must be provided, otherwise the risk of serious injury increases. Operating the tool without protective clothing, not only on a person, but also on the device itself, is strictly prohibited.
The simplest device is ready for use. The angle in the machine design is used as a guide for centering cutting materials. You also need to make a straight hole in the iron sheet, into which part of the disk will “go” when sawing workpieces.
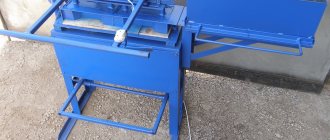
Sheet Steel Cutting Machine
Angle grinder machine for cutting sheet metal
To cut sheet steel, long sheets of textolite, chipboard using a grinder, a different design is needed. In this case, the angle grinder must be able to move along the material being processed. This becomes possible if you fix the grinder on a movable carriage.
The carriage can be made on the basis of roller door blocks. Small corners or channels are used as guides. They are strictly parallel welded to the base. Instead of welding, a screw connection to the platform is possible, in which case the screws must have a countersunk head, the nuts are secured with Grover washers or locknuts.
The angle grinder can be mounted directly on the carriage either rigidly or on a pendulum lever. The guides must be installed so that there is a gap between them and the work table to allow the material to be cut to be positioned on the table.
Related video: Stand for grinder
Publications on the topic
Drawings for making your own stand for a drill
Creating a milling and copying machine at home
Rules for choosing an angle grinder for your home
Option 3 - an even easier way to make a cutting machine from an angle grinder
Many people do not have welding machines or do not know how to use them, so if you belong to the category of these people, then you should not despair. There is also no need to ask your friends and neighbors to make a machine. It is quite possible to do without welding, and bolts and nuts will be used as the main connectors. So, to construct a simple cutting machine from a grinder, you will need the following consumables:
- Corners - and a small number of them up to 1 meter. If there are pieces, that's even better. Corner thickness is standard 2-3 mm
- Steel tube 30 cm long - will be used as a handle on which the grinder will be attached
- Steel sheet 2-3 mm thick and of any size, but not less than 20x20 cm
- Bolts with nuts with a diameter of 8-10 mm
Let's start making a homemade instrument. The manufacturing process is as follows:
- First, you need to attach a 15 cm long corner to the steel sheet
- Attach another corner perpendicularly to the wall of the lying corner using bolts and nuts. If there is welding, you can make tack welds
- Attach the tube to the perpendicularly installed angle using the same bolted connections
- The tube should move freely, so there is no need to tighten the nut on the bolt. Instead, you need to tighten the fixing bolt with another nut.
- Connect two steel plates measuring 5x6 cm to the tube at a distance from the connection point. These plates will be used to attach the grinder to the handle
- Attach the angle grinder to the casing with pre-prepared steel plates
As a result, we get a simple cutting machine, a photo of which can be seen below.
There are many options for manufacturing similar structures, so it all depends on what you want to get in the end and what consumables are available. Working with the version of the cutting machine discussed above is not entirely convenient, as it is necessary to constantly hold the tool (due to the lack of a return mechanism), but this is easy to fix. A spring must be attached to the protruding part of the tube, which will return the tool to its original position, eliminating the need for the master to hold the operating unit.
Secure tool mounting
Many people, inspired by the idea of making a stand, look for drawings on the Internet, without thinking that there may not be any for their instrument, since each model is individual and the fastening to it must be done according to the situation.
I propose to look at different examples of how people made fastenings, and we will take the best from each. Here are a few photos of the location and fixation of the angle grinder based on the needs and desired functionality.
| No. 1 Attaching an angle grinder to a frame | No. 2 Another mount for an angle grinder |
| No. 3 The simplest option for fixing a tool on a pipe | No. 5 Another example of an interesting fastener |
As you can see from the photographs, the mounting of the grinder is individual for each, but the most important thing is that the tool is securely fastened in each of them. In the first photo, the tool is inserted into the frame and secured with bolts at the handle attachment points.
The second example is similar to the first, only the frame has an individual design and a control handle has been added to it, in the form of a welded 20x20 pipe to control the cutting force and ease of operation.
The third option generally captivates with its simplicity and minimalism. The grinder is attached to a protective casing, in which holes are made for bolts and the entire machine consists of a minimum number of parts.
So, we decided on how to mount the tool. In our case, this is the third option - attaching the tool to the protective casing. It's extremely quick and easy to do.
You will need two 10mm bolts and two self-locking nuts, only the nuts must be attached to the outside of the casing. A couple of plates and a pipe on which everything is attached. I suppose it won't be difficult to find such parts. Watch the video to see how easy the installation is
How to make a start button for a pendulum machine from an angle grinder
The angle grinder works when you press a button. Moreover, the spindle rotation speed depends directly on the pressing force of the button. This means that an adjustment mechanism is built into the button, the operation of which facilitates the operation of the tool. When operating an angle grinder on a stationary machine, it is necessary to consider the starting system so that you do not have to hold the handle with one hand and press the button with the other.
If the tool is equipped with a regular button, which automatically locks when it is turned on, as for example in the first version of the machine, then no difficulties arise here. First, the tool is turned on, and then you can perform work. However, most angle grinders are equipped with self-off buttons that must be held by hand while operating. There are two ways out of this situation:
- Use ties (for example, plastic) or clamps of the appropriate diameter. They fix the button in the pressed position. In this case, it is also necessary to take into account the latch, which is responsible for turning the tool on automatically. Both the latch and the button must be tightened with a clamp, tie or other similar materials. In this case, the principle of operation of the device will be as follows - if you need to start the tool, you need to plug the plug into a socket or make a switch
- It is rational to remake the starting system if the tool is planned to be used more often as a cutting machine than as a stand-alone angle grinder. To do this, it is necessary to route the wires from the angle grinder to a separate switch, which will turn the tool on and off if necessary.
The power button, if it is displayed, is best located on the handle. A homemade machine does not require large expenses for its production, which, in fact, is its main advantage.
First option - Using a drill + (Video)
The first option has a simpler solution.
Let's say you need to make a miniature grinding wheel that will be installed in a drill or screwdriver. To do this we can take a broken disk. Using a caliper, we draw a circle of the required dimensions on it. Then we cut out the future miniature disk along the drawn circle. In its center we drill a hole into which we insert a bolt with a diameter of 6 mm. We put the washer on the bottom and tighten it with a nut. The bolt will be the axis of rotation of the disk. We insert it into the chuck of a drill or screwdriver and clamp it. With this tool you can cut materials in hard-to-reach places or those that are small in size. Finished parts can be sanded.
It is easy to make a miniature cutter for cutting small parts from plastic or wood. To do this, take an ordinary tin stopper from a glass bottle. In the center of it we make a hole for installing the axle. The same bolt with a diameter of 6 mm can serve as an axis. Align the edges of the cork and cut out the teeth. It is advisable to make minimal markings.
Such a cutter, loaded into a drill or screwdriver, can easily cut small wooden planks, for example, for modeling. Plastics also lend themselves to this simple tool.
Important points when constructing a pendulum machine
The type of tool under consideration belongs to the category of dangerous, therefore, when constructing the equipment, the following main points are taken into account:
- The manufacture of the frame is the basis responsible for the reliability of the installation. It is impossible to save on the manufacture of the frame, therefore only steel materials are used, the thickness of which is at least 2 mm
- Frame - the design of this part can be different, but the most important thing is to ensure the mobility of the cutting tool. This is achieved through the use of different materials, but in any case, you need to think carefully about the quality of the hinge joint, since your life depends on it. It’s better to spend more material, but make a high-quality and safe cutting machine
- Tool fastening - the angle grinder is fixed directly to the moving part. Moreover, the fixation must be as reliable and high-quality as possible. When working with an angle grinder, “reverse impacts” may occur, which are dangerous because the machine may simply be damaged, and the master who performs the manipulation will suffer as a result.
- Providing a counterweight is a small but important element that allows the tool to return to its original position when not needed. This will eliminate the possibility of damage to parts of the human body
- A protective casing - it must be present, no matter what design of the machine is invented, but using the device without a protective casing is strictly contraindicated
- The presence of a ruler - this will increase the accuracy of the work performed, which is important when cutting parts such as tiles, ceramics, and metal
- The starting device is also a kind of safety-affecting device. The control button should be located in close proximity to the master performing the work. This will allow you to quickly react at the right time by turning off the power supply to the tool.
In addition to options when the machine has a moving part, there are also methods for manufacturing cutting devices with the tool located in the lower part of the bed or workbench tabletop. However, this option is suitable only for cases when sawing wood is planned. Below is an example of how to make a home sawmill from a grinder quickly and easily. Details on making home sawmills can be found in this article.
This is interesting!
The tool can only be used in this form with disks or circles for processing wood. Cutting tiles and metal in this position of the grinder is extremely dangerous.
Making your own devices
To make working on an angle grinder easier, all sorts of designs have been invented that increase its functions. The presence of equipment makes it possible to use angle grinders as a belt grinding machine. It is not difficult to make accessories for an angle grinder with your own hands, and it will also cost much less.
Accessories for grinders
- Tripod
- Retainer
- Fraser
- Miter box
- Wall chaser
- Extension
A tripod is a device that frees one hand. The angle grinder is held with only one hand, and with the other hand it is possible to support the metal and turn it if necessary. In addition, it makes it easy to set the desired cutting angle. It allows you to do work efficiently and safely. The frame is made of metal profiles, a shock absorber, and sometimes even plywood is used. Such an improvement is only permissible for a machine with 125 mm discs; with a larger size it is dangerous, since you have to remove the casing. You can take different options as a basis or make your own drawing. The main thing is that the tool is securely fastened. The most convenient way is when the angle grinder is attached to the protection casing. You only need 2 10mm bolts and 2 nuts, which are attached to the outer part of the casing. There are 2 more plates and a pipe onto which everything is screwed. And the switch should be made not fixed, you can use a foot pedal, then in an unusual situation it is easy to stop the machine. If the design for cutting metal is strong, then you can use it for sawing wood.
Clamp – there are many clamps, but the best option for fastening an angle grinder is a vice. They hold firmly and there is no need to support with your hand, thereby reducing the risk of injury. Rotary vice increases the capabilities of the machine (oblique cut). When you install the desired disk or file in a vice, you get a sharpening machine, but after unscrewing it, you can do the work manually. And by attaching stops with a slot across the disk, very precise processing can be achieved. The most popular option is a band sawmill made from an angle grinder. You just need to have a reliable frame and strengthen the machine well.
A milling cutter is another device for an angle grinder. The machine has a powerful engine, so it can be converted into a milling cutter. To do this, you should take the shaft into the opening of the workbench and put a chuck with heads for milling on top. The resulting homemade device for an angle grinder is used to process hard wood.
It is important to remember that the device is not designed for this type of work, so you need to take care of your safety. A miter box is a rotating surface for a grinding machine.
Using this device, it is easy to cut plinths, baguettes, profiles at the desired angle
A miter box is a rotating surface for a grinding machine. Using this device, it is easy to cut plinths, baguettes, profiles at the desired angle
You just need to install the desired disk, then the surface is fixed at an angle of 45 degrees, and the machine is ready for work. You can cut any platband for a wooden house or paving slabs.
A wall chaser is a necessary device for an angle grinder. Used for laying wiring by hollowing out recesses in the wall. However, this is not safe. When making an attachment for an angle grinder that works on a dense base, it can be used to cut walls along the entire diameter of the disk. With a good sole for an angle grinder, its guiding movement is carried out smoothly, without much effort.
Extension cord – used for plumbing and plumbing work in hard-to-reach places.
What are the advantages and disadvantages of homemade machines made from grinders?
The homemade products in question have some advantages and disadvantages, which everyone who has set out to make a cutting machine from an angle grinder also needs to know about. The advantages include:
- Having a stationary machine in the garage, you can quickly, and most importantly, efficiently cut different materials
- Obtaining a high-quality and even cut, which makes the device perfect
- Cheap - if you have an angle grinder, then the cost of manufacturing the machine will be minimal
Now let’s find out what disadvantages the homemade device in question has:
- Low reliability - even with the most competent approach, the possibility cannot be ruled out that a person may receive various injuries just because of working on such homemade equipment. To protect yourself, you need to work in protective clothing
- The difficulty of transporting the device depends on its size and weight. Only if the machine is called stationary, then it is intended for use in only one place
If you have already managed to manufacture the type of equipment in question, then understanding the correct operation of it will not be difficult. Already from the first test of the tool you can feel how effective its work is. Below is a selection of photos showing options for homemade cutting machines from grinders. In addition, a tool such as an angle grinder is fraught with many interesting ideas for expanding functionality, but that’s a completely different story.
Profitable conversion of an angle grinder
Cool ideas for profitable conversion of an angle grinder. These interesting DIY projects will help you get the most out of your angle grinder. Do you think we should pick it up and saw something off? Let's not think like everyone else and do homemade products to the fullest.
Previously, the repairman school channel already talked about machines made from angle grinders. Each DIYer does it differently. Here's one option for you. This machine is perfect for sawing molded products. The advantage of this homemade product is that it has its own extension cord. This makes it more mobile. The design itself is very simple. The main table is being made. Recoil spring guns. Platform for attaching an angle grinder. Clamp. Socket.
Browse products for inventors. Link to the store.
Here is a homemade product that many will need. This is a circular grinder. Everyone tries to simply use a grinder with a saw blade on wood without any devices or protection. And this is very dangerous! This device is a casing for an angle grinder with a slide. There is also a handle for convenient use. You can adjust the cutting depth. This casing is small and comfortable. You can always take it with you to various jobs.
The following frame is easy to install. All you need is a piece of angle 50 x 50, a profile pipe 20 x 20, two bearings, the inner diameter of which allows you to install a profile pipe. Sheet metal clamps for side spark arrester. The originality of the spark arrestor is that it is folding. This makes it easy to change the disc. Agree, it’s very convenient. For cutting at 45 degrees, you can use this removable guide.
Universal machine. You can cut molded products on it. Milling steel products. Sharpen drills. Clean and polish metal. Use as a cutting machine for sheet metal. For cutting at different angles and inclinations, fixation in any position allows this.
The following homemade product does not stand up to criticism because working on it is very dangerous. Grinder chain saw. It's easy to do. A chain sprocket is put on the shaft. This saw cuts, but we really don’t recommend using it. It does not contain the most important thing that is necessary for safety! This is a clutch system that may save your life if the chain gets stuck. However, we are not talking about chain lubrication and everything else. I decided to show it only as an example of the desperate thinking of our DIYers.
Here's a stand for this tool, which will make work more enjoyable.
How to Rewind a Grinder to 12 Volts
Do-it-yourself grinder from a drill and chainsaw
Quite often in everyday life you need to repurpose working tools. This does not apply to the situation when you need to use an angle grinder, but you don’t have one. There are options to come to the rescue: a drill, a gas-powered one, or an electric saw, what is the duration of the project, what tools are available.
The usual ineffective method of getting an angle grinder from an electric saw
Grinder from a drill ()
For such a transformation, the following tools will be useful at home:
Before starting the transformation, you need to make sure that in the coming days the drill itself will not be useful in the work. In the last article, I told you how to connect and start a 380-volt motor in a single-phase 220-volt power supply. And later it’s enough to follow the step-by-step instructions:
- Choose an attachment for your future grinder.
- Take a small diameter steel rod without grinding off one of its edges. This action is necessary for the best fit into the nozzle. Also, for the best adhesion, you should slightly grind down the places that will come into contact with the petals of the cartridge, not the rod itself.
- Fix all parts.
A frisky, unusual method for creating an angle grinder
There is no second, more difficult method to achieve the desired result.
- The chuck is removed from the drill. For an angle grinder it is not necessary, so there is an option to clean it, lubricate it, or store it.
- Choose an attachment for the upcoming tool. It would be better if it were a part made of strong steel; a lightweight version would be inappropriate here.
- Choosing a rod. It needs to be of such length that its part protrudes outside the drill by 1.8-1.9 cm. Next, one of its ends should be ground off with a rasp so that in the process a rod comes out that completely coincides with the socket in the nozzle itself. Before the joint, it is worth smearing its ends with machine oil for the best passage.
- Installation of the ball bearing is carried out to the output area. A rod will be threaded through it for future fixation at the base. If this step is not necessary, the rod is fixed in its own place.
Do-it-yourself 12-volt cordless grinder
Bulgarian
homemade. Without machines, current was used in production (motor with a Bulgarian disk and almost
Following the instructions, the grinder comes out in 1-2 hours
There is an option to make an angle grinder using this method within a few hours, but you can’t get the necessary tool here.
Grinder made from chainsaw and electric saw ()
A more common method of making a grinder with your own hands is to convert it from a gas-powered or otherwise electric saw. Because of the ready-made fixture
Working of a disc for an angle grinder
will have a number of advantages:
- Possibility of autonomous operation.
- Highest power.
- Cost of operation.
To transform your chainsaw into a different electronic form into an angle grinder, buy special attachments at any hardware store. They will help to accomplish these transformations in a matter of actions.
For an angle grinder, you need to reduce the risk of disc failure. For these purposes, the saw is equipped with a special protective casing. It is also worth reducing the number of revolutions using a speed reducer.
Bulgarian 12 volt ()
For the client to be able to use an electronic instrument, its 12-volt power needs to be converted to 220.
You will learn how to correctly connect single-phase 220 volt electric motors using the example of motors from a washing machine.
Thus, it is natural to power it from a car in which a constant current flows with a voltage of 12 Volts, by installing a special invector.
Low-power invectors should be connected to the cigarette lighter; there are no special requirements. The only aspects are:
- Use at temperatures ranging from 15 to 50 0 C and average humidity.
- Do not allow devices to operate in direct sunlight.
- Do not use the space under the seats for storage, as the invector will heat up during operation. To cool it, you need unobstructed air flow.
It is recommended to connect a more powerful invector to the battery terminals. However, it is prohibited to turn on the ignition or engine if the invector produced is connected to a non-removable battery.
It’s natural to make an angle grinder from different tools that everyone has nearby. Thanks to the instructions, the work can be done with your own hands in just 2-3 hours.
Metal processing machines
To work with metal (especially in mini workshops for the production of metal structures), a variety of machines and devices are used, and many of them can be made with your own hands.
For metal processing, making machines from wood with your own hands is impractical for the reason that they simply cannot cope with the load.
For example, a homemade bending machine (for making half-arcs and rings) is made only from ferrous scrap metal. The design must be reliable.
An automobile hydraulic jack is also additionally used, since the hand strength is definitely not enough to bend the workpiece. And with a jack, the device becomes truly functional.
Making a machine out of wood with your own hands (or rather, just a frame for it) for processing/cutting metal is possible only in a number of cases.
For example, this can be implemented when assembling a cutting machine based on a small grinder. In this case, the base is made of laminated chipboard (you can take plywood).
But all the same, if you are making a machine for cutting metal, then it is better to make the base for it more reliable and durable. You shouldn’t skimp on material here—savings can backfire.
You can weld a simple frame from a profile pipe with reinforcement in the central part, and then weld or bolt a suitable sized metal sheet on top.
A bending machine for bending metal rods and strips also needs a very strong base.
If instead of a sheet of metal there was a plywood board, then the machine simply would not be able to cope with its task.
Therefore, making machines from wood with your own hands for metal processing is possible only in cases where the load on the base (bed) is insignificant. For example, a drill stand or cutting machine.
Advantages of a homemade tool
On the farm, very often there is a need to cut boards, chipboard, fiberboard, plywood and other similar materials. It is most convenient to perform such manipulations using a stationary machine, which is popularly called a circular machine. You can even cut firewood on such a machine, so you don’t have to think long about the rationality of its manufacture.
An angle grinder or grinder has gained wide popularity as it is a universal tool for cutting metal, stone, concrete, plastic and even wood. However, wood processing requires not only special skills, but also caution. After all, it is when processing wood that an effect such as a reverse blow occurs. That is why experts recommend using the tool only as a circular saw, which eliminates the possibility of a kickback and also increases the efficiency of using power tools.
Making a stationary machine from a grinder for sawing wood has a number of advantages:
- Savings on the purchase of a stationary machine, which consists of a frame and a powerful electric motor. The cost of such a machine is at least 10 thousand rubles, while a grinder can be used to make a circular saw without additional investment
- Ease of manufacture - to create a machine you only need a power tool and a base, which can be made from a wooden workbench or boards
- High efficiency - the angle grinder develops a rotation speed of over 9000 rpm, which has a positive effect on the speed and quality of sawing material
- The ability to use an angle grinder at any time by removing it from the machine
If you came to the site, then you are probably wondering about the purpose of making a homemade circular saw from an angle grinder. There is no doubt about the rationality of such an idea, but we will find out later how to make a stationary machine for sawing wood.
Types of disk machines
In addition to tool feeding, various shapes and designs of cutting saws have been developed. The most common are abrasive cut-off saws, usually cutting and cut-off saws. The selection of design depends on the specific type of task and metals.
Metal cutting disc machines are used for cutting various types of profiles and non-ferrous metals. The metal structure does not have the characteristics of increased productivity; it is used in small-scale production and for free tasks. It is used with square and channel metal; depending on the density of the metal, the optimal number of revolutions is selected. The machine is economically located in relation to consumables, this is possible due to the processing of the disk metal structure with increased speed and electric drive power.
Abrasive cutting machine
The abrasive cutting machine is capable of processing metals of any profile and thickness. Used for cutting single pieces at different angles, up to 45 degrees. It is used in preparatory shops for cutting long rolled metal products. Models with dust extraction allow comfortable cutting in confined spaces. Also, more expensive modifications provide a liquid supply for cooling the disk element and an automatic chamfering design.
Cutting of metals supplied in coils is usually done using cutting-off machines. Several types of steel are supplied in packaged form or in coils:
- rods of various sections;
- wire;
- pipe strips;
- reinforcing steel.
The device is implemented in such a way that the mechanism captures the beginning of the material and runs it through the rule. The aligned part is automatically cut off and transferred to a tray with finished products. Cutting machines of the correct type, regardless of purpose and dimensions, are equipped with various unwinders:
- driven;
- mechanized;
- stationary
- roller impact.
Rule-cutting machine
Cutting machines are mainly used in mass production, where high cutting accuracy and low cut roughness are required. A variety of modifications allows you to select a disc cutting machine in accordance with the needs and production volumes.
Basic tools and materials
Modifying an angle grinder does not involve making changes to the design of the angle grinder itself.
In most cases, alteration involves assembling a hinged frame that is installed on an angle grinder. The set of tools and materials used to assemble such a structure is determined by its purpose and the degree of complexity of the design process. The main parts of the mounted angle grinder are a variety of bolts, nuts, clamps and other fasteners. The base is a supporting frame made of durable metal - square iron pipe, corners, rods and other elements. To convert an angle grinder into a device for another purpose, additional tools are used. Among them are:
- electric drill or screwdriver;
- welding machine;
- spanners;
- another Bulgarian;
- vice.
How to work correctly and tips for use
Using an angle grinder as a circular saw does not at all make this tool safer, which is why work must be carried out strictly in protective clothing and safety precautions must be observed. When working on a homemade circular saw, you need to consider the following recommendations:
- Work should begin only after the tool reaches the operating spindle speed
- The duration of continuous operation should not be more than 15-20 minutes to prevent the motor from overheating
- The grinder should only be used with a protective cover, even though its main part is located under the tabletop
- If the spindle speed of a power tool is higher than 10,000 rpm, then this speed will cause wood smoke in the cutting line, and as a result, damage to the appearance and even fire. To eliminate the occurrence of such a drawback, the spindle rotation speed must be reduced using a special voltage reduction device. Reducing the voltage, the number of revolutions drops
- If during the sawing process there is a decrease in speed or a complete stop of the cutting wheel, then you must quickly remove the workpiece, freeing the disc from contact. If you neglect this recommendation, the motor on the angle grinder may burn out.
Making a circular grinder with your own hands is not difficult, and to achieve the result you will need a minimum of investment and a maximum of imagination. The finished tool can be used for sawing boards, beams, logs, fiberboard, chipboard and plywood. With such a household assistant, you can quickly eliminate the need to use a hand hacksaw.
Required tools and materials
When starting to manufacture a cutting machine, you should understand that the accuracy of its operation is directly related to the stability of the structure. Therefore, the choice of a material of a certain thickness is dictated not so much by the requirements for the strength of the body, but by the need for its rigidity.
Before you start working, you need to prepare:
- square profile pipe (25x25x2.5 mm);
- profile pipe “rectangle” (40x20x2.5 mm);
- metal sheet 4–5 mm thick;
- ball bearings No. 202, 203 or 204 – 2 pcs.;
- calibrated rod with a thickness equal to the diameter of the hole in the inner race of the bearing (up to 100 mm);
- rod with a diameter of 8–10 mm;
- metal tire (20x4 mm);
- bolts and nuts with M8 or M thread.
Tools you will need:
- Angle Grinder;
- drill or drilling machine, set of drills;
- a set of dies for cutting metric threads;
- open-end wrenches;
- welding machine.
To make a machine, it is better to choose an angle grinder from a well-known manufacturer.
The main component of a cutting machine is an angle grinder. It is not recommended to use a “small” grinder designed for cutting discs with a diameter of up to 125 mm and a power of up to 500–600 W. Remember that the larger the diameter of the cutting wheel, the more versatile and reliable the machine will be.
The careful selection of power tools is also due to the wide variety of angle grinder designs available on the market. Since such equipment is not unified, the cutting machine is built for a specific model and size of angle grinder. If the equipment is unreliable, then if it fails, it will be difficult to install another angle grinder in its place without the need to rework the mounts and pendulum. That is why it is better to choose products from trusted manufacturers - Makita, Bosch and so on.
Tools and materials
As a rule, at home, a stand for an angle grinder is made from profiled metal pipes, as they are very durable and reliable. Although some craftsmen make holders from lumber. In this case, it is advisable to use only the hardest types of wood that can withstand heavy loads and not deform during operation. As for metal structures, the problem here is only the need to use electric welding and the ability to work with it. However, if you think about it a little, most welding work can be replaced by drilling, that is, using bolted connections. In addition, this option will allow you to almost completely disassemble the machine.
For work you will need the following materials and tools:
- welding machine;
- perforator;
- sander;
- metal corner;
- profiled pipes and channels;
- powerful spring;
- relay 12 Volt;
- bolts, nuts and a set of keys;
- panel made of chipboard or metal (working surface).
Design
Roller metal shears, assembled at home with your own hands, have a common essence that remains unchanged - the presence of a cutting knife. It is made from steel alloys with a maximum strength threshold and other characteristics that should be higher compared to similar parameters for steel that will be processed on a cutting machine.
Roller knife device
In practice, it is known that roller knives produced at the factory for cutting metal have a service life of about 30 km of steel sheets, with a caveat to the maximum sheet thickness, which will not exceed 0.5 mm.
Accordingly, if the thickness of the material is higher, then the durability of the tool is reduced. However, nothing prevents you from sharpening the tool and thereby extending its service life.