If you are the owner of a plot of land, then at least once you have been faced with the need to dig holes for supports and pillars when decorating the appearance of the territory. Sometimes it happens that a hole is needed in a not very convenient place. It is quite difficult to cope with this task with a simple shovel. You can, of course, borrow a hand drill from a friend or call a specialist who can handle the appropriate tool. But if you plan to carry out such work from time to time, then you can make a garden drill for poles with your own hands from scrap materials.
The tool will be easy to use and compact, which is very convenient for storage. Typically, hard metal is used for such work. With its help, you can split plant rhizomes and small stones into pieces. Such a device will allow you to dig a hole by rotating the equipment around an axis like a corkscrew.
Selection of cutting part
The main purpose of the drill is to dig holes. Wells are made with a cutting part, which can have different shapes, namely:
- half-disc shape;
- type of auger;
- two-blade;
- helical;
- removable;
- multi-tiered;
- whole.
If you want to make a pole drill with your own hands, you must determine the design features of the device. Some models have small blades at the bottom, while at the top they increase to larger sizes. By purchasing a factory drill, you will receive an effective and functional tool for use. But it is not always possible to insert it into the soil to the required depth; in addition, the nozzles of such devices may not have the correct diameter.
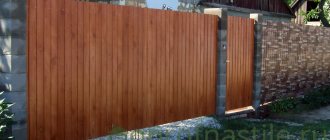
Holes for supports
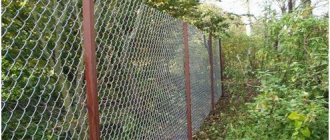
To securely install fence posts, they must be buried in the ground. Not everyone knows how to choose the right depth and drill holes for posts, as a result of which many fences sag over time or even fall. Meanwhile, there is nothing complicated about this, the main thing is to accurately determine the type of soil and calculate the weight of the fence and the parameters of the pillars.
Drilled hole for fence support
Recommendations for the manufacture of individual parts
Before you start making a pole drill with your own hands, you must understand the components of this tool, among them the following should be highlighted:
- baking powder;
- soil receiver;
- shaper plow;
- screw.
The baking powder consists of two planes or a screw. The latter is similar to a spiral; in this unit the knife is located on a rod. There is also a soil receiver in the drill. Soil is collected here, which makes it easier to drill holes with a diameter of up to 35 cm. When making a drill for posts with your own hands, you will need to equip it with a shaper, which will be located in the lower part. This unit allows you to strengthen the columnar foundation, which is required when constructing large buildings.
Shovel: pros and cons
This tool is the cheapest and simplest, but in this case it is also the most ineffective. For digging trenches or wide shallow holes, a shovel is very convenient, but you won’t be able to dig a deep and narrow hole with this tool.
Firstly, this will require a lot of physical effort, secondly, the width of the hole will still be much wider than necessary, and thirdly, it will take a lot of time. But if the pillars are made of brick, a shovel will be ideal. For such pillars, the pits should be square and wider so that it is convenient to pour the foundation.
In addition, there is a shovel in almost every estate, and more than one; it does not require gasoline or electricity; if it breaks, it is not difficult to fix it.
Digging with a shovel
Preparation of materials
If you decide to make a drill for poles with your own hands, then at the first stage you need to start preparing everything you need. Among the details it is worth highlighting:
- nut;
- drill;
- vice;
- pieces of metal pipe.
You will also need an M 20 bolt. You need to take 2 disks with a diameter of 100 to 150 mm. As for the drill, it must have a tip with a diameter of 20 mm. A metal pipe will lie at the base. You will need two sections of 500 mm and one of 400 mm. It is better to take a pipe with a wall thickness of 3.5 mm and an outer diameter of 40 mm. With these parameters, the finished product will be durable and will be able to withstand hard ground.
What you need to know before purchasing
Regardless of the type of hand tool you plan to purchase, you need to consider several basic parameters:
- cutting edge diameter - it must correspond to the hole in the soil; it is recommended to select a blade with dimensions 5 mm larger than the hole;
- characteristics of the holes, which allows you to determine the required set of tools, since it is possible to purchase an excavation drill with several blades for drilling in different conditions, as well as with additional rods for extending the structure.
If you plan to buy a motorized tool, you need to take into account the parameters of the mechanism: power level, operating modes.
When purchasing, you should first of all pay attention to such manufacturers as Hitachi, Husqvarna, Stihl - these are well-established companies
When the task is to rent manual drilling equipment, you need to rely on the volume of expected work (number of holes, soil characteristics).
Preparing tools
You can borrow the discs from a regular circular saw or make them yourself. To do this, you should find 3mm sheets of metal. Among the tools that will be needed in the work are:
- angle grinder;
- welding machine;
- metal drills;
- hammer;
- drill.
If you do not have a tip with a drill, you can replace it with a drill with a shank that looks like a cone. Its diameter must match the screw. In order to prevent injury, you should use soft bicycle handles.
Blueprints
The abundance of designs allows you to create a highly specialized tool for personal needs. Let's look at some drawings of such options.
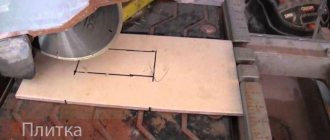
Shovel drill
When planting plants, the drilling depth is not critical. Therefore, you can donate an old shovel to make hole preparation easier. You should retreat 30 mm from the lower center point. Draw lines from it to the edges at an angle of 10-20 degrees. Then step back 30 mm from each edge and draw vertical lines. The bayonet segments located between the verticals and lines diverging from the center are cut out.
Then cut the marked 30mm from the bottom center point. Now all that remains is to bend the lower and side parts of the bayonet in opposite directions along the marked lines. The earth drill with your own hands is ready.
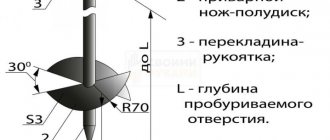
Drill for soft soils
Drilling in low-density soils with classical types of drills is not effective. For these purposes, it is better to use a special type of tool. Two cutting semicircular blades are placed above the peak in one plane with a distance of 20-50 mm between their edges. A flat shelf of the same diameter is attached 180 mm above them. Then a vertical cutter is welded between the edges of the cutting half-discs and the shelf.
Basic drill drawings
There are many drill designs available online, varying in complexity and ingenuity. But as a basic option, nothing prevents you from using your own design, tested in practice and chosen by trial and error.
Thus, manual and automatic drills for posts allow you to quickly create the required number of holes and at the same time are extremely simple to manufacture. The entire process from selecting materials to the first test drilling is unlikely to take more than one day.
Step-by-step work
If you decide to make a manual post drill with your own hands, draw a circle with a center on a metal sheet. This part will be the blade. The circle is cut out with a grinder, after which a cutting line should be drawn along the diameter line. At the next stage, you need to draw a cutout line that will correspond to the circumference of the collar. The disk is divided into two parts, after which a hole for the knob should be cut. At the end of the pipe, which will serve as a wrench, four longitudinal lines must be made with an angle grinder. These are formed into a point using a hammer. In this case, you need to make cuts at the very center of the pipe.
The tip is processed by welding. The driver should not become clogged with soil during operation. When making a drill for fence posts with your own hands, in the next step you will need to connect the disk to the collar using a weld. This is done at a distance of 5 cm between them. It is necessary to maintain the angle of the plane of rotation, which is 20˚.
Classification
A light motor drill, a gas drill, a motor drill is a compact, lightweight tool for the work of one operator when performing a small amount of work. It can be used by both professionals and owners of summer cottages and residents of rural areas for posts when installing fences. A lightweight motor drill can drill soil up to one and a half meters with an auger diameter of 2.5 cm.
Mechanical gas drill, motor drill, hole drill for two operators. This is a more serious instrument. It works on soils up to the third category, can drill to a depth of more than two meters, has an auger with a diameter of up to 30 cm, and the torque is much greater than that of a light motor drill. This tool can be used when installing road signs, fences, and foundations. Two operators work with this equipment.
Mechanical is a wheeled vehicle that can be controlled by one operator. This mechanism can: process soil up to the third category inclusive, drill soil to a depth of three meters, lift excavated soil to the surface using a tripod with a winch. The screw diameter is up to thirty centimeters.
Pit drill, motor drill, gas drill with hydraulic drive. The main difference between hydraulic and mechanical is high reliability and ease of maintenance. Complex mechanical devices are replaced by a simple hydraulic drive, which completely absorbs the reverse impact when colliding with an obstacle in the ground. They drill in soil up to the third category inclusive. They drill up to three meters deep into the soil up to the third category of complexity.
By functionality:
- drilling machines;
- drilling and crane machines;
- drilling and piling machines;
- multi-purpose drilling rigs.
Screw These models can be either non-separable or collapsible. In the first case, the diameter of the auger is about 25 cm, and the length of the installation itself is 2 m. The second version of the model, in comparison with the first, has a longer length - 2.5 m. However, the diameter of the auger reaches only 18 cm.
A collapsible auger consists of a main part on which there is a screw blade, as well as an elongated component called a removable handle.
Manual Externally they are metal pillars, at the end of which there is a point and a screw-type blade. Quite often, manual installations are rented for the purpose of landscaping garden areas. They make it easy to cope with the work of forming holes:
- for planting trees and shrubs;
- for laying water supply systems;
- for installation of lighting masts;
- for installation of fences, sheet piling fencing of pits, pillars.
Mounted
This is a device that is mounted by hanging it on construction equipment, for example, on an excavator or tractor. Using such equipment, shallow holes are created in the ground. The main advantage is the ability to use it in difficult conditions, when it is quite difficult to get to the hole drilling site.
This advantage is due to the presence of an adjustable boom. The longer the boom, the easier it is to reach the work site.
Working on an extension pipe
Next, you can begin working with the extension pipe. It must be equipped with a handle. This part is welded in the shape of the letter T. An amplifier in the form of a scarf is attached to it. The workpiece should be inserted into the driver, making a hole between these parts. This will allow you to fasten the parts with a pin. There should be several holes so that the length of the product can be adjusted. You can complete the work process by sharpening the blades. The edge of the cutter is processed so that when rotating the tip is directed downward.
Types of drills
There are two types of tools:
- disk. The product is equipped with two semicircular blades, which are placed one above the other. To drill a hole with such a drill, the operator moves it back and forth;
Disc drill - screw It uses a solid blade that is wound around a base. To drill with this drill, you need to move clockwise.
Auger drills
Application of protective coating
Having made a drill from a pipe for poles with your own hands, you must protect it from external influences and premature aging of the material. This will prevent rust from occurring. The parts of a homemade drill are processed with sandpaper and coated with a primer. A phosphating solution is applied on top. The finished product after this treatment can be painted.
When using a tool, after each use it is usually disassembled and cleaned of dirt and dust. Particular attention should be paid to connections. They are coated with a special lubricant that helps repel water. You should not miss this moment, because proper care will be an excellent prevention of bolt jamming and will allow the equipment to operate uninterruptedly for a long time.
Equipment used
Automated devices will not only save time, but also avoid heavy physical labor. The higher the fence and the mass of materials used in the construction of the fence, the deeper you will have to drill holes for fence posts. Approximate data for reliable installation in the case of a two-meter support is 0.6-0.7 meters, pipes for a small gate - 20-30 centimeters. Depending on the volume of soil being removed, you can use several methods:
- use a shovel or a specially made hand tool;
- use a motorized or electrified installation;
- Conclude an agreement with a company that provides similar services. Such organizations usually drill holes in the ground using a vehicle rig.
How to improve the tool
When making your own garden post auger, you can think about improving it. When drilling holes, you may encounter large rhizomes that lie tightly in the ground. Sharp edges make work easier. For ease of use, teeth should be cut on the sloping area of the blade or the cutting part should be rounded.
The design can be improved by adding removable cutters. They will allow you to drill holes of any diameter. In addition to the manufacture of spare parts, it is necessary to provide for their attachment to the collar. They are connected by two iron plates, fixed by welding. Two holes are drilled into the mounting plates and blades for the bolts. The cutters are fixed with M 6 bolts. The bolts may interfere during operation. To eliminate this problem, they are screwed in with the threads facing up.
If you want to make the best DIY post drill, you can improve it using one more method. To do this, a narrow metal plate is cut out and turned into a cone using a grinder. This will improve the efficiency of the lower end of the knob. The dimensions of the plate are 10 x 2 cm. As a result, you should get a kind of point. There is no need to make cuts in the collar. Metal plates are inserted into the end and secured by welding. They are flattened to form a peak.
If you want to use a pike, you can base it on a different method of making it. To do this, take a 17-centimeter metal plate, from which a screw similar to a corkscrew is cut out. The further algorithm of actions will be the same as in the first option.
If you decide to make a pole drill with your own hands, photos of such structures will allow you to understand which design to give preference to. If a screw is provided, a drill can play its role. It should be able to handle wood and metal. Such a tool will penetrate the soil more easily and will drill holes of the required depth.
If you are working with dense deep layers of soil, you can weld a small flat cutter between the cutter and the pick. This design will allow you to loosen the ground and center it when drilling. For such a part, you need two metal plates 3 x 8 cm. A trick of this kind will speed up the work with the tool.
When making a drill for installing pillars with your own hands, you can supplement it with cutters made from disks that are designed for working with stone. The circles are cut along the radius, and the hole widens in the center. It must match the diameter of the knob. Bending the disk allows you to get something like a screw or a corkscrew. This part will only need to be welded using the algorithm described above.
The cutter can be made from a circular saw blade. The teeth will cope with rhizomes and hard soil. You can upgrade the tool at your discretion. But no matter how high-quality it is, before the drilling process it is better to loosen the soil with a shovel, then the device will penetrate the soil well and the work will go faster.
Stages of drilling a well for sampling
Usually, on a personal plot or in a country house, such work is carried out independently. Before the event starts, you need to study the topic, listening to the opinions of experts. To get a good result, the whole process should be divided into stages, which are performed one by one:
- Marking and planning the site involves clearing debris, weeds, and rhizomes. The preparation of pegs at the locations of supports, construction twine, and laser level must also be carried out.
- Selecting a tool with a preliminary inspection for defects. All cutting surfaces must be well sharpened to quickly and easily drill holes of the required quality.
- Drilling carried out in layers, gradually. At a depth of 30-40 centimeters, difficulties with penetration usually begin. This is due to reaching solid layers of soil. To soften them, pour water into the hole.
- After making the holes, you can begin installing the supports. To fix them in the ground, you need to use stone butting or pouring concrete mortar. Until complete setting, further activities are prohibited.
Using these simple tips, all fencing installation work can be completed quickly and with minimal help from others.
Maximum effect
So, we found out that the most economical and optimal drilling method is to use a garden auger. However, you should ensure that it is constantly sharpened. When preparing for work, it is better to carry out this procedure yourself to be sure of the high speed of work.
To soften the soil, pour half a bucket of water into the hole.
Now it’s worth talking directly about the technology of digging holes with its help. In fact, drilling with such a tool can be called primitive. The equipment is installed strictly in a vertical position in the place where the future pit should be located. Next, you need to start turning the drill while pressing the handle.
Which drilling mechanism is better
The choice of such a tool should be made based on the soil structure. And only if it matches the parameters of the drill can you count on effective operation. However, some versions are still characterized by increased wear resistance to significant loads.
In particular, when considering non-motorized drills, the best option in terms of functionality and strength is the auger version.
But when choosing, a lot depends on the purpose for which the tool is purchased. Sometimes it is not practical to spend money on a more expensive unit, for example, if you plan to make only a few shallow holes in soft soil. Then a simple plate drill would be an excellent option.
When considering motorized mechanisms, it is necessary to highlight a gas drill - this is a powerful unit that is offered at a relatively affordable price when compared with analogues that operate on a drive. The disadvantage of this option is the heavy weight, as well as the need to work together with a partner.
Parameters of holes for pillars
There are two ways to install the support posts: lower them freely into the hole; drive into a hole of equal or smaller diameter than the dimensions of the post. Accordingly, in the first case, it is possible to prepare holes of much greater width.
If the drill gets stuck or has difficulty turning, pour some water into the hole, then wait a couple of minutes.
For example, if the support has a cross-section of 60x60 mm, the pit may well be twice as wide. Then partial or complete concreting of the free space is performed.
If it was not possible to find a drill with a blade of suitable diameter, it is possible to make a hole with dimensions equivalent to the dimensions of the pillar. Then the support will need to be driven in. The laying depth is determined by the weight of the fence structure and the soil freezing limit: from 0.8 to 1.5 m.
And incomparably more energy will be expended. In order not to redo all the work, you need to immediately pay attention to the preparation of the holes. It is important to control the location of the drill. You can stop drilling when the drill reaches dense layers of soil. The diameter of the pit is determined by the size of the pillars.