One of the most common fasteners that are found everywhere in objects around us is bolts. They can be very diverse, hidden inside ceilings and walls, or visible, acting as connectors for parts of various structures. The variety of shapes and applications of bolts is enormous. Let us dwell in more detail on the classification of these hardware and their most popular types.
Characteristic
By definition, a bolt is a metal connecting product consisting of a head and a cylindrical rod with an external thread. The bolt is secured with a nut or special fastening (for example, anchor bolts). Connection type: detachable.
The most popular are hex head bolts. This is the so-called “classic” bolt. The “secret” bolt is also very popular. Hardware is classified according to the following principles:
- Purpose: furniture, ploughshares (for agricultural machinery), road (fencing, metal structures), mechanical engineering.
- According to the material used: ordinary, carbon, alloyed and low-alloyed, heat-resistant steels, copper, titanium.
- According to the class of strength and accuracy.
- By coverage.
Depending on the purpose and tasks performed, bolts may have different head shapes. There are the following: folding, anchor (foundation), eye bolt, with a 6-sided head (multi-sided), with a semicircular or countersunk head.
- Hexagons are the most common bolts, sold in any supply stores for construction and home repair. A hex bolt is designed to hold parts together through through holes using a nut and wrench. Scope of application: mechanical engineering, construction, etc.
- The round head bolt is used in furniture production. Reliably fastens structural elements of furniture, while having an attractive appearance, made of stainless steel or zinc coated.
- Anchors are designed for fastening floor slabs, installing door or window blocks, suspended ceiling structures and other structures. Made from stainless steel for installation in hollow and porous materials (but can also be used for solid ones).
- An eye bolt is a specialized fastening with a ring-shaped head. May have a hexagonal base, swivel joint. Used in connection systems with cables and chain channels. Material – alloy steel. The scope of use, due to its special strength and reliability, is very wide - from apartment renovation to shipbuilding and installation of railway lines.
- The countersunk bolt is used in mechanical engineering and furniture production when working with natural wood and metal. They are effective and allow you to visually hide the joints of parts.
There may be such varieties as anchor bolts with a countersunk head or a ring (hook), a sphere, a fork head, a round head with a hole, etc.
Important parameters for classifying bolts are the shape of the rod and the thread pitch. The rods can have the same diameter along the entire length or combine two sizes, arranged in steps, with the smaller part being threaded and the larger (upper) smooth.
Thread type can be: metric, pipe. inch, trapezoidal, thrust, square or rectangular. Thread pitch: large and small.
GOSTs, which guide manufacturers when producing hardware, may specify a bolt design option. These could be options for additional locking of the threaded connection or additional slots in the head to reduce the weight of the bolt.
Design and installation
The anchor consists of a stud with a spacer, an outer shell and a nut with a pressed washer. When the nut is tightened, the pin with the spacer moves towards the nut, thus wedging the outer shell, which, in turn, rests against the walls of the hole. The anchor is made of galvanized (yellow-passivated) steel.
Installation of the anchor bolt is carried out in the following order:
- Drill holes corresponding to the diameter of the anchor
- Clean the hole from dust and crumbs of the base
- Place the anchor in the hole (together with the part being fastened) and lightly hammer it in until it stops
- Tighten the nut 3-5 turns
Bolt weight
When purchasing a large number of fasteners, the store does not count units of goods, but sells them by weight. To know how many bolts you weighed, you need to know how much 1 piece weighs.
Thus, the most popular type of hardware of this type is considered to be a bolt with a hexagonal head, made in accordance with interstate GOST 7798-70. Accuracy class B with full thread.
Let us give an example of the mass of bolts of minimum length for various nominal diameters.
- The weight of an m10 bolt for 10 will be 16.68 g, 1 kg - 60 pcs.
- the weight of the m16 by 18 bolt is 65.54 g, 15 pcs in 1 kg,
- weight of M24 bolt for 32 – 237 g, 1 kg – 4 pcs.
The bolt weight table contains tabular values of the most popular sizes
| Name | Weight 1 piece in g | Weight of 1 piece in kg | How many pieces in 1 kg |
| bolt M5x20 | 3,88 | 0,00388 | 257,73 |
| bolt M5x50 | 7,6 | 0,0076 | 131,58 |
| bolt M6x30 | 8,98 | 0,0089 | 111,36 |
| bolt M6x60 | 15,64 | 0,01564 | 63,94 |
| bolt M8x40 | 21,07 | 0,02107 | 47,46 |
| bolt M8x60 | 28,97 | 0,02897 | 34,52 |
| bolt M10x70 | 52,87 | 0,05287 | 18,391 |
| bolt M10x100 | 71,38 | 0,07138 | 14,006 |
| bolt M12x50 | 58,67 | 0,05867 | 17,04 |
| bolt M12x130 | 129,7 | 0,1297 | 7,71 |
| bolt M16x60 | 129,4 | 0,1294 | 7,73 |
| bolt M16x150 | 287,4 | 0,2874 | 3,68 |
| bolt M20x100 | 317,8 | 0,3178 | 3,15 |
| bolt M20x200 | 564,6 | 0,5646 | 1,77 |
| bolt M24x80 | 402,1 | 0,4021 | 2,49 |
| bolt M24x300 | 1184 | 1,184 | 0,84 |
Production time for curved bolts version 1.1
The manufacturing time of 1 foundation bolt takes no more than 5 minutes.
First of all, this will be appreciated by our customers who are passing through Moscow and who require a small batch of foundation bolts.
Up to 50 sets will be produced within one hour right in front of the customer.
When ordering bulk quantities of anchor bolts, we give the best production times not only in Moscow, but throughout Russia. We provide a flexible system of discounts for regular wholesalers.
How to place an order for production
To quickly complete your application, log in to the website and use the order form through the online store cart in the upper right corner of the page.
If your order requires clarification, use the order form at the bottom of the page.
In order for us to respond to you faster, please provide your email and phone number.
If you wish to receive an invoice for payment immediately, you will need to indicate the name of the organization and payment details.
Indicate the desired date for receiving the finished order and the name of the transport company through which your order should be sent after production.
You can discuss all the details with your manager by phone or by sending a request by email
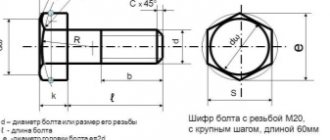
Briefly about deciphering the main symbols
Any fastener has its own designation, consisting of a set of letters and numbers that is incomprehensible at first glance. Let's look at what the “cipher” consists of:
- Name of fastener – Bolt,
- Accuracy class - A, B, C, where A is the most accurate, is indicated if there is no further reference to GOST.
- Bolt design (special design features) – from 1 to 4,
- Type of thread: M - metric, K - conical and Tr - trapezoidal,
- Thread diameter in mm,
- Thread pitch (only fine pitch is indicated for a specific diameter),
- The thread direction is indicated only to the left, since the right is the main one,
- Thread accuracy level 4 – 8 (fine – coarse),
- Length of hardware in mm,
- Strength class,
- Indication of the alloy used,
- Symbol for the type of coating – 1 – 13,
- Coating thickness in microdistrict,
- Type of standard for production.
The product marking contains the strength class of the material, the manufacturer's mark and the thread direction arrow. The strength class is determined by numbers. The first shows the maximum load, and the second shows the relationship between fluidity and strength indicators.
Steel grade 09G2S
Low alloy structural steel
The designation 09G2S indicates that the steel contains 0.09% carbon, the letter “G” means manganese, and the number 2 indicates a percentage of up to 2% manganese. The letter "C" stands for silicon, silicon content less than 1%.
The main advantage of this steel is its high mechanical strength, which allows the use of thinner parts compared to parts made from other steels. This means that parts made of 09G2S have less weight, which is more economically profitable. In addition, another advantage of this steel is its low tendency to temper brittleness.
Weldability of steel 09g2s
Steel grade 09G2S is widely used for welded structures. Welding can be done either without heating or with preheating up to 100-120 degrees Celsius. Welding is quite simple, and the steel is not hardened or overheated during the welding process, so there is no decrease in plastic properties or an increase in its grain size. At air temperatures of minus 15 °C and below, local preliminary heating is used, regardless of the thickness of the steel.
Application temperature for steel 09g2s
The minimum temperature of use (the temperature of the coldest five-day period in the region) is minus 70.
The maximum temperature of use is plus 450.
Hexagonal bolts with thread up to the head Thread from M1.6 to M52 Accuracy classes A and B
Hexagon head screws; Metric thread M 1.6 to M 52, product grades A and B
Compatible with DIN ISO 4017/09.87 Replaces edition 12.83
ISO 4017 should be used instead, see comments. It should be noted that until 07/01/92, the DIN 933 standard as amended on 09.87 will be withdrawn from circulation.
In the standard, all dimensions are indicated in millimeters.
1 area of use
This standard contains requirements for hex bolts with threads up to the head, with metric coarse threads from M1.6 to M52, accuracy class A with dimensions up to M24 and length ≤ 10 d, i.e. up to 150 mm, as well as for accuracy class B - with thread sizes over M24 or length > 10 d, i.e. over 150 mm. Bolts conforming to DIN 933 Part 1 are threaded to approximately the head and have a standard length of up to 200 mm.
In special cases, if it is necessary to use other requirements instead of those given in this standard, for example, other strength classes, they should be selected in the relevant standards.
2 Dimensions
Thread ends – according to DIN 78-K, also permissible for non-chamfered bolts with thread sizes ≤ M4.
Acceptable bolt head shape:
k' – minimum height for gripping with a key (0.7 k min.)
Table. Bolt sizes for threads from M 1.6 to M 6
| Thread d | M 1.6 | M 2 | M 2.5 | M 3 | (M 3.5) | M 4 | M5 | M 6 | ||
| P1 | 0,35 | 0,4 | 0,45 | 0,5 | 0,6 | 0,7 | 0,8 | 1 | ||
| a2 | max | 1,05 | 1,2 | 1,35 | 1,5 | 1,8 | 2,1 | 2,4 | 3 | |
| c | min | 0,1 | 0,1 | 0,1 | 0,15 | 0,15 | 0,15 | 0,15 | 0,15 | |
| max | 0,25 | 0,25 | 0,25 | 0,4 | 0,4 | 0,4 | 0,5 | 0,5 | ||
| da | max | 2 | 2,6 | 3,1 | 3,6 | 4,1 | 4,7 | 5,7 | 6,8 | |
| dw | min Accuracy class | A | 2,4 | 3,2 | 4,1 | 4,6 | 5,1 | 5,9 | 6,9 | 8,9 |
| B | — | — | — | — | — | 5.7 | 6,7 | 8,7 | ||
| e | min Accuracy class | A | 3,41 | 4,32 | 5,45 | 6,01 | 6,58 | 7,66 | 8,79 | 11,05 |
| B | — | — | — | — | — | 7,5 | 8,63 | 10,89 | ||
| k | Nominal size | 1,1 | 1,4 | 1,7 | 2 | 2,4 | 2,8 | 3,5 | 4 | |
| Accuracy class A | min | 0,98 | 1,28 | 1,58 | 1,88 | 2,28 | 2,68 | 3,35 | 3,85 | |
| max | 1,22 | 1,52 | 1,82 | 2,12 | 2,52 | 2,92 | 3,65 | 4,15 | ||
| Accuracy class B | min | — | — | — | — | — | 2,6 | 3,26 | 3,76 | |
| max | — | — | — | — | — | 3 | 3,74 | 4,24 | ||
| k' | min | 0,7 | 0,9 | 1,1 | 1,3 | 1,6 | 1,9 | 2,28 | 2,63 | |
| r | min | 0,1 | 0,1 | 0,1 | 0,1 | 0,1 | 0,2 | 0,2 | 0,25 | |
| s | max = Nominal pp s | 3,2 | 4 | 5 | 5,5 | 6 | 7 | 8 | 10 | |
| min Accuracy class | A | 3,02 | 3,82 | 4,82 | 5,32 | 5,82 | 6,78 | 7,78 | 9,78 | |
| B | — | — | — | — | — | 6,64 | 7,64 | 9,64 | ||
Table. Bolt weights for threads from M 1.6 to M 6 and accuracy classes A and B
| Nominal size (length) | Allowable length for different accuracy classes | Weight (7.85 kg/dm3) 1000 pieces, kg | ||||||||||
| A | B | |||||||||||
| min | max | min | max | M 1.6 | M 2 | M 2.5 | M 3 | (M 3.5) | M 4 | M5 | M 6 | |
| 2 | 1,8 | 2,2 | — | — | 0,1 | |||||||
| 3 | 2,8 | 3,2 | — | — | 0,11 | 0,2 | 0,37 | |||||
| 4 | 3,76 | 4,24 | — | — | 0,12 | 0,21 | 0,4 | 0,48 | ||||
| 5 | 4,76 | 5,24 | — | — | 0,13 | 0,23 | 0,43 | 0,53 | 0,84 | 1,26 | ||
| 6 | 5,76 | 6,24 | — | — | 0,14 | 0,25 | 0,46 | 0,57 | 0,9 | 1,33 | 2,18 | 3,4 |
| (7) | 6,71 | 7,29 | — | — | 0,15 | 0,27 | 0,49 | 0,61 | 0,96 | 1,41 | 2,28 | 3,57 |
| 8 | 7,71 | 8,29 | — | — | 0,16 | 0,29 | 0,52 | 0,66 | 1,02 | 1,49 | 2,38 | 3,74 |
| 10 | 9,71 | 10,29 | — | — | 0,18 | 0,33 | 0,58 | 0,75 | 1,14 | 1,64 | 2,63 | 4,08 |
| 12 | 11,65 | 12,35 | — | — | 0,2 | 0,36 | 0,64 | 0,84 | 1,26 | 1,8 | 2,87 | 4,424 |
| (14) | 13,65 | 14,35 | — | — | 0,39 | 0,7 | 0,92 | 1,38 | 1,95 | 3,12 | 4,76 | |
| 16 | 15,65 | 16,35 | — | — | 0,42 | 0,76 | 1 | 1,5 | 2,1 | 3,37 | 5,11 | |
| (18) | 17,65 | 16,35 | — | — | 0,82 | 1,09 | 1,61 | 2,25 | 3,62 | 5,45 | ||
| 20 | 19,58 | 20,42 | — | — | 0,88 | 1,18 | 1,73 | 2,41 | 3,87 | 5,8 | ||
| (22) | 21,58 | 22,42 | — | — | 0,94 | 1,27 | 1,85 | 2,56 | 4,12 | 6,15 | ||
| 25 | 24,58 | 25,42 | — | — | 1,02 | 1,4 | 2,03 | 2,8 | 4,49 | 6,65 | ||
| (28) | 27,58 | 28,42 | — | — | 1,52 | 2,21 | 3,04 | 4,86 | 7,15 | |||
| 30 | 29,58 | 30,42 | — | — | 1,61 | 2,33 | 3,19 | 5,11 | 7,51 | |||
| 35 | 34,5 | 35,5 | — | — | 2,63 | 3,57 | 5,73 | 8,37 | ||||
| 40 | 39,5 | 40,5 | — | — | 3,96 | 6,35 | 9,23 | |||||
| 45 | 44,5 | 45,5 | 43,75 | 46,25 | 4,34 | 6,99 | 10,1 | |||||
| 50 | 49,5 | 50,5 | 48,75 | 51,25 | 4,73 | 7,59 | 11 | |||||
| 55 | 54,4 | 55,6 | 53,5 | 56,5 | 5,12 | 8,21 | 11,9 | |||||
| 60 | 59,4 | 60,6 | 58,5 | 61,5 | 5,5 | 8,83 | 12,7 | |||||
| 65 | 64,4 | 65,6 | 63,5 | 66,5 | 5,89 | 9,45 | 13,6 | |||||
| 70 | 69,4 | 70,6 | 68,5 | 71,5 | 6,28 | 10,1 | 14,4 | |||||
| (75) | 74,4 | 75,6 | 73,5 | 76,5 | 10,7 | 15,3 | ||||||
| 80 | 79,4 | 80,6 | 78,5 | 81,5 | 11,3 | 16,2 | ||||||
Notes on tables:
1P = Thread pitch
2a min ≥ 1P
Dimensions in brackets (both diameters and lengths) are not recommended.
Accuracy classes A are indicated in green
.
Accuracy classes B are indicated in yellow
.
Table. Bolt sizes for threads from M 7 to M 20
| Thread d | (M 7) | M 8 | M 10 | M 12 | (M 14) | M 16 | (M 18) | M 20 | ||
| P1 | 1 | 1,25 | 1,5 | 1,75 | 2 | 2 | 2,5 | 2,5 | ||
| a2 | max | 3 | 3,75 | 4,5 | 5,25 | 6 | 6 | 7,5 | 7,5 | |
| c | min | 0,15 | 0,15 | 0,15 | 0,15 | 0,15 | 0,2 | 0,2 | 0,2 | |
| max | 0,5 | 0,6 | 0,6 | 0,6 | 0,6 | 0,8 | 0,8 | 0,8 | ||
| da | max | 7,8 | 9,2 | 11,2 | 13,7 | 15,7 | 17,7 | 20,2 | 22,4 | |
| dw | min Accuracy class | A | 9,6 | 11,6 | 15,6 | 17,4 | 20,5 | 22,5 | 25,3 | 28,2 |
| B | 9,4 | 11,4 | 15,4 | 172 | 20,1 | 22 | 24,8 | 27,7 | ||
| e | min Accuracy class | A | 12,12 | 14,38 | 18,9 | 21,1 | 24,49 | 26,75 | 30,14 | 33,53 |
| B | 11,94 | 14,2 | 18,72 | 20,88 | 23,91 | 26,17 | 29,56 | 32,95 | ||
| k | Nominal size | 4,8 | 5,3 | 6,4 | 7,5 | 8,8 | 10 | 11,5 | 12,5 | |
| Accuracy class A | min | 4,65 | 5,15 | 6,22 | 7,32 | 8,62 | 9,82 | 11,28 | 12,28 | |
| max | 4,95 | 5,45 | 6,58 | 7,68 | 8,98 | 10,18 | 11,72 | 12,72 | ||
| Accuracy class B | min | 4,56 | 5,06 | 6,11 | 7,21 | 8,51 | 9,71 | 11,15 | 12,15 | |
| max | 5,04 | 5,54 | 6,69 | 7,79 | 9,09 | 10,29 | 11,85 | 12,85 | ||
| k' | min | 3,19 | 3,54 | 4,28 | 5,05 | 5,96 | 6,8 | 7,8 | 8,5 | |
| r | min | 0,25 | 0,4 | 0,4 | 0,6 | 0,6 | 0,6 | 0,6 | 0,8 | |
| s | max = Nominal pp s | 11 | 13 | 17 | 19 | 22 | 24 | 27 | 30 | |
| min Accuracy class | A | 10,73 | 12,73 | 16,73 | 18,67 | 21,67 | 23,67 | 26,67 | 29,67 | |
| B | 10,57 | 12,57 | 16,57 | 18,48 | 21,16 | 23,16 | 26,15 | 29,16 | ||
Table. Bolt weights for threads from M 7 to M 20 and accuracy classes A and B
| Nominal size (length) | Allowable length for different accuracy classes | Weight (7.85 kg/dm3) 1000 pieces, kg | ||||||||||
| A | B | |||||||||||
| min | max | min | max | (M 7) | M 8 | M 10 | M 12 | (M 14) | M 16 | (M 18) | M 20 | |
| (7) | 6,71 | 7,29 | — | — | 5,6 | |||||||
| 8 | 7,71 | 8,29 | — | — | 5,85 | 8,5 | 15,2 | |||||
| 10 | 9,71 | 10,29 | — | — | 6,35 | 9,1 | 16,2 | 23,3 | ||||
| 12 | 11,65 | 12,35 | — | — | 6,85 | 9,8 | 17,2 | 25 | 40 | 52,9 | ||
| (14) | 13,65 | 14,35 | — | — | 7,35 | 10,5 | 18,2 | 26,4 | 42 | 55,6 | ||
| 16 | 15,65 | 16,35 | — | — | 7,85 | 11,1 | 19,2 | 27,7 | 44 | 58,3 | 82 | 105 |
| (18) | 17,65 | 18,35 | — | — | 8,35 | 11,7 | 20,2 | 29,1 | 46 | 60,9 | 84,9 | 110 |
| 20 | 19,58 | 20,42 | — | — | 8,85 | 12,3 | 21,2 | 31 | 48 | 63,5 | 87,2 | 114 |
| (22) | 21,58 | 22,42 | — | — | 9,35 | 12,9 | 22,2 | 33 | 50 | 66,2 | 92,2 | 119 |
| 25 | 24,58 | 25,42 | — | — | 10 | 13,9 | 23,7 | 34,1 | 53 | 70,2 | 95,8 | 124 |
| (28) | 27,58 | 28,42 | — | — | 10,7 | 14,9 | 25,2 | 36,2 | 55,9 | 74,2 | 100 | 129 |
| 30 | 29,58 | 30,42 | — | — | 11,3 | 15,5 | 26,2 | 37,7 | 57,9 | 76,9 | 104 | 134 |
| 35 | 34,5 | 35,5 | — | — | 12,5 | 17,1 | 28,7 | 41,3 | 62,9 | 83,5 | 112 | 145 |
| 40 | 39,5 | 40,5 | — | — | 13,8 | 18,7 | 31,2 | 44,9 | 67,9 | 90,2 | 120 | 155 |
| 45 | 44,5 | 45,5 | — | — | 15 | 20,3 | 33,7 | 48,5 | 72,9 | 97,1 | 128 | 165 |
| 50 | 49,5 | 50,5 | — | — | 16,3 | 21,8 | 36,2 | 52 | 77,9 | 103 | 136 | 176 |
| 55 | 54,4 | 55,6 | — | — | 17,5 | 23,4 | 38,7 | 55,6 | 82,8 | 110 | 145 | 186 |
| 60 | 59,4 | 60,4 | — | — | 18,7 | 25 | 41,3 | 58,2 | 87,8 | 117 | 153 | 196 |
| 65 | 64,4 | 65,6 | — | — | 20 | 26,6 | 43,8 | 62,8 | 92,8 | 123 | 161 | 207 |
| 70 | 69,4 | 70,6 | — | — | 21,2 | 28,2 | 46,3 | 66,4 | 97,9 | 130 | 169 | 217 |
| (75) | 74,4 | 75,6 | 73,5 | 76,5 | 22,5 | 29,8 | 48,8 | 70 | 102 | 137 | 177 | 227 |
| 80 | 79,4 | 80,6 | 78,5 | 81,5 | 23,7 | 31,4 | 51,3 | 73,6 | 107 | 144 | 186 | 238 |
| (85) | 84,3 | 85,7 | 83,25 | 86,75 | 25 | 33 | 53,8 | 77,2 | 112 | 150 | 194 | 247 |
| 90 | 89,3 | 90,7 | 88,25 | 91,75 | 26,2 | 34,6 | 56,3 | 80,8 | 117 | 157 | 202 | 258 |
| (95) | 94,3 | 95,7 | 93,25 | 96,75 | 27,5 | 35,2 | 59,8 | 84,4 | 122 | 164 | 210 | 268 |
| 100 | 99,3 | 100,7 | 98,25 | 101,75 | 28,7 | 37,7 | 61,3 | 88 | 127 | 170 | 218 | 279 |
| 110 | 109,3 | 110,7 | 108,25 | 111,75 | 40,9 | 66,4 | 95,2 | 137 | 184 | 235 | 300 | |
| 120 | 119,3 | 120,7 | 118,25 | 121,75 | 71,4 | 102 | 147 | 197 | 251 | 320 | ||
| 130 | 129,2 | 130,8 | 128 | 132 | 76,4 | 109 | 157 | 210 | 268 | 340 | ||
| 140 | 139,2 | 140,8 | 138 | 142 | 81,4 | 116 | 167 | 224 | 284 | 361 | ||
| 150 | 149,2 | 150,8 | 148 | 152 | 86,4 | 123 | 177 | 237 | 300 | 381 | ||
| 160 | 159,2 | 160,8 | 158 | 162 | 316 | 402 | ||||||
| (170) | 169,2 | 170,8 | 168 | 172 | 332 | 422 | ||||||
| 180 | 179,2 | 180,8 | 178 | 182 | 348 | 442 | ||||||
| (190) | 189,08 | 190,92 | 187,7 | 192,3 | 364 | 462 | ||||||
| 200 | 199,08 | 200,92 | 197,7 | 202,3 | 380 | 484 | ||||||
Table. Bolt sizes for threads from M 22 to M 39
| Thread d | (M 22) | M 24 | (M 27) | M 30 | (M 33) | M 36 | (M 39) | ||
| P1 | 2,5 | 3 | 3 | 3,5 | 3,5 | 4 | 4 | ||
| a2 | max | 7,5 | 9 | 9 | 10,5 | 10,5 | 12 | 12 | |
| c | min | 0,2 | 0,2 | 0,2 | 0,2 | 0,2 | 0,2 | 0,3 | |
| max | 0,8 | 0,8 | 0,8 | 0,8 | 0,8 | 0,8 | 1 | ||
| da | max | 24,4 | 26,4 | 30,4 | 33,4 | 36,4 | 39,4 | 42,4 | |
| dw | min Accuracy class | A | 30 | 33,6 | — | — | — | — | — |
| B | 29,5 | 33,2 | 38 | 42,7 | 46,5 | 51,1 | 55,9 | ||
| e | min Accuracy class | A | 35,72 | 39,98 | — | — | — | — | — |
| B | 35,03 | 39,55 | 45,2 | 50,85 | 55,37 | 60,79 | 66,44 | ||
| k | Nominal size | 14 | 15 | 17 | 18,7 | 21 | 22,5 | 25 | |
| Accuracy class A | min | 13,78 | 14,78 | — | — | — | — | — | |
| max | 14,22 | 15,22 | — | — | — | — | — | ||
| Accuracy class B | min | 13,65 | 14,65 | 16,65 | 18,28 | 20,58 | 22,08 | 24,58 | |
| max | 14,35 | 15,35 | 17,35 | 19,12 | 21,42 | 22,92 | 25,42 | ||
| k' | min | 9,6 | 10,3 | 11,7 | 12,8 | 14,4 | 15,5 | 17,2 | |
| r | min | 0,8 | 0,8 | 1 | 1 | 1 | 1 | 1 | |
| s | max = Nominal pp s | 32 | 36 | 41 | 46 | 50 | 55 | 60 | |
| min Accuracy class | A | 31,61 | 35,38 | — | — | — | — | — | |
| B | 31 | 35 | 40 | 45 | 49 | 53,8 | 58,8 | ||
Table. Bolt weights for threads from M 22 to M 39 and accuracy classes A and B
| Nominal size (length) | Allowable length for different accuracy classes | Weight (7.85 kg/dm3) 1000 pieces, kg | |||||||||
| A | B | ||||||||||
| min | max | min | max | (M 22) | M 24 | (M 27) | M 30 | (M 33) | M 36 | (M 39) | |
| 16 | 15,65 | 16,35 | — | — | 133 | 173 | |||||
| (18) | 17,65 | 18,35 | — | — | 137 | 178 | |||||
| 20 | 19,58 | 20,42 | — | — | 143 | 184 | |||||
| (22) | 21,58 | 22,42 | 20,95 | 23,05 | 148 | 190 | 269 | ||||
| 25 | 24,58 | 25,42 | 23,95 | 26,05 | 155 | 199 | 280 | ||||
| (28) | 27,58 | 28,42 | 26,95 | 29,05 | 161 | 200 | 292 | ||||
| 30 | 29,58 | 30,42 | 28,95 | 31,05 | 168 | 214 | 310 | ||||
| 35 | 34,5 | 35,5 | 33,75 | 36,25 | 181 | 229 | 319 | 424 | 543 | 670 | 869 |
| 40 | 39,5 | 40,5 | 38,75 | 41,25 | 193 | 244 | 338 | 448 | 572 | 714 | 910 |
| 45 | 44,5 | 45,5 | 43,75 | 46,25 | 206 | 259 | 358 | 472 | 601 | 748 | 951 |
| 50 | 49,5 | 50,5 | 48,75 | 51,25 | 219 | 274 | 377 | 496 | 630 | 783 | 992 |
| 55 | 54,4 | 55,6 | 53,5 | 56,5 | 232 | 289 | 397 | 519 | 659 | 817 | 1030 |
| 60 | 59,4 | 60,6 | 58,5 | 61,5 | 244 | 304 | 416 | 543 | 688 | 851 | 1070 |
| 65 | 64,4 | 65,6 | 63,5 | 66,5 | 257 | 319 | 435 | 566 | 717 | 886 | 1110 |
| 70 | 69,4 | 70,6 | 68,5 | 71,5 | 269 | 334 | 454 | 590 | 746 | 910 | 1160 |
| (75) | 74,4 | 75,6 | 73,5 | 76,5 | 282 | 348 | 473 | 614 | 775 | 950 | 1200 |
| 80 | 79,4 | 80,6 | 78,5 | 81,5 | 295 | 363 | 492 | 637 | 806 | 990 | 1240 |
| (85) | 84,3 | 85,7 | 83,25 | 86,75 | 308 | 378 | 512 | 661 | 837 | 1020 | 1280 |
| 90 | 89,3 | 90,7 | 88,25 | 91,75 | 321 | 393 | 531 | 685 | 866 | 1060 | 1320 |
| (95) | 94,3 | 95,7 | 93,25 | 96,75 | 333 | 408 | 550 | 708 | 891 | 1100 | 1360 |
| 100 | 99,3 | 100,7 | 98,25 | 101,75 | 346 | 423 | 569 | 732 | 920 | 1140 | 1400 |
| 110 | 109,3 | 110,7 | 108,25 | 111,75 | 371 | 453 | 608 | 779 | 978 | 1200 | 1480 |
| 120 | 119,3 | 120,7 | 118,25 | 121,75 | 937 | 483 | 647 | 827 | 1040 | 1260 | 1560 |
| 130 | 129,2 | 130,8 | 128 | 132 | 421 | 513 | 685 | 874 | 1090 | 1330 | 1650 |
| 140 | 139,2 | 140,8 | 138 | 142 | 448 | 543 | 724 | 921 | 1150 | 1400 | 1730 |
| 150 | 149,2 | 150,8 | 148 | 152 | 473 | 572 | 762 | 969 | 1210 | 1470 | 1810 |
| 160 | 159,2 | 160,8 | 158 | 162 | 498 | 602 | 801 | 1010 | 1270 | 1540 | 1890 |
| (170) | 169,2 | 170,8 | 168 | 172 | 523 | 632 | 839 | 1060 | 1330 | 1610 | 1970 |
| 180 | 179,2 | 180,8 | 178 | 182 | 548 | 662 | 875 | 1110 | 1390 | 1680 | 2050 |
| (190) | 189,08 | 190,92 | 187,7 | 192,3 | 573 | 692 | 911 | 1160 | 1440 | 1740 | 2140 |
| 200 | 199,08 | 200,92 | 197,7 | 202,3 | 598 | 722 | 947 | 1210 | 1500 | 1810 | 2220 |
Table. Bolt sizes for threads from M 42 to M 52
| Thread d | M 42 | (M 45) | M 48 | (M 52) | ||
| P1 | 4,5 | 4,5 | 5 | 5 | ||
| a2 | max | 13,5 | 13,5 | 15 | 15 | |
| c | min | 0,3 | 0,3 | 0,3 | 0,3 | |
| max | 1 | 1 | 1 | 1 | ||
| da | max | 45,6 | 48,6 | 52,6 | 56,6 | |
| dw | min | 59,9 | 64,7 | 69,4 | 74,2 | |
| e | min | 71.3 | 76.95 | 82.6 | 88.25 | |
| k | Nominal size | 26 | 28 | 30 | 33 | |
| min | 25,58 | 27,58 | 29,58 | 32,5 | ||
| max | 26,42 | 28,42 | 30,42 | 33,5 | ||
| k' | min | 17,9 | 19,3 | 20,9 | 22,8 | |
| r | min | 1,2 | 1,2 | 1,6 | 1,6 | |
| s | max = Nominal size s | 65 | 70 | 75 | 80 | |
| min | 63,1 | 68,1 | 73,1 | 78,1 | ||
Table. Bolt weights for threads from M 42 to M 52 and accuracy classes A and B
| Nominal size (length) | Acceptable length for accuracy class B | Weight (7.85 kg/dm3) 1000 pieces, kg | ||||
| min | max | M 42 | (M 45) | M 48 | (M 52) | |
| 35 | 34,4 | 35,5 | ||||
| 40 | 39,5 | 40,5 | 1090 | 1330 | 1590 | |
| 45 | 44,4 | 45,5 | 1130 | 1380 | 1650 | |
| 50 | 49,5 | 50,5 | 1180 | 1430 | 1710 | 2090 |
| 55 | 54,4 | 55,6 | 1230 | 1490 | 1770 | 2170 |
| 60 | 59,4 | 60,6 | 1270 | 1540 | 1830 | 2240 |
| 65 | 65,4 | 65,6 | 1310 | 1600 | 1890 | 2310 |
| 70 | 69,4 | 70,6 | 1370 | 1650 | 1950 | 2390 |
| (75) | 74,4 | 75,6 | 1410 | 1710 | 2010 | 2460 |
| 80 | 79,4 | 80,6 | 1460 | 1760 | 2080 | 2540 |
| (85) | 84,3 | 85,7 | 1500 | 1810 | 2140 | 2610 |
| 90 | 89,3 | 90,7 | 1550 | 1870 | 2200 | 2680 |
| (95) | 94,3 | 95,7 | 1600 | 1920 | 2260 | 2750 |
| 100 | 99,3 | 100,7 | 1650 | 1980 | 2320 | 2830 |
| 110 | 109,3 | 110,7 | 1740 | 2090 | 2450 | 2970 |
| 120 | 119,3 | 120,7 | 1840 | 2190 | 2570 | 3120 |
| 130 | 129,2 | 130,8 | 1930 | 2300 | 2690 | 3260 |
| 140 | 139,2 | 140,8 | 2020 | 2410 | 2820 | 3410 |
| 150 | 149,2 | 150,8 | 2120 | 2520 | 2940 | 3550 |
| 160 | 159,2 | 160,8 | 2210 | 2630 | 3060 | 3700 |
| (170) | 169,2 | 170,8 | 2300 | 2740 | 3180 | 3850 |
| 180 | 179,2 | 180,8 | 2400 | 2850 | 3310 | 400 |
| (190) | 189,08 | 190,92 | 2500 | 2960 | 3430 | 4150 |
| 200 | 199,08 | 200,92 | 2590 | 3060 | 3560 | 4300 |
3 Technical delivery conditions
Table. Technical delivery conditions
| Material | Steel | Stainless steel | Non-ferrous metals | |||
| General requirements | according to DIN 267 part 1 | |||||
| Thread | Tolerance field | 6g | ||||
| Standard | DIN 13 part 12 and part 15 | |||||
| Mechanical properties | Strength classes (Material) | 8.8, 5.6, 10.9 | ≤M20 | A2-70 | For example: CU2, CU3 | |
| A4-70 | ||||||
| >M20 | ≤M39 | A2-50 | ||||
| A4-50 | ||||||
| >M39: at the discretion of the manufacturer | ≤M39 | C3, C4 | ||||
| >M39 | At the discretion of the manufacturer | |||||
| Standard | DIN ISO 898 part 1 | DIN 267 part 11 | DIN 267 part 18 | |||
| Limit deviations of dimensions, shape and arrangement of surfaces | Accuracy class | A - for products with dimensions up to M24 and / ≤10d, up to 150mm1 B - for products with dimensions above M24 or / > 10d, from 150mm1 | ||||
| Standard | DIN ISO 4759 part 1 | |||||
| Surface | Without cover. From 8.8 – blackened (thermal or chemically treated) | Without cover | Without cover | |||
| Requirements for surface roughness - according to DIN 267, part 2; Permissible surface defects – according to DIN 267, part 19; Galvanic coatings - according to DIN 267, part 92; Hot zinc coating - according to DIN 267, part 10. | ||||||
| Acceptance control | In accordance with the requirements of DIN 267, part 5 | |||||
1 - The minimum value prevails.
2 - Only for bolts without protective coatings. 6g allows the normal layer thickness to be used in accordance with DIN 267 part 9, where the zero line must not be exceeded. Depending on the required layer thickness, the maximum deviation should be the same as for the g-level. A maximum deviation exceeding this value may cause the bolt-nut connection to weaken.
4 Symbol
Symbol of a hex head bolt with thread size d = M12, nominal length l = 80 mm, with strength class (material) 8.8:
Sechskantschraube DIN 933 – M12 X 80 – 8.8
If it is necessary to indicate accuracy class A for sizes not exceeding M24, with a length exceeding 150 mm, in particular for / > 10d or for sizes above M24, then the accuracy class is indicated in the symbol, for example:
Sechskantschraube DIN 933 – M30 X 100 – 8.8 – A
For the designation of shapes and versions, DIN 262 is used as additional information when ordering.
For the designation of versions equipped with integral parts (combined bolts), DIN 6900 is used.
For the designation of versions with rolled threads, DIN 7500, part 1 is used.
For bolts conforming to this standard, the tabular representation of the characteristics of DIN 4000-2-1 is used.
Appendix A Additional dimensions of spare parts
The sizes M1.7, M2.3 and M2.6 that were previously used are not included in the international thread size catalog and should no longer be used. However, they can be ordered in accordance with DN 933 issued in December 1970*, taking into account the available documentation and the need for spare parts supply. The bolt sizes are shown in the table below. Thread characteristics - in accordance with DN 13, part 1 and part 15.
* — Withdrew from circulation in 1982.
Legacy Bolt Dimensions
| Thread, d | M 1.7 | M 2.3 | M 2.6 | |
| b | 9 | 11 | 11 | |
| c | — | — | — | |
| da | max | 2,1 | 2,9 | 3,2 |
| e | min | 3,82 | 4,95 | 5,51 |
| k | js14 | 1,2 | 1,6 | 1,8 |
| r | min | 0,1 | 0,1 | 0,1 |
| s | h13 | 3,5 | 4,5 | 5 |
Weights of bolts of obsolete sizes, (7.85 kg/dm3) 1000 pieces, kg
| Nominal size (length) ±1/2 IT 15 | M 1.7 | M 2.3 | M 2.6 |
| 2 | 0,125 | ||
| 3 | 0,135 | 0,290 | 0,383 |
| 4 | 0,145 | 0,310 | 0,413 |
| 5 | 0,155 | 0,340 | 0,443 |
| 6 | 0,170 | 0,360 | 0,473 |
| (7) | 0,185 | 0,390 | 0,513 |
| 8 | 0,195 | 0,410 | 0,543 |
| 10 | 0,225 | 0,470 | 0,603 |
| 12 | 0,255 | 0,520 | 0,673 |
| (14) | 0,285 | 0,570 | 0,740 |
| 16 | 0,315 | 0,620 | 0,806 |
| (18) | 0,670 | 0,873 | |
| 20 | 0,720 | 0,933 | |
| (22) | 1,00 | ||
| 25 | 1,09 |
Standards used
DIN 13, part 1 Metric ISO thread. Threads with coarse pitch and nominal diameter from 1 to 68 mm. Nominal sizes. DIN 13, part 12 Metric ISO thread. Threads with coarse and fine pitch with diameters from 1 to 300 mm. Choice for diameters and pitches. DIN 13, part 15 ISO metric thread. Basic deviations and tolerances for threads with a diameter greater than 1 mm. DIN 78 Thread ends. Bolt projections for metric ISO threads in accordance with DIN 13. DIN 267, part 1 Mechanical fasteners. Technical delivery conditions. General requirements. DIN 267, part 2 Mechanical fasteners. Technical delivery conditions, design and dimensional accuracy. DIN 267, part 5 Mechanical fasteners. Technical delivery conditions, acceptance control. DIN 267, part 9 Mechanical fasteners. Technical delivery conditions, galvanized parts. DIN 267, part 10 Mechanical fasteners. Technical delivery conditions, coated parts. DIN 267, part 11 Mechanical fasteners. Technical delivery conditions, with additions to ISO 3506, parts made of stainless and acid-resistant steels. DIN 267, part 18 Mechanical fasteners. Technical delivery conditions, parts made of non-ferrous metals. DIN 267, part 19 Mechanical fasteners. Technical delivery conditions, bolt surface defects. DIN 931, part 1 Hex head bolts of accuracy classes A and B with threads from 1.6 to 39 mm. DIN 962 Bolts, screws, studs and nuts. Symbols, forms and design. DIN 4000 part 2 Tabular representation of the characteristics of bolts, screws, studs and nuts. DIN 6900 Combination bolts. DIN 7500 Part 1 Rolled thread bolts for ISO metric threads. Dimensions, requirements, control. DIN ISO 898, part 1 Mechanical properties of fasteners: bolts. DIN ISO 4759, part 1 Mechanical fasteners. Tolerances for bolts, screws, studs and nuts of accuracy classes A, B and C with nominal thread diameters from 1.6 to 150 mm.
Previous editions
DIN Krk 144: 02.31; DIN Kr 553: 09.35; DIN 933, part 1: 07.26, 04.42, 12.52, 03.63; DIN 933, part 2: 07.26, 04.42;
DIN 933: 12.67, 12.70, 12.83
Changes
The following changes were made to the standard, issued in December 1983: a) An entry was made to limit the validity of the standard. b) For M10, M12, M14, and M22 the spanner dimensions according to DIN ISO 272 have been eliminated. c) A reference line has been added to indicate the reference diameter dw. d) The main provisions of ISO 4017 are published in DIN ISO 4017, see Comments.
Comments
For over 20 years, efforts have been made to ensure the interchangeability of fasteners on an international scale and therefore uniform international standards have been created for them. ISO standards are now available for the most commonly used fasteners (see ISO Standards Reference Guide No. 18).
However, efforts in this direction at the international level will only be meaningful if national standards are as close as possible to international ISO standards or, ideally, can be replaced by them. The DIN standards currently in force in Germany are already largely harmonized with the corresponding ISO standards. However, there are still national differences on individual items. An example of this is the spanner dimensions for hex products. The international standard ISO 272, which contains information on key dimensions, was adopted by Germany as the national standard DIN ISO 272 in October 1979. However, for nominal values M10, M12, M14 and M22, different key dimensions are still used in Germany from those specified in DIN ISO 272. The following table shows a comparison of old and new spanner sizes for these four ratings.
| Nominal thread sizes | M 10 | M 12 | M 14 | M 22 |
| Used turnkey dimensions, mm | 17 | 19 | 22 | 32 |
| new turnkey dimensions according to DIN ISO 272, mm | 16 | 18 | 21 | 34 |
Manufacturers and consumers of hexagonal products that are part of the FMV, as well as representatives of the distribution network, have now decided to make changes for these sizes in all product standards being developed. As past experience suggests, the introduction of new sizes is not recommended unless they represent a significant alternative to the old turnkey sizes that were given in the current DIN standards. To speed up the conversion process, the following decision was made.
Along with the existing DIN standards, which indicate the old turnkey dimensions, similar standardization objects are subject to the requirements of the DIN ISO standards, which indicate other dimensions corresponding to those given in the DIN ISO 272 standard. Both standards state that it is preferable to use a normative document DIN ISO conforming to the DIN standard and that it will replace the current DIN standard after a transition period of 5 years. In the absence of a corresponding ISO standard, the DIN normative document must contain a notice that the old turnkey dimensions will be deleted after a transition period of five years and replaced by dimensions in accordance with DIN ISO 272.
Thus, both manufacturers and consumers of hexagonal products are given a period during which they must switch to using the new turnkey sizes. To order the necessary spare parts, in the opinion of the committee, after this period it will remain possible to purchase obsolete products. The replacement of current DIN standards by the corresponding DIN ISO standards in individual cases, along with the transition to new turnkey sizes, has further consequences, which must be mentioned in the national preface for the corresponding DIN ISO standards. These consequences are due to the fact that the development of ISO standards is not fully completed, as is the case for the German DIN standards. ISO product standards still lack a number of nominal sizes, as well as specific requirements for products with fine threads. In addition, ISO standards for technical delivery conditions are still under development. Therefore, during the transition period when ordering products in accordance with DIN ISO standards, certain requirements must be agreed separately, since they are not listed in the DIN ISO order form.
In addition to these consequences, which are relevant when using the new DIN ISO standards, the changes in turnkey dimensions for the new products used also include a number of designs that must be taken into account by designers. Along with the changed mounting dimensions, there is also a change in pressure on the supporting surface of the nut and bolt head. Guidelines published by the VDA have addressed this issue.
M12 bolt wrench dimensions (conditions for the possibility of tightening the nut)
For prefabricated keys
Turnkey location according to GOST 2839-80 – stroyone
For keys according to GOST 2839-80
Turnkey location – stroyone.com
Dimensions in mm
| Dimensions | For keys according to GOST 2839-80 | For prefabricated keys |
| Dmin | 38 | 20 |
| Amin | 23 | 27 |
| Bmin | 30 | 24 |
| Cmin | 32 | 16 |
| Emin | 22 | 22 |
| Fmin | 10 | — |
| Gmin | — | 29 |
