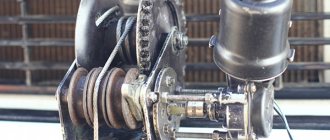
Options for making an electric plane
There are many ways to make a thickness planer using an electric planer. All of them are easy to manufacture and do not require the use of special tools. The most practical of them are:
- side planing thicknesser. Suitable for processing small planks and bars. This installation is easy to manufacture, and if necessary, the plane can be quickly dismantled and used for its intended purpose. The disadvantage is the need to constantly monitor the thickness of the treatment, since there are no pressure rollers;
- manual thickness planer. It has a more complex design and requires more time to manufacture. With its help, you can process boards and bars of greater length. In addition, the design uses pressure rollers, which minimize processing errors.
Assembling a jointing machine based on a jigsaw
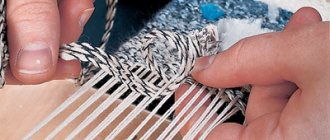
A jointer is designed to remove existing irregularities from the surface of wood. The work process consists of one-sided planing of lumber along a plane. You can also shoot at different bevel angles. Thanks to processing on this equipment, beams or boards become smooth.
The design of the jointing unit is simpler than that of its thicknesser counterpart. This allows you to assemble the installation yourself using available materials.
The procedure for making a jointer
To make a planer for processing small-sized workpieces, you will need an electric plane that can be fixed in a stationary position. The base of the created unit can be a fragment of plywood, MDF or chipboard. A piece measuring 50 by 35 cm is sufficient. The thickness of the sheet material used should be more than 2 cm.
Assemble the jointing tool by performing the steps in the following sequence:
- cut out the base for the machine from the existing sheet material;
- a stop for the workpiece is attached to it using self-tapping screws or screws at an angle strictly of ninety degrees (a square is used to set it);
- install ribs that will ensure rigidity of the stop;
- An electric plane is attached to the base using M8 bolts and nuts.
Before fixing the stop, a hole is cut out in it for the pipe and for cooling the electric motor of the tool.
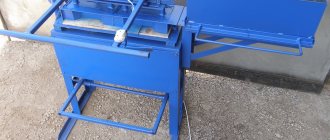
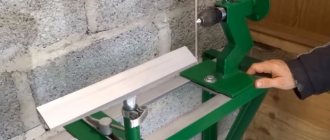
If you need to plan large workpieces, then it is enough to increase the size of the unit being created. This will result in a design as in the photographs below.
In addition to the considered option from an electric planer, jointing equipment can be assembled in another design. The practical implementation of such designs depends on the materials and creativity available to the home craftsman. How to make homemade jointing units of other designs is shown in the following videos:
How to make a thickness planer for wood at home
If necessary, such a machine can be made at home. This does not require the use of special equipment or special technical skills.
The simplest machine can be made by fixing the plane on the table in a sideways or upside-down position. More advanced models require more time and effort.
What is needed for making
To make a homemade thicknesser, you need a minimum set of materials and tools, which are often in the arsenal of every owner. It includes:
- electric plane;
- jigsaw;
- metal sheet 0.5 mm thick;
- laminated chipboard sheet;
- metal pipe;
- hand drill;
- set of drills for wood and metal;
- fastening hardware;
- set of wrenches.
Which plane to choose for this purpose?
The electric plane is the main working part of the machine. Therefore, before starting assembly, it is necessary to select a tool with optimal parameters. The main technical characteristics that should be taken into account when choosing a plane are:
- planing width. Most modern electric planers are equipped with a support sole and blades 82 mm wide. This is quite enough for household work;
- electric motor power. To carry out high-quality planing of workpieces, it is best to use planes with an electric motor power of 800 W or more. This will allow for high-quality planing;
- blade rotation speed . There is a direct relationship between the number of revolutions of the knife block and the quality of planing. In other words, the more revolutions the blades make, the cleaner the processed surface is.
The best choice for making a thickness planer would be the following tools:
- RESANTA P82/800;
- DIOLD RE-1100-01;
- INTERSKOL R82/710.
Safety regulations
To ensure safety when working on a homemade surface planer, it is necessary to check the knife shafts before starting work, check their position, degree of sharpening, and the presence of a guard. It is unacceptable to machine products whose length does not exceed the distance between the shafts - this is unsafe.
Important! To avoid injury, it is strictly forbidden to make any adjustments, cleaning or repairs while the instrument is in operation. To do this, you must first turn it off.
Correct feeding of workpieces - end to end. It is also important not to leave a “reserve” in the width of the table, but to use the entire width. If you feed the part incorrectly, the part may fall out of the machine.
Be sure to wear safety glasses before starting work. This will prevent possible eye injury.
If the assembly of a homemade thickness planer was carried out correctly, as well as in compliance with safety measures, working on such a machine will be no different from working with a tool purchased ready-made. The main thing is to carefully read the instructions and carefully carry out each stage of the work.
Source: 2lzz.ru
Step-by-step manufacturing instructions
To make a household thicknessing machine, you need to prepare a workplace and perform the following steps:
- Attach a sheet of plywood to the side edges of the plane. Mark along the contour of the protective casing and cut out a template. It should go around the electric motor casing without gaps.
- Make a template of another shape in the same way.
- Transfer the contours of the templates onto 10 mm thick plywood sheets and cut them out. Then you need to make two strips 10x10 mm thick, which will subsequently serve as guides.
- Make holding crossbars from a block. They should fit as tightly as possible to the front and back parts of the electric planer handle.
- Using a milling machine or jigsaw, cut out longitudinal grooves according to the previously applied markings. In the future, they will be necessary to adjust the thickness of the planing.
- By passing the crossbar under the back of the electric planer handle, connect the cut out parts. To fix the jumper, it is better to use screws with a countersunk head.
- Attach the slats prepared in advance to the back side of the workpiece and apply markings on them. Then you need to trim them according to the applied markings.
- For further fastening of the workpieces to each other, a through hole for bolts is drilled in the upper part. In the same place, using a cutter, a hole 4 mm deep is made. Then the fastening nuts are hammered into it with a hammer.
- Having combined both blanks, they must be fastened using bolts with pressed wooden washers. As an alternative, wing bolts can be used.
- Make a hole in a wooden block to install a guide pin into it. For secure fixation, it is better to use a lock nut.
- Install a block with a guide pin in the front part of the future machine. Secure it with countersunk screws.
- Assemble the outer frame in the same way as the inner one. Place a wing nut on the guide pin to adjust the position.
- Make a guide sheet. To do this, use a chisel or milling machine to make rounded grooves in wooden blocks, the diameter of which will correspond to the diameter of the guide pipes, and install them as shown in the picture below.
- Prepare your desktop. It consists of a sheet of plywood 10 mm thick. Stoppers are installed along the edges, on which the guide rails will subsequently be fixed.
- The guide pipes must be connected to each other using plywood strips and the vacuum cleaner pipe must be connected. After this you can start working.
After watching the video, you can get acquainted with the nuances of manufacturing a thickness planer, as well as see its practical application.
Correct installation of studs and guides
Another important point is the position of the pin, using which you can raise and lower the tool during operation. Many self-taught people make this pin so that it is located exactly in the middle of the body. But this solution is completely wrong: when making such a machine with your own hands, it is recommended to place the pin exactly in the middle between the rear and front handles. In such a case, not only will it become more convenient to work with the tool, but also fixing it in the desired position will be much more reliable, and it will be much easier to do it.
When converting an electric planer into a manual surface planer with your own hands, its pin must be made as movable as possible. For this purpose, a rolling bearing is installed in the top cover of the new machine. In addition, a nut is installed on the middle plate, which is responsible for setting the height of the machine. In this case, the height of all equipment can be adjusted, if necessary, in small increments and with fairly high accuracy.
The guides of the new machine for the workpieces processed on it can easily be made from ordinary bars, but a small margin of length should be provided so that they are not exactly the same as the length of the wooden part being processed, but slightly larger.
In addition, it is important to design the lower plane in such a way that during the processing of the part it moves immediately parallel to the machine knives. If this plane begins under the electric planer, during the work it will be very difficult to achieve maximum precision in processing the part.
Pros and cons of a homemade machine compared to a factory-made machine
The cost of a professional thickness planer is several times higher than the price of a homemade one. Its purchase will be beneficial only if it is used regularly, for example, in the manufacture of furniture. In the case of infrequent household use, it is much more profitable to make such a machine yourself.
The advantages of a homemade machine include:
- low cost;
- relative ease of manufacture;
- the ability to use the plane separately from the machine.
Despite all its advantages, this machine is not without some disadvantages. Among them, it is worth highlighting the short operating time, since the motor of the electric planer is designed for continuous operation for 20 -25 minutes.
In addition, it is limited in the planing width per pass. Professional machines have the ability to process workpieces from 100 mm in one pass, while for homemade machines this parameter is limited to 82 mm.
The process of assembling a circular saw table
First, adjust the base to the optimal size. The wooden countertop is treated and left to soak in the antiseptic composition for a day. The metal base is sanded along the edges to avoid nicks.
Wood antiseptic is a modern building material that protects wood of any species in structures.
Electric saw
Electric saw table assembly process:
- First, prepare the beams, which are trimmed using a plane. A strong frame is assembled from them. Holes with a diameter of 5 mm should be drilled on each side of the base.
- Holes of the same diameter are also made in the drawers.
- Legs and drawers are installed on the tabletop. To ensure fixation, it is recommended to use clamps. They will help secure the legs while the glue dries. They are additionally fixed with metal corners and tightened with self-tapping screws.
- Fastening the saw with M4 bolts. The process is performed from the reverse side.
- To make a parallel stop, two strips are sawn off from plywood. Their width should be similar to the width of the tabletop. The average size is 10 cm. The corners must be rounded and polished.
The key property of the created table should be convenience
Important! When installing an electric saw, you need to fix the start button
For this purpose, a wire is suitable, which is threaded through the hole in the handle and twisted in the desired position.
Hand saw
For a hand saw you will need a 20mm sheet of plywood. The tabletop blank is made according to the selected size. The markings are made with a pencil, and the cutting is done with an electric jigsaw. Finally, the edge is milled. The workpiece must be sanded with sandpaper.
Care should be taken to ensure its stability. No loosening is allowed, otherwise it will negatively affect safety.
Subsequent assembly technology:
- The header is turned over, and markings are made on the bottom side for a hand saw. You need to attach a saw without a disc to the base and mark the dimensions of the sole.
- Using a hand router, a 10 mm recess is made.
- Next, the saw is tried on and the markings are adjusted.
- Markings are made on the bottom side, which are intended for stiffening ribs. For them, blanks are prepared from boards measuring 50x100 mm. The optimal location is up to 10 cm from the edge of the table.
- The longitudinal stiffening ribs are sawn and attached to the tabletop using wood glue. Clamps are used for fixation. Using a similar principle, side stiffening ribs are attached from beams.
- After the glue has dried, holes are drilled in the stiffeners and tightened with self-tapping screws.
- For table legs, boards measuring 50x100mm are used. The average optimal height is up to 110 cm. The legs are attached to the outside of the stiffeners with strong bolts. To improve stability, you can use ties made of beams measuring 50x50 mm.
The tabletop should have as smooth a surface as possible. This will reduce the likelihood of injury while working. The hand-held circular saw is installed in the finished groove from the bottom side, the sole is fixed with bolts. A toothed disk is inserted into the slot. By following the technology and completing all the steps, you can make a homemade table at minimal cost to suit your height.
Regularly check the position of the table and its strength. The structure must be stable, without loosening.
Factory equipment for converting a plane into a machine
You can find special beds for sale on the domestic tool market. By attaching an electric planer to it, you can make a simple thickness planer. It is included in the delivery set with some models of planes.
A thickness planer allows you to plan wooden blanks much faster and more accurately. That is why it should be in the arsenal of every owner. We hope that after reading the article, everyone will be able to make such a machine on their own.