SHARE ON SOCIAL NETWORKS
FacebookTwitterOkGoogle+PinterestVk
Blacksmithing is hard physical work that requires special equipment combined with specialized knowledge and experience of the master. However, to make some artistic elements, you simply need to bend the blanks at the desired angle. Metal deformation can be performed without heating mechanically; cold forging machines are used for this. What features do such units have will be discussed in this article.
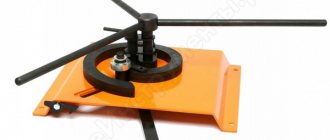
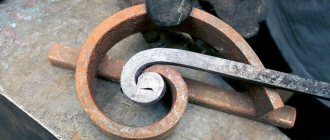
Cold forging machine that allows you to create wave-like elements
Maybe you need a punch? Main concepts
You've probably already noticed that on our website we love to point out anything that's wrong. Now, too, we will not change ourselves: the concept of “cold forging” in its usual meaning is fundamentally incorrect, read carefully, we will explain.
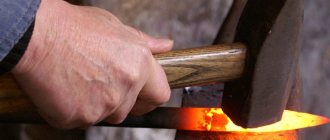
First, what is forging: it is the processing of metals heated to forging temperature, that is, to the temperature when the metal becomes soft and can be deformed. Blacksmithing is all about forging - with a hammer, an anvil, a forge and mighty bearded blacksmiths wearing leather aprons.
Blacksmithing products are an exclusive and expensive business. And, in general, it is already exotic, if we exclude stamping, which is done automatically and in huge volumes.
Stamping is the extrusion or deformation of metal using a stamping press with a special matrix - a nozzle at the end. This is what it is - a punch that is made from the highest strength steel. Stamping can be hot, with heating of metals to forging temperature, and cold, without any heating. You don’t have to look far for an example of cold stamping - these are all metal drink cans.
Types of forging machines.
We are finally approaching working with metals in a cold way - without heating. Question: is it possible to deform metal without heating? Answer: yes, you can. The only way is mechanical. It is called a not very serious word - riveting or cold hardening. To do this, you will have to hit the metal with a hammer until you are stupefied until its structure begins to change significantly.
This process is precisely cold forging - mechanical deformation of metal blanks using mechanical blows with a hammer. If you decide to take up peening forging, then we say hello to your family and neighbors in advance - they will face serious challenges.
But seriously, there are fans of cold forging using the riveting method, we wish them success and move on to pseudo-cold forging, as they used to call it.
Mechanical deformation of metals using various machines without heating is more correctly called metal bending, because in this method of metal processing, craftsmen bend metal rods. They don't do anything else - they just bend. Another question is how and where they bend, along what axis, but all these are artistic aspects of metal bending, which we will also dwell on, but later.
The most important thing is that in the future we will call this process cold forging - as it is done in all sources, so that there is no confusion. It’s just that now we understand the methods and understand what the essence of the so-called “cold forging” is.
By the way, do you need a punch? It's a beautiful word. You won't be involved in industrial stamping of metal blanks, will you? But artistic forging with your own hands is a very real possibility at home. There is even light stamping along with punches... Let's look into it further.
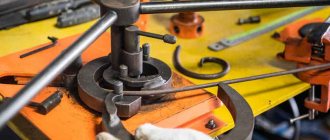
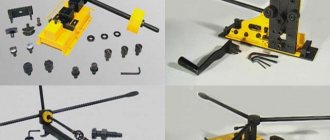
Step-by-step manufacturing of a small-sized manual machine for making curls
A small machine is designed for the production of curls from rolled strip with a width of 20...30 mm. It's easy to make it yourself.
Center
First the center is made. To do this, a small fragment of round timber is sawed off. The workpiece is fixed in a vice and the cutting line is marked. Using a cutting disc and an angle grinder, the workpiece is sawed off.
It has a diameter of 38 mm. The side surface is not further processed.
The center length is 28 mm. A little more is possible, but this is enough to bend a strip 30 mm wide.
A hole Ø 8 mm is drilled on a drilling machine. It is placed eccentrically. This situation is due to the fact that it is necessary to make a clamp for the end of the workpiece.
A profile is drawn, which should be removed using cutting and cleaning discs installed on the grinder. The workpiece is secured in a vice and excess metal is removed.
The flap discs protect the surface so that there is a smooth transition between different surfaces of the clamp.
To make it easier to fix the end of the workpiece in the future, you need to drill a hole. It is placed on the radial surface of the center. A hole is drilled for an M10 thread.
Using a set of taps, the internal thread is cut. A headless screw will be used here. After fixing the workpiece, it will hide inside the metal of the center.
The center is welded to the 4 mm thick base plate. This completes the work of its production.
Making a fixture
To make it easier to work with the device, a shaft is welded to the back side of the plate. By rotating it in a special mandrel, the snail will rotate.
The outer surface must be ground so that the welds do not interfere with the free fit of future workpieces.
The future spiral is drawn on the plate. A contour is created where it will be welded later.
A spiral is bent from a strip 4 mm thick. It must correspond to the project.
After checking the spiral against the template, the excess is cut off, and the spiral itself is welded to the plate and to the center.
A 40×40 mm profile pipe with a 3 mm wall is used as a stand. Holes are drilled on it for attaching machine elements. Using support platforms, the prepared parts are fixed.
The handle is visible on the reverse side. It was secured to the shaft using a bearing. The prepared “Snail” can rotate.
A performance check is being carried out. The handle turns the spiral around the center axis.
Types of cold forging machines
We reason logically and point by point. You cannot bend metal with your hands, no matter how hard you try. Do-it-yourself cold forging is done only using special machines. It's all about them. This is the first point. One machine is not enough; there are a whole bunch of them. This is the second point. Some of them can be done with your own hands.
If you decide, you will need drawings for cold forging machines. How many and what kind of machines you need to have to do what you need and like depends on what you need and like. Exactly like that and in that order.
We take the rod. There are only two options to bend it:
- Along the axis so that the rod begins to resemble a twisted cord.
- Across the axis in the form of various curls, waves and bends.
Types of forging tools.
All cold forging machines are divided into four groups according to the same principle:
- Torsion bar machines that produce longitudinal helical twisting of rods and various filaments, which we will discuss below.
- Twisters for forming curls and spirals with a narrow center.
- Bending machines for waves and zigzags.
- Stamping machines for flattening the ends of rods in the form of legs, clamps and other patterns.
Types and purpose of forging machines
A machine for any purpose is used to facilitate manual labor. For cold forging, various equipment can be used, minimizing the physical effort of the master and allowing the following basic operations to be performed:
Machine for creating a shaped profile using cold forging
- bending the profile at the desired angle or radius;
- making spirals or curls;
- longitudinal twisting of workpieces.
The variety of parts obtained allows you to arrange them in combinations and intricate designs, create a neat artistic canvas for fences and gazebos, symmetrical decor for park benches, as well as other items for various purposes.
Note! Decorating machines help create elements of the same shape and size in a short period of time, allowing you to reduce the cost of each of them and shorten the duration of the manufacturing process.
Industrial bending machine, which allows you to obtain a workpiece with a given radius
Cold forging machines can be specialized (perform only one operation) or universal. There are the following types of special machines:
- bending machines (bending machines) – allow you to bend a workpiece at an angle or a given radius (wave);
- snails - twist the blanks into spirals and curls;
- torsion bars - help to longitudinally twist a workpiece or several such parts at the same time;
- stamping machines - they are used to make decorative clamps, shaped ends, and waves with fine pitches.
Universal machines include components of special equipment in various combinations.
Devices for cold forging are driven mechanically (manual machines) or by electric drive. Electrically driven equipment is characterized by speed and ease of processing workpieces. A cold forging machine, the price of which can be quite high, is characterized by high productivity. When there is no need for productivity and speed, then a manual machine will be quite sufficient to complete the work, especially if blacksmithing is a hobby.
Bent machine designed for processing pipes using cold forging
Is it possible to make a cold forging machine with your own hands?
You can buy a manual machine for cold forging in a specialized store that sells tools or order it online. The question is the price and solvency of the buyer. An alternative option is to assemble it yourself. The principle of operation will be no different from a product purchased in a retail chain, and the functions performed are absolutely identical to the factory ones. Additional advantages are a reduction in price, confidence that the design will not fail after the first use.
Important! Not all equipment can be made independently; some spare parts require industrial production or custom manufacturing.
To begin with, it is worth familiarizing yourself with the design features of each type of machine in order to assess the possibility of its self-assembly.
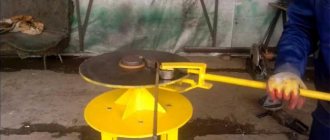
A snail cold forging machine that allows you to create spiral elements
The torsion bar must twist metal rods, so its design assumes the presence of two elements that hold the workpiece. One of them serves as a clamp, and the other contains a rotating spindle, which, in fact, will twist the rod to the desired frequency of the helical wave. The device is quite easy to build yourself, and some craftsmen even make do with a vice and a simple hand crank.
The design of the bending machine is also simple, but it contains several mandatory elements, the assembly of which is impossible without specialized tools. The base is a massive metal plate with a groove in the middle into which a movable stop is inserted, moved by a worm mechanism. The other two cylindrical stops are stationary and are attached to the base on both sides symmetrically relative to the groove. It is the installation of stops that can cause difficulty, since holes for fasteners are drilled only on a specialized machine; such a workpiece made of high-strength steel will not yield to the influence of a drill.
Creating elements using the cold forging method on a homemade gnutik machine
A snail metal forging machine can have two types: with a collar or a lever type. The first option allows you to vary the shape of the bend during operation, however, it has a number of weak points in the design and is very demanding on the strength of the manufacturing materials. The second type is more stable, but less productive. Craftsmen consider the snail to be the simplest machine, the self-assembly of which will not cause difficulties.
Which machine is most needed?
Do-it-yourself cold forging machine: which one is the most necessary and which one to start with?
There is no clear answer to this question; you must decide for yourself. To make a smart decision, let’s go through the main types of machines to have an idea of their functionality and, most importantly, DIY manufacturing methods. You should remember what materials you will have to work with during the cold forging process: these are metal rods or rods with a diameter of no more than 14 mm, squares and strips with a thickness of approximately 3 to 6 mm with a width of no more than 25 mm.
A complete gentleman's set of machines in the workshop for full-fledged work will look like this:
- twister with snails for obtaining spirals of various radii;
- bender for bending arcs and parts at different angles;
- wave for curved parts and processing of metal pipes;
- globe for obtaining large arcs from profiles;
- flashlight for bending parts;
- volumetric
You don't have to have it all at once. It’s quite possible to start work if you have two machines from the first two points - a twister and a bender. Forging with your own hands has a great advantage: you can choose what to do and where to start. Let's start the review with the most popular machine - the twister or the famous snail.
Twisters or snails?
Description of forging machines.
Both of them are one and the same. The most popular cold forging machine among the general forging community. Indeed: at first glance, the machine seems too primitive.
But in it simplicity is combined in half with genius:
- it’s easy to make it yourself;
- it's cheap;
- it is extremely easy to use;
- with its help you can make entire arrays of beautiful metal lace.
According to the principle of operation, twisters are a type of bending machines, see below about them, with some improvements, beginners can easily work on them. In a word, a snail or twister is an amazing machine in terms of all possible criteria: ease of manufacture, wide artistic possibilities, low cost and ease of use; there are simply no others like it.
Twisters are found in two engineering versions:
- With a collar and a rotating plowshare with the principle of rigidly fixing the product on the surface and turning the scroll clockwise. The rotation is made by a lever, most often manual. This is the most democratic machine for cold forging of profiles: you can work on it alone, even in an apartment. It is not without reason that the largest number of links in RuNet related to cold welding are filled with pictures, drawings and videos with the action of rotary volutes. Everyone who starts with them feels like a master and is in a hurry to share their own finds in twisting flat curls. So this machine can add a few more points for increasing the master’s self-esteem - this is always important, and especially at the beginning of work. The maximum number of possible curls is 5.
This snail has weaknesses, what would we do without it. It's all about the folding share: both the correct material from which it needs to be made and the complexity of making the joints of the share links are important. These joints must be extremely precise - they are the ones that create the shape of the curl. The design and material of the joints must take into account multiple repetitions of turns with severe workloads. The second and final weak point is the eccentric clamp of the part.
Considering the frequency of use of the snail and its weaknesses, the wisest thing to do would be to buy it rather than make it yourself. If we are talking about a debut in cold forging, and the choice of machine is made for an absolute beginner, then the best option would be the second engineering version of the snail.
- Champion in popularity and positive aspects of work! Lever volute with a fixed template and a deflection roller. At its core, it is a pipe bender. It should be immediately noted that this option is inferior in labor productivity to a twister with a collar and a plowshare. Secondly, no tabletop is suitable for it; here you will need a real steel frame with fastenings on the supporting surface. You can’t install a bed at home: you can only work on a lever volute in a workshop.
Machine for giving a relief surface.
Another feature of the lever volute is the slow pace of work. You can curl 3 – 4 curls, a little less than with a collar snail. However, the advantages of the lever snail outweigh all its disadvantages:
- All elements of the machine can be made of ordinary steel.
- Instead of a pressure roller, which is not made of ordinary steel, you can use a bearing.
- The material of the bed and other parts allows you to count on long-term use of the machine.
- Greater variety of curls - you can change their shapes with bends in both directions (in the first version of the snail this is impossible).
- It is more convenient to work with the ends of parts that can be fastened.
On a lever twister you can work with strips of metal laid flat. This is considered a great advantage of the machine, since it is impossible to work on other devices with flat strips.
In this champion subsection, you can make a small champion summary in the form of advice for beginners: in debut artistic work in cold forging, it is better to start with a lever twister - a snail with a fixed template and a deflection roller.
Making a snail with a lever
Drawing of a forging machine.
Before you begin the practical part of the work, you need to prepare theoretically. We are talking about calculations and drawings of the machine and its parts. Nobody will give you the exact dimensions, because this is an independent design.
Much will depend on the availability of similar materials, the scale of future cold forging work, the dimensions of the room where you are going to work and many other factors. The main thing is the principles that you need to understand in order to make a homemade cold forging machine with your own hands - the most convenient option for you and only you.
Here's what you need to gather before you begin assembly:
- metal plates or tabletop cloth with a thickness of at least 4 mm;
- metal round pipe for a rack or frame;
- metal rod;
- bearings of different calibers;
- drill;
- welding machine;
- hacksaw for metal;
- M8 bolts.
Basic parts
The twister has only four basic parts. Pay special attention to their preparation and, most importantly, installation:
- frame or stand;
- table top;
- main shaft;
- lever arm.
Rack
Only made of metal, no wooden beams. We place it in a thoughtful place so that you have access to the machine from any side. The machine will be subject to heavy loads, so the best option may be a thick-walled pipe or a metal corner.
It is best to concrete the stand directly into the floor, it will be reliable. Externally, this design may resemble a stool. As strong as possible - this is the main principle of producing a countertop stand. Therefore, it is better to connect metal parts by welding.
Tabletop
Homemade forging machine.
The most important part of the machine, which is best made from a metal plate with a decent thickness, preferably at least 5 mm. In the production of forging machines with your own hands, you cannot save on the thickness of the metal, because the table top and other basic elements will take on a huge load.
The preferred shape is a circle. You need to make two of these tabletops: the second is needed for bending the rods and placing the snails.
Main shaft
From the same metal plate, cut four right triangles with equal sides. Weld the triangles to the bottom of the structure, and their base is in the center of the circle. Another shaft option is not made from triangles, but from a pipe with thick walls of a suitable diameter. Fasten either with bolts or welding.
Lever or handle
And again “as tightly as possible”: attach the lever to the shaft with a ring so that it rotates around it. Attach the bending roller to the top tabletop. It is very important to correctly calculate the length of the lever, which depends on the diameter of the tabletop circle. One rod should be approximately equal to this diameter, the second rod should be longer.
Bearings are attached to the lever at its end, this is done to provide greater freedom in the directions of movement of the lever. The lever elements and fixed triangles are secured with a special round nut with a large diameter.
Attachment parts
Be careful here, you need to choose the degree of complexity or, so to speak, “artistry.” We have three options for you.
- Simple static snail
The simplest and therefore most primitive option from an artistic point of view. You apply a drawing of a snail, that is, a spiral, directly onto the tabletop.
In no case do we ignore the requirement in the drawings - cold forging loves precision and thoughtfulness in everything.
Then cut out segments from thick metal strips repeating the snail pattern and weld them as firmly as possible perpendicular to the tabletop. Simple, but not at all ingenious: on this tightly welded snail you can only make the same simple bends without any flight of creative thought.
Metal bending machine.
However, it all depends on what you are going to forge. If, for example, you have plans for a long wrought-iron fence with a simple design, then a simple static snail will be the best option.
- Collapsible snail made of removable parts
Let’s say right away that this is the most popular option among amateur craftsmen. The contours of snails are also applied to the tabletop. Threaded holes are drilled along this contour. Snail segments from metal strips are prepared using cardboard templates, and exactly the same matching holes are drilled into them as on the tabletop.
The segments are not welded, but are secured with bolts or cylindrical stops. The main advantage is the ability to bend spiral parts with different radii and different numbers of revolutions.
- Modular system with different snails
An option with the greatest artistic freedom for forging with your own hands: instead of segments with stops, removable modules with different snails are used here - both in shape and size. The modules are prepared on separate metal platforms on which the segments are welded.
Of course, you need to tinker a lot with such a machine, but this game is worth the effort: you can forge real metal lace. It all depends on your plans: a simple fence or a lacy gazebo in the garden?
Diagram of the bender and the sequence of work on it
Let's look at the design of the device using the example shown in Fig.
2. The simplest device for cold forging consists of - a base mounted on a table/workbench, touching a moving lead, which performs bending;
- a lever that moves the leash;
— a dial with an indicator of the angle of rotation of the lever;
— replaceable rollers with different bending angles;
- adjustable spacers and clamping jaws that fix the part in a certain position.
Figure 2 — General view of the bend
The sequence of manufacturing bending for cold forging is as follows. The device is attached to the table/workbench or installed on it. For bending metals that require significant force, it is better to mount the device permanently, for which holes are provided in the support angle. A slider is placed in a rectangular steel frame, the internal surfaces of which must be ground. The following parts are installed on the upper plane of the slider:
- A replaceable punch, on the working surface of which there are all the most commonly used options for bending workpieces: radius, arc, straight bend, etc.
- A lever with which you can move the slider back and forth.
- Slider travel limiters in the device frame.
Having installed the replacement tool, bolt the frame to the supporting surface of the bend, after which two rollers are installed on the upper plane. It is better if the rollers have the ability to move longitudinally along the frame: this will allow bending of workpieces of various thicknesses or diameters. For this purpose, the grooves for fastening the rollers are made oval, taking into account a certain range of changes in the thickness of the workpiece. The axes of the rollers must allow free rotation: this will reduce the bending force and eliminate clamping of the rollers when bending products made of stronger metals.
To increase the accuracy of bending in the manufacture of forging tools, a dial with divisions graduated in the bending angles (taking into account the springing of the metal) is often installed on the support angle.
Having secured the workpiece, gradually move the lever until it approaches the workpiece, then adjust its location between the rollers and the slider and bend it to obtain the required angle. To facilitate the process of returning the slider to its original position, it can be equipped with a return spring. Its force is selected taking into account 20-25% of the bending force. This force can be determined either using an existing dynamometer or using an approximate relationship:
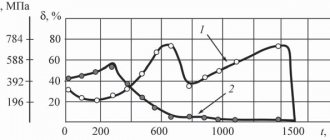
Р = 0.25bSσв, where:
b - strip width (or rod diameter);
S—thickness of the material being bent;
σв is the limit of tensile strength of the workpiece material (see table):
Thus, the functionality of the bend will be determined by the presence of replaceable punches, the ability to adjust the position of the workpiece in front of the bend, as well as the dimensional scale that sets the bending angle.
Making a torsion bar machine
Torsion treatment is fundamentally different - it is a screw twisting of the rods along. This machine is very easy to make with your own hands. The main thing in it is to ensure a strong fixation of the two ends of the metal rod; the success of screw twisting depends on this.
At one end the rod should hold tightly, at the other it should rotate with the help of a lever. The components of the torsion bar are a metal cylindrical blank made of a profiled pipe and two fastening elements with a locking device. They can be made from bearing units.
The clamps have nuts welded into the bolts that are tightened to hold the metal rod.
If your plans include “pump up your biceps and triceps,” be sure to make a torsion bar machine and start twisting the rods by hand. Torsion forging is not for the weak, you will develop excellent muscles in the upper shoulder girdle. But one way or another, it is better to make the lever for rotation longer, it will be easier.
Exploitation
In order not to damage the material and equipment, you need to know a number of features. Blacksmiths give the following recommendations:
- Before starting work, you need to check the integrity of the fastening elements.
- Moving parts must be periodically lubricated with engine oil. This will ensure reliable operation of the equipment.
- To make it easier to bend metal workpieces, you can preheat the material.
- When bending parts, the movements should be smooth. Homemade machines are not as reliable as purchased equipment.
- You cannot hope for high accuracy of a homemade unit.
After welding the metal structural elements, you need to clean the seams.
Coat them with an anti-corrosion compound. Individual parts of metal structures are produced using homemade equipment for cold forging. The blacksmith places them on the workbench as they will be located in the finished product. After that, he must connect them using a welding machine. Homemade machines for cold forging are popular in private workshops and garages. Blacksmiths use them to make various forged products of complex shapes. Assembly does not require any additional skills. It is enough to make a drawing, prepare materials, tools, and carry out step-by-step assembly.
Bends, flashlights, waves and other machines
As you can see, we have collected all other types of cold forging machines in one small section. Why is there such disrespect for them, in contrast to the snail and torsion bar, which we talked about in separate sections? The answer will be honest in the form of advice:
If you decide to make a forging machine with your own hands, opt for two machines: a snail and a torsion bar. Firstly, they are absolutely necessary from a functional point of view, and secondly, they are quite simple to implement independently.
Types of cold forging.
The remaining machines, such as a flashlight or a wave, can be built much later, when you realize that cold forging is for you, and when you have specific creative plans in your head.
But there is a third machine after the volutes and the torsion bar, without which it will not be possible to start cold forging. This is a bending machine. Outwardly, it seems the simplest of all, and its function is the most seemingly simple: bend rods at a certain degree or make waves of different sizes.
There is no need to make a bending machine yourself; it is better to buy it ready-made for two important reasons:
- Wedges and rollers, which are used to change the dimensions of manufactured elements, must be machined to the ideal dimensions. It is almost impossible to do this at home.
- Bending machines are very inexpensive, so the budget saving requirement will be met.
Having at your disposal the three most necessary machines - a self-made volute and torsion bar and a purchased bending machine - you can begin cold forging of almost any complexity. There is one more small issue left to resolve.
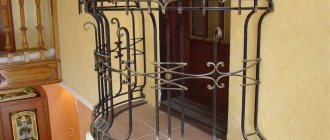
Products produced by cold forging
We invite you to familiarize yourself with the options for products that you can make using the cold forging method:
- The fence element is completely made using the cold forging method. Clamps are used to connect the parts. The following machines were used for manufacturing: “snail”, torsion bar, “bend” and “flashlight”.
- Soda bench - made by cold forging and covered with wood. Welding and clamps are used to connect the elements. Machines used in production were “snail”, torsion bar, and press.
- Balcony railings - production method - cold forging. The railing elements are connected using welding and clamps. The machines used in production are “wave”, “snail”, press.
- Stair railings are produced using the cold artistic forging method. The parts are connected by welding. The machines used in production are torsion bar, flashlight, and snail.
- Visor - the frame of the visor is made using cold forging. The parts are connected by welding. In the manufacturing process, machines were used - “snail”, “wave”, press.
- The grill is a simple design made using the cold forging method. Clamps and welding are used to connect the parts. The barbecue elements were produced on machines - torsion bar, "snail".
- Double bed - cold forging method is used for the backrests. Connections are made by welding and clamps. In the manufacturing process, machines were used - “snail”, “wave” and press.
As can be seen from all of the above, the cold forging method does not require large financial costs and is quite easy to learn, so if you decide to start learning blacksmithing with this method, then you did the right thing.
Manual drive or electric?
The electric drive can be installed on any machine. Another question is – is it necessary? Again, the decision depends on your plans. The electric drive will allow you to save your own energy. But this is not its main advantage. The torque with electric force will be more uniform, and this will lead to smooth and uniform forging elements.
Drawing of a cold forging machine.
The number one contender for an electric drive is a torsion bar machine, where it is extremely difficult to maintain uniformity of screw twisting by hand. It's also very easy to do. You will need a drive axle axle shaft of an old car, a differential gear pair, and a protective sleeve. The power of a homemade engine should not be high - no more than three kW and no higher than 900 rpm.
As for the electrification of the remaining machines, decide for yourself. If you plan to do cold forging for your own needs, you are unlikely to need electric traction.
Making a cold forging machine with your own hands is a difficult and very exciting task. The better its implementation, the easier it will be for you to work on it. And the more beautiful your metal lace will turn out.
We wish you strong snails, high-quality rods and true connoisseurs of your blacksmithing art.
Do-it-yourself cold forging: machines, drawings, video
It is quite simple to make convenient and functional cold forging equipment, guided by the basic principles of its operation and purpose. Any drawings, videos and photographs of structures always leave room for the author’s creativity and perfection of the finished product. Below we will dwell on the main points that are important for assembling machines.
Cold forging machine design, preparatory work
The first and main condition for assembling a cold forging machine with your own hands is drawings. You will need several such graphic documents:
- drawing of the base of the future machine for installing equipment;
The location of the guide elements of the snail machine for cold forging
- assembly diagram or several diagrams for each device being performed;
- drawings of replacement parts, if they are provided for in the design.
Important! At the design stage, it is worth considering how moving parts and components will move in the finished product. This is especially necessary when making replaceable working tools, for example, a snail or a bender.
To assemble a homemade cold forging machine, you will need the following tools and materials:
- medium-carbon thick sheet steel (grade not lower than 35);
- thick-walled pipe having a square or rectangular cross-section;
- metal cutting machine (preferably portable) or grinding machine;
- manual fastening tool;
- welding;
- milling cutter;
- bending device;
- measuring and marking tool.
Creating spirals from various blanks on a snail machine using the cold forging method
Helpful advice! In order for products made by cold forging to be of fairly good quality, it is necessary that the parts of the homemade machine are also of high quality. To do this, all welded joints, cut ends and finishing surfaces are carefully ground.
How to assemble a torsion bar machine for cold forging with your own hands
Some craftsmen do simple twisting without a machine, clamping one end of the workpiece with a vice and rotating the other with a regular collar. With this method, the workpiece can not only twist, but also bend, especially in the area of the fixed end. To prevent this from happening, a guide structure is constructed in the form of a narrow gutter, for example, from a pipe with an upper longitudinal cut (U-shaped section). It is worth considering:
- length of the gutter - it should be shorter than the workpiece, which will shrink when twisted;
- width of the gutter - it is necessary that it be 1.5 times wider than the workpiece, since it will expand when deformed.
Model of a torsion cold forging machine for creating twisted elements
You can get the desired result without a machine - for this you will need to apply physical strength and spend a lot of time on work. For those who do not like this option, it is more advisable to take up a universal equipment project.
It is possible to assemble a torsion bar forging machine with your own hands in two versions: simple and universal. A simple model will be an improved method of working with a vice, and a universal one has the ability to additionally perform such elements as a lantern or a basket.
Related article:
Do-it-yourself cold forging as a separate art form
Selection of tools and materials for forging. Tips for beginning metal artists. Description of the forging process, features and warnings.
The main working force required to deform the material will be taken by the support, so the base of the future machine must be strong. An I-beam or a pair of channels welded together are suitable for this purpose. Stability of the base will be added by paws made of a similar profile, welded to the overall structure. Next, you can start making other components - the tailstock and spindle.
Torsion bar machine with a base of two square rods
In each of the components of a homemade cold forging machine with your own hands, the cartridges intended for placing workpieces in them must have strong screw clamps (for the purpose of reliable fixation). Due to the reduction in the length of the workpiece when twisting, the tailstock is always sliding. It is possible to construct a headstock from a vice, securing them to the base with bolts of a standard size of at least M16. On the same axis with the clamping unit, a bushing is installed for the moving part of the machine, in which holes for the clamping bolts are pre-drilled.
The moving part of the spindle is rotated by a handle consisting of 4 levers, which are of sufficient length to absorb the force applied for rotation. You can add rubber grommets to protect your hands from slipping.
The main difference in assembling a universal homemade cold forging machine is the design of the moving part. It should provide for screw feed when making lanterns and baskets and be fixed during normal twisting of the metal. Therefore, the moving part is equipped with a set of two spindles - smooth and screw. In this design, the sliding headstock requires a locking screw for fixation.
Production of twisted rods on a torsion bar machine using the cold forging method
Helpful advice! If it is necessary to make a workpiece that is not twisted along its entire length, but only in certain areas, limiters are added to the design of the machine. They are made like a tailstock - with screw clamps and the ability to slide.
Working on a torsion bar machine is physically tiring, and it is difficult to obtain high-quality products in large quantities. Therefore, introducing an electric drive into the design would be an appropriate solution.
How to make a cold forging machine
The bending machine is monumental, massive, simple in design and assembly, but difficult to find and fit parts. Its purpose is to bend workpieces at different angles, so the force on all components will be equally large, which means that the requirements for assembly parts are high.
Production of rectangular bent structures by cold forging on a gnitik machine
A thick steel frame is selected for the base of the machine. It is worth considering that the machine will be mounted on a table. Usually the fasteners are made with a bolted connection, for example, like a vice. There is a guide in the center of the frame that will be movable. It is driven by an eccentric mechanism, which, in turn, is fixed to the base frame. Additionally, three stops are installed, creating a kind of “fork” - these are the working elements of the structure. Depending on the bend profile, they are changed: round rollers - for making waves, “hammer” - for forming corners.
Working elements are made only from structural steel. Their strength is the reliability of all equipment. Processing and fitting of such products require exclusively professional equipment. Therefore, if there are difficulties in ordering, purchasing or manufacturing the main components, then it would be advisable to buy a machine for cold bending forging in a store. Its cost is low, but it can be additionally useful for bending pipes.
Model of a bending machine for the production of angular or wave blanks using the cold forging method
Do-it-yourself snail machine for cold forging: design options
The algorithm for assembling a homemade cold forging machine with your own hands is quite simple and understandable. Only when creating a snail, three variants of the design idea are possible, and even then very approximate. Each master sees the execution of a curl or spiral, as well as the sequence of bending the workpiece in his own way.
Like any creative process, making a snail for cold forging with your own hands begins with the basics - designing the key components of the machine. In this case, these are the frame, tabletop and main shaft with a rotation lever.
The upper part of the machine is a snail for cold forging with removable guides
The frame or table for the snail must be made of metal. Wood is completely unsuitable for this design: prolonged and heavy loads will destroy it after several uses. The material used would be a corner, thick-walled pipes or a channel. For the tabletop you will also need metal - a sheet with a thickness of at least 4 mm: the thicker, the more reliable. The shaft and lever are the main assembly that will force the metal workpiece to bend according to a given pattern. The lever is connected on one side to a roller that bends the workpiece, and on the other to the main shaft.
According to the type of design, snail machines come in three variants:
- monolithic with a fixed bending template;
- with removable bending structures that allow you to create different types of curls;
- with collapsible curl designs and a rotating tabletop for obtaining complex bending profiles of great precision.
Installing guides on a snail cold forging machine
Drawings of a cold forging machine for a snail with your own hands
Many craftsmen who take on the manufacture of machines for the first time neglect the design stage, build templates “by eye”, and develop and modernize components directly during the assembly process. A drawing of a snail for cold forging with your own hands should be done at the preparation stage. It will help to avoid some subtle nuances during assembly, and will also significantly reduce the manufacturing process time.
It is not necessary to follow the drawings made by another master. The availability of manufacturing materials or assembly conditions may vary, and it is likely that the vision for the finished structure may also be different.
One of the design options : 1 - snail ploughshare; 2 - base of the machine; 3 — pressure roller; 4 — lever for controlling the pressure roller; 5 — fastening the base; 6 — finger for fixing the plowshares; 7 — groove for the pressure roller; 8 — control lever axis; 9 — spring for pressing the roller; 10 — clamp for the workpiece; 11 — leading ploughshare of the snail; 12 — main axis; 13 - levers Diagram of a snail machine for processing products using cold forging
A drawing is especially important for constructing curl patterns with your own hands. A video of cold forging equipment will help you correctly calculate and build a proportional spiral. This stage is necessary so that the curl made on a homemade machine has an aesthetic appearance.
Helpful advice! Templates for the snail are built according to the rules of mathematical spirals, taking into account the number of turns, their density, the width of the opening for equipment on the machine and the initial radius of the entrance to the curl.
Making a snail: how to make a machine with your own hands
A monolithic machine is the simplest design of a snail. The spiral pattern is applied directly to the tabletop. Then, following the drawing, several pieces are cut out of thick metal. They are welded to the tabletop, following the previously applied markings. Work on a snail of this type progresses slowly, but the machine allows you to bend both workpieces of symmetrical diameter and strips of metal that are laid flat, without vertical deformations.
Monolithic snail machine for creating products using cold forging
A monolithic machine may have an alternative design when the base is not fixed, but can be rotated. A worm mechanism is used for a given rotation and to facilitate physical labor.
How to improve a snail cold forging machine with your own hands
A homemade snail does not have to contain only simple elements. You can immediately assemble an improved model. For example, what should you do if you need curls of different shapes, and with different patterns of spirals? It would be impractical to assemble a separate machine for each sample. Therefore, instead of a tightly welded single template, a number of removable options with different patterns are created on the tabletop. Adjustments are made to the design that allow you to change the template, secure it stably, while maintaining the overall reliability of the machine.
Making a curl using the cold forging method on a snail machine
The most professional of the snail models is a machine where the table top rotates and the curl template is made from several collapsible segments. It is worth noting that all sections are manufactured with high precision. It is difficult to implement this in a home workshop, so the production of the unit is ordered in workshops or at a factory. The curvature of the template is changed using adjusting screws, and a number of holes are made on the surface of the tabletop that will fix the template segments in a given position. You can bend any type of curl using this method.
Making a cold forging machine with your own hands, the drawing of which will help you complete this task, is quite simple if you understand the principle of its operation and design features. It is important to calculate everything carefully and take measurements. It is possible that someone will be able to come up with their own new options or improve existing models.