The change house is perfect for temporary living during the construction of a full-fledged house. But even after the completion of the main construction work, the change house will not remain out of use. It can be equipped as a budget country house, a place to store various equipment, work clothes, bicycles and other household supplies.
Ready-made cabins are relatively inexpensive. But why spend money if you can build such a structure on your own by purchasing only the necessary materials and tools? We present to your attention instructions for arranging a cabin made of wood, a finished trailer and a metal profile. Choose the option you like and get to work.
Planning Guidelines
The change house is a secondary utility room, but you should not take the process of its construction and arrangement too lightly.
First, prepare a drawing. You can make it yourself or find a ready-made version in available sources. The drawing will allow you to imagine how the finished building will fit into the surrounding landscape, as well as calculate the required amount of building materials.
Select the dimensions of the structure and its layout at your discretion. As a rule, industrial structures intended for living are about 5-6 m long, about 2.5 m high and similar in width. Otherwise, regarding the dimensions of the house and its layout, be guided by your needs and preferences.
Step-by-step instructions: photo reports with explanations
It is difficult to understand some things from the description. No matter how much you read, you won’t understand until you do it, or at least watch how others do it. This is why photos of the construction of cabins are useful: you can look at how the units were made and find a solution for yourself. This is a kind of manual for those who decide to build on their own.
Construction of a wooden cabin
A cabin was built from wood at the dacha. Dimensions 3*6 m, insulated - for temporary residence during the construction of the house. The following materials were used:
- board 50*100 mm - 28 pcs;
- timber 100*150 mm - 5 pcs and 50*50 mm - 24 pcs;
- blocks 20*40*20 mm - 20 pcs;
- roof boards 25*150 mm - 10 pieces;
- tongue and groove floor board 30 mm thick - 21 pcs;
- lining class A 5 packs of 6 meters and 6 packs of 3 meters;
- roofing felt 4 rolls;
- polystyrene foam - 4 cubes;
- windows 90*90 cm - 2 pcs;
- doors;
- Senezh Ultra - 10 l;
- corners and plates to strengthen strapping connections;
- fasteners (nails, screws, finishing nails), polyurethane foam. This is what the materials on the site look like
Since prices for materials greatly depend on the region, there is no point in talking about the cost of construction. But from this list, you yourself can determine with fairly high accuracy how much a self-built shed will cost.
Please note that this list does not include roofing material (ondulin was planned) and there is no glass. Also, lining for interior decoration has not been purchased.
Before construction began, all wood, with the exception of the lining, was treated with Senezh Ultra antibacterial impregnation. Covered in two layers. So the quality of processing should be normal.
Wood processing
They marked out the area for the building. We decided to place the blocks on a sand bed. They dug holes 25-30 centimeters deep, poured sand, and compacted it. Blocks were placed. First we set up the two outermost ones, put a flat board on them, and a level on it. This is how the outer blocks were set up. Then the intermediate ones were adjusted to the height of the boards. So on all sides.
Setting up blocks
Next, the harness was laid. Beam 100*150, cut into half a tree. They folded it and secured it with pins for security.
This is how they cut into half a tree
And this is how to lay a medium beam. After checking the corners and diagonals, we knocked them down with studs.
The next step was to lay the floor joists. They were placed every 50 cm, and we will also install the racks every other one. They were made from a 50*100 mm board placed on a narrow part.
Floor joists installed
We decided to immediately assemble the racks with rafters on the ground, strengthen the connections with corners, and then install them ready-made. They were assembled from the same 50*100 mm board.
We knock down the front pillar - it is longer, the rear one and the rafters
They hit with nails, and the plates were screwed with self-tapping screws. The racks were secured with temporary jibs
The posts were nailed down with long nails. Then, for reliability, all attachment points were reinforced with corners and plates. They were already mounted on self-tapping screws.
50*50 mm bars were nailed to the sides of the joists. The result was “nests” for laying polystyrene foam. It was placed on polyurethane foam: both hermetically and reliably. A floor board was nailed on top.
They nailed the block on both sides of the joists
Styrofoam laid
The floor was laid on top
Next, the sheathing stage began. First, we installed additional racks on the sides and reinforced them with jibs.
Additional racks and jibs give greater rigidity to the building
Now comes the actual plating. On the short side there was a lining made of packs of 3 meters, on the long side they nailed six-meter ones.
Beginning of plating
Having completed the sheathing halfway, we laid the sheathing under the roofing. A 25*150 mm board was nailed in increments of 30 cm, with increments of 20 cm at the edges (so that the overhang could withstand). Then we continued with the paneling.
In the places where the windows will be located, they installed mortgages - a board that lies across the counter. The window frame will rest on it. They were fastened with nails all the way through, but the joints were additionally reinforced with corners.
Installed mortgages in places where windows are supposed to be fastened
When the back and blank side walls were sewn up almost to the top, roofing felt was rolled out onto the roof. He will lie there until we buy ondulin.
Sheathing continues The outer sheathing is almost complete. The doors were bought without finishing - just a frame covered with fiberboard. Beginning of door trim
While we were finishing nailing the clapboard on the outside, work was also in full swing inside - they were installing foam plastic. The width of the sheet is 100 cm, the distance between the posts is 95 cm. We have to cut thin strips.
We put foam between the posts
To prevent it from “falling”, we grab it on top with thin corners, which we attach, of course, only to the beam of the rack.
This is what a room lined with foam plastic looks like from the inside. You can see the corners at the top that hold the foam plastic.
We started lining the inside, but the lining ran out. For now we have switched to painting the outside. It turned out well, it seems.
This is what a painted cabin looks like from the outside
We had to buy additional lining and finish the interior finishing.
The inside was also lined with clapboard
We started making the partition. It was assembled from the same boards - 50*150 mm. The joints are traditionally reinforced with corners. They covered it with clapboard.
Drains under the partition
Lined on one side with clapboard
We started insulating the roof. They used the same foam and the same technology - they propped it up with corners.
Insulating the ceiling of a cabin
The joints with wall insulation were foamed with polyurethane foam.
The joint with the wall insulation is foamed
Then we started covering it with clapboard.
Beginning of lining the ceiling with clapboard
The ceiling trim is finished
We started laying the roofing. We bought ondulin and laid it with overlap on one wave. They were attached to each wave with special hardware purchased along with ondulin.
Mounting ondulin on the roof of a garden shed
Then we started finishing up the interior. The partition was also insulated with polystyrene foam and lined with clapboard on the other side.
Almost sewn up partition Finishing the piece above the doorway This is how the partition looks in the final version
The inside of the lining is coated with water-based varnish. It only gives a slight tint to a slightly darker color. There seems to be no film on the wood. If you look directly, it generally seems that the tree is not covered with anything. Only when viewed from the side at a certain angle is the shine visible.
This is after painting
On the floor, the varnish is already with a film: so that the wood does not wear out. Covered in two layers.
Then we started finishing the overhangs. They were sewn up with the same clapboard. In general, working with the clapboard took the most time.
Seal the roof overhangs
The front is almost finished
Side view
Metal frame for a change house
Metal was chosen as the basis as it is more reliable and durable. The thought that the change house might have to be moved also played a role. If the frame is made of metal, she will not be in any danger.
We are going to build something like this type of cabin
The dimensions were determined based on the length of the angle rods: 11.7 m. The following dimensions emerged: 2.8 * 5.8 m, height - 2.5 m. The frame was welded from an angle with a shelf 75 mm, thickness 6 mm.
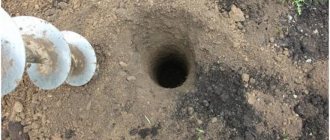
The foundation is made on pillars cast independently: construction began in the fall, and there’s still nothing more to be done. So it was decided to fill in reinforced columns: six pieces. First, the area was marked, after which the locations for the foundation columns were determined.
Marking the area and the base for the posts
Holes were dug 50*50 cm, total depth about 30 cm. Crushed stone was poured onto the bottom in a layer of about 10-15 cm and compacted tightly. There is the same amount of sand on top, also with a tamper. As a result, the bedding came to the same level as the ground.
Roofing material is laid at the bottom so that moisture does not escape from the concrete, and it “ripes” normally and does not dry out. Next, the formwork was assembled and the reinforcement was laid in it.
This is what the formwork for the post and reinforcement looks like
The area is dry, the water drains normally, so there should be no problems. I just mastered welding, so it’s not clear whether the reinforcement is welded or twisted.
Before pouring concrete
Everything is filled with concrete, covered with film: the end of October, and in order for the concrete to be of normal strength, it needs to be wrapped.
The columns are wrapped up
The frame frame took a long time to cook - all winter: frosts, workload, did not allow us to operate with the required frequency. The base was made from a 75 mm corner, 6 mm thick, and 40*2 mm was used for reinforcement.
The beginning of the cabin frame from a metal corner - the bottom frame
The side parts were cooked entirely, then with the help of 4 people they were placed in a vertical position and fixed in this way. Profiled pipes 40*40*2 mm were used on the racks to which the window and door frames would be attached.
Frames are assembled lying down
The most inconvenient moment is measuring diagonals alone. You have to constantly monitor them, but doing it alone is inconvenient. But it is necessary to set everything, otherwise there will be a distortion.
To give greater rigidity, I welded strips of metal in the corners. I got them by loosening the corner (40 mm). It was possible to buy an additional strip, but I used cuttings of a corner.
Strips for rigidity in the corners of the frame View from inside the corner
It was difficult when we were installing the frames: in the cold we only wore thick gloves, and it was difficult to hold them firmly. That’s why they propped it up with boards and whatever they could. But the angle was strictly maintained.
The first circuit is exposed
To ensure a rigid attachment to the frame, metal plates are welded at an angle.
Having exposed the sides of the frame, they were rigidly connected using a metal angle
The entire frame was gradually assembled.
Sidewalls are raised and welded
We weld the plates in the corners: at the top and bottom. We weld several beams at the top. Now the frame for the change house is "iron" The frame from the metal corner for the change house is ready
Now all that remains is the casing. It can be anything: even the same lining, block house, or an economical option - plywood and OSB. To attach the bleach to the corner, it is more convenient to screw the beam, and then attach the sheathing and everything else to it. The same situation applies to the rafter system: a block is screwed around the perimeter with self-tapping screws and pre-aligned, and the rafters are attached to it.
Choosing a place to build a shed
When choosing a location for our house, we take into account a couple of important points.
Firstly, we think about whether we will transport the structure somewhere in the future. For example, you are going to build a lightweight house for a couple of seasons, and then remove it to another place. If moving is part of your plans, it is best to place the change house as close as possible to the exit from the site.
Secondly, we decide on the purpose of the room. If the shed will be used only as a shed for storing various tools and other household supplies, it is best to install it approximately in the center of the long side of the main house so that it can be easily reached from any side of the site.
Helpful advice! If you do not rule out that in the future the shed will be converted into a bathhouse, build it in a remote, secluded corner of the site, keeping in mind the fire safety rules.
Materials required for the manufacture of metal cabins
- The main material for the frame is a profile pipe with dimensions of 40 by 60 mm, 40 by 40, 40 by 20;
- If you need to install additional insulation in your building, it is best to use material specialized for this purpose;
- Material for protection against the negative effects of steam;
- Moisture barrier;
- Metal sheet that has been pre-galvanized;
- Mounting rail;
- Fastening elements such as screws for metal and wood;
- A primer mixture that is suitable for use on metal surfaces;
- Flexible elements made of metal and used as corrugated sheeting;
- Electrical devices, wires, sockets, insulation. This will be necessary for the electrification of the cabins. Particular attention should be paid to insulation and grounding, since the cabin is made entirely of a conductor of electricity - metal; Design and layout of a metal shed for self-assembly
- Structural elements such as windows and doors.
Making the base
Our foundation will be the same for all three cabins. The only exception would be a ready-made trailer on wheels - there is no need to build a foundation for it.
We make the basis as follows:
- we get rid of the top fertile layer of soil;
- compact the bottom and walls of the resulting pit;
- cover the hole with geotextiles;
- pour a layer of sand over the geotextile and compact it thoroughly;
- We place the cinder blocks symmetrically on the resulting pillow;
- We wrap each support with a layer of roofing felt.
Important! If you plan to attach a small porch to the shed, consider installing supports for it at the same stage.
We are building a wooden cabin
Let's start building the frame of our cabin. First, we lay a wooden beam around the perimeter of the future structure, as well as in its center to further strengthen the structure.
We connect the opposite sides of the beam. To do this, we fasten the logs to the beam of the lower trim. You can connect in any suitable way. Connections using the tongue-and-groove method, using metal corners and anchors, have proven themselves well. We made preliminary selections to connect the elements and additionally strengthened the fastening points with nails.
We install vertical corner and intermediate posts. We install intermediate supports in meter increments. To do this, we use timber with a cross section of 15x15 mm. Don't forget to leave an opening for the door. To securely connect the frame elements, we use metal corners and self-tapping screws. At the same stage, we install support pillars for the future porch, if its presence is provided for by the design of the cabin.
Important! The height of the vertical supports on the rear and front sides of the cabin should differ by approximately 50 cm. Such a difference will ensure an optimal slope of the roof and precipitation will not linger on it.
We mount the beam of the upper trim. The support posts of our cabins have different heights, so we work as follows: first we lay the timber on the tops of the higher supports, then we connect the low posts and install the side crossbars perpendicular to them. We make connections using the already familiar method with samples and nails.
As a result, our frame will be divided into a number of rectangular sections. To strengthen the structure, we connect the opposite lower and upper corners of each such section with jibs made of boards.
We attach the rafter beams to the top roof sheathing. We use the boards that are as even as possible to make lathing easier in the future. We install the rafters in increments of about 500-600 mm. We pay special attention to the strength of connections on roof beams.
We construct the roof so that it protrudes slightly beyond the boundaries of the frame. This will allow us to arrange a base for drainage on the back side of the cabin, and mount a canopy on the front part.
We choose the material for the finishing roofing at our discretion. For example, ondulin is good. We lay it with an overlap, starting from the bottom of the slope. Before laying ondulin, you should lay out a continuous sheathing of boards and attach a waterproofing film on top of them. Instead of ondulin, you can use slate or other material of your choice.
Prices for various types of timber
timber
Preparation for construction
In terms of technological processes, building a shed is not very difficult, since there is no need for special training, the use of rare and expensive tools, or extensive knowledge in the field of construction. But you should not hope that all stages of construction of the cabin structure will go smoothly and without problems, especially for novice craftsmen.
Project drawings for standard frame cabins
The most convenient size is a change house measuring 3 x 6 meters, since it is universal in weight, area, as well as the availability of building materials of a suitable size and price. However, for each individual case, its own layout is designed, which is based on a standard frame layout with the addition of the necessary partitions and openings. If the structure is temporary or you need to divide the room into certain zones (kitchen, bathroom, warehouse, etc.), then the internal partitions must be indicated in the drawing.
The traditional configuration of a 3 x 6 meter cabin design implies the presence of the following premises: a central room 4.5 x 3 meters with amenities and heating, a corridor that prevents the entry of cold air, a bathroom and a storage room with dimensions of 1.5 x 1.5 meters. The roof is made from corrugated sheets, regardless of the model of the cabin.
Photo gallery: various layouts of cabins
Selection of material for the frame and foundation base
On the modern market you can find a huge amount of building materials for building a shed: panels, plastic, metal, wood slabs, and so on. Therefore, when choosing them, it is worth taking into account the technical properties and design configuration.
The main part of the cabin is the frame. For its construction you can use:
- A metal profile that is connected by welding. This profile is durable and resistant to various mechanical damage. Change houses with a metal frame are used for frequent moves.
The welded metal frame has sufficient strength for repeated transportation of the cabin
The wooden frame of the cabin is usually insulated with one or two layers of mineral wool, which is protected by a waterproofing film
Metal parts of the cabin frame must be painted with powder enamel
It is better to make the foundation of the cabin from brick pillars, cinder block supports or concrete blocks. Under heavy metal frames, a cast concrete foundation is made.
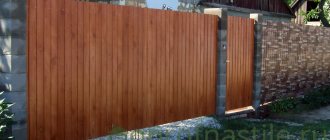
For the external cladding of the cabin, it is better to choose galvanized steel sheets. They are quite durable and very convenient to use. You can also use wooden paneling.
Wood-based cabins cost much less than wooden structures, but they can emit various chemicals that have a negative impact on human health. You should not chase after cheap materials for construction and subsequent cladding, as you risk wasting your money. When choosing a building material for constructing a shed, proceed primarily from your individual preferences, standards of durability, practicality, ease of design and its reliability.
Material calculation and necessary tools
When calculating the cost of a 6x3 meter wooden cabin, you must take into account the cost of materials, as well as how much their delivery will cost. To erect a temporary structure of the above dimensions, you need to purchase the following materials:
- geotextiles - 30 m2;
- anchors - 9 pcs.;
- sand - from 3 to 6 cubes;
- expanded clay - up to 3 cubes;
- material for pillars or ready-made foundation blocks;
- insulation - 8 m 3 or plates - 81 m 2;
- timber 150x100 mm - 18 linear. m or 0.27 cubic meters;
- beam 100x100 mm - 47 linear. m or 0.47 cubic meters;
- lining - 22 linear m;
- edged board 40x150 mm - 0.72 cubes;
- tongue and groove board 30x150 mm - 0.54 cubic meters;
- OSB - 63 m2;
- board 40x100 mm - 40 m or 0.16 cube;
- timber 50x100 mm - 95 meters or 0.47 cubic meters;
- sheathing beam 50x500 - 50 m or 0.125 cubic meters;
- polyethylene - 81 m2;
- waterproofing membrane - 81 m2;
- corrugated sheeting - 21 m2;
- metal corners for fastening;
- self-tapping screws for the roof - 180 pcs.;
- self-tapping screws 70 or 80 mm - as needed;
- nails 150 mm;
- windows, as well as internal and external doors - in accordance with the drawing.
- various types of partitions;
- decorative finishing;
- technical and engineering systems.
The final calculation of building materials should be made only according to the drawing.
You will need the following tools for work:
- bow saw with a sharp blade;
- shovels - bayonet and shovel;
- sherhebel;
Sherhebel is a special plane for the primary processing of unplaned wood.
Cabin layout
Today there are quite a lot of traditional layouts of cabins. They differ in the location of windows, the configuration of rooms and other characteristics. However, the main types of layouts are:
- Construction of 2 rooms. One is a work room, the other is a hallway. There is a door opposite the hallway and one window.
- Construction of 3 rooms. The peculiarity of such a change house is the separation of two hallway rooms. Each room has one window. Such cabins are called vests.
- Change house from room and hallway. In this case, the hallway will be larger than the room. The length of the hallway is equal to the width of the entire structure.
- The simplest option is a one-room cabin with one window.
- A cabin without windows.
There are other layouts of cabins. They differ in the area of the premises, the location of windows and doors. However, traditionally such structures do not provide more than 3 rooms, since the total area of the cabins is very limited.
Change house from a construction trailer
Don’t want to bother with assembling the frame and other related activities? You can buy a ready-made trailer and equip it for a cabin. Such trailers do not even need their own foundation - you just need to carefully level the site and install the container (trailer).
If you equip a used trailer as a cabin, carefully examine its condition. Clean off traces of rust, replace heavily damaged cladding elements with similar ones, weld patches onto the through holes, coat the metal with a special primer and paint.
The installed structure must be insulated. The rest of the arrangement is at the discretion of the owner. These points will be discussed separately below.
You can also buy a trailer on wheels. The option is mobile and very easy to use. After completing all the measures for arranging such a trailer, it is installed on the frame of the trailer.
Layout and drawings
Despite the fact that the building is considered temporary, it often turns into a bathhouse or guest house. That’s why even in a change house there is such a thing as a layout. Even temporary housing should be relatively comfortable.
Cabin trailer
There are two main types of cabins: trailer and vest. In a “trailer” type building, the entrance is on the side, there is no separation inside; in extreme cases, they put a partition - 1.5-2 meters from the entrance. This room is used as a vestibule-dressing room and a warehouse for storing instruments. This is the simplest possible option.
Drawing of a trailer cabin with dimensions
Yandex.RTB RA-1479455-3
The drawings will contain graphic and digital symbols, their explanation is in the photo below.
Designation on drawings
Yandex.RTB RA-1479455-8
Baby vest
The most popular layout is the vest. This is when the entrance is in the middle. Moreover, the middle is fenced off and used as a vestibule, storage room, etc. The purpose of the other two rooms may be different. Some people use both as bedrooms, others use one as a kitchen.
Two rooms and a vestibule with a fenced-off small storage room
Only vestibule without storage room
Change house with toilet and shower
Not everyone agrees, even at a construction site or at a dacha, even temporarily, to lead a Spartan lifestyle. At least basic amenities are required. Although, it is probably better to build them separately.
Read how to build a toilet in your country house here.
The sanitary block is located on the edge - a wiser decision, especially if you make a separate entrance with a toilet
Having chosen a drawing, do not forget, when developing a frame for a change house, that racks must be installed at the junction of the walls. If doors are attached to the racks, they must be reinforced - double.
We build a shed from metal profiles
The construction of a frame made of metal profiles will require more effort compared to the construction of a wooden analogue. But the iron change house will last much longer.
The set of necessary tools includes:
- hammer;
- welding machine;
- drill;
- screwdrivers;
- corner;
- grinder;
- tassels;
- construction stapler;
- roulette;
- hacksaw
We also buy the following materials:
- profiled pipe measuring 2x2 cm, 4x2 cm, 4x4 cm and 4x6 cm;
- mounting rail 2x4 cm;
- galvanized sheet steel;
- corrugated sheeting;
- primer for metal;
- self-tapping screws for fastening corrugated sheets;
- screws for metal;
- staples for a construction stapler;
- rivets;
- OSB boards;
- polyurethane foam.
Making the base
We will assemble the base of the frame from a pipe measuring 4x6 cm. We cut the pipes in accordance with the dimensions of the structure being built.
We weld the pipes according to their external dimensions and get a rectangular edging. In total we need to make 2 identical rectangles. We will make the floor from one, and the upper part of the cabin from the other.
To make the floor reliable, we create a grid inside the rectangle from the same profiled pipes. We are making a change house with a width of 250 cm. With such dimensions, it is enough to weld 2-3 longitudinal pipes along the entire length inside the edging. We weld cross pipes every 50 cm.
Next, we take a galvanized sheet and fix it with self-tapping screws to the base of our change house. We turn the base over and lay it with the galvanized sheet down on cinder block supports or simply a leveled area. The structure does not need to be attached to the cinder block - the cabin will be sufficiently supported by its own weight.
We mount the racks
We make vertical supports from a 4x4 cm pipe. We cut it into pieces in accordance with the planned height of the change house. Usually it is 250 cm.
We place the first supports in the corners of the foundation constructed at the previous stage. We check that the angle at the junction of the posts with the base is strictly straight.
We fix the leveled rack by welding. Similarly, we set up the racks in the remaining corners.
Additionally, we will need to install intermediate racks. To do this without disturbing the geometry of the structure, we take the second rectangular pipe base made in the previous step and lay it on top of the corner posts.
We scald the resulting “cube” with intermediate posts and spacers. First, we take pieces of corrugated pipe 4x4 cm along the height of the structure and weld them vertically between the lower and upper bases. The recommended installation step is 100 cm. At the same stage, we provide an opening for the door.
We weld the horizontal cross member around the support structure. The pipe must be welded to the vertical posts at a height equal to half the height of the change house.
We make the spacers from a 2x4 cm profiled pipe. We cut it into 30-centimeter pieces. We cut each edge of the workpiece at a 45-degree angle. We scald all the corners of the structure with the resulting spacers. Additionally, we can scald the floor with them.
We make the roof
We made the bottom part of the frame and the wall. Next we are engaged in the manufacture of the “skeleton” of the roof.
We make trusses in the form of isosceles triangles. We use a 2x4 cm pipe. The recommended installation step for the trusses is 1 m. We weld them along the length of the frame. We cover the roof with corrugated sheets. If you wish, you can use another material of your choice.
We cover all metal elements of the frame with a special primer, and after it dries, we apply paint of the desired color.
How to build a change house with your own hands - photo instructions
In order for the change house to be reliable, its manufacture should be taken seriously. But how to build a change house with your own hands? This step-by-step instruction will help you. If you make it yourself or order a summer cottage from a manufacturer, which will be assembled according to the scheme described below, rest assured that it will serve you for a very long time. Even after the need to use it as housing disappears, you can use it as a utility room.
To make a change house you will need the following tools:
- Welding machine
- Hammer
- Bulgarian big and small
- Drill with roofing attachment and drill bits
- Paint brushes
- Screwdrivers
- Carpentry corner large and small
- Welding mask
- 6 meter tape measure
- Stapler
- Wood hacksaw
Before you start making a change house with your own hands, prepare all the necessary tools.
Consumables you will need to make a frame cabin with your own hands:
- Profile pipe 40x60, 40x40, 40x20, 20x20
- Galvanized or colored corrugated sheeting
- Insulation Isover 50-100 mm.
- Hydrobarrier
- Vapor barrier
- Mounting rail 20x40
- Smooth galvanized sheet (can be illiquid)
- Primer for metal
- Roofing screws 19mm, in the color of the corrugated sheet
- Flea screws
- Hardened wood self-tapping screws 35mm
- Rivets
- Metal bending elements for corrugated sheets
- Staples
- OSB board 10mm and 20mm thick.
- Metal-plastic window
- Polyurethane foam
- Electrical wire 2x2.5
- Sockets, switches and machines.
- Entrance door
When starting to manufacture a country frame cabin , I would like to determine a certain sequence of the process itself:
- Frame making
- Interior work
- Waterproofing and insulation
- Electrical installation
- External cladding
- Installation of doors and windows
Making the floor
First, we construct a subfloor from boards treated with an antiseptic. We lay them out as tightly as possible to each other and attach them to the frame with self-tapping screws.
We spread a waterproofing film over the boards. We attach it to the joists using a construction stapler with staples.
We nail additional logs to the base for laying thermal insulation and attaching the second layer of boards. We fasten the logs in increments equal to the width of the selected thermal insulation material. Mineral wool, a relatively inexpensive and time-tested thermal insulation material, is well suited for floor insulation.
We lay insulation in the space between the joists. We fix a layer of vapor barrier material on top. A stapler with staples will help us with this again.
We lay the finished floor boards. We attach them to the joists using self-tapping screws. Finally, we varnish or paint the floor.
We carry out external cladding
The trailer cabin can be left without cladding, but a structure made of wood or metal will require mandatory external finishing. We won’t just leave the “bare” frame, will we?
We cover the frame with waterproofing film. Carefully seal the joints of the waterproofing strips with tape. Many different materials are suitable for external wall cladding:
- wooden boards;
- composite panels;
- siding, etc.
Choose at your own discretion. The cabins covered with a block house also look very nice.
Important! The area of the frame allocated for the porch is not sheathed.
Interior decoration
We place insulation in the space between the frame posts. We cover it with a layer of vapor barrier material. We attach the vapor barrier to the frame using a suitable method.
We fill transverse slats on top of the frame to secure the insulation. We attach the selected internal lining material to the same slats. Most often, lining is used for interior decoration. For the rest, focus on your preferences and available budget.
Electricity
We will not install full-fledged wiring into the change house. Such buildings are not permanent and do not require such equipment. But how, in this case, can at least organize lighting and heating? A good extension cord with a cord of suitable length will help us with this. We turn it on to the nearest available source of electricity and pull it into the change house.
In a change house, we can include a tee in such an extension cord for greater convenience and the ability to use several electrical appliances at once.
Lighting
We arrange it at our discretion. In general, a few simple lamps installed in the main functional areas will be enough for a change house.
Water supply
For maximum ease of use of the cabin, we run water into it. We will not build a major expensive water supply system. It is enough to connect a flexible hose to a water supply source, insert it into the household through a pre-prepared hole in the wall and equip it with a tap to shut off the water.
We can install a compact water heater near the hose attachment point. Special bulk models are available on the market. It is enough to remove the top cover from such a tank, fill the container with water from a hose, plug in the heating unit, and after a short time use warm water at your discretion. If desired, a hose with a shower head can be easily connected to such a water heater.
A compact sink wouldn’t be out of place in your household. We attach it to the wall in a convenient place. We connect a corrugated pipe to the sink drain to drain water. We remove the corrugation through a pre-arranged hole in the floor and connect it to the sewer pipe. Water will flow through the sewer pipe into a drainage hole or other designated place.
Heating
The heating is done electrically. A budget option is a pair of fan heaters. More expensive and efficient - an oil heater or convector. We select the power of the heating unit in accordance with the area of our shed.
At the end, all we have to do is furnish the room. At this point, we focus entirely on our preferences and needs.
| Parameter | Wooden cabin | Metal shed |
| Parameter | Wooden cabin | Metal shed |
| Price | Cheaper. To further reduce the cost, natural wood can be replaced with wood boards. | Expensive. Metal has a higher cost. |
| Durability | Lasts less than metal ones. Wood does not tolerate moisture well. | Lasts for decades. |
| Mobility | It is easier to transport, but there is no guarantee that the wooden structure will withstand transportation normally. | Transporting is more difficult, but safer. |
| Possibility of installing communications and additional elements | Can. More difficult. | Can. Easier. |
| Environmental friendliness | Eco-friendly | Less environmentally friendly when compared with wooden cabins. |
Good luck!
Prices for popular models of electric heaters
Electric heaters
What is a change house and its purpose
A change house is a small-sized, inexpensive and comfortable structure that is easily transported or moved. It can be made from different types of building materials. The main purpose of the change house is to store equipment and accommodate construction crews in it. In addition, it can be equipped as a production or office temporary structure.
Metal cabins with one room are designed to accommodate construction crews and store various equipment
Types of modern cabins
Depending on the material used, there are the following types of cabins:
- metal - the service life of such a design is at least 10 years. The metal change house has a strong frame, so it can be moved frequently;
The metal shed has standard dimensions that allow it to be transported on the platform of a crane.
Wooden cabins are more often used in summer cottages and country houses
Depending on its purpose, the change house can be used for the device:
- Wagon-house. This type of mobile structure is equipped with runners in winter, and wheels in summer. This car-house is intended for people working on a rotational basis or film crews. In addition, it can be used as an office, a room for drying work clothes or a recreation area.
A movable car-house on wheels can be attached to a tractor and towed to the desired location
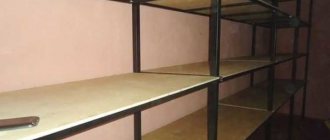
Racks are placed inside the storage shed for convenient storage of goods.
The canteen can be used for catering at construction sites
Stationary office huts are installed on construction and retail sites, parking lots and other open areas
People can live in specially decorated cabins for a long time