Before attaching the chain-link mesh to the profile pipe, the pillars must be prepared. Why do they need to be cleaned of rust, if it appears, painted with a spray or brush. But most importantly, before attaching the chain-link mesh to metal posts, you need to weld hooks to fix the mesh material (considered the best option for tension fencing). If this option is not available, fastening to the corrugated pipe can be done with clamps, staples or wire.
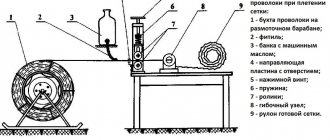
How to attach a mesh metal sheet without welding
Characteristics of chain-link mesh - pros and cons
The mesh was named after its inventor, the German Karl Rabitz, who patented a mesh weaving machine in the 19th century. Since then, the production and use of this material has become widespread.
Chain-link is used not only for fences or fences. It is used for sifting bulk materials, reinforcing structures, making cages or enclosures, strengthening mines and slopes.
The chain-link is produced in accordance with GOST 5336-80 in the form of rolls up to 2 m wide and 10 m long. Wire diameter is 1.2-5 mm, cell side (mesh number) is 5-100 mm. Cells can be square or diamond shaped.
Advantages of chain-link fencing:
- ease;
- air and light permeability;
- low windage;
- simple installation;
- sufficient strength;
- durability (subject to high-quality protective coating).
If the mesh is cheap and manufactured in violation of technology, the following disadvantages may appear:
- instability to corrosion and rapid rusting;
- low strength;
- short service life.
For fences and fencing, chain link No. 15-No. 50 with a weight of 1.77-2.44 kg per 1 square meter made of wire with a diameter of 1.4-3.0 mm is mainly used.
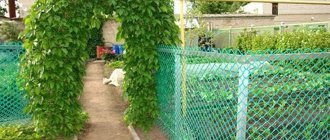
Pros of mesh fences
Chain-link mesh is popular in the building materials market and has established itself as an affordable and easy-to-install material.
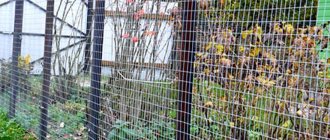
Fence on a summer cottage
Advantages of metal mesh fencing:
- Every person who is not involved in construction will be able to install this iron fence;
- can be purchased at a relatively low price, and in the Leroy Merlin chain of stores delivery is made free of charge to the site, taking into account the order estimate;
- air circulation throughout the entire territory;
- mesh fences are characterized by good quality and long service life, taking more than 30 years;
- the fence fits perfectly into any landscape design;
- this fence does not shade the garden area;
- if the homeowner has dogs, they can guard the area as effectively as possible so that thieves cannot steal something;
- This is a really reliable fence on which you can install barbed wire if required, this ensures inaccessibility.
Gate in the fence
The product is an excellent material intended for fastening in internal areas of a certain territory, for example, in playgrounds, places where animals are kept and other types of fences. In addition, the list of disadvantages is not as long as the advantages.
Types of chain link
Depending on the purpose, the mesh is made of ordinary uncoated steel or galvanized wire. In more aggressive conditions, polymer-coated wire is used.
Non-galvanized
This mesh is made from black untreated metal. It is afraid of humidity, and after the first rain or fog it becomes covered with rust. Its scope of application is reinforcement of reinforced concrete structures and plaster, fastening of thermal insulation and other work where the metal does not come into contact with a humid environment or only contacts for a short time.
Non-galvanized mesh is inexpensive, which is what attracts summer residents to it. When installing a fence, it is recommended to cover it with waterproof metal paint or a water repellent. Protection needs to be updated at least once every 1-2 years, which, of course, increases the cost of operation.
Galvanized
A galvanized wire chain-link can last 20 years or more. The best way to protect steel is hot-dip galvanizing. An important characteristic is the thickness of the zinc layer, which is determined by the mass value per square meter and averages 70-90 g/m².
The second most reliable method is the galvanic method. The thickness of zinc during electrochemical processing is less than during hot-dip galvanizing, but it also ensures a fairly long service life of the material.
Corrosion of galvanized mesh in the first months of operation is the result of the fact that there is not enough zinc on the wire - 10 g or less. It can only be called galvanized formally. When purchasing, pay attention to this important factor.
Plasticized
The chain-link mesh with a protective polymer coating is decorative and at the same time very resistant to corrosion. This material is used in humid climates, including on the sea coast. Modified PVC is used for processing. It is evenly sprayed onto the metal surface, creating a sealed, resistant film.
High-quality polymer coatings do not crack from frost or heat, and do not fade. The mesh retains its appearance and technical characteristics for a long time.
Types of fasteners depending on wall material
hardware for attaching plaster mesh
For installation work, use fasteners that match the base material. So nails are only suitable for working on wooden surfaces, and sometimes on brickwork. To attach a metal mesh to a metal structure, spot welding is used. For concrete and brick surfaces, self-tapping screws and dowels are used.
It is better to purchase self-tapping screws, taking into account the fact that the plaster solution is a wet environment. The best hardware is those that are not afraid of exposure to water.
Attaching a plaster mesh is not as difficult a job as installing beacons or decorative plaster. But the reliability, strength and durability of the finish depend on its quality.
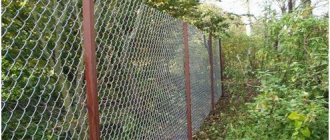
How to make a chain-link fence: fastening methods
The main 3 options for installing the mesh are tension with or without guides, as well as the production of individual sections, which are subsequently attached to the supports.
Tension without guides
The simplest and most economical way to build fences where there are no requirements for appearance. The fact is that this design does not look very decorative and often sag over time.
Tension mounting technology without guides:
- Install pillars.
- Attach the roll to the first support.
- Stretch the mesh and fix it sequentially to each rack.
- Attach the chain-link to the last post, cut off the excess.
The two rolls are connected to each other with wire, which is unscrewed from the edge of the chain-link. The mesh is positioned so that the top and bottom coincide, and the convex part of the cells faces one way. Using a rotational movement, insert a spiral behind the wall of each cell and evenly weave them one after another.
Clamps, tension couplings, staples, hooks, self-tapping screws with overlays, and vertically welded rods are used as fasteners.
Stretch with guides
This is a more labor-intensive method that ensures minimal structural rigidity. The guides keep the chain-link tensioned and prevent it from stretching and sagging. During installation, a metal cable, slats, thin pipes or fittings are passed horizontally through the cells, which create the necessary support for the mesh.
When installing pillars, you need to provide some kind of device for fixing the veins. If it is a metal cable, a nut is welded to the support or a through hole is drilled. Some manufacturers produce poles with hooks already welded on.
A fence with guides can be mounted in two ways:
- first tension the mesh and secure it to the supports, and then pass the guides;
- install the guides, and then attach the mesh to them.
If a profile or reinforcement is used as guides, they are passed through the mesh cells and welded to the posts. The protruding wire is bent down.
Sectional fence
This method is more complex and time-consuming than the others. But the fence turns out to be rigid, durable and neat.
Diagram of a sectional chain-link fence
A rectangular frame is pre-prepared from corners, pipes, and fittings. The mesh is cut to the size of the section and fixed to the frame in one of the following ways:
- using hooks;
- fastening strips;
- welding the reinforcement rod.
The finished sections are attached to plates welded to the posts. Gates and wickets are made in the same way, they are then hung on hinges.
Installation of fiberglass sheeting
Having figured out how to fix the meth. mesh for plaster, we will easily understand how to attach a plastic mesh. The fiberglass panel bends easily and weighs little. Therefore, it is easier to attach it to the wall. Usually they do this with self-tapping screws only along the top edge, lowering the “fabric” from top to bottom like wallpaper. The entire panel “sticks” to the wall using plaster mortar.
Sometimes, in order to increase strength, the panel is attached with self-tapping screws and along the bottom (near the floor).
Using a solution, the network is attached to the base, doing this:
- Apply a layer of plaster composition to the surface. The width of the applied layer is equal to the width of the mesh. The composition is applied with a trowel (50 cm) or a wide spatula.
- The canvas is unwound and applied to the upper edge of the wall with its end. The remaining part of the canvas is lowered down.
- The panel is straightened so that its edge runs parallel to the corner line. Craftsmen often place the edge on the surface of the adjacent wall (3 cm).
- Using a wide spatula or trowel, finally leveling, the net is embedded in the layer of solution. The plaster mixture appears through the meshes above the network and is immediately leveled with the same tool.
- Allow the reinforced plaster to dry, after which the following finishing work is carried out according to plan.
Pillars
Wooden, metal or asbestos-cement supports are often used as supports, less often concrete or brick.
Tree
The weight of the chain-link mesh is small, the wind load is low. Wooden poles can handle it quite well. They are inexpensive, but less durable than metal or stone. They are made from sanded logs or timber. It is recommended to coat the lower part with heated bitumen and wrap it in roofing felt, and treat the upper part with an antiseptic.
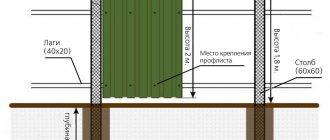
Before installing the supports, prepare holes or holes with a diameter exceeding the cross-section of the pillar by 15-20 cm and a depth of 0.7-1.2 m. The installation step of the supports is 2.5 m.
The racks are fixed vertically. The pit is filled layer by layer with crushed stone and sand, spilled with water, and compacted. The mesh can be attached to wooden posts with ordinary nails, bent with a hammer.
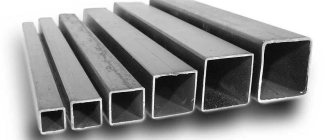
Metal
The supports are made from profile pipes with a cross-section of 40x40 mm or more or round pipes with a diameter of 45 mm or more. The racks are installed by driving, backfilling or partial concreting.
The depth of immersion of the base of the pillar is 0.7-1.2 m, step 2-3 m. If concreting was carried out, you need to wait 1-2 days until the concrete has completely set, and then attach the mesh.
It is recommended to pre-treat the metal against rust and prime it. To prevent precipitation from entering, the holes must be welded or plugs placed on the posts.
Asbestos cement pipes
Asbestos cement posts are a popular material for making fences. They are not afraid of frost, fire and moisture. Due to their fragility, they must be handled with care.
To fasten the chain-link, posts with a diameter of 100 mm and a length of 2950 mm are used. They are dug in to a depth of 1-1.2 m, the base is covered with crushed stone or concreted. It is recommended to attach a cap on top to protect against water ingress. The chain-link fence posts themselves do not need to be filled with concrete. They stand for years without additional reinforcement. The load is small, so no destructive forces are created in the pipe walls. The material of the veins and the method of their fastening have a much greater influence. It is necessary to avoid rigid metal connections, where critical stresses can arise due to large differences in the coefficients of thermal expansion.
Concrete
Concrete pillars are strong, durable supports designed for high loads. They are made by pouring at the installation site, assembled from blocks, or purchased ready-made.
Installation of monolithic pillars is long and labor-intensive. Requires installation of formwork and reinforcement cage, preparation and pouring of concrete. Strengthening time is 3-5 days. After this, the structures are demolished and further installation is carried out.
Prefabricated pillars are laid out from concrete blocks. They are permanent formwork with ready-made decorative finishing. Installation also requires installation of a reinforced core and pouring concrete, but externally such pillars are much more attractive.
Brick or stone
Supports made from these materials look impressive, they are durable and reliable. Due to the large mass of the pillar, a solid reinforced concrete foundation is required. It is laid below the freezing point.
For columns, both facing brick and ordinary brick with subsequent finishing are used. Masonry is quite labor-intensive and requires highly qualified craftsmen. In areas where building stone is mined, it is also used for fences. Due to the irregular shape of the stones, laying out the column is not easy. Masters use various technologies. For example, a mass of stones and mortar is placed in formwork. After the cement has set, the formwork is removed and each stone located on the surface of the pillar is carefully cleaned with a chisel.
Net care
Anti-mosquito structures can be installed on a variety of types of fastenings, but still, when using them, you should adhere to very specific recommendations:
- The mesh fabric loses its elasticity over time and therefore breaks even under minor mechanical loads. Perforated fabric copes with its functions much worse, so it should be changed periodically (every five to six years).
- To extend the service life of the canvas, the nets should be dismantled for the winter period. I usually remove structures in October and put them back in place in March. Thanks to this, neither the profile nor the canvas are subject to freezing, and therefore last an order of magnitude longer.
For the winter, remove and clean the products
- After removing the structure, it is worth washing it - during the warm season it collects an incredible amount of dust. If your windows overlook a highway, then I would advise washing the screens more often - once every two to three months.
- Finally, keep in mind that this design is not designed for fall protection. Not a single mount can withstand a significant weight load, so if you have children or active pets in your home, then the sash with an installed mosquito stack can only be opened in the folding position.
I never tire of repeating: to protect children from falling, the opening of the window must be blocked. To do this, install either a special handle with a key or a lock on the bottom of the frame. It doesn’t interfere with ventilation, but it will protect you from turning the sash with overly curious hands!
"Anti-cat" is not a panacea, but it can help
- The only exceptions are anti-cat nets, which are distinguished by reinforced fabric and more reliable fasteners. But even they cannot support the weight of a well-fed Maine Coon or a small child, so it’s better to play it safe without getting into trouble!
How to calculate the amount of materials
At the first stage, the number of supports is determined. To do this, the perimeter of the site or the length of the segment where the fence is to be installed must be divided into increments of 2-2.5 m plus one post for the last point. If the fence has a gate or wicket, it is necessary to take into account the posts for each opening.
The length of the mesh is equal to the length of the fence. It is not difficult to convert into rolls - the length must be divided by the standard size of 10 m. The resulting number should be rounded up.
Depending on the method of fastening, fasteners are selected and calculated. Guides, if used, are needed as many as there are spans in the fence. If they are mounted in 2 rows, then the quantity is multiplied by 2.
To manufacture sections, determine the consumption of angles or pipes for each element and mounting plates at the rate of 2 per support.
Additional materials for foundation construction, primer, paint, protective caps, fittings for gates and gates are taken into account.
Advantages of galvanized mesh
They produce galvanized mesh from metal wire. Its rods are arranged perpendicularly and are fastened at the connection points by welding. The cells of the welded mesh are made rectangular, square, less often diamond-shaped, trapezoidal or other shapes.
The wire for the mesh is galvanized or with an additional polymer coating. Fencing made of welded galvanized mesh has its advantages:
- Affordable price;
- Simple and quick installation of the mesh can be done with your own hands;
- Light weight, does not require foundation construction;
- Transparency and good visibility allow it to be used at protected sites;
Fence design made of galvanized mesh and metal corners
Manufacturing of tension fence
This is a simple and economical way to install a chain-link fence with your own hands, for which you will need:
- profile or round pipes for racks;
- net;
- clamps or hooks;
- drill, shovel;
- tape measure, bubble level or plumb line;
- crushed stone, sand, water;
- Bulgarian;
- anti-corrosion agent.
Site marking
Before installation, the fence line is cleared, freed from excess vegetation, and large mounds are cut off. A cord is pulled between the extreme points and the installation locations of the supports are marked in increments of 2-2.5 m along a plumb line.
Pit preparation.
Using a hand or gasoline drill, holes are made at marked points to a depth of 0.7-1.2 m. First, the blades are rotated in one direction, then in the other. The soil from the hole is discarded. Add crushed stone to the bottom in a layer of 10 cm and compact it with a long crowbar.
Installation of poles
The pipes are treated against rust and primed. After drying, the primers are installed in the wells strictly vertically. If there is no assistant who could hold the pole, it is fixed with improvised materials. The following operation is carried out depending on the chosen method of foundation construction:
- butting - crushed stone is covered in layers, each compacted with a crowbar;
- partial concreting - first, concrete is poured to 2/3 of the height, crushed stone is poured on top;
- full concreting - the hole is filled with concrete, pierced with a rod to release air bubbles.
On dry soils with low groundwater levels, pipes can be installed by plugging. To avoid flattening the top of the stand with a striking tool, a metal “glass” is placed on it.
Fastening the mesh
After the concrete has hardened, a mesh is fixed to the outermost column. The reinforcement is threaded into the cells and hooked. You can weld the rod to the stand.
The roll is unwound 2.5 m, tensioned and sequentially secured to the racks using clamps, hooks, screws with overlays or other devices.
If it is unsafe to install mesh on clamps in your area, you can pass a steel rod through the cells and weld it to the post after 20-30 cm. Another way to prevent the theft of the mesh is to use anti-vandal nails or hardware with tear-off caps.
It is not recommended to outline corners with a solid canvas. The mesh must be cut and secured thoroughly on both sides of the post separately.
Installation of fencing support elements
Before filling the perimeter of the fence with mesh, support posts are initially installed. There are several types of supports for fastening the chain-link:
- wooden;
- plastic;
- concrete;
- asbestos-cement;
- metal.
Support installation diagram
The easiest and cheapest way is to use wooden posts, but the strength of such posts is low. The mesh material is attached to them with nails or staples. Supporting structures made of wood have an increased degree of susceptibility to rotting.
Therefore, before being immersed in the soil, the base of such supports must be treated with antifungal compounds.
The most acceptable option is metal racks in the form of profile pipes of rectangular or square cross-section. A metal profile with a cross-section from 40x40 to 50x50 mm with a wall thickness of 3 mm is used for the mesh fence.
Installation of a sectional fence
Marking and installation of supports is carried out similarly to a tension fence. A pair of plates with a thickness of at least 4-5 mm are first welded onto each post, to which the sections will be attached.
Frame assembly
To make a frame, corners are cut according to the size of the section:
- the length is equal to the pitch of the pillars minus 10-20 cm;
- height - length of supports minus 15-20 cm.
The frame is welded and polished. You can weld hooks to attach the mesh.
Section preparation
We will tell you how to secure a chain-link using reinforcing bars and welding. This method is convenient because the mesh is often tangled and its edges are uneven. The rods will help not only fix, but also evenly tension the mesh.
The chain-link is spread horizontally, a Æ 6 mm rod is inserted into the outer cells. Stretch the roll to the required length. Place the mesh on the frame. Align the edges. If any wire has become untwisted, it is twisted in a circular motion around the axis.
To prevent the mesh from getting tangled, weld the rod to the corner, cutting off the excess. The step between the welding points is 25-30 cm. Slightly pulling the chain-link, measure the required length. Unscrew the wire, thus disconnecting the fabric. A rod is inserted and secured by welding to the frame.
On the sides of the mesh, the wire is aligned and bent with pliers. The rods are threaded into the cells, cut to size and welded. Clean the seams from scale and prime them.
Installation
The section is installed vertically into the fence span. For fixation, you can use 2 methods:
- welding - the frames are welded to the plates, aligning the top edge horizontally;
- assembly - drill holes and tighten with bolts and nuts.
Welded seams are ground, all sections and pillars are coated with a primer, if this has not been done previously, and finally painted.
One part of the hinge is welded onto the gates and gates, and a counter part is welded onto the post. The panels are hung and adjusted for height and uniformity of movement.
If the area is flat, the level of adjacent fence elements should match. When there is a difference in height, the sections are secured with “steps”.
What is the function of the grid
The plaster mortar hardens and becomes artificial stone. Compositions with a mineral binder, while working well in compression, can hardly resist bending or tensile loads. Therefore, the plaster coating easily bursts at the slightest deformation of the wall or when the thickness of the layer peels off from it. In concrete structures, metal rods - reinforcement - are used to absorb tensile forces, and in plaster, the function of reinforcement is performed by a reinforcing mesh. Connecting with the network into a single whole, the plaster becomes a composite material capable of resisting bending, compression and stretching, no matter from which side external force is applied. Thus, the strength of the plaster layer increases many times over.
The second task that the reinforced mesh solves is the reliable fixation of the plaster to the base. To achieve this, several methods have been developed for attaching the network to the ceiling or walls. The methods and elements of fastening the mesh are different and depend on the materials of the base and the mesh fabric.
Another task of the mesh is to help the plaster mortar applied to the junction of structures made of different materials (for example, wood and concrete), hardening differently, and not form cracks.
The classic material for reinforcing plaster coatings is metal. Modern means such as plastics and basalt fiber have become such materials. You can learn more about reinforcing meshes in a separate article.
A simple rule will help you choose the type of reinforced mesh: if the layer thickness is 5 cm, use a metal mesh; if the layer is 2-3 cm, a plastic product will cope with the task. When plastering fireplaces or stoves, use a metal mesh.
In order for the attached mesh to fully cope with the task, it must:
- cover the entire surface to be plastered;
- be inside the plaster layer.
The mesh fabric is unwound and attached to the wall, placing the strip vertically. The fixed panels are overlapped (for metal - by the size of the cell, for plastic - 5-10 cm). They begin to mount the canvas on the wall from the ceiling. Attach it before installing the beacons. Only in this case is complete reinforcement ensured.
Installation in problem areas
Even if the terrain in the area is difficult, it is quite possible to stretch a chain-link mesh onto the poles. To do this, the fence is laid out in an area where the height of the supports will be approximately the same. In the first section, the mesh is fastened with normal tension (with or without guides).
At the point of support between two sections of different heights, the roll is first unraveled by unscrewing one wire, then woven lower or higher. The mesh is fixed and continued to be pulled further. In this way, the integrity of the fence will be maintained. At the bottom of the fence you can install a concrete plinth, which will level the terrain and close the empty gaps.
How to decorate a chain-link fence
Since the fence has a rather monotonous appearance, it is decorated in various ways:
- climbing plants are planted nearby;
- weave colored ribbons, wire, bamboo;
- use shading nets and camouflage nets;
- attach a photo panel;
- decorated with various hand-made products.
An important condition is that the materials must be light and resistant to atmospheric conditions. If the mesh was mounted without guides, it may not withstand a large mass and sag. The decor must be attached firmly so that a gust of wind does not tear it off.
Fence decoration options
A mesh fence can serve not only as a fence for a site, but also as its decoration. A variety of methods and materials are used for this. One of the simplest options is to plant climbing plants along the entire fence line. As the bindweed grows, it will fill the entire area, creating a beautiful hedge.
As special materials for decoration, you can use colored twine or polymer ribbons, using them to create a variety of colored patterns. A simple, although not very effective, option is to use a camouflage net. But here it should be taken into account that its elements fade over time in the sun and become covered with a persistent coating of dust.
Among the more modern methods, we can recommend a special photo grid made of polymer materials. It is secured to the surface using special eyelets or polymer clamps.