When repairing or adjusting a car's suspension, it becomes necessary to fix the spring in a certain position.
There is a service tool for this work: a spring remover, with which you can remove chassis elements both in a specialized workshop and in a garage.
Various tool concepts:
- Passive: Represents two brackets connected to each other either rigidly or using a threaded rod.
Simply secures the spring, compressed using the weight of the vehicle. After lifting the body with a jack, the elastic element remains in a compressed state. - Active: The compression mechanism can operate under load when the shock absorber is under operating tension. The position of the body relative to the ground does not matter.
Let's consider the second option in more detail.
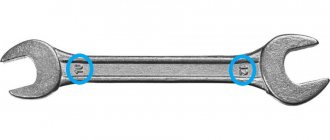
A device (puller) for loosening the shock absorber rod nut on VAZ 2108, 2109, 21099
To remove the front struts for disassembling and assembling the suspension of VAZ 2108, 2109, 21099 cars and their modifications, you need a special device that allows you to quickly and without much difficulty unscrew the nuts securing the shock absorber rod to the supports and the car body (“cups”).
A device (puller) for loosening the shock absorber rod nut on VAZ 2108, 2109, 21099
— Device device
A two-part device for loosening the shock absorber rod nut of the front suspension strut of VAZ 2108, 2109, 21099 cars (see photo above). It consists of a special key for holding the strut shock absorber rod 67.7823.9535 (holder) and a special nut key 67.7812.9533. On the nut wrench and the rod holder there are edges for open-end wrenches, for example on “17” and “27”. The holder has a groove of a certain shape into which a rod fits, the tip of which has the same shape.
— The principle of operation of the device
How to use a device for loosening the shock absorber rod nut of VAZ 2108, 2109, 21099 cars? Use a wrench to unscrew the rod nut, while holding the rod with the holder.
Example: unscrewing the shock absorber rod nut of the front strut of VAZ 2108, 2109, 21099 cars
We install a special device on the shock absorber rod nut
Unscrew the shock absorber rod nut.
Unscrew the shock absorber rod nut using a special tool and two keys
Notes and additions
— To unscrew the rear strut shock absorber rod nut, instead of a device (puller), it is easier to use a curved spanner set to “19” and an open-end wrench set to “10” to keep the rod from turning. For the shock absorber nuts of the front struts, you need the device described above.
Necessary equipment for work
- Jack, wheel chocks, supports under the car (it is unsafe to carry out work using only a jack).
- Open-end and ring wrenches according to the size of the fastener.
- Spanners with ratchet handle.
- Special key for disassembling the cylinder.
- Flathead screwdrivers of different sizes made of high quality steel.
- Retaining ring removers.
- Oil for replacing the shock absorber (with reserve for pumping).
- An air compressor or a cylinder of nitrogen (carbon dioxide).
Do-it-yourself repair and restoration of shock absorber struts - can this be possible?
Springs are a kind of consumable material for your car. Moreover, the costs of maintaining the rear suspension in working order are proportional to the quality of the roads. Car owners are constantly looking for ways to save money on repairs and maintenance of their own cars. We will tell you about self-repair and restoration of shock absorber strut features.
How does a shock absorber work and how does it work?
Despite the difference in the design of shock absorber struts, the operating principle is similar. Inside a pipe (cylinder) filled with liquid or gas (or both), a rod with a piston moves. The kinetic energy of the suspension stroke is converted into thermal energy. For this purpose, the piston is equipped with forward and reverse valves. They slow down the movement of liquid (gas), thereby damping suspension vibrations.
Typical design of a shock absorber strut
The liquid (gas) inside the shock absorber heats up and the heat dissipates from the surface of the body. Overheating occurs when moving over uneven surfaces for a long time. The environment inside the shock absorber loses its properties, and the quality of work deteriorates. In this case, the shock absorber components begin to degrade, and the strut quickly fails.
When the front and rear shock absorber struts need to be checked
Common malfunctions of this unit are known to everyone:
- Depressurization of the rod seal. Leads to oil leakage from the strut. It may leak at any moment. Properties change right up to complete loss of functionality.
- Very free movement of the rod in the pipe. In practice, the shock absorber strut is converted into a guide for the suspension spring. The malfunction is related to the internal valves.
- Free play during compression or rebound. Associated with production in the rod or cylinder. The consequences are like broken valves. The shock absorber does not perform its own function in the car, it knocks, rattles and makes other nasty sounds, which is why driving in such a car becomes uncomfortable and unsafe.
- External damage - dents on the body, cracks in the eyelet. They affect the chassis as a whole and can lead to the most serious damage.
If any malfunction is detected, you need to remove the strut and free it from the spring. Dismantling is done in the garage, without the use of special tools.
From time to time, owners of foreign cars, noticing that their struts are leaking, seek diagnostics (the process of drawing conclusions about the nature of the disease and the patient’s condition)
to the service station, where they will check the panel.
Troubleshooting and repair: what to do with springs, boot, etc.
We check all components for wear, mechanical damage, and nicks. We especially carefully inspect the polished surfaces of the inner wall of the cylinder and rod. It makes sense to replace rubber O-rings, seals, and gaskets in any case. Even if they do not show signs of wear, soft rubber loses its properties under the influence of oils. If you disassemble the shock absorber, spend a small amount on consumables.
Tip: When replacing parts, you can change the characteristics of the rack by installing aftermarket parts.
If you thoroughly wash all shock absorber components, consider half the work done. Fine particles of road dirt or wear products from metal parts interfere with the operation of the stem valves. Coked deposits should be removed using strong solvents.
Then check the remaining elements of the strut: spring, damping pad, shock absorber boot.
Not all parts can be repaired; some will have to be replaced with new ones.
Cracks and holes in rubber parts cannot be repaired, only replaced.
Below are more specific cases of repair of rack parts and options for its execution.
Repair or replacement? What you can create with your own hands
In fact, this is not such an ordinary task. Before carrying out work, you should carefully study the material and observe safety precautions. First of all, you need to find out whether you have a collapsible shock absorber or not. The one-piece body cannot be repaired; opening it with a grinder and welding it is unacceptable.
Interesting read: DIY wood chopping machine
If there is a nut or retaining ring where the rod enters the pipe, such a shock absorber strut can be serviced and repaired.
This is what a repairable rack looks like
How to do it yourself
So, we have decided that we really need a shock absorber remover, all that remains is one small matter - how to make it yourself? Here, each person’s ability to think logically and analyze should come to the rescue - what is unnecessary in the household and what you can do.
When making a puller, it is important to remember that it must be suitable specifically for your car model and type of shock absorbers.
If welding parts is not a problem for you, then go ahead and make the part in this way; if you have strong extra jacks in your home arsenal, they can become an assistant, etc.
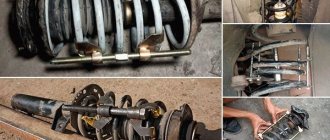
Using an example, let's look at how to build a shock absorber puller:
- We take a metal tube with a diameter of 18-22 millimeters and cut off 4 pieces of 15 centimeters each, not forgetting to smooth the edges. This is important not for the structure itself, but for its safety. In addition, all work should be carried out with gloves.
- Next, we cut off several pieces of metal rod with a diameter of 10 millimeters and a length of 25-30 centimeters. There should be 8 identical pieces, after which we bend one edge of the rod evenly so that it has the shape of a one-sided hook. Please note that such a rod is very difficult to bend, so for this process it is better to use additional metal supports.
- We prepare four large nuts M16 or another size, depending on the selected diameter of the future narrow tube or rod.
- We insert one piece of the cut pipe between two metal hooks made of a rod and weld this structure on both sides. Similar actions should be performed with the remaining parts. The result should be 4 small pipe parts and 2 hooks.
- Next, you should cut the edges of the rod so that the part ends on the pipe, in other words, we align the part to the level of the tube.
- We measure the large shock absorber spring. It will be different for each car model, so take yours right away, and from the front wheels. This is important to do because the shock absorber on the front wheels fails most often, since the front wheels take on the entire load. Measurements should start from the first large coil and end with the last large coil of the spring.
- Based on the measured size of the spring, we cut off two pieces of a narrow, strong tube or rod with a diameter of about 1 centimeter and smooth the edges. The pipe must be very strong; you can take it with already prepared threads for a large part of the pipe. We put welded pipes with rods on each side and tighten them with a nut. Please note that it is important to make a thread on a narrow, strong tube so that the nut fits “like clockwork.”
- Welded hooks should be placed so that the rounded edge is on the outside, and the ends look inside the spring.
- For structural strength, the locknut can be welded on one side. You can weld not a nut, but a welded tube with rods, this is at the request of the master. You can leave the resulting design as it turned out and test it on a non-working shock absorber.
This is interesting: The right front window lifter of the Lada Kalina does not work
You will use it more than once, and maybe more than twice, so don't think that this is a one-time use device. In order to quickly and least expensively complete this auxiliary part, analyze what spare parts you have at home. If the welding mechanism is not available, then you can do without it, but using other parts.
Tools needed
- A compressor for supplying compressed air or a pump for servicing bicycle shock absorbers.
- Special fitting for injection of compressed air.
Attention! You need to take care of safety. The work involves high pressure, so eye and hand protection is required.
Restoring gas pressure in the rack
- The shock absorber is firmly fixed in a vice, the position is vertical. It is necessary to carefully clean the part and blow out the space where the rod enters with compressed air. It is disassembled - removing the protective cap of the rod.
For convenience, work is carried out in a vice
Use a pressure gauge to control. The method is suitable for gas and gas-oil racks
You can watch the process in the video.
Video on how to pump gas into a gas-oil rack
There are different ideas about how to fill a car shock absorber. Nitrogen, carbon dioxide or just compressed air? In terms of a garage, there are few options. Compressed air will not greatly worsen the properties, especially considering that this is a repair and not a manufacturing of the rack at the factory.
Summarizing the spring puller...
It must be said that the use of such a device is justified especially in cases where spring replacement on racks of this type occurs frequently. These are mainly car services. It should also be noted that the device is universal. It can be used to remove springs from the struts of any car, actually changing the height of the arm with which the spring is pressed. The work associated with removing and replacing the spring when using such a device will be significantly simplified, which is perhaps the determining factor when deciding whether to manufacture something similar in your garage.
Bleeding the shock absorber
- The stand needs to be completely disassembled and cleaned of dirt and old oil. Check the O-rings and the condition of the inner pipe wall.
Remove stains and other dirt from all rack devices
To work with oil struts, no special equipment is required.
Video: how to restore functionality of a non-separable mechanism and is there any point?
Replacing the rod, valves, adjusting the stiffness of shock absorbers
Subsequent malfunction is damage to the rod, seals, valves inside the strut. There is a certain selection of spare parts on the market for repairing dismountable shock absorbers. In addition, the most experienced car enthusiast never throws away old spare parts, but tries to repair them. In addition, workable parts can always be extracted from them.
- So, let's disassemble the shock absorber.
Don't forget to wear gloves, the job is dusty
Turning work is usually cheaper than the price of a new shock absorber
Tip: The entire process of disassembling the shock absorber should be photographed. This will avoid problems during assembly.
Get rid of stains, dirt and dust during the disassembly process
All parts must be painstakingly repaired
The oil seal is recommended for replacement
After pumping oil, the rack must be pumped as usual
Video: How to repair auto MacPherson struts
If you have simple information about the operating mechanisms of your shock absorbers, you can save on replacing them. Most rack models are repairable, and components are either purchased at reasonable prices or made independently.
Interesting read: DIY drill case
Manufacturing a shock absorber spring remover
Many car enthusiasts use a regular chain: they wind a few turns around the coils of the spring and tighten the chain. After lifting the car with a jack, the shock absorber strut is stretched, but the spring remains compressed. This is a dangerous method: if the chain slips, the spring may spring back and cause serious injury.
How to make a simple puller similar to an industrial one
A mechanical semi-stationary “machine” can be created from a “Volgovsky” jack.
- old jack from Volga-24, Moskvich 412 or other Soviet passenger car = 0 rub.
- old connecting rod from any engine = 0 rub.
- steel corner from a landfill 1 meter = 0 rub.
- a pair of rods from broken shock absorbers = 0 rub.
- a handful of bolts and nuts M12 - M14 = conditionally free.
Drill, grinder, file, welding machine - such a set is either in the garage or available from a neighbor for a couple of beers. A platform from a corner is assembled to the top of the jack (where the turntable with the gearbox is located). Then a bracket according to the size of the support cup is welded to it. We screw the connecting rod to the standard support arm of the jack; the shock absorber strut will fit into it.
No need to worry about the strength of the structure. The jack lifts the car, the connecting rod also withstands a huge load. And to strengthen the cantilever structure of the bracket, we weld rods from the shock absorber rods. The puller is universal: the length of the shock absorber allows you to service any struts for passenger cars, as well as most SUVs.
The next spring remover, which is easy to make with your own hands, is a tightening type. Suitable for small spring sizes, since it is unrealistic to develop a large force on such a device.
The components are even more affordable than in the previous design. A piece of pipe, an angle and a long bolt M14 - M18. You can use a hairpin. We weld brackets from a corner and sawn pieces of an inch pipe. The puller consists of two identical ties, so there should be four brackets.
Be sure to weld the guide bushings for the studs. Otherwise, when tightening, the brackets will jam.
The spring is tightened by synchronously tightening the nuts on the studs. If you use a set of 2 ties, they should be installed strictly symmetrically.
DIY shock absorber repair
Almost any car enthusiast can repair shock absorber struts if he is not afraid of dirty work under the car. With all this, you will also be able to save a good amount of money. After all, when dull knocks begin to appear in the car’s suspension when driving over holes and potholes, it means it’s time to get serious about repairing the shock absorbers.
Any automaker uses its own design solutions to dampen vibrations when the vehicle is moving. But springs are found in virtually all modern passenger cars.
The lifespan of the shock absorber is determined by the driving style of the car and the quality of the roads. For example, almost all 10-year-old cars from Europe with a mileage of more than 200 thousand km come to us with “original” shock absorbers. And in our road conditions, the rarest suspension part survives up to 100 thousand km.
At the end of this article for us, you will find a nice video tutorial on how to repair the shock absorber strut of a VAZ 2110 car.
Below we will tell you what the main malfunctions of shock absorbers are, and how you can remove them yourself, if you have certain abilities, tools and the desire to do this.
The main malfunctions of shock absorber struts
The main defects of shock absorber struts are:
- Free movement of the rod in the cylinder,
- The presence of knocking noises when compressed or stretched,
- Oil leaks.
Finding all these problems is quite simple, without even removing the springs from the car.
To determine the performance of the shock absorbers, you need to press very hard a couple of times with your entire body weight on the wing or bumper of the car directly above each shock absorber in turn. If, after the car stops rocking, subsequent vertical oscillations occur, then the shock absorber is faulty. Usually a working unit stops swinging immediately after the action on it ceases.
Knocks in the shock absorber strut are detected in the same way. To do this, you should rest your palm on the highest point of attachment of the stand and swing it up and down with sharp rhythmic pressures. The blows will definitely be felt upon contact.
To find leaks in shock absorbers, just look between the wheel and arch of the car. Turning the wheel to one side will help improve your visibility. It is even more convenient for these purposes to use an inspection hole, overpass or lift.
Read more about ways to check the serviceability of car shock absorbers in our article on how to check the springs on a car.
Making a stand
The connecting rod was cut approximately in the middle; it will be used to mount the shock absorber.
A piece of tube into which the connecting rod will be inserted.
I flattened the tube a little so that a connecting rod could be inserted into it.
I gave the tube the desired shape by inserting a connecting rod into the tube and tapping it with a hammer.
I welded the tube to the lifting part of the jack.
I made a mount like this on top from the same scraps.
Having cut off the support heel from the jack, I lengthened the jack and made two legs. It turned out to be a full-fledged stand.
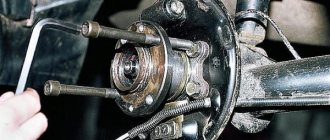
Removing shock absorbers
Repair of shock absorber struts begins with their dismantling. Removing shock absorbers usually does not cause problems. Unless the fasteners force the motorist to swear loudly and resort to drastic measures (“grinder” or gas “cutter”).
But most often it is enough to clean the nuts and bolts of sand and dirt, and then treat them with WD-40. After 20-30 minutes you can begin dismantling.
Here are a few points to consider when removing shock absorbers for their next repair or replacement:
- Often, the part of the car where the shock absorber is removed has to be suspended using a jack. You should definitely install stops under the threshold or bottom so that the car does not accidentally move during repairs.
- For best access to the lower mounting elements of the shock absorber, it is necessary to remove the corresponding wheel.
- The upper mounting points for the struts in most cars are usually located under the hood and in the trunk.
Interesting read: How to make a mini compressor with your own hands
In front-wheel drive cars, removing the strut will require more work. The complexity of the work depends on the type of shock absorber strut.
- Collapsible shock absorber designs are distinguished by the most difficult dismantling of the strut. To remove such a unit, you will have to unscrew the hub nut and remove the strut together with the hub.
- Non-separable springs have the most ordinary strut system. At the lowest point, the shock absorber is inserted into the cup, where it is secured with one or two bolts.
The upper mount for both types of struts is usually located under the hood (for front shock absorbers) and in the trunk (for rear shock absorbers). Here you will need to tighten only two nuts.
Shock absorber struts on front-wheel drive cars are usually removed together with the springs.
How does a spring remover work, and what types are they?
What is a puller used for? It overcomes the straightening force of the springs. The applied force on the puller brackets is commensurate with the weight of the car, but this does not mean that its design is too expensive and high-tech.
There are many options, but they are divided into only two types: mechanical and hydraulic drive.
Mechanical spring remover
Most often it has a threaded drive mechanism.
With a sufficient diameter of the pin (providing a good gear ratio on the thread), and a long handle of the key, you can compress the springs manually without excessive effort.
The technology is as follows: two pullers are symmetrically put on the rack. By turning the threaded rod, you bring the claws to the middle of the spring directly on the shock absorber, compressing it to the required size.
Installing one puller on a spring will cause it to break.
Pullers placed on both sides ensure uniform compression. When working with the suspension of trucks or heavy SUVs, experienced craftsmen install 3 or even 4 pullers.
Correct installation of pullers on the spring
Semi-permanent racks
Service stations often use semi-permanent struts to remove springs from shock absorber struts. The tool is quite universal and fits most pendants. Thanks to the drive mechanism gearbox, working with it is convenient and safe.
The only drawback is that it is not always possible to compress the spring directly on the car. After all, this is a bench device: the puller works with the suspension removed from the car.
Lever type
Lever type pullers have a similar “problem”. The mechanism is reliable and safe, but its dimensions do not allow it to fit into the space under the wing of the car.
Hydraulic puller
Can be portable or stationary. It works on the principle of a jack: there is a main and a working cylinder. By pumping liquid using a lever handle, the operator compresses the power brackets, between which there is a spring.
A compact two-section puller can also become a helper in a home garage, but a floor-mounted stationary machine is only suitable for a car service center.
The hydraulic system is pressurized using a foot lever. At the same time, the car mechanic’s hands are free, working comfortably and safely.
Of course, there are pullers with compressors, electric drives, and other devices that make life easier when servicing a car. This is all good until you see the price tag.
Sometimes it is more profitable to visit a car service center several times than to purchase an industrial puller for personal use. Which exit? Make your own instrument.
DIY shock absorber repair
To find the cause of a malfunction in the shock absorber strut of a front-wheel drive car, the quickest way is to completely disassemble it. For a thorough discussion of disassembling, reassembling and repairing the shock absorber, watch the video tutorial at the end of this article for us.
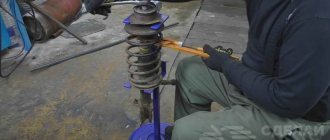
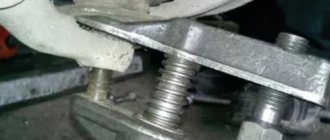
An indispensable device for disassembling the shock absorber will be zip ties. This device for compressing springs is a strong pin, on one end of which a left-hand thread is cut, and on the other, a right-hand thread. There is a hex key at the end of the stud. Clamps (with left and right threads, respectively) are screwed onto the ends of the stud, which will firmly cling to the coils of the shock absorber spring when it is compressed.
- To compress the spring, two such tensioning devices are required. They are installed on the reverse sides of the spring. Tightening is done by alternating rotation of the pins.
- When the spring is compressed so that it can “move” freely in the strut, you can unscrew the top nut, remove the support bearing with the rubber bumper, and carefully remove the spring.
After a careful inspection, it may turn out that the cause of the knocking noise lies in a worn rubber bumper. A tight rotation with a squeak is observed when the support bearing fails.
- The collapsible shock absorber is turned out of the body using a special key. Some motorists successfully manage this work for us with the help of a hammer and a suitable iron rod.
- After replacing defective parts, reassemble the shock absorber strut in the reverse order.
- When the upper nut is tightly screwed, the spring must be slowly released to working condition. It is important that the first turns fall into their sockets, which prevent its displacement.
After this, all that remains is to install the shock absorber strut in the space, tighten the wheel and lower the car.
Repair of shock absorber struts should be carried out without haste and in compliance with safety regulations. In particular, you need to carefully and carefully compress and release the springs. Then the repair will take place without damage to the vehicle or human injuries. And after repairing the shock absorber struts, the car will move smoothly and quietly.
We cook the screeds ourselves
In general, it makes sense to make shock absorber spring ties yourself. How to do this is discussed further.
Four nuts and two threaded rods
The metal products listed below are easy to find in almost any supermarket. For example, you can buy two M16 threaded rods. You will also need four extended nuts, as well as a steel plumbing pipe. Its internal diameter is 16-16.5 mm.
The end result is what is shown in the pictures. You will also need a steel rod, which is used to make reinforcement. Let's look at how screeds are made:
- Two identical cylinders are cut from the pipe, the length of which is 80-120 mm;
- Threaded rods can be shortened if necessary;
- 8 rods approximately 30 cm long are made from reinforcement;
- Using any bending equipment, the rods are bent to obtain hooks;
- Four rods are welded to two nuts, another four - to pipe sections;
- The set of components is completely ready for use at this stage.
It is easier to weld by placing the workpieces on a plane. The essence of these words is illustrated by the picture:
How to weld hook rods
Actually, what follows is a film where the technology is shown “inside and out”. The author even solved the problem with the lack of a bending machine: to bend one rod, you need two similar rods welded to a steel profile.
If the reader thinks that using welding is difficult, then it is better not to take risks. Welded joints can withstand significant loads, but only if they are performed according to all the rules. Spring ties can be made without welding. A suitable drawing is given below.