Just as a theater begins with a coat rack, so the entrance to an estate begins with a gate. All homeowners are faced with the problem of fencing a site and creating a convenient entrance to it. Requirements for a gate: ease of use, beauty, strength and reliable protection of the area from uninvited glances and guests, ease of manufacture and maintenance, durability.
A product made from profile pipes perfectly meets these requirements. A do-it-yourself gate made from a profile pipe will serve as a source of pride for the owner and as proof of his craftsmanship skills.
If you, our dear reader, are reading this article, then the topic of installing gates is not alien to you. Here you will find a detailed description of the technology for installing and manufacturing a gate made of corrugated pipe. We hope that this information will be useful to you.
How to choose the size of a gate made of corrugated sheets?
There are no strict mandatory standards or restrictions regarding the size of gates. However, when choosing them, you need to consider the following:
- The optimal width of a gate made of corrugated sheets is 1.0 m. This opening width allows you to easily bring furniture or other large items onto the site. Moreover, if it is larger, this can lead to rapid wear of the hinges or skewing of the gate cloth.
- The height of the gate should not exceed 2.0 meters. If the fence around the site is high, then such a gate made of corrugated sheets will not look very good. In this case, in the opening between the support pillars above it, it is better to install additional crossbars with a metal profile insert. This will allow you not to overly weigh down the canvas of the gate itself.
Naturally, there are exceptions to these rules. For example, if your height or the height of someone in your family is above 2.0 meters, then making a gate from high-height corrugated sheets will be simply necessary. However, you should not forget about using special hinges and strengthening the frame with additional cross members.
Top ↑
Hinged or sliding?
Structurally, gates are divided into two types: swing or sliding.
Their advantages and disadvantages are given in the table:
| Wicket type | Advantages | Flaws |
| Swing | ease of manufacture | In winter it is necessary to clear snow |
| light weight | There is no sound insulation at all | |
| low price | ||
| beautiful appearance | ||
| Time-tested design with hinges is trouble-free | ||
| Sliding | manufacturing is more difficult than swing | If there is a power outage, it may be difficult to enter the site |
| the price is higher (the electric motor and automation are more expensive than simple profiles and sheets of metal or corrugated sheets) | If the electric motor breaks down, it takes time to purchase and replace; during this time the gate cannot be used | |
| beautiful appearance | There is no sound insulation at all | |
| small space saving | Difficult to install on your own |
In general, the choice of the type of gate is a matter of taste, although many prefer the traditional hinged design - it’s more familiar. The main advantages of sliding work are that automation and saving space for opening are not so relevant for small gates.
Installation of support pillars
The first and one of the most labor-intensive stages of work is the installation of support posts on which the metal profile gate will be supported, with your own hands. This is not difficult to do, but it will take quite a lot of time, especially when it comes to brickwork.
There are two options for installing a fence made of profiled sheets. The first and simplest is the option of attaching the fence to poles made of metal pipes dug into the ground. In the second option, a fence with a gate and a wicket made of corrugated sheets is attached to pillars made of brick or stone.
Top ↑
Using metal support posts
The use of profiled sheets for the manufacture of entrance groups has become so widespread because making wickets and gates from corrugated sheets is very simple and inexpensive. Therefore, in the vast majority of cases, metal pipes are used as supports. They are much easier, cheaper and faster to install than brick ones.
a profile pipe of 80x80 mm with a wall thickness of 3-4 mm is best suited . To install them, holes are dug in the ground with a size of at least 300x300 mm and a depth of at least 1.0 m.
Previous Next
Gates and wickets made of corrugated sheets - photo of installation on metal poles
The depth of the holes depends on the type of soil where the pillars are installed. If the soil is rocky, then 70 cm will be enough. But if the soil is clayey, the depth of the holes should be no less than the freezing depth of the soil. In most regions of the middle zone it is 1.2 m.
be careful
Installing a gate made of corrugated sheets on insufficiently deepened pillars in heaving soil leads to serious deformations of the frame and canvas, the correction of which is often impossible.
Top ↑
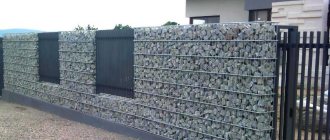
Support pillars made of brick or stone
In this case, the dimensions of the foundation must be larger than the cross-section of the support column. Typically, such pillars are made of 1.5 bricks, that is, 390x390 mm. Therefore, the foundation must be no smaller than 500x500 mm. Since it is much more difficult to make such posts for a gate from corrugated sheets yourself, this option is chosen less often.
The brickwork itself does not withstand bending loads well, so to give the pillar additional strength, a metal pipe is installed in the hole before the foundation is poured with concrete. Around it the masonry is made of brick or stone. Metal embeds are welded to the same pipe, which are removed outside the masonry. Gates and wickets made of corrugated sheets will subsequently be installed on them.
Classic gate made of metal profiles - photo of installation on poles using an external frame and mortgages
The top of metal support posts should be capped to prevent moisture from entering the post. If you plan to install lamps near the gate, then before concreting the pillars in them, you need to tighten the wire in a corrugated pipe.
Top ↑
Important information
When making gates from pipes, you need to take into account many nuances so that the work turns out to be of high quality and durable. It is necessary to select the right materials, perform calculations, and also check the availability of the necessary tools. Perhaps we’ll start with them.
What tools and materials do you need to prepare?
To complete the job, we used the following tools and materials:
- Welding inverter
- Electrodes with a diameter of 3 mm
- Welding generator, since there was no electricity on site
- Grinder + grinding and cutting wheel
- Roulette
- Square
- Level
- Profile pipes
- Loops
- Thermal insulation material (in our case, foam)
- Facing material (in our case, metal sheets)
- Paint and primer + roller
- Polyurethane foam
Selecting materials
The most important thing to do is to choose the right materials. After all, the strength and durability of the entire structure largely depends on them.
You can weld garage doors from angles or profile pipes. The second option is more reliable and durable, in our experience. That is why now we will not tell you how to weld a garage door from corners. This is a topic for a separate article.
The profile pipe can be square, oval or rectangular. It's better to use a square one. A square pipe makes a reliable and beautiful gate, and this profile is easier to work with. Of course, you can weld a garage door from a round pipe, but such work is more difficult and more expensive.
We've sorted out the profile. Now we need to choose the material from which our professional pipe is made. If the budget is completely limited, then you can buy carbon steel pipes, they are cheaper. The best option is stainless steel pipes, but you will have to spend money. The optimal choice is pipes made of low-alloy steel.
Next you need to decide on the thickness of the pipe wall. Manufacturers offer products with thicknesses from 1 to 20 mm. In our case, 2 mm will be enough. It is not advisable to take pipes with a larger wall thickness when assembling garage doors.
As for the sizes, prepare pipes 40x20 mm. This is a universal size, easy to find on sale, relatively inexpensive, and can withstand loads well.
We use metal sheets 2 mm thick as cladding. You can also use corrugated board or wood.
Additionally, the doors can be insulated using polystyrene foam. If you spend a long time in the garage in winter, then insulation will significantly reduce heating costs. Styrofoam is cheap and works great for this purpose.
After assembly and installation, the gate can be painted to protect it from premature corrosion. Choose paint for exterior use.
What to consider?
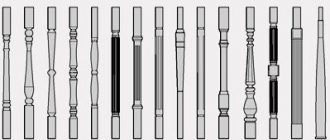
To ensure that the gate meets all requirements, think through every detail. To begin, select the design type. The consumption of material and the complexity of the work will depend on it. Below you can see the most common gate frame options.
Next, decide whether the design will be complicated by any additional elements. For example, a gate inscribed in one of the gate leaves. This also affects material consumption and welding complexity. In our case there will be no gate.
Decide what material you will make the cladding from. In our opinion, the best option is metal sheets a couple of millimeters thick. Take care in choosing paint and its color.
Make a detailed drawing; do not assemble the doors by eye. Otherwise, you risk getting a lopsided, crooked gate. Based on the drawing made, calculate the amount of materials and purchase them with a small margin. This way you will be sure that during the work you will definitely have enough of all the components.
Preparing parts for the frame
While the concrete mixture in the foundations of the support pillars gains the necessary strength, you can start assembling the gate itself. Before you make a gate from corrugated sheets with your own hands, you need to make a frame for it.
For the frame, take a profile pipe 40x40 mm or 60x30 mm . A light small gate can also be made from a 40x20 pipe, but then to give the frame the necessary rigidity, the pipe must be placed with its narrow side facing the corrugated sheet metal sheathing.
A layer of crushed stone is poured into the bottom of the pit and thoroughly compacted. Then the pillars are installed strictly vertically, using a level, and the hole is filled with concrete mixture. Gates and gates made from metal profiles can be hung on concreted pipes no sooner than after 5-6 days. This time is necessary for the concrete to gain at least 20-30% of its strength.
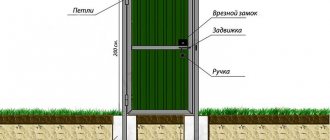
In order to avoid mistakes when preparing parts, before cutting the pipe it is better to first draw a sketch or make a drawing of a gate made of corrugated sheets with all the necessary dimensions. An example of such a drawing is given below.
Detailed drawing of a metal profile gate
The prepared pipe is cleaned of rust using a metal brush and cut into pieces of the required length. To assemble, the edges of the workpieces are cut at an angle of 45°.
In addition, in order to make a gate from corrugated sheets, it is necessary to cut one or two crossbars, depending on its height, which should fit closely between the large sides of the frame. This will make the structure more rigid and subsequently make it easier to install the lock.
Top ↑
We weld the hinges and install the gate
In order to hang profile swing gates without distortion, the leaves are temporarily welded together with narrow metal strips with a gap of 3 - 5 mm. Then, using bricks or wooden blocks, they are inserted into the opening to the height of the technical clearance. The position is checked horizontally and vertically with a plumb line and level, after which it is fixed with wedges or welded to the posts with steel strips.
To evenly distribute the load on the pipes of the racks and frame, steel strips (ears) are welded to the cylindrical hinges. In this way, canopies can be welded on both sides. The lower part of the hinges is attached to the post, the upper part with the ball is attached to the sash. If it is solid, you need to drill a hole for lubrication. To prevent the movable connection of the canopies from sintering during welding, it is first generously lubricated with grease.
Depending on the weight of the swing gates, 2–4 hinges are installed. First, they are grabbed, then, after removing the temporary fastenings, the movement of the valves is checked. The final welding is carried out from the bottom up along the perimeter of the ears. To prevent the removal of swing gates by intruders, limiters are installed on the supports.
Welding the gate frame
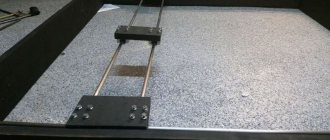
The workpieces are connected to each other by welding. To prevent the frame from being deformed, before making a gate from a profiled sheet, the blanks must be secured from a profile pipe in a homemade jig .
It's very easy to make:
- Take an OSB sheet with a thickness of at least 10 mm or a sheet of thick plywood.
- A canvas is cut out of it, the width and height of which must be at least 50 mm larger than the planned dimensions of the gate.
- Clamps are prepared that will hold the frame elements, pressing the metal profiles to the surface of the sheet. There should be twice as many clamps as welds.
Before welding a gate from corrugated sheets, all angles are carefully checked and the diagonals of the frame are measured. One or two crossbars are installed between the upper and lower lintels of the gate frame. Then clamps are installed, which should be located a short distance from the welding site.
Diagram of how to weld a gate from corrugated sheets using a jig made from an OSB board and clamps
After fixing all the frame elements on the jig, you need to once again check the angles and parallelism of the opposite sides of the frame. Then you can start welding. In this case, the clamps cannot be removed until the seams have completely cooled down - otherwise, temperature stresses in the metal can deform and even destroy the metal. After welding is completed, all joints are cleaned.
Thanks to this welding technology, even a complete beginner can make a gate from a corrugated sheet with his own hands. At the same time, even if you have some experience in welding, I do not recommend neglecting the fixation of the workpiece. Remember that making a new frame after accidental damage to the old one will take longer and will cost more than making a simple jig.
Drawing for swing metal gates with a wicket made of corrugated sheets (click to enlarge)
In small summer cottages, gates with a wicket made of corrugated sheets are often installed. All operations for assembling the wicket frame built into the door leaf are performed in the same way as those described above. The design of the gate is subject to change, in which an opening must be provided for installation. In addition, the need to build in a gate imposes certain restrictions on its height.
Top ↑
Choosing the right material
Rolled metal products such as profile pipes are versatile and are used at any construction stage, from laying the foundation to finishing activities. This explains the wide range of such products. Pipes are usually distinguished by the type of cross-section, external coating, and general composition. Products can be:
- stainless;
- galvanized;
- carbonaceous.
Profile pipes differ in types of production; they are usually divided into seamless and welded options. Devices belonging to the first type are characterized by high resistance to increased pressure, vibration, and adverse external factors. This explains their high cost.
In this video you will learn more about how to make a gate:
If we talk about welded pipes, their price range is much lower. Their most vulnerable places are welded seams, but this property is unacceptable for small products. The assembly of gate frames is usually carried out using welded pipes obtained by hot rolling.
Installation of fittings on metal profile gates
After assembling the gate frame, but before covering the frame with a metal profile, hinges and plates are welded to the gate for installing a lock and handle, if necessary.
The hinges for the gate made of corrugated sheets are installed towards each other and secured with welds 1-2 cm long. The hinges are placed so that the sheet cannot be removed after final installation. With this installation, the gate can only be cut with a grinder. Attach the loops at a distance of 25-30 cm from the upper and lower edges of the canvas.
Installation of hinges on a gate made of corrugated sheets
When choosing a lock for a gate made of corrugated sheets, you must pay attention to the operating conditions specified by the manufacturer in the passport. The lock must be designed for outdoor installation . When choosing a lock core, preference should be given to those that can be opened from the inside without a key. This will save you from problems if the water in the castle freezes in winter.
When opening the door inward, the lock can be either mortise or overhead. If the gate opens outwards, only a mortise lock is placed on it. The lock and handle for a gate made of corrugated sheets are usually installed at a height of approximately 90 cm.
Of the mortise locks, the most convenient are special narrow-profile locks designed for installation in profile pipes. The very principle of their installation partially protects them from moisture and dust, which increases their service life.
Narrow-profile lock for a gate made of corrugated sheets
Before cutting the lock into a gate made of corrugated sheets, you need to mark the location for its installation: a rectangular slot for the body and a circle for the core. In addition, it is better to immediately mark the attachment points for the handle. Next, the installation process is quite simple:
- Using a grinder, cuts are made along the long sides.
- Using a drill, holes are drilled along the short sides as close to each other as possible. It is necessary to drill not along the marking strip itself, but slightly inside the rectangle.
- To install a mortise lock in a gate made of corrugated sheets, the hole is brought to the desired shape using a file.
- Round holes for the core are cut out using a metal burr. If it is not available, you can also use contour drilling and finishing with a file.
- Holes for mounting screws are drilled.
- The area around the lock is cleaned of rust, primed and painted.
- The lock is installed on a gate made of corrugated sheets, but without linings - they are installed after the frame has been covered.
This completes the installation of the lock in the frame. However, since putting a lock on a gate made of corrugated sheets is only half the battle, the work does not end there. It is necessary to install the counter part into the support column. This stage is performed after installing the gate on the posts.
A clear example of how to insert a lock into a gate made of corrugated sheets (click to enlarge)
Additionally, a lock or latch can be installed on the gate made of corrugated sheets. Such solutions make sense both from the point of view of increasing safety and for convenience - especially if the gate is often used. In this case, it is easier to close it with a latch than to fiddle with the lock every time. You can also immediately purchase a lock with a latch and not install it separately.
Previous Next
Classic latch and already installed narrow-profile lock with handle for a gate made of corrugated sheets
Top ↑
Covering and decor
The simplest cladding is made from corrugated sheets or metal tiles. The materials already have a beautiful and durable protective coating on both sides, and all that remains is to cut them to the required sizes and attach them to the welded frame. Fastening is carried out using metal screws according to the following algorithm:
- Mark the places of the screws on the canvas in increments of about 25 cm. 4 points corresponding to the corners of the frame are required, the rest are made arbitrarily for fastening to the frame and jibs.
- Drill holes in the canvas.
- Place the sheet on the frame and attach it with self-tapping screws, screwing them through the holes into the corrugated pipe of the frame.
Using the same principle, sheathing is made from boards or furniture panels, metal picket fences or similar materials.
For a gate assembled entirely from pipes, the cladding parts are cut in advance. They can be equal in length, and the sash will be rectangular. To obtain a shaped profile of the top edge, using a pre-prepared sketch you need to measure the length of the outer, central and intermediate segments. It is more difficult to install the parts of the figured canvas on the frame; they need to be aligned. You can make the task easier using a template.
You can also decorate the gate with forged parts. Forging elements do not go out of fashion, and you can even make them at home if you have a pipe bending machine. For a forged gate you will need a detailed sketch indicating the size and quantity of each element. The pattern is made up of simple shapes: circles, spirals, curls and wavy details.
You can decorate a flat, solid sheet of metal with forging by welding parts of the pattern onto it. To assemble an openwork sash, the parts are welded to the frame and to each other, connecting them at the points of contact. Sometimes forged decor is done only on the upper edge of the frame, above the canvas.
The decoration of the gate can be complemented by painting or varnishing. To do this, choose metal materials (for steel parts). The cladding wood is painted with appropriate compounds. The treatment is performed not only for the aesthetic appearance of the structure, but also to protect the materials from the effects of precipitation. Finally, handles and lock plates are installed.
How to install a gate made of corrugated sheets on support posts?
After several days have passed, the concrete mixture in the foundations of the support pillars has gained some of its strength, and the assembly of the frame is completed, you can install the gate from corrugated sheets.
To do this, place a wooden block under the frame. Using a level, the gate is set strictly vertically and the places where the second halves of the hinges are attached are marked on the support post. It must be remembered that for normal opening in winter, the canvas must be 100 mm higher than the surface of the track. Especially if you are installing a gate to a dacha made of corrugated sheets, where snow is rarely cleared in winter.
Having marked the installation locations of the hinges, they are temporarily attached to the support posts using electric welding. After checking the opening and closing of the gate, the hinges are welded with a continuous seam.
Consider
Installing a gate made of corrugated sheets with your own hands requires care and repeated double-checking, since without a “fresh look” from the outside it is easy to make a mistake.
If the gate is installed correctly, it should not open or close spontaneously. To prevent it from opening in both directions, a limiter is welded to the support opposite the hinges.
When the welding work is completed, all seams are cleaned using an angle grinder, and rust is removed from the frame and primed. Then they are painted twice with metal paint for exterior use. The main part of the lock installed in the frame must be covered with film or construction tape.
Metal profile gate frame mounted on poles
This is the penultimate stage before sewing, since you need to install a lock on the gate made of corrugated sheets and in the support post. To do this, the bolt is smeared with toothpaste and the lock is closed. After this, the place where the locking device should go will be marked on the pole.
If the lock is simple and there is no receiving block, then you just need to drill a hole of the desired shape and finish it with a file. If there is a receiving block, then you must first mark its location based on the location where the crossbar enters, and then, again, drill a hole of the desired shape. Then holes for fasteners are drilled and the mating part is installed.
Top ↑
Installation
Let's consider the main stages of installing a gate:
- We choose a place for load-bearing elements. For them, choose wooden poles, a metal pipe or a profile with a cross-section of 10 cm or more. Remember that the poles are dug into the ground, so they must be a meter higher than the gate. We measure the gap between the supporting pillars.
- We are preparing the material for the frame and stiffeners. For a wooden structure, we assemble a frame from boards, fastening them with self-tapping screws. Metal plates with teeth driven into the frame will help increase its rigidity. For metal – profile and corners 3 mm thick. Pipe cuttings will add rigidity. For cladding, choose a sheet with a thickness of 1.5 mm. Next, you need to clean the metal surface with a grinder and treat it with anti-corrosion agents.
- We prepare the solution for pouring the foundation and crushed stone.
Next you need to prepare the foundation:
- A drill will be useful for this. We drill 2 holes 1 meter deep. Be sure to take into account the margin in the distance between the posts for mounting the frame.
- Prepare the solution by mixing sand and cement in proportions 1: 3
- We insert the pillars into the prepared recesses. Drive in 30 cm with a sledgehammer.
- We fill it with crushed stone, tamp it down, and fill it with mortar.
Installation of a wicket door consists of the following steps:
- For a metal gate, a frame is welded from corners and corrugated pipes. For added rigidity, a transverse strip is welded in the middle. Do not forget that a gap is left at the bottom to account for bad weather and snowfall! Finished structures must be sanded, uneven surfaces removed, and degreased with a special antiseptic.
- When the frame is fastened, its diagonals are measured. If they are equal, then the door will turn out without distortions and will function properly.
- We attach the sheathing to the frame. We attach the pre-processed material (boards, solid or galvanized sheet metal, lining) to the frame using self-tapping screws or rivets.
- When starting the installation of a metal gate, it is necessary to firmly fix the support post and the frame of the gate together with clamps (auxiliary tools for fixing parts). You only need to leave a gap of about 3mm by inserting pieces of wire.
- We attach the door handle.
- We install the lock.
- We hang the product on the supporting structure, having previously primed and painted the product.
These are the basic rules for installing wooden and metal structures.
In the case where you have enough experience and decide to install custom forged gates yourself, remember that installation here requires much more attention to detail
It is also important to take into account the width of the doorway, the weight of the structure, the depth of the pits for supports, and the reliability of fastenings
If you want your fence to remain repair-free for as long as possible, take the correct installation of the product extremely seriously. If necessary, contact a specialist for help.
Sewing a gate made of corrugated sheets
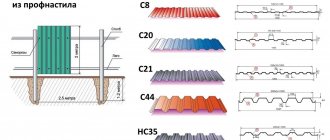
After the paint has dried, the gate canvas is sewn up with a profiled sheet. As a rule, wall corrugated sheeting C-20 or C-21 with a thickness of 0.5-0.6 mm is used for this. The use of sheets with a lower wave height is not recommended.
To fasten the corrugated sheets, roofing screws are used, less often - special rivets. Sometimes bolted connections are used for this, but this is not recommended, since in this case the necessary protection against corrosion is not provided for the web at the point where the bolt passes through the corrugated sheet. The sheets are fastened through each wave horizontally and into each transverse beam vertically.
A gate covered with corrugated sheets with closed corners
If desired, all sides of the gate made of corrugated sheets are covered with special square strips in the color of the corrugated sheet. This gives it a finished look and, in addition, provides additional protection for the frame from moisture.
After sewing the fabric, linings for the lock are installed, as well as a handle for the gate made of corrugated sheets.
Top ↑
Decorating Tips
The metal structure of the gate must be reliably protected from the influence of natural factors. For this, a primer for metal and enamel is used, which, after the primer has dried, is applied using a brush, roller or spray. You can use an aerosol can available on the market.
Before applying the primer, degrease the surface using acetone or gasoline. This improves adhesion and increases the service life of the paint and varnish coating.
It doesn’t matter when to paint - before hanging the sashes or after installation
It is important to ensure high-quality enamel coating of all parts of the metal structure. It is possible to improve the appearance of the gate using various materials and decorative elements
Forging decoration
You can decorate gates made from a profile pipe in an original way with forged parts.
Forged elements were used for decoration
Making forged elements yourself is problematic. They can be purchased in specialized stores or ordered from a forge.
The combination of forged elements and bent rods creates an original pattern
It is easy to weld the finished decor yourself to the finished product in the required places, creating an original pattern.
Application of profiled sheets
Using profile sheets to cover the gate frame allows you to reduce manufacturing costs.
Budget finishing option
The wide range of colors of profiled sheets offered in the retail chain allows you to harmoniously fit the structure into the interior of the site.
The color of the profile sheet emphasizes the finishing of the building
The low weight helps reduce the load on the hanging loops.
Wood finishing
The wood that can be used to decorate gates has an original texture and gives the product a presentable appearance.
Textured wood makes the gate presentable
The material requires additional processing to protect it from moisture and cracking.
Wood coated with varnish is resistant to moisture
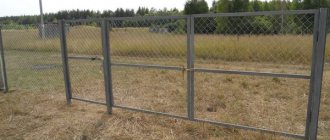
Using a Grid
Metal mesh is a budget solution for decoration. Using a mesh, you can easily cover the metal structure of the frame and provide a free view of the surrounding area.
These gates provide visibility
Mesh made from galvanized wire is less susceptible to corrosion and is durable.
Gate option with wire mesh
Polycarbonate sheathing
Polycarbonate is a modern material used in the manufacture of structures.
The combination of polycarbonate with forging improves the presentation
The lightness of the material and ease of fastening make it popular.
Option for finishing gates with colored polycarbonate
The use of polycarbonate in various colors allows you to approach the design creatively.
Metal lining
Metal sheets are a simple and quick solution for covering the frame.
Gates covered with metal look aesthetically pleasing due to the use of decorative elements
Possessing increased strength, the material is distinguished by significant mass. This increases the weight of the sashes and requires additional reinforcement of the structure.
Wicket design made of corrugated sheets
After the frame is ready, it's time to think about the design. Despite the comparative simplicity of the design, there can be a lot of design options, including the use of decorative elements.
The simplest gate made of corrugated sheets is a rectangular frame made of a profile or round steel pipe, onto which a profiled metal sheet is attached. Such a gate is perfect for a fence made of corrugated sheets - it will fit especially well into the usual blind fencing of a summer cottage or personal plot. This solution also looks good with a fence made of brick or stone, including when used as supports for pillars made of these materials.
Previous Next
Classic versions of gates made of corrugated sheets
The gate does not have to be rectangular at all. It can be made arched, but this will require minor changes to the structure of the frame. An arched gate under corrugated sheeting looks especially good with a small rounded canopy or canopy.
Beautiful gates made of corrugated sheets of original shapes with forging and canopies
In order to highlight the entrance group in a fence with solid sections made of corrugated sheets, you can leave an opening in the middle of the gate with a decorative steel grille or polycarbonate strip inserted into it. In addition, street lamps can be installed on support poles.
A gate made of corrugated sheets with forging will look even more beautiful. In this case, the profiled sheet will serve as a kind of background for decorative forged parts. In addition, if forged elements cover the entire opening, they strengthen the frame of the gate and make it more resistant to burglary.
Previous NextElegant gates made of corrugated sheets with forging elements - photos of four design options of varying complexity
A forged gate from corrugated sheets can be made with your own hands without any problems. Nowadays, ready-made decorative forged parts can be purchased at almost any building materials store. The main thing is not to overdo it with forged elements, so that the gate canvas does not look colorful and overloaded with decor.
To begin with, it is better to draw a sketch of the design of the gate. The parts purchased in accordance with the sketch are laid out on the canvas and welded to the frame, starting with the largest and ending with the smallest. However, such gates made of corrugated sheets with forging elements look much worse than the products of real specialists.
A gate made of corrugated sheets with forging - a photo of some forged elements made on production lines, as well as a simple sketch that can be implemented using them.
Firstly, professional artistic forging allows you to produce very elegant and thin elements that cannot be produced industrially. Secondly, the range of ready-made elements is very limited. And thirdly, a forged gate with corrugated sheets, made by a professional, can reflect any idea and is stylistically integral, unlike composite products.
Finally, the gate can be either a separate object or part of the gate. Thus, swing gates with a wicket made of corrugated sheets are often used. This decision is justified if for some reason you are very limited in the size of the entrance group - for example, you are replacing an old gate and want to install new ones on the same support pillars.
Built-in wicket inside a gate made of sliding corrugated sheets
However, this solution has certain disadvantages. In particular, gates with a built-in wicket made of corrugated sheets are heavier and place more stress on the hinges. In addition, the operation of such a gate can cause certain difficulties, since its opening is limited from below and above by the gate frame. As a result, it is easy to get caught on the lower profile, and to hit your head on the upper profile.
Top ↑
How to sheathe a gate frame
Upon completion of the installation of the frame, finishing of the sashes follows. The cladding technology depends on the material used. It is advisable to use sheathing identical to the fence. Otherwise, the gate will not fit into the overall picture of the fence.
At the summer cottage
To fill the frame of the profile sashes, various variations of material are used:
- forged elements;
- sheet metal (galvanized);
- profiled sheets;
- edged and tongue and groove boards treated with primer, antiseptic or paint and varnish compounds.
Sheathing made of corrugated sheets
This is the most practical option for finishing this structure. The material is low in price and easy to install. It can be combined with forged elements (bolts, trim). Often sheets are purchased with a painted and galvanized coating. The corrugated sheeting is attached to the frame of the sashes with self-tapping screws.
Types of profiled sheets
Wood paneling
It wins in presentable appearance, but loses in durability. Wood is susceptible to rotting and mechanical damage. To improve strength and extend service life, the lumber used is treated with fire inhibitors and anti-fungal agents.
Forged elements
Often the cladding of the structure frame is made of forging elements made from metal that is heated to forging temperature and amenable to high-temperature pressure treatment. The implementation of original design solutions is possible by cutting and welding such products.
Forged doors
If you have a welding machine and a blowtorch, you can forge a metal pattern on the doors yourself. However, it is easier to buy ready-made forging elements, but they will cost much more. For example, the price for 1 m2 of finished products will be at least 1 thousand rubles.
Cost of a gate made of corrugated sheets
How much it will cost to install a gate will depend on how much of the work was done independently, without the involvement of specialists.
When making your own gate
If you did all the work on installing and assembling the gate yourself, you will only have to pay for the materials that were needed for this.
Usually the final cost is up to 2000-2500 rubles. But you don’t have to make the gate yourself. You can buy gates made of metal profiles in the construction departments of most supermarkets. Ready-made gates made of corrugated sheets can also be purchased from specialized companies engaged in the manufacture of metal structures. There you can order the production of such a product according to your own sketch, while receiving free technical advice. When such a gate made of corrugated sheets is installed, its price will be from 4,500 rubles, excluding the cost of locks and hinges.
If for some reason you also had to hire specialists to install a gate made of metal profiles, the price of such work in different regions of the Russian Federation will be from 2100 to 2500 rubles. And this also does not include the cost of installing a lock.
Useful article? Save it on social networks so you don’t lose the link!
Top ↑
Team oprofnastile.ru
Read on topic:
How to make gates from corrugated sheets with your own hands?
Do you want to make a gate from corrugated sheets yourself? Then read the step-by-step instructions: from marking the frame to installing hinges and locks.
Drawing of swing gates made of corrugated sheets
Are you looking for a detailed drawing of swing gates made of corrugated sheets? Sketches, installation diagrams, drawings of various types of swing gates made of corrugated sheets are in the article.
Manufacturing of sashes
First, you should study the project and prepare a welded frame for each garage door. A metal sheet is subsequently attached to them. To work, you need a profile element of a suitable cross-section.
Scheme for making sashes
Canopies are welded on both sides. The result is a solid frame, suspended by means of canopies framed by the opening. It needs to be divided into 2 separate doors.
To prevent possible difficulties with opening garage doors, it is necessary to provide gaps between the doors:
- from the bottom of the gate above the threshold - 2 cm;
- between the overlap of the garage door opening and the leaf – 1 cm;
- side surfaces and sash - 5 cm.
Garage door diagram
The assembly of the structure begins with the side posts. The work is carried out as follows:
- The course section of the corner, prepared taking into account the required gaps, is attached to the side of the structure. Leave 5 mm gaps between the frame of the opening and the corner. Then the metal is grabbed using temporary pads. They do the same on the other side.
- The horizontal parts of the opening are cut from the corner and welded to the vertical corners. You need to cut one of the shelves in the middle.
- Canopies are welded. Their lower part should be welded to the frame and the top to the sash.
- 2 vertical posts are welded in the center of the opening.
- Horizontal lintels are attached in the middle of each sash.
- The result is a frame that only needs to be cut into 2 halves so that they can open independently. Since the top and bottom corners are already cut in half, all that remains is to separate them to the end.
Gate sketch with dimensions
To prevent the product from sagging under its weight, it is necessary to temporarily secure it by welding inside the braces. After this, the halves will begin to open.
Gate leaf trim
This is part of the job where you need to do everything well, since the accuracy of the execution will affect the appearance and performance.
It is necessary to perform certain operations sequentially:
- Pieces of galvanized metal sheets are cut to the size of the sashes. The left half needs to be cut 3–5 cm wider so that the sash overlaps the right half and covers the gap.
- The prepared sheet is immediately grabbed to the frame at points.
- The right side is done in the same way as the left.
Dimensions of welded frame
After this, the entire structure is scalded
It is important to first weld the metal sheet in the center and at the corners so that it does not accidentally move or one of the corners bends. Of course, this is not critical, the metal can be bent back using a sledgehammer, but it is better to immediately install everything efficiently
The metal is not welded with a continuous seam, but only with frequent tacks. Otherwise, the design may fail. If you need to weld the doors with a continuous seam, then you need to press the metal to the frame with clamps and weld slowly, in sections of about 10 cm. You should cook from different sides. This prevents overheating of the metal and the result is deformation of the structure.
Installation of hinges
To install any gate, at least 2 hinges are welded. Their centers must be placed strictly on the same line running vertically. This way they will turn easily and the load will be even.
Drawing of swing gates
First, thick metal plates are welded onto the hinges, otherwise called plates. It is convenient to do this on a flat horizontal surface. You can weld them in a vice.
First, the door leaf needs to be leveled. The bubble tool produces errors, so it is advisable to use a laser level. The structure is installed at the required height, placing wedges and stands from scrap materials under the bottom. After this, loops with plates welded on them are applied in the right places.
To ensure reliability and increase the strength of garage hinges, they are sometimes strengthened on the inside by welding on scraps of reinforcement.
Decoration
The design is chosen by the owner of the site depending on his own wishes. Popular options:
- Decoration of the canvas with forged elements. They can be welded to the main frame.
- Painting corrugated board or euro-fence. Before carrying out work, you need to clean metal surfaces from dirt, rust, and plaque. To increase adhesion, it is recommended to treat the metal with fine-grain sandpaper.
- An interesting option for a garden gate is to fill the inner space of the canvas with various tools.
- Decorating the top bar with decorative rods in the form of pointed peaks.
In order for the canvas to last longer, the seams must be coated with anti-corrosion compounds.
European picket fence (Photo: Instagram / cabinlife2019)
Features of care
Rules for caring for homemade structures:
- Once every 3 months, re-coat the joints of individual elements and metal surfaces with anti-corrosion compounds.
- Renew the decorative coating once every 6 months.
- Elements of the canvas that have collapsed due to rust must be replaced with new ones.
When erecting a fence along the border of your own property, you need to take care of making a gate. It must match the style of the fence to create a visually consistent picture. If you want to save money, you can assemble the door leaf yourself. Various materials are suitable for this, which have certain characteristics.