After the family of our children and granddaughters moved into their own home, there were a lot of their things left in the closets that they did not need. I was sorry to throw them away, since many of the things were bright and attractive, and I decided to give them a second life, namely, to weave rugs with my own hands for the home.
There are a lot of ways to weave: on machines, by hand, by crochet, and even on a mesh. But this time I decided to weave a rug on a frame with nails, because I became interested in this method of weaving from a video I accidentally saw on the Internet and decided to try it too.
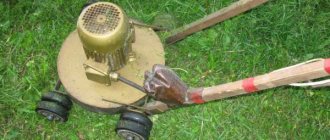
The idea of how to make a rug was born, the goal was set, so soon I had a frame with nails, with the help of which I intended to weave rugs from old things without any financial investment.
Master class: Making a frame for weaving
Author: Sergey Saltykov
In order to make a frame for weaving, we need to take four bars measuring approximately 2x3 cm. The size of the frame depends on the size of the tapestry that you will weave in the future. The frame must be strong, so glue and metal corners must be used to connect the bars.
So, we make a frame for a medium-sized tapestry (30x30 cm). The frame size should be about 70 cm in height and 50 in width
Headroom is necessary because... The more you weave, the greater the tension in the warp threads. But if we improve our frame a little, then we can easily cope with this difficulty. To do this, you need to take another block and secure it in this way in the upper part of the machine
Now you can use bolts (preferably “wings”) to adjust the tension of the base.
All that remains is to drive in the nails. The distance between them depends on the thickness of the thread (warp) you will use. In any case, it should be strong and not stretch. For weaving, it is best to use linen thread (or twine). As a last resort, you can also use cotton thread, which is freely sold in stores.
I want to assure you that in the future it will be more difficult to switch to working with a thin warp (smaller pattern, more difficult to weave). To do this, I suggest you use the medium thread tension (7 mm). From this position it is easier to move on to a small or large pattern (this does not apply to working with thick twine. Here the distance between the nails should be 1 cm).
So, if the choice is made, we move on to the next stage of the process.
We stretch the base.
The tension should be uniform along the entire length
The next task is to braid the hair. It is needed to secure the bottom of the tapestry
In order to divide the threads into two parts (through one), you need to use a 1-1.5 cm thick strip. It is better to use a tube (for example, a piece of an old ski pole).
Now our machine is ready and we can move on to the most interesting process - weaving.
Source
DIY tapestry
- a small skein of wool thread.
Now inside the frame, between the two formed rows of threads, we will place a strip of cardboard measuring 50-300 mm. This is done so that the braids, that is, the first and last horizontal rows woven from the threads of the first and second rows of the warp, uniting them into one plane, are even. The lower braid will still rest on a strip of cardboard, while the upper one should be pushed upward with a wooden strip measuring 300-5020 mm until the work is completed. The lath is threaded to separate the warp threads into even and odd. In addition, it allows you to regulate the tension of the threads to some extent: the higher the rail is installed, the weaker the tension and vice versa.
Immediately on top of the braid, the so-called earnings are woven vertically with a height of 20 to 50 mm. This is already part of the tapestry, which can subsequently be hemmed on the wrong side if the tapestry will hang directly on the wall, or folded onto the end of the stretcher if the tapestry is supposed to be stretched and inserted into a frame.
And here we are for the first time encountering the principles of simple plain weave, that is, the already sung above wattle. We especially note that the thread that begins to work is tied with a simple knot to the edge of the warp next to the pigtail. Now we will use a skein - this is what tapestry artists call short-length threads wound from a bobbin into small skeins. Taking it off makes it easier to work with; in addition, the skein can hang on the base without unwinding if we want to use wefts of a different color.
Now, selecting the even warp threads with one hand, with the other hand, pass the skein behind them, leading it to the edge of the tapestry and, wrapping the outer thread, turn it in the opposite, horizontal direction, this time choosing the odd warp threads. Having finished the row, nail the threaded horizontal threads (weft slips) with a fork to increase the density of the work. In this case, the warp threads become invisible from both the front and back sides. Thus, the plain weave is formed by alternating weft inserts. The first throw covers the even warp threads, the second covers the odd ones, and so on.
Having finished the work and securing it with a knot on the base, we move on to weaving the tapestry itself, using woolen rather than linen threads. You can work not with one, but with several wefts of different colors, which will significantly expand the palette, making the tapestry truly polychrome. A new weft can be inserted from anywhere - it just needs to be tied with a simple knot to the warp threads. You can also make wefts from two or three threads of different colors, achieving tonal and color transitions from light to dark, for example, from light blue to dark blue.
A sharp change in color is also possible, for which one weft does not stretch to the edge of the warp, but unfolds anywhere, and the other weft, moving in the opposite direction to the first direction, also unfolds.
Starting work as a new duck.
Throwing in another weft thread.
Using a strip of newsprint as a weft.
Threading the skein through the warp.
The last knot and the tapestry is ready.
The pigtail is nailed to the earnings with an ordinary fork.
Cutting the finished tapestry from the frame.
Decorating the edges of the tapestry with fringe.
Having mastered the method of simple plain weave, let's move on to the pile. The pile is attached to the base with a double knot. It should be noted that after a row of pile, one or two rows of regular weft should be placed to protect the shedding pile. After laying several rows of pile, it can be trimmed with scissors to the desired length according to your design.
In our case, ordinary polyethylene cut into strips and short colored threads were used as pile.
If you want to change or make the texture of the tapestry even more original, anything can serve as weft: newspaper, scraps of fabric, nylon, wire.
At the end of working on the tapestry, the thread is secured with a knot and the earnings are woven again, onto which the “pigtail” is then lowered with a fork. Our tapestry is almost ready. All that remains is to cut the warp threads, thus freeing it from captivity. By tying the ends of the threads with ordinary knots, you can beautifully decorate the edges of the tapestry in the form of fringes or tassels.
Amazingly, all tapestries, tapestries and tapisseries, no matter how huge they are, are made according to these simple and ancient rules.
Weaving on frame. Imitation of bran weaving.
Needle with a wide eye, scissors, fork So, let's get started: We tie the warp thread to the outermost nail and begin to warp
the warp is done loosely, with sagging
I like to work with a needle for sewing up bags. The flattened, curved tip is very convenient
We insert the thread folded in half into the needle and begin to make a plain weave.
Cut the loop on the eye of the needle...
and point the threads in opposite directions
thread a new thread into the needle and lay the next row of plain weave
and we repeat: cut the loop,
We tie the ends on one side with a knot and put a loop on the outer stud
and begin to lightly nail the threads (the fork does the preliminary work :) )
after preliminary tamping, we tighten the free ends on the other side
and so on until the beginning of the drawing
Drawing upon request. It can be paired, maybe in the center. It is advisable that the broaches be no more than 5 threads
Now we lay the threads according to the pattern of the drawing. But also: double thread - cut the loop - separate
In the process, I realized that the decorative thread is thinner than the main thread. I had to double the threads of the pattern
Don't forget to tap the threads every 3-4 pairs. It is advisable to control parallelism with a ruler
We are nearing completion
We laid the last pair. You can leave it like a designer garment :)
But I decided to finish it right :) Cut one length with some extra for fringe
and stretch the last thread of linen
Trim the fringe. (I was in a hurry. It’s better to cut it after removing it from the frame)
Source
Instructions for weaving a rug on a frame with nails
For me, it’s easier to knit a rug on a frame with nails than to describe this process on paper, but since I decided to tell you how and where I use unnecessary things, here are instructions with photos for you on knitting rugs from rags.
My granddaughter Julia helped me take photos to show the process. So, the frame with nails is ready, the rags are cut into a long thread, wound into balls. Weaving on a frame with nails begins by stretching cut yarn from rags onto nails.
How to make a rug from old things on a frame with carnations
Beginning the process of weaving a rug
I will try to show step by step the weaving pattern on a frame with nails. For the 1st layer, choose yarn of the color you have in mind. In my example, the color is pink. We put a loop at the end of the thread on the 2nd nail on the left side (we skip the 1st for the convenience of further weaving) and lead the thread to the right side.
There we bend the thread around the stud of the same name, and lead it again to the left, then again to the right and back, alternating studs one at a time. It looked like zigzags made of thread. We do this all the way to the bottom, but do not forget that we do not hook each nail, but every other one.
At the end, we make a loop at the end of the thread, and with this loop we hook the thread to the last nail at the bottom right. 1st layer is ready. Let me remind you that there will be 4 layers in total. If you are learning to weave for the first time, it is better to take balls of different colors of fabric to make it easier to navigate when working.
Next, turn the frame onto the other side by 90 degrees. We will pull the yarn in the same way, in a zigzag, through 1 nail. The dark gray threads lie perpendicular to the pink ones.
I note that the tension of the threads should be average so that they do not fall off the nails, and so that as a result the knitted product does not decrease too much in size. The thread on the last row at the bottom is again secured with a tied loop on a nail.
Next, we turn it 90 degrees again, take yarn of a different color (I got it raspberry-pink, since the children’s T-shirt was like that) and stretch it over the nails that we skipped in the previous layer. In the photo below you can see that all the studs on this third layer are occupied.
The last, 4th time we turn the frame and stretch the last layer, it will be dark gray. Thus, we “occupied” all the free nails, hooking the cut threads into them in the form of zigzags.
Weaving rugs on a frame - technology
Now you need to understand that the rug will have neither a front nor a back side - they will be the same, in the form of a checkerboard pattern. This will happen because it was not in vain that we pulled the threads through one nail. This alternation will create the weave, and this can be understood from the attached photos.
First, we secure all the rows on the left so that they do not fall off the nails. To do this, remove the left edge of the lowest dark gray thread from the nail and drag it under the pink thread, which we will pick up with our finger from the depths, from the 1st layer.
Having pulled the thread through, we again put this fixed left edge on the same nail. We do this through the row (1st, 3rd, 5th, etc.). The pink thread secured the entire left edge of the future product.
Now we remove the bottom thread from the right side {1} and begin to “dive” with this thread under the pink thread, which we take out from below, from the 1st layer {2}. We dived in, pulled the top thread under the pink {3} and saw the resulting weave {4}.
Then we “compact” the resulting row with our fingers. To create an interlacing of threads, that is, a checkerboard pattern, you need to move the next row, which is visible inside, by hand towards the just “compacted” row.
Then we continue like this: we stretch one row under the pink thread, and simply move the other down to the formed row. On a small frame this happens very quickly, but on a large frame it happens more slowly, since the rows are longer there. We do this until the end.
The final stage of weaving with carnations
When all the threads are hooked onto the nails, they need to be closed with a hook to create an edge. To do this, we insert the hook into the 1st loop, then pull the 2nd through it, removing it from the nail, then pull the 3rd through the 2nd, and so on.
It is important that there is always 1 loop left on the hook. When we close all the loops, there will only be one left. It needs to be sewn to the edge of the rug so that it does not unravel. Our rug is ready!
All that remains is to use a hook to hide various “tails” and knots inside. You can decorate such products with fringes made of threads or beautiful shreds - whatever your imagination requires. If you use rugs as rugs, then it will do without fringe.
My very first one was not made from knitted rags, but from old yarn. His granddaughters immediately took him to their house to play. Of course, the yarn makes the weave even, and the rug looks beautiful and neat. But the threads do not stretch, and weaving becomes difficult.
Rugs on frames with nails are used everywhere: I give them to friends for a bath, for a dog bed, for a stand for pots. Our family lives in a private house, so I have such products everywhere on the floor, and in the bathhouse too. In the summer we sit in the yard on a bench covered with rag rugs.
Basics of home weaving for beginners: frame, looms and other devices, description of the process
Hand weaving is a fascinating, but at the same time quite complex and painstaking process. To learn how to weave fabrics with your own hands, you need to know many nuances. When you decide to take up weaving, it is first recommended to acquire a loom. You can either buy such a device ready-made or make it yourself. The only thing that is required for this is a little free time, the necessary tools and strict adherence to the recommendations for making the machine.
What does a beginning weaver need?
This ancient craft has been known to mankind since the late Neolithic period. The very name of this type of small handmade production speaks for itself. By hand weaving we mean the process of making fabric on a loom or using simpler devices (reed, reed, planks) by interweaving 2 systems of threads that are located perpendicular to each other.
To start weaving at home, you will need a minimum set of tools: thread or yarn, a loom. When creating one fabric, several types of raw materials can be used simultaneously: regular, art and textile yarn, floss, silk threads, viscose and wool fibers, roving.
How to make a homemade loom with your own hands?
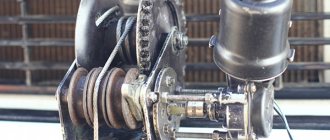
The standard device operates by laying the thread using a metal spacer. It has a shedding mechanism that vertically moves the warp threads. Such a device happens:
The machines also differ in the width of the filling. The value of this parameter for narrow structures is about 2.2 m, for wide ones – 2.5 m. The operation of the machine is carried out through the functioning of the following mechanisms:
The machine also has starting and installation mechanisms, as well as guides. Having decided to make such a design yourself, first of all you need to draw a diagram. A drawing on paper allows you to freely navigate the dimensions of the future machine. When constructing a drawing and choosing design parameters, it is necessary to take into account that the greater the width and length of the frames, the greater the maximum size of the woven fabric.
To work, you will need 2 frames: one larger, the other smaller (for example, a frame with parameters of 30x10 cm allows you to weave a doll scarf). Frames can be made of flat slats. Algorithm for further actions:
The length of the teeth should be from 7 to 10 cm, the width - from 0.5 to 0.7 cm. The standard height of the comb is 15 cm. Its length exceeds the distance between the side frames. It is made from thick plywood sheet. One of the main parts of the design is the weft. It performs 2 functions: the thread is wound on it and it supports the spool. It can be made from plywood as a separate element.
Knitted floor products
To make a knitted product, you need to prepare the following materials
- cardboard sheets,
- marker pen,
- threads of various thicknesses,
- scissors,
- hook number 7 or higher (can be replaced with knitting needles).
First of all, air loops are collected in the quantity that corresponds to the rectangular size of the future carpet. To make a round product, it is enough to cast on five air loops, connect them with a ring, and then, adding them in a circle, tie the workpiece.
For convenience, they came up with the “patchwork” technique, when several parts of the canvas are prepared, and then they are all sewn into a single product.
HOW TO MAKE A FRAME FOR A TAPESTRY YOURSELF?
METHOD 1. TENSIONING THE BASE CIRCULARLY ON THE STRETCHER
With this method, you can weave a tapestry on each side and at the end cut them off at the same time.
You will need:
• Wooden stretcher (in the example – 30x45 cm);
• Warp thread – durable cotton / linen / jute;
• A simple pencil, ruler, eraser, scissors.
1. Determine the width of the future tapestry. Using a ruler and pencil, mark the corresponding notches on the opposite slats of the frame - at the top and bottom. Divide this distance into equal sections of 4 or 5 mm - the warp threads will be located at this width from each other. The notches on the top and bottom rails should be parallel to each other.
2. Take the thread for the warp, tie it with a double knot to the top rail of the frame at the leftmost point of our marking. Start stretching the base from left to right. While pulling the thread, bring it to the leftmost point on the bottom rail of the frame, go around the rail and pass the thread behind the frame from the back. Wrap the thread around the top rail along the second notch from the left and go down again.
Repeat until you run out of serifs. The thread should always be in good tension.
3. You need to finish pulling the thread on the top rail so that the number of warp threads is even. To secure the structure, tie the thread around the top rail two or three times. Then tie a double knot on the rightmost warp thread.
4. To prevent the back threads from visually interfering with the front ones, place a suitable piece of cardboard under them. You can later attach the sketch to it using paper clips. Ready! You can start weaving.
METHOD 2. WEAVING FRAME WITH CLANKS
A classic way to create a weaving frame. I use a frame 60x60 cm (according to internal dimensions). The advantage of such a frame is that within its confines you can make a tapestry of any width. That is, use only part of the nails to tension the warp threads. In this case, you can weave two small works in parallel.
You will need:
• Carnations 2-2.5 cm long, no more than 1.5 mm thick;
• A simple pencil and eraser;
• Help from the stronger sex