Most private homes often experience power outages. The way out of this situation is an electricity generator.
To connect the network to the generator, you need to install a changeover switch in the distribution board itself.
Its difference from other methods is that it has a special system of blockers. A changeover device is often installed in a living space, and even then. How to install it depends on the type of electrical network.
There are four types of changeover apparatus. Single-pole and two-pole require installation in a single-phase network, and three and four-lane require installation in a two-phase network.
This device is connected to the generator in a manner suitable for the type of electrical network to which the device will be connected. What is the difference in their installation?
A single-pole switch is only suitable for switching between two phases, in which case the neutral conductor is common.
Two-pole is used in the presence of a network with one phase, where it is necessary to switch both zero and phase at the same time.
Three-pole switches are used in a circuit that supplies a three-phase load in the absence of a neutral wire. A switch with four poles is installed if the generator and the network that powers the house are three-phase.
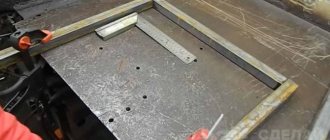
The switch is installed in a distribution board (a plastic box indoors, or in a metal housing outdoors), or there are devices that are installed on a DIN rail.
Metal panels often have regular DIN rails mounted in them.
The connection system is as follows: a cable must be connected to one of the switch inputs. which comes from the panel - this way the main network is created; we connect the backup network to the second input, that is, the cable from the generator itself.
When connecting a changeover switch from a pair of sources with three phases, you must maintain polarity so as not to change the zero and phase at the output to the panel.
What kind of lighting do you prefer?
Built-in Chandelier
Distribution boards are mainly used. in which automated switches are installed at the inputs. In addition, all supply lines must be additionally protected using a circuit breaker or fuses.
There are also some tips to consider during installation.
For example: installation must be carried out in a limited space, protection from moisture and temperature fluctuations must be present (the norm is from minus forty to plus fifty degrees), the device must be installed firmly and not move.
When installing a changeover switch outdoors, it is necessary to take into account the effects of environmental factors and protect the device from them as much as possible.
Expert opinion
It-Technology, Electrical power and electronics specialist
Ask questions to the “Specialist for modernization of energy generation systems”
Rules for connecting a changeover switch You don’t need to be a rocket scientist to understand that such a sequence of operations cannot be performed with a conventional changeover device. Ask, I'm in touch!
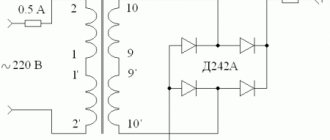
Three-phase network
The switch must be mounted using power supplies with voltage parameters of 400 V. The transformers that are used are pulsed. To connect, you need to provide an inverting input. The output current flows through the transition capacitor elements. The use of two-module types of reversible switch is required.
Single-module models are characterized by a maximum voltage limit of 350 V. The negative resistance is 55 Ohms. A blocker is required. Electrical panels are required in residential buildings. The preferred modification is KK22. In control units they are installed as thyristors, and options with dinistors are also acceptable.
Installing a changeover switch and connecting it to the electrical network: installation diagrams and recommendations
Let us describe the installation of an electric generator with a power of 2 kW or more. To organize a backup power supply network you will need:
Expert opinion
It-Technology, Electrical power and electronics specialist
Ask questions to the “Specialist for modernization of energy generation systems”
Connecting a home generator using an ABB changeover switch Another example of the importance of controlling a lighting fixture at two points is when there is a light switch at the entrance to the bedroom and a switch near the bedside table. Ask, I'm in touch!
Connection diagram for a pass-through switch from two places
This scheme is convenient in a two-story house on the stairs, in a passage room, in a long corridor. You can also use it in the bedroom - turn off the overhead light at the entrance and near the bed (how many times did you have to get up to turn it on/off?).
Electrical diagram for switching on a pass-through switch from 2 places
Zero and ground (if any) are connected directly to the lamp. The phase is supplied to the output of the first switch, the input of the second is connected to the free wire of the lamp, the outputs of the two devices are connected to each other.
Looking at this diagram, it is easy to understand how the pass-through switch works. In the position shown in the figure, the lamp is on. By pressing the key of any of the devices, we break the chain. In the same way, when in the off position, by moving any of them to another position, we will close the circuit through one of the jumpers and the lamp will light up.
To make it clearer what to connect to what, and how to lay the wires, here are a few images.
Connecting wires on a pass-through switch
If we talk about the room, then you need to lay the wires approximately as in the photo below. According to modern rules, all of them should be located at a distance of 15 cm from the ceiling. They can be placed in mounting boxes or trays; the ends of the wires are inserted into mounting boxes. This is convenient: if necessary, you can replace a broken wire. Also, according to the latest standards, all connections occur only in installation boxes and using contactors. If you make twists, it is better to solder them and wrap them well with electrical tape on top.
The return wire of the lamp is connected to the output of the second switch. White indicates the wires connecting the outputs of both devices.
How to route wires around the room
How to connect everything in the terminal box is described in the video.
Types of generators
Household energy sources can be different types of generators, but the most popular are gasoline ones. They have the following features:
- wide range of prices;
- power 0.8-12 kW;
- small sizes;
- there are stationary and mobile models;
- There are single-phase and three-phase;
- A four-stroke internal combustion engine is used.
When choosing a connection diagram, it is necessary to take into account the method of cooling the internal combustion engine, which in turn depends on the time and frequency of operation. Most often, models are equipped with air radiators. Industrial models are able to work for a long time, as they are equipped with liquid cooling. This increases overall dimensions, but increases efficiency.
Diesel generators are used less frequently in home networks, as their cost is higher. However, their use is justified by a large resource.
Types of electric generators
- Asynchronous. They have a simple and reliable design. All components are completely protected from moisture and dust. The devices are best used for active loads. Asynchronous generators are not recommended for use to power an electric motor.
- Synchronous. They do not contain the listed disadvantages of asynchronous generators. They are also able to maintain voltage more accurately. Preference should be given to a brushless design with better current characteristics and less radio interference. Inventory models have lower power and higher cost. Single-phase ones have worse characteristics, especially inexpensive ones. Three-phase generators are a little better. The second disadvantage is the high cost and lower reliability.
Single-phase and three-phase
How to make a pass-through switch with your own hands - labor lesson
You've probably already looked at electronic catalogs and noticed that a triple pass-through switch can cost a lot of money. What to do? – The eternal Russian question, reinterpreted by Shakespeare as to be or not to be. We would choose the first: definitely not everyone is able to pay that kind of money for pass-through switches. We present to the attention of our readers the first handmade product in RuNet, where it will actually be shown in pictures how to convert an ordinary switch costing around a hundred (this is a really cheap model) into an expensive thing - a pass-through switch. And without any special skills or special techniques.
We look at the first picture and see the switch from which the buttons have been removed
More precisely, it was also taken out of the socket (so to speak), but this is not important now. As you can see from the picture, we have a typical connection diagram for 2 keys
Just in case, the screws of the spacers of the socket box and the clamping contacts of suitable wires are shown and labeled with colored lines. Each and every one of them must be significantly loosened to remove the switch from the wall socket. Do not forget to turn off the power before this, and we also strongly recommend checking with a probe where the phase is located, and somehow draw these places directly along the cambric (plastic insulation of the core). In the future, all this will greatly simplify the process of reinstalling the switch.
Socket spacer screws
Now look at the next picture, which shows the other side of our future victim. In the good sense of the word, of course. Here we see the switch housing clamps that need to be unbent to remove the electrical part. All this is done with a regular screwdriver within a few minutes. Then you need to remove the spring pushers from the plastic frame. The easiest way to do this is with a thick slotted screwdriver. Thin just won't do. You will quickly understand this. There is no need to rush, because this place is the most difficult in the entire process of converting a conventional switch into a walk-through one. In the picture, the spring pushers have already been removed, and moving contacts are visible in the place where they were.
Movable contacts under spring pushers
We skipped the moment of removing the plastic part from the ceramic one (in the pictures), because in our opinion this does not require explanation. At the ends of the entire removed part of the switch there are two weak teeth. Just pry them off with a slotted screwdriver, and let's start converting a regular switch into a walk-through one. Now on the ceramic base of the switch we see groups of contacts:
Three groups of contacts
- General group contact pads.
- Individual contacts for each light bulb.
- Movable rocker contacts.
Now all we have to do is rotate one rocker arm 180 degrees, and cut off one of the contact pads of the general group (it’s better not to isolate it). The resulting position is shown in the last picture. Now the final stage is how it all works. We take and glue both buttons with a Chinese gun so that they become one. Now that one of our contacts is closed, the second one will hang in the air.
Everything ingenious is simple. Therefore, in addition to the fact that we showed how to make a pass-through switch from a regular one, we will add that, in principle, it is not necessary to remove the spring pushers. You can do without this. And you don’t have to glue the two buttons together if you remove the key from a regular switch of the same width and the same manufacturer. Usually the pinout of the legs is exactly the same. All this will allow you not only to make a pass-through switch with your own hands, but also to produce a truly functional and beautiful product.
So, we believe that we have adequately covered the questions asked. They showed how to properly connect a pass-through switch, how not to do this and - most importantly - told how you can save a lot of money in the whole process. We hope that you will like the recommendations, and now every handy owner will be able to boast of having such an original design in his home. Well, what else would you call a pass-through switch?
Switch design
Installation of a reversing switch in the distribution panel
The reversing automatic machine has the form of a box with a built-in blade contact system and spring brackets. When closing the first, metal blades enter the brackets. Thanks to this operating principle, contact rupture under its own weight is eliminated. There is a smooth redistribution of electricity from one line to another.
You can fix the switch on the wall in any position - horizontally, vertically and even diagonally. This does not affect its performance.
Expert opinion
It-Technology, Electrical power and electronics specialist
Ask questions to the “Specialist for modernization of energy generation systems”
Connection diagrams A reversing switch is an excellent solution for safely and error-free load switching from one supply line to another. Ask, I'm in touch!
Gas generator operation
You can do this connection work yourself. To do this, you need to apply maximum perseverance and attentiveness to each of your actions. Any work with electrical devices requires a special attitude towards these types of activities.
At the initial stage, a room for operating the gas generator is selected. It should be well ventilated; it is advisable to additionally have an air exhaust system. Soundproofing the room is equally important.
After installing the generator, wires are drawn from it to the house panel. A changeover switch is used in the circuit when connecting a gasoline generator to a diesel power plant.
Its use is very convenient when operating a generator in the following cases:
- When there is voltage in the network, the switch is placed in the first position.
- If there is no voltage, it is necessary to turn off the circuit breakers. Switch the switch first to the zero position, then to the second.
- We start the starter of the gas generator.
The presence of electricity in the room will be signaled by an LED installed on the meter in the panel. It blinks at the same time.
When electricity appears in the network, the generator must be turned off and the switch switched to its original position.
Advantages and disadvantages of switches
- Visibility. The device usually has an open or semi-closed design, which means that its serviceability can be verified visually. Well, since you can clearly see the conductive knives and tires, it will not be difficult to determine in what position the breaker is located.
- Simple design. Almost all such switches, including changeover switches, have an extremely simple design. They are very durable, easy to maintain, and their repair usually does not require high qualifications and is inexpensive.
- High switching power/cost ratio. This is perhaps one of the main advantages of the devices. Some of these devices can switch currents of hundreds of amperes, and are relatively inexpensive.
Pass-through switches always work in pairs
Now take a look at the third option, which shows how pass-through switches should actually be used
Please note that there are two wires between the control points. And this is a big minus for those who hoped to somehow use old veins lying in the thickness of the walls for control.
Look, now you can see that the neutral (black wire) goes straight to the chandelier. But the neutral can be broken or connected at any time from both ends of the corridor. In this case, there is always a phase on one of the wires, and you just need to apply it to the desired point. Due to this, the whole problem is solved.
Now we leave the bedroom, turn on the light, get to the threshold of the kitchen, and turn off the chandelier. By the way, if someone wants to join night gatherings, they will solve their problems in exactly the same manner without any difficulty. But what if we need to place another switch - say - near the front door?
Changeover switch diagram
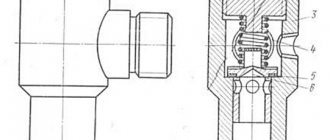
The changeover switch consists of a housing, blade-type movable contacts mounted on the shaft, stationary contacts, a control handle, an arc chute (if present) and terminals for connecting to the line. The device has two operating positions (contacts 1 and 2) and one neutral (intermediate), in which no load is connected to any of the lines.
A simple connection diagram for two power sources and one load line looks like this: for example, a central power supply is connected to contacts 1, and a diesel or other type of electric generator is connected to contacts 2. The most popular are four-pole and two-pole switches.
The connection of the changeover switch in the case of introducing three-phase voltage into the building is as follows:
- the switch must have four poles;
- four terminals go to the network input;
- four terminals go to the generator input;
- The load is connected to four terminals.
Three of the four terminals go to phases, one to zero.
Correct connection of a rocker switch to organize three lighting control points
In this case, two single-key pass-through switches are combined with a changeover switch. And this is what it gives. As before, in the picture we used two colors. Imagine that the phase is now in blue. As shown in the picture. Now it's time to go visit. And we turn off the light with one movement of the rocker switch. Isn't that great?
All other options work similarly. Now the light in the corridor can be turned on and off from any of three points. Be it the front door, the kitchen threshold or the exit from the bedroom. Moreover, changeover switches can be arranged in garlands. But they all turn towards each other.
Thus we get the second rule. It applies to both changeover and pass-through switches: the switches are turned on in the opposite direction.
We believe that there is no need to explain these words. They can be clearly seen in the first figure, where the pass-through switches are located sideways to each other. The second one looks outward, that is, towards the power supply and the light bulb in the chandelier.
Installation Tips
Follow these tips if you want to use the changeover switch in your housing safely:
- The device can only be installed indoors.
- The device must be moisture-resistant and resistant to natural precipitation.
- The device can be operated at temperatures ranging from -40 to +55°C.
- If the top of the contact knife is burnt, you need to clean it with a file.
- The fastening of the switch must be reliable and durable.
Characteristics
The main characteristics of the changeover switch are:
- The rated current it can carry. The devices are produced at 15.0, 25.0, 32.0, 40.0, 63.0, 80.0, 100.0 and 125.0 A.
- Thermal current that does not destroy elements.
- Permissible mains voltage.
- Short-term impulse voltage that the insulation can withstand.
- The number of poles that a changeover switch can simultaneously switch.
- The wear resistance of electrical contacts is determined by the operating voltage and the amount of current passed.
- The wear resistance of mechanical elements is determined by the number of switching cycles.
How to connect a pass-through switch
A. Zemskov has a whole video about this. Not to say that it is ideal, but on the whole it leaves a feeling of complete understanding of the topic within the framework of the material taught by the author. Yes, of course, there were those who made rude remarks like that such things are called switches because they throw the ends of the chains crosswise. But we and our readers understand that all this is out of envy. Everyone wants to see a good renovation in their home, but not everyone can pay for it as much as Project-Service charges. This is where the misunderstanding comes from. As for A. Zemskov himself, in our humble opinion, the little man who managed to earn such a car legally is worthy of all respect. So, today we are talking about how to connect a pass-through switch.