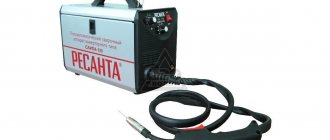
The welding inverter type resanta SAI 190, like all others, has significant advantages compared to a conventional welding machine. Thanks to the mobility and small weight of the resant, ordinary welding units have been forced out of the market. There are cases of inverter failure, and for this you need to know the principle of operation, structural diagram and malfunctions of the Resanta Sai 190.
Design and principle of operation of Resanta SAI 250
The principle of operation of the inverter is based on converting alternating current of 50 Hertz from a regular household electrical network into direct current. This voltage indicator has a value of 400 Volts .
The current of the welding machine is regulated by modulation (by and large, it is wide-pulse) of the resulting high-frequency voltage. The device in question for welding Resant SAI is manufactured in a steel case. On the outer part of this housing there are power connectors, which are intended for connecting welding cables, two indicators (“Network” and “Overheat”), and a regulator for selecting the characteristics of the welding current. There is also a special hole in the housing, through which hot air is removed from the device. It is part of the forced ventilation system, which protects the inverter from excessive overheating during operation.
The Resanta SAI inverter also has another protection system ; it automatically turns off the device in cases where the power cords are shorted. Moreover, the corresponding indicator on the front control panel begins to blink. The inverter is distinguished by the presence of several important functions that are often used during operation:
- Anti-sticking;
- Hot start.
Hot start guarantees quick and high-quality ignition of the welding electric arc due to an increase in the level of welding current (the worker does not have to do anything, the current increases automatically). And the anti-stick mode, on the contrary, reduces the welding current if, during ignition of the electric arc, sticking of the welding wire (electrode) is observed. Then, when sticking is eliminated, the welding device automatically restores welding performance.
Why do you need a diagram?
In a general sense, a diagram is a way of simplifying the representation of an electronic device. When talking about welding machines, the term “circuit diagram” is usually used. The circuit diagram shows the location and interconnection of all the electronic components of the inverter. You may need the diagrams to repair or assemble your device at home.
The electrical circuit of an inverter welding machine contains complete information not only about the relationship of all components, but also the names of these same components. Using the circuit, you can find any component in the inverter itself and, for example, replace it with a new one. Simply put, a diagram is a list of all the electronic components of a welding inverter and a depiction of their interconnection.
Inverter technical data
The main advantage of this welding inverter for the home needs of consumers is that it is specially adapted for connection to those electrical networks in which there is a low voltage (130-250 Volts) .
Resanta SAI operates without interruption at the specified voltage when welding in manual arc mode. You can use welding rods with a cross-section of up to 6.0 millimeters. The welding current in the device can be adjusted up to 250A. It is also important that the device is capable of withstanding quite large workloads for a long time. This property positively distinguishes its operating scheme from other devices that are found in abundance in the windows of specialized hardware stores.
At idle, the Resanta SAI welding device operates with a voltage of 80 Volts. The durability of the device at fairly high power is ensured in its circuit by the design of modern high-quality IGBT transistors. In addition, this welding inverter has a high degree of protection - IP 21 protection level.
It is impossible not to mention the compactness of this welding machine, as well as its excellent mobility. Equipping the device with a carrying handle makes it easier to carry it around the site where construction is taking place. Consumers also note the accuracy and ease of setting up the Resanta Sai welding inverter. At the same time, the specified indicators are guaranteed to retain the established data even in cases where the electrical network is not stable in its voltage indicators.
The technical characteristics of the Resanta SAI device we are interested in are as follows:
- maximum current consumption – 35 Amperes;
- load duration at 250 Amps – not less than 70%;
- welding adjustment interval – 10-250 Amperes;
- operating ambient temperature range – -10/+40С;
- electric arc voltage – 30 Volts.
If necessary, this device can be connected to the equipment of a generator that runs on gasoline. It is best to choose a generator with a power above five kilowatts.
Attention! When choosing a welding electrode (the electrode can have a diameter of no more than 6 millimeters), it is also necessary to take into account that the welding current decreases when the input current decreases.
Simple repair of welding machine Resanta SAI-250PN, platform SH46
And again the welder is being repaired. In my opinion, Resanta has one of the most successful models in 2013, where the manufacturer saved practically nothing. If it dies, it’s because of small things; repairs are usually simple and inexpensive, as you can see in this topic. Warning
: For your safety, please do not get involved in power equipment if you do not understand anything about repair and maintenance. Attempts at unqualified repairs always lead to more complicated and expensive restoration of the device, and sometimes even to injuries to the would-be repairman. As usual, the owner of the device killed the welding with his own hands, dropping it from a height while it was working. It’s a common thing, there are enough idiots everywhere. The board has shorted to the casing because The insulating gasket between the board and the casing was lost during its next cleaning. The device was brought without a lid. It’s good that they stopped there and didn’t start to break the patient. There was not much dust and dirt inside, the device was periodically purged.
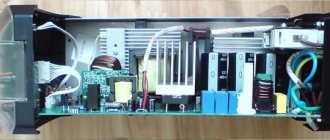
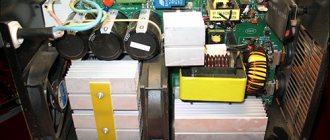
A quick inspection and measurements showed that only the power supply was faulty, the power part survived.
The location of the problem is clearly visible on the printed circuit board.
Unsoldering the faulty element
The power supply is made using a TOP223YN PWM controller in a TO-220 body. In welding, such a shim is rarely used. Many craftsmen call this knot the duty unit, but this is incorrect, because... The device does not have a standby power supply (this is not ATX Power), but it sounds short.
The TOP was replaced with a new one from stock, no problems were found in the wiring, but just in case, the TL431 reference stabilizer in the feedback circuit was also changed because there is no optocoupler isolation of the secondary circuit and it could really suffer, which would cause unnecessary problems (we swam, we know).
After the repair, the welder started up normally. Solder spots and critical areas of the board were additionally patched with Plastic 71 to increase survivability in a dirty and wet working environment.
A distinctive feature of welding on such a shim is very long attempts to start after turning off the power, it looks funny
Welding pulled out its honest 190A with the display meter set at 250A and afterburner at maximum. This current allows you to confidently cook with an electrode up to 4 mm inclusive in all reasonable positions and situations. Unfortunately, for most Chinese welders, the declared and actual current are significantly different, and the newer the device, the greater the difference.
The device did not check for an arc, because I only repaired the power supply. After successful testing on LATR and on ballast, the device was given to the owner for final assembly and testing on the arc. The entire repair took 2 hours.
Thank you for your attention, take care of yourself and your equipment.
How to prepare a welding machine for work?
The scheme for preparing a welding device for operation is quite simple, but it must be carried out as accurately as possible if you want the device to serve you for a long time and without repair.
First of all, you need to connect the cord with the electrical holder and the ground wire to the power terminals of the device (you definitely need to pay attention to the polarity of the welding rod you are using). Set the regulator to minimum welding current , then you can connect the inverter to the mains, and then turn it on. The required level of welding current must be selected from the calculation of indicators recommended by the manufacturer of Resanta SAI:
- 200-300 Amperes – electrode diameter 6 millimeters;
- 160-200 Ampere – 5 millimeters;
- 130-160 Ampere – 4 millimeters;
- 90-140 Amperes – 3.2 millimeters;
- 60-90 Amperes – 2.5 millimeters;
- 50-60 Ampere – 2 millimeters;
- 25-50 Amperes - 1.6 millimeters.
After welding, the current is set to the minimum value using the regulator, the inverter is turned off (first with the switch, and then from the mains). You also need to disconnect the electrical holder and grounding cord from the device.
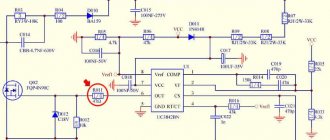
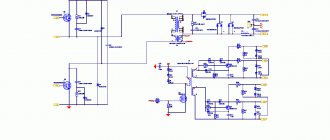
Scheme and malfunctions of SAI 250PROF
We attach all the circuit diagrams of the SAI 250PROF inverter. All images are available in high resolution. Just open each picture in a new tab and save to your computer.
We do not recommend repairing the Resanta 250 welding inverter from the SAI line if you do not have sufficient skills. At best, you will break the device, and at worst, you can harm your health.
Below is a list of the most common faults. If your device has a malfunction that is not listed, contact the service center for diagnosis and repair. Resanta has a developed network of service centers throughout Russia and the CIS countries.
Safety requirements at work
Before switching on, the device must be kept at positive air temperatures for several hours. Otherwise, condensation may appear in it, which can lead to damage to the inverter. It is strictly forbidden to operate the device in cases where its welding cords or power connection wire are deformed (even small ones).
Near the switched on welding machine, you cannot process metal and steel parts using grinders, electric jigsaws and similar equipment, during the operation of which metal dust appears . Dust can get inside the housing and damage the inverter. In addition, it is prohibited to operate the unit in open areas in the rain or in rooms with high humidity.
Before operating the Resanta SAI inverter, you must study the “Safety Rules for Users of Electrical Devices” and “Rules for the Operation of Household Electrical Installations.” When operating the welding machine you need to:
- create access to fresh air in the room where welding work is carried out (when welding takes place in a room, it must be well ventilated);
- work in a welding protective mask, gloves, headgear and special clothing that protects the body from possible thermal burns;
- comply with fire safety rules.
The welding device must be stored in rooms where the formation of acidic or alkaline vapors is excluded, and there is also no excessive dust. Optimal characteristics for storing the device:
- temperature – no higher than +55 and no lower than -15 degrees;
- relative humidity – no more than 70 percent.