Warming up concrete with a welding machine is one of the options for solving the problem of water freezing and stopping the hardening of a concrete monolith in conditions of low air temperature. Work with concrete can only be carried out in the warm season, and when the temperature drops to 0 and further, the chemical reaction between water frozen into ice and cement stops, and the hardening process stops.
If it is necessary to work with concrete on a construction site in winter, you need to take care of heating and preventing the water in the solution from freezing. Many craftsmen decide to heat the concrete with a welding machine, which can be done in two ways - using PNSV wire or electrodes.
For electrical heating of concrete at temperatures below +5 degrees, special air/oil three-phase transformers are usually used. True, for small amounts of work at home, a two-phase welding machine is also suitable.
Warming up concrete with a welding machine - connection diagram with PNSV cable
Warming up concrete with a welding machine is one of the options for solving the problem of water freezing and stopping the hardening of a concrete monolith in conditions of low air temperature. Work with concrete can only be carried out in the warm season, and when the temperature drops to 0 and further, the chemical reaction between water frozen into ice and cement stops, and the hardening process stops.
If it is necessary to work with concrete on a construction site in winter, you need to take care of heating and preventing the water in the solution from freezing. Many craftsmen decide to heat the concrete with a welding machine, which can be done in two ways - using PNSV wire or electrodes.
For electrical heating of concrete at temperatures below +5 degrees, special air/oil three-phase transformers are usually used. True, for small amounts of work at home, a two-phase welding machine is also suitable.
Pros and cons of PNSV
Heating concrete in this way is quite beneficial. This is explained by both the low cost of the wire and the relatively low electricity consumption. Separately, it is necessary to note the resistance of the wire to alkaline and acidic influences, which allows the use of this method when adding various additives to the mixture.
Main disadvantages:
- complexity of calculations when calculating the length of the wire;
- the need to use PT.
Step-down stations are quite expensive, and given the length of the process, it is not profitable to rent them (such services cost 10% of the cost of the product). The use of welding machines makes it possible to heat small structures, but since it is not designed for this mode of operation, its failure and subsequent expensive repairs are quite likely.
Features of heating using a welding machine
The technology provides for through or peripheral arrangement of heating elements. The first option is suitable for structures of complex shape with a large thickness of the poured mixture. In both cases, builders recommend constantly monitoring current temperature readings to prevent overheating.
When using a welding machine to heat a plate, you need to consider the following features:
- The operating parameters of the equipment and the exposure time are determined individually, taking into account the air temperature at the construction site.
- To retain moisture in the cement mixture, the surface is covered with a layer of sawdust. The evaporation process is controlled by changing the current generated by the welder.
- Overheating of the structure is unacceptable. It is accompanied by dehydration of concrete, its structure becomes porous, and strength is lost.
- To increase the efficiency of the installation, the surface is covered with a layer of thermal insulation.
- The circuit according to which conductive elements are connected to the power source is developed individually, taking into account the design parameters.
Subject to safety precautions, the technique can be used by home craftsmen and professional builders.
One welding machine is capable of heating up to 100 m³ of mixture at air temperatures down to -40 °C.
Preparation for independent work
To ensure reliable contact of the heating elements with the concrete and uniform heating, it must be properly compacted by removing air. Boiling of the solution and burnout became possible if the current density in the near-electrode zone increased to critical values. Local overheating occurs, excessive evaporation of moisture occurs, and hydration slows down. The final grade strength of concrete products is reduced.
Before pouring, craftsmen recommend monitoring the placement of heating elements relative to the fittings in order to prevent short circuits or failure of the transformer or cable.
When using heating wires, you need to accurately determine the optimal length of the loops and first check the integrity of the conductors.
The electric heating equipment is turned on after the process of laying the concrete mixture has been completed and the heating elements have been placed, their terminals have been connected, and all safety requirements have been met. Craftsmen recommend making holes in the slab for control measurements of temperature indicators.
Required Tools
The maximum permissible delay time before turning on the heating after pouring the mixture is 1.5-2 hours if the air temperature exceeds +5 °C. Energy consumption depends on external conditions and the volume of concrete poured. The list of equipment is determined by the type of heating elements used. It also includes:
- transformer welding device 200 A;
- inverter;
- cable AVVG;
- insulating cotton tape;
- power tool to determine current current readings.
Experts recommend choosing a device that includes a generator, a module for reducing operating voltage, units for drying electrodes and heating the soil when it freezes. Auxiliary functions are performed by a unit designed to reduce the no-load voltage level. It protects the welder from arc breakage by cutting off the power supply.
Installation of sectional heating cable
Since such concrete heaters are supplied not in coils, but in ready-made sections, the issue of cutting is eliminated. All that is needed to assemble a winter concreting installation is to calculate the power of the segment based on how many cubes of concrete are in the structure, and then select a cable of the appropriate length.
Let's start with a brief guide to calculations and small installation recommendations:
- The instructions for the concrete TMT technology indicate that heating a cubic meter of mixture requires from 500 to 1500 W (depending on the air temperature). Electricity consumption can be significantly reduced if you use a few simple technical techniques:
- Use special additives for the mixture to lower the freezing point of the solution.
- Insulate the formwork.
- If a beam or ceiling is being poured, the heating cable is calculated using 4 linear meters per 1 m2 of surface area. When constructing volumetric elements, such as I-beams, electric heating is laid in tiers, with a distance between them of no more than 40.0 cm.
- The cable protection allows it to be wound to the fittings.
- The distance from the surface of the structure to the electric heater placed inside must be at least 20.0 cm.
- In order for the concrete mixture to heat up evenly, the heaters must be placed at the same distance.
- There must be at least 40.0 mm between different contours.
- Crossing heating conductors is prohibited.
Heating concrete with electrodes
Electrode heating is one of the most popular methods of heating a cement-sand mixture in cold weather conditions.
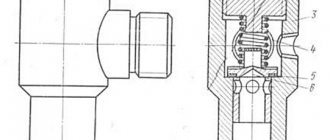
Schematic diagram of a transformer for heating concrete.
There are several types of electrodes used for this type of work:
- Lamellar. The conductive elements are made in the form of a plate. Such heating elements are installed on the inside of the formwork to ensure good contact with the sand-cement mixture. Concrete is heated due to the appearance of an electric field near the plate heating elements.
- Stripes. A similar version of heating devices is mounted on both sides of the formwork. The principle of operation of strip electrodes is identical to plate electrodes: when current is supplied, an electric field appears around the heating elements, heating the concrete structure.
- Strings. String-type heating elements are often used when heating cylindrical concrete structures, such as columns. The electrodes are connected to the center of the structure, surrounded by conductive formwork. To simplify the connection of conductive elements with each other, the power wires visible from the formwork are bent in the shape of the letter L.
- Rod. In appearance, this model of heating elements resembles fittings. The rod elements are installed inside the concrete, which allows heating even the most complex structures.
There are cases when, instead of electrodes, longitudinal metal rods placed in the formwork can be used. This method is simple and effective, but has a high consumption of electrical energy.
Warming up with a welding machine - PNSV wire
Heating of concrete with a welding machine can be carried out by connecting PNSV wires to it. The process requires certain knowledge, a pre-drawn diagram and consideration of a number of nuances.
Features of heating concrete with a welding machine and cables:
- The device must be powered from a household electrical network of 200 volts.
- The design is relatively simple and effective if done correctly.
- This option is cost effective.
- It is possible to significantly reduce the hardening time of the concrete mixture.
- The temperature in a monolithic structure can be maintained automatically.
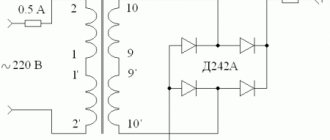
The operating scheme here is identical to the use of oil transformers, but the calculations are carried out differently. So, to heat concrete using a welding transformer and a PNSV cable, you will need: a 150-250 A welding machine, a certain length of PNSV wire, an ordinary ammeter (clamps), a cold-end cable made of aluminum, and ordinary fabric-based electrical tape.
As an example of performing calculations, you can take a slab of 3.8 cubic meters measuring 4x5x0.19 meters at an air temperature of -12 degrees using a 250 A welding machine. The PNSV cable is cut into pieces of 18 meters (for each individual case the length may be different, here was determined empirically).
Types and features of KDBS and VET cables
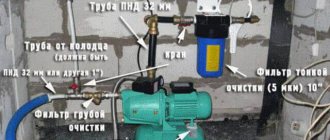
The main disadvantage of the thermal wires described above is the need for additional equipment that allows you to regulate the heat generation power by changing the voltage. The task can be significantly simplified by using two-core sectional self-regulating thermal cables, namely the Finnish VET or the domestic KDBS. They do not require additional equipment for heating and are connected directly to a 220 volt network. The heating cable structure is shown below.
Main elements of the heating cable design
Designation:
- A – Outputs of heating cores.
- B – Installation cable used to connect the KDBS to a 220V network; for this purpose, you can use any connecting wire, for example APV.
- C – Coupling for connecting the heating section.
- D – End insulator sleeve.
- E – Heating section of fixed length.
Structurally, the VET cable is practically no different from the domestic analogue discussed above; as for the main technical characteristics, they are shown in the comparative table below.
Table of comparative characteristics of VET and KDBS cables
As for marking, domestic products of this type are coded in the following form: ХХКДБС YY, where ХХ is the linear power characteristic, and YY is the section length. An example is the marking 40KDBS 10, which indicates a power of 40 W per meter, and the section itself is ten meters long.
What is needed to heat concrete?
- First of all, you need a transformer itself, which can be used at home. On average, this is a technique with a maximum limit of 200-250 A.
- It is also necessary to have a PNSV wire. For the procedure, it is advisable to cut it into several pieces of the same length.
- Aluminum single wire. It is advisable to choose its cross-section within the range of 2.5-4 mm square.
- For insulation, simple cotton tapes are suitable, which are precisely produced for such purposes.
- Current clamps.
- Pliers.
Warming up the concrete
Note. According to SNiP 13.03.01-87 for load-bearing structures, if the average daily temperature outside drops below 5⁰ C, the concrete should be electrically heated. This is used to prevent an ice film from forming in the fresh mortar around the reinforcement.
At home, you can heat concrete with a welding transformer.
Using a heating loop
Schematic diagram - how to heat concrete with a welding machine
Note. In addition to loops, heating of fresh concrete structures can be carried out using the electrode method, in heating formwork, liquid installations, induction and infrared radiation.
If the solidification of the solution occurs with failures in the temperature regime (the mixture freezes), then the strength decreases sharply and the surface becomes crumbling - this is immediately visible when cutting reinforced concrete with diamond wheels or diamond drilling holes in concrete.
Heating of reinforced concrete structures with heating loops based on the principle of supplying a limiting current to the cable is needed mainly for platforms (slab foundations) of floors and less often for walls, when the room itself is not heated. Such circuits, as a rule, are powered through step-down transformers, which have voltage regulation - this allows you to maintain the required thermal power depending on changes in air temperature outside. This method is more economical than the electrode method (see also the article “Aerated concrete wall chaser: design features and application”).
What do we need
PNSV (Heating Wire, Steel Type, Vinyl Sheath)
- So, as we have already said, we need a transformer, which means that at home for these purposes we will use the power of a welding machine - in our case up to 250A, although more is possible, but we will specifically consider the minimum in order to learn how to get the maximum benefit . In addition, as the instructions require, we will need PNSV wire - in this situation we will cut pieces of 18 m each.
- We also need an aluminum single wire with a cross section of 2.5-4 mm 2 (APV is suitable), cotton insulating tape and pliers, and current clamps. And, of course, such work can be carried out only in those areas where there is a 220V power source - this can be a power line, but also (this happens at the beginning of construction) you can use a carburetor or diesel (more economical) generator.
| Core diameter in mm | 1,2 | 2,0 | 3,0 |
| Ohm/meter | 0,15 | 0,05 | 0,02 |
PNSV resistance depending on cable thickness
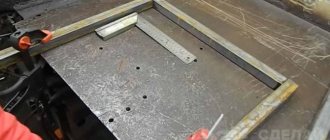
Let's get started
This is what the setup will look like
We have a 250A welding machine, now we need PNSV, the quantity of which we will calculate based on the formula R=U/I, and if we know that U=220V, I=250A, then R=U/I=220/250 =0.88ohm.
What follows from this - if we have a maximum of 250A at the output, then in order not to overload the device we will make 8 loops of 25A each with our own hands - this will be quite enough. To do this, take a piece of PNSV 18 m long and 3.0 mm in diameter (0.05 cm/meter) - for a 4x5 m slab this will be enough.
You strip the ends of the PNSV by 40-50 mm and connect an aluminum wire to each of them (you can, of course, use copper, but the price of aluminum is much lower) - make sure that the twist is tight - the correct operation of our design will depend on this. The length of the aluminum wire will depend on how far away you can install the welding machine - it would be better to bring it as close as possible. If these ends turn out to be short, don’t be upset - they can be extended at any time to the required length, just isolate the twist carefully (see also the article “Pigments for concrete: main characteristics, scope of application and methods of self-preparation”).
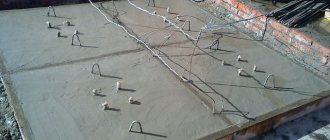
Laying hinges on a metal reinforcement frame. Photo
Now we need to lay the PNSV, distributing it evenly over the entire area so that the twists with aluminum are inside the slab being poured, but in no case touch the metal frame! It’s best if you can thread the PNSV between two sheathings - inside the frame - so the cable will end up inside right in the middle of the slab, like butter in a sandwich between two pieces of bread of the same thickness.
Preparatory work
The PNSV wire is cut into segments (heating loops) of 17-18 m. The resulting segments are evenly tied to the reinforcement frame for pouring the concrete structure. At the same time, make sure that the loops are located above the middle of the slab being poured; if a column is being poured, the layer of concrete above the heating loops should be at least 4 cm.
The garter is carried out with an insulated aluminum wire. The ideal option is if the loops are arranged “snake-like”. The distance between the loops is taken depending on the air temperature - from 10 to 40 cm. The rule here is “the lower the temperature, the shorter the distance.”
The number of heating loops depends on the power of the specific welding machine. Since one loop consumes 17-25A, in our case (power 250 A) no more than 7-8 heating loops with a length of 17-18 m can be used.
Important! When laying loops, the ends are marked - one end is marked with electrical tape, the second is left free.
The loops are laid and tied. Now it is necessary to extend aluminum wires onto them, which will be connected to the welding machine. The length of the aluminum wire is determined by the location of the welding machine, but not more than 8 meters.
I insulate the twists of the heating loop and the extension wire with CB electrical tape, and place it in such a way that it remains in the thickness of the structure being poured. Otherwise, the twist will overheat and burn. The markings are applied with electrical tape to the ends of the aluminum wires.
Why do you need to heat concrete?
Most of the currently common varieties of this building material require operation at temperatures above 5 degrees Celsius. Only at such positive temperatures is high-quality hardening of the material ensured, which quickly gains strength and is free of cracks and other defects. If such work is carried out at sub-zero temperatures, the concrete hardens unevenly, cracks appear, the material begins to crumble, which subsequently leads to the need for expensive repair work. The use of special equipment for heating concrete allows us to ensure proper hardening and hardening of this material, while all such construction work can be carried out even at sub-zero temperatures. If for large volumes of work special oil and electric heaters are used, then for small volumes of concreting it is much easier and more convenient to use compact portable welding machines for heating.
Low-power amateur models are better suited for this job than powerful professional equipment. Such welding inverters are portable, they are more economical and allow you to smoothly regulate the welding current. Such a welding machine can easily be found in every homeowner’s household, and if necessary, you can rent it and properly pour concrete while heating the building material used.
Warming up the concrete
Note. According to SNiP 13.03.01-87 for load-bearing structures, if the average daily temperature outside drops below 5? C, the concrete should be electrically heated. This is used to prevent an ice film from forming in the fresh mortar around the reinforcement.
At home, you can heat concrete with a welding transformer.
Using a heating loop
Schematic diagram - how to heat concrete with a welding machine
Note. In addition to loops, heating of fresh concrete structures can be carried out using the electrode method, in heating formwork, liquid installations, induction and infrared radiation.
If the solidification of the solution occurs with failures in the temperature regime (the mixture freezes), then the strength decreases sharply and the surface becomes crumbling - this is immediately visible when cutting reinforced concrete with diamond wheels or diamond drilling holes in concrete.
Heating of reinforced concrete structures with heating loops based on the principle of supplying a limiting current to the cable is needed mainly for platforms (slab foundations) of floors and less often for walls, when the room itself is not heated. Such circuits, as a rule, are powered through step-down transformers, which have voltage regulation - this allows you to maintain the required thermal power depending on changes in air temperature outside. This method is more economical than the electrode method (see also the article “Aerated concrete wall chaser: design features and application”).
What do we need
PNSV (Heating Wire, Steel Type, Vinyl Sheath)
- So, as we have already said, we need a transformer, which means that at home for these purposes we will use the power of a welding machine - in our case up to 250A, although more is possible, but we will specifically consider the minimum in order to learn how to get the maximum benefit. In addition, as the instructions require, we will need PNSV wire - in this situation we will cut pieces of 18 m each.
- We also need an aluminum single wire with a cross-section of 2.5-4 mm2 (APV is suitable), cotton insulating tape and pliers, and current clamps. And, of course, such work can be carried out only in those areas where there is a 220V power source - this can be a power line, but also (this happens at the beginning of construction) you can use a carburetor or diesel (more economical) generator.
Core diameter in mm 1.2 2.0 3.0 Ohm/meter 0.15 0.05 0.02
PNSV resistance depending on cable thickness
Let's get started
This is what the setup will look like
We have a 250A welding machine, now we need PNSV, the quantity of which we will calculate based on the formula R=U/I, and if we know that U=220V, I=250A, then R=U/I=220/250 =0.88ohm.
What follows from this - if we have a maximum of 250A at the output, then in order not to overload the device we will make 8 loops of 25A each with our own hands - this will be quite enough. To do this, take a piece of PNSV 18 m long and 3.0 mm in diameter (0.05 cm/meter) - for a 4x5 m slab this will be enough.
You strip the ends of the PNSV by 40-50 mm and connect an aluminum wire to each of them (you can, of course, use copper, but the price of aluminum is much lower) - make sure that the twist is tight - the correct operation of our design will depend on this. The length of the aluminum wire will depend on the distance at which you can install the welding machine - it would be more advisable to bring it as close as possible. If these ends turn out to be short, don’t be upset - they can be extended at any time to the required length, just isolate the twist carefully (see also the article “Pigments for concrete: main characteristics, scope of application and methods of self-preparation”).
Installation of PNSV
Here is a brief guide to the standard methodology:
- We select the wire diameter according to the technical data sheet, as a rule it is 1.20-4.0 mm. If you plan to heat reinforced structures, it is recommended to use PVC insulation, since it is more durable. For unreinforced structures, it is allowed to use polypropylene-coated wire.
- Cutting is done in segments of equal length, after which they are rolled into a spiral (Ø 30.0-45.0 mm).
- Spiral threads are laid in a reinforcement frame or they are placed in a plywood or wooden frame (formwork).
- The characteristics of the PNSV do not imply its operation as a heater outside the concrete mixture. Under such conditions, it immediately fails. To correct the situation, use any mounting wire of a larger cross-section, which is connected to the terminals of the segment.
An example of how to connect PNSV using cold ends - After the formwork is poured with concrete mixture, wait until it begins to set, after which the transformer substation is turned on. With its help, the required temperature is set by increasing or decreasing the voltage.
Please note that the principle and layout of PNSP, PNBS, PTPG are practically no different from PNSV.
Using a welding machine as a PT.
This method of heating is quite possible; we will give an example of how this method can be implemented. Let's say we need to fill a slab with a volume of 3.7 cubic meters, at an outside temperature of 10°C. For this purpose, you will need a 200.0-250 ampere welding machine, current measuring clamps, PNSV wire, cold ends and fabric insulating tape.
We cut eight segments of 18.0 meters each, each of which can withstand a current of up to 25.0 A. We will leave a small margin and take eight such segments to connect to a 250.0 A welding machine.
We connect a twisted installation wire to each output of the segment (we connect the cold ends). We are laying the PNSV, its diagram will be given below. It is advisable to connect the cold ends (plus and minus separately) using a terminal block placed on a textolite or any other insulating material.
Connecting the PNSV to the welding machine
Having completed the filling, we connect the direct and reverse output of the device (the polarity does not matter), having previously set the current to a minimum. We measure the load current on the segments; it should be about 20.0 A. During the heating process, the current strength may “sag” a little; when this happens, we increase it during welding.
Warming up concrete with PNSV wire
One of the most effective and safest ways. When current passes through the PNSV wire, heat is generated, heating the mixture. Consumption - on average 60 m3 per 1 m3 of concrete. This wire is often used as a floor heater in the private sector.
- it is easy to predict the “behavior” and adjust the temperature, the concrete heats up gradually, the strength gain occurs smoothly;
- significantly accelerates the hardening process;
- suitable for reuse;
- resistant to fire due to insulation coating;
- is durable and does not bend;
- effective at extreme temperatures;
- resistant to acidic and alkaline environments.
requires precise calculations and preparatory work.What you need to know about the PNSV wire
1. The cable should be laid in cold weather in such a way that it does not touch the formwork, the ground, or extend beyond the concrete. After the formwork is filled with concrete mixture, wait until it begins to harden, then connect the transformer substation and regulate the temperature.
2. Sections are mounted at the same distance of heating wires relative to each other (approximately 15 cm). The mixture will heat evenly.
3. The wire should be secured to the reinforcement frame along which it is stretched so that there is no risk of damaging it when feeding concrete into the trench.
4. The temperature of the mixture is measured during isothermal heating every two hours. This item is included in the contents of the technological map for electrical heating of monolithic structures with heating wires.
5. 70 V is the voltage that should be limited when carrying out work. Therefore, during operation, a step-down transformer (PT) may be required.
Example of equipment: Substation for heating concrete KTPTO-80
Send a request
Types of heating wires and cables
Most often, PNSV wires are used for electrical heating of concrete. This is due to its relatively low cost and simple installation. Below is the appearance of the thermal wire, its design features and the explanation of the markings.
Appearance of the PNSV wire (A), explanation of the markings (B) and design (C)
As an alternative, an analogue can be used - PNSP, the main difference of which is insulation; it is made of polypropylene, which allows a slight increase in the maximum heat release power.
Table of main parameters of PNSV and PNSP wires
Please note that wires of this type can be used as floor heaters, which operate on the principle of a warm floor.
The main difficulty associated with the use of thermal wires of this type is the need to calculate their length. Small miscalculations can be corrected by adjusting the voltage level coming from the warm-up transformer.
Details on how the installation of PNSV is carried out, as well as a description of the related procedures (calculation of the length of wires, laying diagram, drawing up a technological map, etc.) will be given in another section.
Features of the methods
Heating concrete using a welding machine has its own characteristics:
the poured cement-sand mixture should be covered with a thin layer of sawdust in order to avoid excessive evaporation of water from the thickness of the cement-sand mixture;
The technology for heating concrete with electrodes includes two types:
- Through. This type of heating is used for concrete structures that have a complex shape or large thickness. As a rule, with this heating method, all electrodes are installed at a distance of at least 30 millimeters from the formwork.
- Peripheral. The electrodes are installed on the surface of the structure. The method allows you to remove the heating elements after the concrete-filled area has hardened.
When heating with electrodes, the following factors should be taken into account:
- evaporation of moisture, due to which it is necessary to constantly regulate the current supplied to the electrodes;
- the heated surface must be completely covered with heat-insulating material in order to increase the efficiency of the electrodes and reduce heat losses;
- during rod heating, all electrodes should be placed at equal distances to avoid overheating of individual areas;
- ineffectiveness of electrode heating for small structures;
- the need to measure the current temperature of the cement-sand mixture at certain intervals;
- The connection diagram of current-conducting elements for heating concrete with electrodes must be developed individually for each case.
Warming up concrete with a welding machine. When using a welding device, experts recommend:
- insulate the surface of the heated structure to avoid serious heat losses;
- try to limit water loss when using a welding device to heat up a reinforced concrete structure;
- connect only electrodes suitable for the current work to the welding machine;
- install an incandescent test lamp to check the voltage;
- constantly monitor the temperature of the structure and prevent overheating;
- do not close the welding circuit to the intra-concrete reinforcement, since this method is incredibly energy-consuming.
Warming up concrete structures using special cables has serious advantages over heating using a transformer welding device:
- power supply from a household electrical network 220 volts;
- significant reduction in concrete hardening time;
- high economy;
- relatively simple design;
- the ability to automatically maintain temperature in a monolithic structure.
Using a preheated solution
The method of heating the concrete mixture before performing concreting work is the simplest. The technological algorithm provides for the following operations:
- heating the concrete solution at the stage of mixing the components;
- pouring the heated mixture directly at the work site.
For the practical implementation of this technology, special calculations are made aimed at determining the operating temperature.
This takes into account:
- amount of concrete poured;
- time for transportation and filling;
- ambient temperature.
In case of deviations in the calculations, additional heating is carried out using any of the known methods.