Tools
To putty walls, you will need a small set of tools. Some of them are optional.
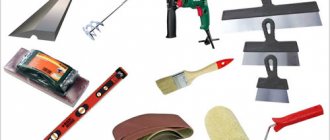
- A drill with a mixer attachment is necessary for mixing the putty.
- A clean container is necessary for diluting the dry mixture with water.
The container should not be contaminated with remnants of plaster or old putty. Small particles will fall into the fresh mixture and leave grooves when leveling. To avoid such mistakes when puttingty, read the article “11 mistakes beginners make when puttingtying walls”
- Spatulas are one of the important tools when carrying out work. You must have at least two spatulas: a wide one and a narrow one for spot work. For beginners, it is better not to use a hard spatula, because it is difficult to calculate the pressure with it, as a result of which furrows remain on the surface.
- The necessary measuring instruments include a hydraulic, bubble or laser level . Depending on what is at hand.
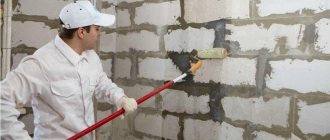
- Rollers and brushes are used to apply primers. A roller is needed for processing large areas, a brush is needed for applying primer to corners.
Some craftsmen use spray guns to apply primers, but in this case, most of the primer liquids end up in the air. Most manufacturers recommend using rollers and brushes to apply primers.
- Sandpaper or abrasive mesh is required to clean the surface after completion of work. It is secured to a sander (sander, sanding block).
As an alternative to a sandpaper, you can use a regular wooden block on which sandpaper is applied.
Which side is correct to putty on?
The spatula has the same surface on both sides, so it doesn't matter which side you use. There are other important features of the work:
- Hold inventory correctly. Many people, when doing repair work unprofessionally, make serious mistakes by holding the tool incorrectly.
Therefore, it is not always possible to properly level the surface the first time. The correct way to hold it is to place the handle in your palm and place your index finger on top of the working part. This will ensure good pressure. When working with corners, you need to press the corners of the blade with your second hand, then you can make fewer movements and achieve the result the first time. To remove excess solution, you need to hold the tool almost at a right angle so that the edge of the canvas does not bend. - Getting rid of sagging: there is too much putty material on the working surface, it is squeezed out from the edges. It is required to gradually reduce the angle of inclination of the tool relative to the working surface.
- Number of spatulas for work. To putty the walls or ceiling, you need to get at least two. A product with a narrow blade is used for puttying minor defects, smoothing out sagging, and applying mortar to the work surface. Use a wide spatula to level the putty material over large areas.
If you follow these rules, you will get the job done right the first time.
Preparatory work
Before applying putty, you need to prepare the base. If the wall has been plastered recently, no major work will be required. If the wall crumbles, cracks and pieces fall off, it is necessary to clean and strengthen the coating.
Stains of soot, grease and mold are cleaned, and rust must be removed from metal surfaces. Wash off dust from the wall, cover up cracks and dents.
When all defects have been removed from the wall, you can proceed to priming the surface. The choice of primers depends on the base material and the composition of the putty.
If the base consists of old loose plaster, then a deep-penetrating strengthening primer will be required. These compounds impregnate the surface and harden inside. As a result of this treatment, the plaster coating becomes stronger. Universal compounds are used to remove dust.
Using a level you can identify unevenness on the wall. To do this, the measuring device is applied in different directions.
How are they classified?
Spatulas are classified into several types according to their purpose. At each stage of repair, different tools may be needed. Let's look at which ones are used for puttying walls.
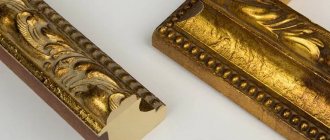
Corner
An angle tool is a metal surface bent at a right angle with a comfortable handle. They use it to line walls in corners. Its shape helps to easily align surface joints between walls and under the ceiling.
Attention
Difficulties in working with an angle tool arise if the initial layout of the structure has incorrect angles.
Most often, the problem of incorrect angles is encountered during repair work in Khrushchev buildings. There, the angles between the walls are either too sharp or too obtuse. Such defects make it difficult for an angle tool to access the required area and reduce the quality and uniformity of putty application in hard-to-reach places. The problem in this case is solved by installing decorative corners at the joints where the design allows.
Facade
They are required for covering walls with putty or plaster material during exterior work; they allow you to level the applied mixture and eliminate unevenness. They are used to work on pre-prepared large-scale surface areas. Facade equipment is expensive due to improved basic characteristics.
Advice
Facade spatulas are durable, with high strength. The working surface is made of high-quality metal, which increases resistance to deformation under strong pressure.
The working plane is tightly attached to the handle with an aluminum profile, which minimizes the possibility of breakage. The handles are usually rubberized, comfortable, lie firmly in the hand, and do not slip out during operation. The average width of the working blade ranges from 15 to 80 cm.
Serrated
Such equipment can be purchased at any hardware store. It is a working blade with a serrated outer edge, secured in a wooden or rubber handle. Necessary for applying an even layer of glue. You cannot do without a serrated tool when laying tiles, ceramic tiles, and porcelain tiles.
Attention
The larger the tile being laid, the larger the teeth should be. And vice versa - small tiles require small teeth.
With a serrated tool, the adhesive mixture is used sparingly and will ensure a high-quality adhesion of the tile to the wall. A spatula with teeth is convenient for removing excess applied glue from working materials.
Painting type
It is similar to a facade tool, but differs from it in design. The dimensions of the working cloth are 20–45 cm. Painting equipment has a thinner edge. Inexpensive, but the quality is low. Therefore, there is a risk of rapid breakdown and short service life under strong pressure or bending.
Advice
However, the small thickness of the working surface, its elasticity, and flexibility make it possible to use equipment for applying putty mortar in a very thin layer. This gives an advantage to the painting tool at the finishing stage when processing the final layer of coating.
It will be an excellent assistant for:
- removing old wallpaper;
- covering up cracks;
- eliminating minor irregularities and roughness on the walls.
Made of rubber
Rubber puttying tools are made from elastic, flexible and dense types of rubber. The price depends on the manufacturer, size, and basic characteristics of the material. It can be very small (for working in the most difficult to reach places) or large (for processing large surfaces).
Rubber products with a wide working blade connected to a handle made of rubber or wood are used to process wide surface areas covered with flowing liquid solutions. Smaller ergonomic rubbers are needed:
- for applying thin finishing layers of plaster and putty;
- for caulking seams, grouting joints, eliminating defects on small walls.
Advice
Typically, tools are sold in sets of several pieces of different sizes in a set. Such tools are universal, have increased elasticity, and are often made entirely of rubber (without joints with additionally attached handles).
Starting putty
This is a type of composition that is laid in a layer of up to 1.5 cm, which allows you to even out differences on the walls and cover up defects. Such compositions are not suitable for finishing the base. The starting putty can be applied in several layers; the first must dry before applying the second layer. To create a durable coating, you can put a painting mesh under the putty.
Puttying on beacons
Reminds me of a similar method of applying plaster. The thickness of the wall is set using beacons, which are set according to the level. To level the putty, use a rule that is established between two beacons. This method is rarely used due to the significant costs of material.
About plastering walls using beacons, read the article: “A simple way to plaster walls with your own hands: step-by-step instructions”
Preparation of putty from a dry mixture
To prepare a thick plastic composition you will need a clean container, water, a spatula and a drill mixer.
The finished solution should not slide over the surface, and there should be no lumps in it.
- You need to pour water into the container, then add the dry mixture to the water.
- The putty is first stirred with a spatula, and then brought to a homogeneous state with a drill-mixer.
For the starting layer, it is better to prepare the solution in small portions so that the mixture does not have time to dry out during the application process.
DIY puttying technique basics
Builders distinguish between 3 types of finishing work. Each of them has strengths and weaknesses.
Classical
Different spatulas are used for repairs. The master manually applies putty to the wall. This is the most common technique. This is where a beginner should start:
- The mixture is diluted strictly according to the instructions: experiments will not lead to anything good, especially if there is no experience.
- First, water is poured into the container, and then the dry mixture is added. Putty is added until its cone rises above the water level by about 5 cm.
Attention
Today, polymer compounds are in demand. They are more expensive than ordinary ones, but significantly increase labor productivity.
Mechanized
Mechanized application of putty solution saves time spent on repairs. Instead of monotonous movements to apply the material, a professional apparatus works. For work, putty stations are used, which quickly prepare the required volume of solution. It will be evenly applied in an even ball over the entire surface.
The technology increases labor productivity - the process moves 4 times faster. After machine mixing, the consistency of the building material becomes uniform. Thanks to high pressure and fine-grained texture, maximum adhesion is achieved: this term in construction refers to the adhesion of dissimilar substances.
The apparatus used is a device that runs on electricity. The kit includes:
- mixer;
- compressor;
- solution supply system;
- control system.
Semi-mechanized
The putty is applied with an ordinary compressor and a texture gun. This method is inferior in speed to the mechanized one, but it is still faster than the manual one.
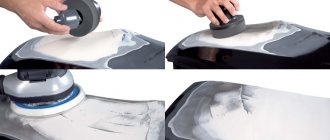
Applying the starting layer
- At this stage, you don't have to worry about trowel marks. The main thing is to maintain an even surface geometry.
- The spatula should be held at an angle of 30 degrees to the wall. Using a small spatula, you can apply the mixture onto a large spatula or on a trowel, then spread the solution over the wall.
- The composition is applied diagonally. Adjacent layers are applied overlapping so that no bumps appear on the wall.
- The starting putty is applied in two stages. The first layer must be allowed to dry, then we again check the evenness of the plane with a level. All distortions must be noted; they are eliminated when laying the second layer.
Corner processing
You need to start working on the walls with a distance of 5 - 10 cm from the corner. In order to properly cover the corner with putty, you need to first treat one plane, then let it dry and treat the second. The corner can be brought to its final state using an angle spatula.
Applying the finishing layer
When the starting putty has dried, you can proceed to laying the finishing composition. It takes 12 hours to dry completely. The thickness of the finishing layer should be no more than 2 - 1.5 mm. The starting layer is primed before starting work.
When the finishing layer is dry, it must be sanded with sandpaper. It is more convenient to work if you fix the paper on a sanding block. At this stage, all cracks and irregularities are removed.
If the base is prepared efficiently and no mistakes were made during plastering, then the putty will not require serious labor costs. Read more about mistakes when plastering in the article “16 common mistakes when plastering walls.”
Expert advice
It is recommended to remember a few more rules and recommendations:
- If you do not have sufficient experience, you should not purchase a lot of materials at once. There is a risk of throwing money away.
- Before applying each subsequent layer, you need to make sure that the previous one is completely dry. This takes at least 12 hours.
- Fiberboard and other wood bases are initially smooth materials, but they also need puttying. The procedure will allow you to disguise the joining seams and protect from mechanical damage.
- It is difficult to use a spatula in the corners of the room. For better application in this situation, use a narrow brush with long, hard bristles.
- All wooden plugs, nails and screws should be removed from the walls. The remaining holes are sealed with cement mortar. Do the same with deep cracks.
- The application and leveling of the putty is carried out under lighting from several lighting fixtures installed at different ends of the room.
- It is forbidden to speed up drying with a heater or draft: this may cause the putty layer to peel off.
- If the walls in the room are high, you need to take care of a reliable and stable staircase or build “trunks” - they will allow you to cover a large finishing area at once. The stairs will have to be constantly rearranged.
Puttying walls is a mandatory stage of a major overhaul and a necessary procedure before making partial cosmetic changes to the interior. Learning to do everything with your own hands seems difficult only at first glance. But a little effort and training will lead to decent results.