Individual water supply for a private house or cottage can be from two sources - a well or a borehole. To automate the supply of water to the house, as well as to create stable pressure, it is necessary to install a pumping station. It consists of a pump, a hydraulic accumulator, a pressure switch and a safety group (pressure gauge and drain valve). The advantage of this idea is that any household appliance can work with such a water supply scheme; another good news is that connecting is not too difficult a task; if you wish, you can install and connect the pumping station with your own hands.
Purpose of pumping stations
Such a station is intended for the functioning of the water supply system of a household, dacha, cottage and maintaining the required pressure in it. Thanks to its operation, it is possible to equip an extensive water supply network, creating conditions for connecting household appliances to it - a washing machine, dishwasher, shower stall, boiler, etc.
According to the installation diagram of the pumping station, it contains a pump, a hydraulic tank, filters, automation and a pipeline structure. The source of life-giving moisture is a well or borehole. In some cases, water intake may be carried out from open reservoirs or other reservoirs.
When installing a pumping station at a dacha is needed to supply water from a pond, lake or river, it can be used exclusively for watering the site or other household needs. Samples of liquid supplied from wells and wells must be taken to a laboratory for analysis - their results will show whether it can be used as drinking water.
Typically, the depth of a well in a personal plot is approximately 20 meters - this is the optimal parameter for placing automatic equipment. This distance allows liquid to be supplied to water collection points without the use of additional devices.
Water supply pumping units operate in cycles consisting of two stages. When the unit is turned on, water rises from the source, fills the system and the hydraulic accumulator. This happens until the pressure reaches the upper limit, after which a special relay turns off the pump and the liquid supply stops.
When you open the taps or operate household appliances that consume water, it flows from the storage tank. The liquid from it is consumed until it reaches the bottom mark. Next, the pump comes back into operation and begins to pump water into the hydraulic tank.
The number of cycles per hour must not be allowed to exceed the permissible number of starts of the pumping equipment being used.
The advantages of installing a water pump in a private home are undeniable:
- Autonomous water supply is provided;
- the efficiency of the water supply system is increased;
- equipment and pipelines are operated in safer conditions;
- it is possible to create a supply of water and, in the event of a lack of power supply, supply it;
- the system maintains a constant pressure and stable liquid pressure;
- the service life of various household appliances connected to the water supply structure increases;
- energy consumption costs are reduced.
In addition, such a station has compact parameters, relatively light weight, and is easy to install.
How to do a test run
The main condition for this is that the pumping station is filled with water, including all lines, as well as the hydraulic accumulator. Water enters the device through the filler hole. Turning on the power and starting the engine is carried out after the shut-off valves have been opened. After this, water gradually fills the pressure pipe. This is necessary in order to displace all the air from it. As a result, pressure increases. As a rule, this parameter can take values from the range from 1.5 to 3 atmospheres; when the limit is reached, the equipment turns off.
Thus, the effective operation of such equipment is ensured not only by the correct choice of model suitable for use in certain conditions, but also by proper connection. And for this, it is first decided where the equipment will be installed, after which a hermetically sealed connection of the equipment with the internal and external pipelines is organized.
Criterias of choice
When it is planned to install a pumping station in a private house, it is selected so that it fully performs its function, and therefore meets the needs of people who live there permanently or who often come to visit.
Before installing a pumping station in a private house, certain criteria are taken into account:
- Technical features of the equipment.
- Features of the operation of water sources.
Where to begin
After completion of the well drilling work, the organization that carried out the work issues a passport to the homeowner. It indicates the characteristics of the source (depth, distance to the water surface, height of the water column) and flow rate (well productivity). These parameters are necessary to calculate the water supply network. Knowing the number of sampling points and water flow, the required pump performance is determined. Another important parameter is the pressure, or pressure in the system.
Using the available values, the operating point of the pump is determined. This is the main characteristic used to select the power of the pumping station. You can purchase the unit assembled or buy all the elements separately. If the distance to the mirror is more than 10 m, this will have to be done.
Manufacturing and connecting a pumping station to a well with your own hands will significantly reduce its cost.
Technical indicators
If you plan to install a pumping station for a dacha or household, when choosing it, pay special attention to performance. The best solution would be a design that will provide the required pressure from the well, capable of satisfying the need for water for domestic needs and for a personal plot.
For a comfortable stay outside the city for a family of 4 people, installing a water station of medium or low power is suitable. Typically, such designs are equipped with a hydraulic tank designed for 20 liters. They lift liquid from the well in a volume of 2 - 4 cubic meters per hour and create a pressure of 45 meters or more.
In addition, before installing a pumping station, when purchasing, take into account its dimensions, the water level when the pump is off and running, the type of filter and the cross-section of the pipes.
Common mistakes
Connecting fittings manually can lead to depressurization.
When installing a pumping station, craftsmen may make the following mistakes:
- Absence of check valves at all inputs to the equipment. This will cause water to constantly flow back, which will lead to incorrect operation of the station.
- Lack of pipe length reserve. It is worth taking into account all turns of the highway and entrances into the house. It is better to take a length with a reserve than to increase the number of connections or the number of pipe sections consumed.
- Joining threaded fittings without a key. Even if the master has remarkable strength, it is better to tighten the elements with a special tool. Otherwise, depressurization of the line may occur.
- Lack of pressure adjustment for the hydraulic accumulator. Leads to excessive consumption of electricity, pump burnout, and unstable pressure in the water supply.
- Ignoring the filtration system. Well water requires good purification. Even if visually it is completely transparent. The type of filter is selected after laboratory analysis. The most optimal are reverse osmosis installations, the separateness of the flasks of which allows you to perform several stages of liquid purification at once. These filters are connected under the sink with a separate tap for drinking water.
If all of the above recommendations are followed, the master can independently connect a pumping station for an Abyssinian well (needle well) at the dacha or a sand source with his own hands.
Installation diagrams
Before installing a pumping station, you need to choose the optimal location for it.
This takes into account:
- distance from the station to the source;
- humidity and temperature conditions at the pump location;
- availability of space for repairs and maintenance;
- the ability to soundproof the room.
After choosing a location, the water pumping station is installed step by step:
- Work begins with preparation. A solid base with a flat surface made of wood, concrete or brick is created for the transfer pump. You can use a special metal bracket.
- Since the unit begins to vibrate strongly during operation, leaks may appear at the joints of the pipes. Therefore, before connecting the pumping station, a rubber mat or special pads are placed under its supports. Anchor bolts can be used to securely fasten the legs.
- In order to ensure uninterrupted water supply, it is necessary to ensure a constant supply of liquid from the source. It is necessary to follow the instructions on how to properly connect the pumping station to the well, protecting it from freezing. To do this, dig a straight trench in the direction from the source to the foundation of the house to lay pipes in it, preferably with a cross-section of 32 millimeters.
- Pipes are laid below the freezing mark of the ground. When forming a trench, take into account the slope in the direction of water intake. When groundwater lies close to the surface, the pipes are placed above the critical level, but at the same time they are insulated or a heating cable is used.
- When the pipeline is located above the ground, high-quality thermal insulation and heating are required; for this, basalt-based mineral wool can be used.
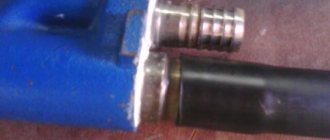
- Before connecting the pumping station to the water supply, they complete the water intake unit with a surface device and a built-in ejector, connecting polypropylene pipes to the end along with a check valve and a metal mesh, which performs the work of a coarse filter. The check valve ensures stable filling of the pipes with water. To fix it, use a coupling with an external thread. When operating a submersible pump, you only need a pipe and a check valve - it already has a filter of this type.
- The pump weighs a lot, so a strong cable is required to hang it. When lowering the water intake unit of a structure with a surface pump, take into account that the gap between it and the bottom of the well or borehole must be at least 1 meter. For a submersible unit it is 0.5 meters.
- Next, in accordance with the connection diagram of the pumping station, a hydraulic accumulator and a control unit are placed using a five-pin fitting; it is placed in a convenient location in the pressure pipeline. Then a pressure switch and pressure gauge are mounted to it. The storage tank is connected to the side entrance of the fitting.
- All piping elements of the pumping station are complex units, and the breakdown of one of them leads to a malfunction of the water supply system. For this reason, shut-off valves are installed at each site so that it is possible to carry out local repairs by disconnecting a certain part of the structure. This is best done using an American type tap (for more details: “American tap - rules for using fittings for connections”).
- It is advisable to provide in advance the possibility of draining water from the system. Therefore, a branch is made in the pipeline from a tee with a drain valve. A coarse filter is installed on the water supply branch, and a fine filter is installed on the pressure branch.
- Then consumers are connected to the station, the first of them will be the distributing collector.
- The electric motor of the pump is characterized by high power, so a separate power line must be allocated for it. The electrical connection diagram for the pumping station provides for grounding and connection of a voltage stabilizer.
- During the installation process, you need to check the pressure in the air chamber of the accumulator. Its value compared to the switch-on pressure of the unit should be 10% lower. The setting is performed in operating mode. Preliminary values for a tank with a capacity of 20 - 30 liters are 1.4 - 1.7 bar, and for a tank with a volume of 50 - 100 liters 1.7 - 1.9 bar.
- When you install a pumping station with a surface-type product yourself, you need to fill the working part of the system before starting. Unscrew the plugs from the filler hole located at the top of the pump. When the pipeline is equipped with a filler funnel, use it. Water is poured in until it begins to flow out, and then the valve is tightly closed.
- The pump is connected to the power supply during startup. To remove any remaining air that has entered the funnel, open the valve on the pipeline.
- You need to not only know how to properly connect the pumping station, but also how to start it. After turning it on, water should appear from the outlet of the pressure pipeline or a slightly open water tap. When this does not happen, the pump is stopped, water is added and it is started again. After a successful start of the equipment, it is run in and the pressure switch and valve body are adjusted. Most often, adjustment of the pressure switch at the pumping station is performed by a specialist.
Assembly diagram with a submersible pump
Starting pumping equipment
A pump of any type has decent power, for this reason, it is better for the pumping station to have separate wiring with grounding and install an automatic machine.
- Before starting, the pumping unit should be filled with water and the pressure checked.
- The pump is connected to the network
- Open the filler funnel slightly to allow the remaining air to escape.
- Supply power to the installation. Water should flow from the faucet in the house within a few minutes.
- If fluid movement has not begun, the installation is turned off, water is added to the hydraulic tank, and then the test is carried out again.
Recommendation All screw connections should be made with a sealant or foam tape.
Station assembly
To assemble a pumping station, you need to understand what it is and how it functions.
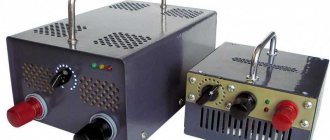
The station has the following main components:
- a centrifugal pump that pumps out and transports water into the house;
- pressure switch;
- hydraulic tank preventing hydraulic shock;
- an electric motor connected to a relay and a pump;
- pressure gauge for pressure control;
- intake system with check valve;
- line connecting the pump and water intake device.
The installation of these units is carried out in accordance with the water supply diagram of the pumping station of a private house.
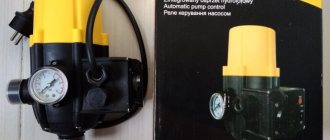
The pressure switch regulates its value in the system. When it is below the required parameter, the pump starts, and if it is higher, then it turns off. Using a pressure gauge, the pressure is adjusted. A mandatory element of any water supply station scheme for a home is a hydraulic accumulator. It is sometimes replaced with a storage tank, but this design is considered obsolete.
Some valuable recommendations
Threaded connections must be tightened with a wrench and not by hand to ensure the required tightness. To connect fittings, protective devices and the pumping station itself, it is better to use pipes whose diameter is slightly larger than the calculated one in order to compensate for the load increased due to bends in the line.
The recirculation line will protect the pump and increase the water pressure in the system. To install the return line you will need a tee
To protect the pump from idling, you can install a recirculation line. To do this, tees are placed on the supply and suction pipes and the free pipes are connected with a return line.
A valve should be placed on it to control the intensity of the reverse flow. This addition will improve the pressure, but will slightly reduce the performance of the device.
A bracket can be used as a base for the pumping station, but it must stand level on shock-absorbing pads so that vibration is minimal
The pumping station is placed on a perfectly level base equipped with shock-absorbing pads. This will reduce the vibration impact and also reduce the amount of noise.
About once every three months you need to check:
- condition of joints for leaks.
- condition of filters for timely cleaning.
- relay settings for their correction;
- the condition of the hydraulic tank to determine the location of leaks.
If the pressure level in the HA does not meet the required level, it is easy to pump it up using a compressor or pump. On larger containers a nipple connection is provided for this purpose. If fluid leaks from the hole, the inner membrane is torn and needs to be replaced.
Installation location
Usually the pumping station is assembled in a heated room. The ideal place would be a boiler room with well-equipped sound insulation. There are other options for installing a water supply station. Often it is placed in the basement or basement, but subject to their heat, sound and waterproofing. You can also use a special box - it is placed in the underground with a hatch providing access to the equipment.
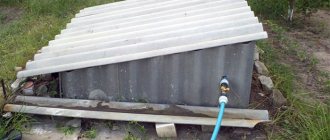
A platform is used to place the station in the well. It is installed below the freezing level of the ground. In this case, the structure of the well should be insulated from above. But this method of placing a water station is characterized by problematic access to it.
You can also provide space in the caisson for the pumping station. To do this, a structure is built around the well, buried below the freezing level of the soil. The caisson is closed and thermally insulated at the surface of the earth. For maintenance, a small hatch will be sufficient.
You can also build a house for a pumping station or place equipment in an extension. If this is a separate building, it must not only be insulated, but also heated in cold weather.
Self-installation allows you to significantly reduce the cost of installing a pumping unit. Depending on the type of source, different connection schemes for the water station are used. Correct installation depends, among other things, on small elements such as an oil seal, check valve, filters, etc. They can improve and make the operation of pumping equipment longer.
Design features of the pumping unit
Depending on the type of pump, stations are modular or made up of individual components. The installation includes the following elements:
- Pump. It is a unit that works by creating centrifugal force. The device is immersed in a well or placed on the surface. It is used to lift water from the shaft and direct it into the pipeline. With a small volume of extracted liquid, most of the resource ends up in the hydraulic accumulator, which is necessary to maintain normal pressure in the water supply system. The pressure pipe is equipped with a coarse filter that captures large impurities washed out of the well by the flow.
- Hydraulic accumulator. It looks like a metal container equipped with a curved rubber gasket. There is compressed air between the tank walls and the seal. When filled with water, the membrane expands and the pressure increases.
- Pressure switch. This part of the system is responsible for turning on and off the equipment. If the pressure in the pipeline exceeds 3 kg/cm³, the relay sends a signal to stop the pump. When the parameter is reduced, the installation is turned on. Monitor the system parameters using a pressure gauge. The same element allows you to configure the relay.
- Check valve. This part is installed on the pressure part of the equipment. It prevents water from flowing out of the tank. The system operates under pressure, the valve prevents the occurrence of water hammer when starting the submersible pump.
Expert advice
When, thanks to the operation of the station, an uninterrupted water supply has been established in the household, it must be periodically serviced. First of all, you need to monitor the condition in which the coarse filter is located. If necessary, it must be cleaned.
If this is not done, the performance of the equipment will decrease and water will flow in fits and starts. When the filter is completely clogged, the pump will run idle and then turn off. The frequency of cleaning depends on the amount of impurities present in the water.
It is advisable to check the pressure in the air compartment of the hydraulic tank once a month after installing the water station. The same should be done in case of preservation for the winter, repairs, or downtime. Its value should be 1.2-1.5 atmospheres. If necessary, air is pumped up with a car pump or compressor.
When the station is used exclusively in the warm season, the water must be drained from it before frost sets in.
If all the recommendations on how to correctly install the pumping station specified in the instructions have been followed and the equipment is connected for debugging and determining the pressure at which it will turn off, two liters of water are poured into the receiving device and the unit is started.
When the station turns off, you need to record the fluid pressure. You should also know this parameter when starting the unit automatically. The station may not turn off at a certain liquid pressure. You can deal with this problem using the screws on the pressure switch. They adjust the compression ratio of the springs. To do this, first remove the cover on the device, then tighten the screw with the letters “DR” towards the “plus” or “minus”. To regulate the pressure at which the start will occur automatically, you need to engage the screw marked with the letter “P”.
Rules for starting and setting up equipment
Before starting the pumping equipment for the first time, it is first necessary to prepare the hydraulic accumulator, since the stability of the entire water supply system depends on the correctly selected pressure in it . A high pressure in the tank will provoke frequent switching on and off of the unit, which will not have the best effect on its durability. If there is low pressure in the air chamber of the tank, this will lead to excessive stretching of the rubber bulb with water, and it will fail.
The hydraulic tank is prepared as follows. Before pumping air into the tank, make sure that the bulb inside it is empty. Next, check the pressure in the tank with a car pressure gauge. Typically, new tanks are filled with air at the factory. Hydraulic tanks up to 25 l should have a pressure in the range of 1.4-1.7 bar. In containers of 50-100 liters, the air pressure should be in the range from 1.7 to 1.9 bar.
Advice! If the pressure gauge readings are lower than recommended, then you should pump air into the tank using a car pump and adjust it, referring to the pressure gauge readings.
First launch of the station
To correctly start the pumping station for the first time, perform the following steps step by step.
- Unscrew the plug that closes the water hole located on the unit body. Some devices may have a valve instead of a plug. It should be opened.
- Next, fill the suction pipe and pump with water. Stop pouring liquid when it begins to flow out of the fill hole.
- When the suction pipe is full, close the hole with a plug (close the valve)
- Connect the station to the power supply and turn it on.
- To remove remaining air from the equipment, open the tap at the water intake point closest to the pump.
- Let the unit run for 2-3 minutes. During this time, water should flow from the tap. If this does not happen, then turn off the pump and refill the water, and then start the pumping station.
How to do it?
The supply of water from the well to the premises can be provided either exclusively in the summer or on a regular basis throughout each season. To prevent water from freezing due to winter cold, it is wise to run the water supply system directly under the ground. There are several options for independently arranging a water supply system that do not require significant labor or material investments. However, even during such work, you can encounter a number of difficulties, the main of which is the correct connection of the hose to the sides of the ring where the hole is made.
To prevent surface water with contaminants from entering the well, the joining point is isolated using a special composition, which must be made from cement and liquid glass. When a country house or private house has a constant water supply, it is very comfortable for residents. However, in order to conduct water at home and do it correctly, you will need to work hard.
In addition to a number of building materials and tools, certain skills and theoretical knowledge will be needed. The main ways to ensure an uninterrupted water supply include supply through a pumping station, through special tanks or using a hydraulic tank. Proper organization and configuration of such a water supply system will allow you to get excellent water pressure at the tap.
To begin with, you will need to allocate a place in the room where the pump will be installed. A small storage room is perfect for this purpose - such a room is not so difficult to convert to the necessary needs. Next, they usually proceed directly to the construction of the water supply system. First, you need to lower a pipe into the well to collect water at a distance of approximately half a meter from the bottom. One end of this pipe is closed with a special filter made of a special mesh - it is this that will purify the water from all kinds of debris.
It should be noted that the filter will need to be cleaned occasionally. Don't be alarmed - it's quite easy to do. If a metal pin is mounted at the bottom of the well, then the cleaning hose is attached to it; otherwise, this is done in any convenient way.
Before the pumping station, it is necessary to connect a check valve and a filter system for rough cleaning. A filter for fine cleaning is installed after the pump. This installation procedure is dictated by the fact that dirt particles should not enter the device, because they can simply break it. Installing a valve is required to prevent water from flowing back to where it came from.
If all connection rules are followed, supplying water to the house will not be difficult. This homemade system works extremely effectively. However, there are a number of nuances and subtleties that will make water supply wiring even easier. In many cases, installation of pumps can be done directly above a well or borehole, for which all equipment is installed in a special container - a caisson. This method of supply is very popular. First you need to dig the pipe to a depth of 2.5 meters, and the diameter of the hole should be 2 times larger compared to the caisson. A standard concrete solution is poured into its bottom in a layer of 20 centimeters, after which a caisson is placed there.
The pipe is cut so that its end is approximately another half meter above the caisson. Then you need to dig a trench about 2 meters deep. After this, you can begin installing the pump and connecting it to the water supply system. And finally, at the final stage of installing a water supply system with your own hands, you need to fill the caisson with a concrete solution along the contour and cover everything on top with soil.
The best furniture for a large hall
Many people wonder what furniture to choose for a large hall so that the room does not look empty and can be divided into zones. For a large room, a good option would be to create a dining room together with a living room.
The dining area should have display cases, a table, and comfortable chairs or armchairs. This area needs to be arranged in such a way that the whole family can gather during lunch or dinner.
In the recreation area you need to create the most comfortable environment so that you can relax after a difficult day at work or receive guests. This zone should emphasize the overall style as much as possible and show the refined taste of the owner.