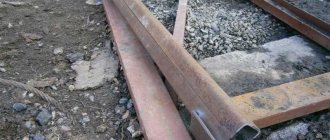
Sometimes the word “open” is too strong. They simply set up a sawmill for use at home, for example to build a house, or, in extreme cases, to cut a log for a neighbor. This is the case we are considering.
When opening your own sawmill, there are several options on how best to do this:
- Buy inexpensive equipment;
- Do it yourself.
Again, to build a house and get 3 - 5 cubic meters of boards, buying a sawmill for 50 - 150 thousand is just some kind of waste. After all, our boards will cost several times less: 18 - 30 thousand rubles.
There is a way out, make a saw frame from. This will not take you much time if you have hands that grow from the right place. In addition, it will serve you faithfully for a long time, because today it has its own sawmill.
What do we need?
- Welding machine, electrodes;
- Lumber, posts, screws, nails;
- Chainsaw, electric saw or just an electric motor;
- Extended tires with chains, if you cut wood with large diameters, more on that below;
- Material for making the case, preferably a corner, as it is quite resistant to vibrations;
- Rollers and guides;
- Cord, clothesline or cable for moving the saw while sawing;
- Roller bearings.
What material should I choose to make the case? Metal is certainly considered generally accepted. It withstands the weight of logs well and is resistant to changes in humidity.
Another cheaper and more economical option for using wood can be considered as a material. With high-quality fastening with screws and self-tapping screws, the wood will easily withstand the load from.
How to make
Let's take a closer look at how to make your own sawmill from a regular chainsaw using the example of a stationary structure.
What you need
For work you will need the following materials:
- Chainsaw.
- Welding machine.
- Square metal pipes.
Manufacturing process
To manufacture the device you will have to perform the following steps:
- Assemble the base of the future sawmill from pipes and angles. There is no need to install the structure immediately. First you need to fold it and check how smoothly all the elements are connected. They do this using a level. Only after this the pipes are connected to each other by welding.
- When the base rectangle is assembled, for greater structural strength it must be strengthened with at least two ties. They can be made from the same metal pipes. The ties are fastened transversely at an equal distance from each other. The best mounting option is bolted.
- Then thinner pipes or metal profiles are welded on top of the pipes from which the base of the structure is assembled. They will serve as guides for the logs being cut and will not allow them to fall off the sawmill. Transverse guides are also welded. Ideally, they should rotate - this will ensure smoother movement of the log and minimize the effort that needs to be applied during operation of the device.
- After the base is completely ready, it is installed on racks. Steel squares are best suited for their role. They are welded in the corners of the base. For greater structural strength, braces can be welded between the posts.
- Afterwards, the trolley for the cutting part is assembled. It is a rectangle of metal pipes supported by two longitudinal steel strips. Between these strips and the walls of the rectangle, two slopes are installed so that the structure is stable. Rollers are placed under the strips, which will ensure the movement of the cutting part along the base. Then another pipe is welded to one of the strips, connecting it to the rectangle on top. This is the attachment point for the saw.
- When the cart is ready, secure the saw. This can be done in a variety of ways. The most common method is to secure the saw body using clamps or metal ties. It is quite reliable and does not cause irreversible damage to the device. If necessary, additional transverse strips are welded to the trolley from the same pipes from which the remaining parts of the structure were made.
What needs to be provided?
Before making, you need to pay attention to the following things:
- Diameter, if there are large diameters, then you need a more powerful saw, a longer bar with chain;
- Loading heavy logs for sawing, for this it is necessary to provide some kind of mechanism, or they can be rolled up either by additional jacks or, ideally, by a loader;
- The log must be fixed so that it does not play during sawing and the boards are even;
- The chainsaw guide and sled should not play, so they need to be strengthened;
- The more powerful the saw, the easier production will be. Therefore, when purchasing a saw, you need to take the most powerful one;
- Using electricity as an energy source allows you to save a lot;
- Do not forget that the chain must be for longitudinal sawing, this will significantly increase the speed of the process. Experts recommend using a 3*8 chain.
- It is advisable to buy carbide. This is what he is doing today. Conventional circuits fail quite quickly;
- The length of the logs to be cut must take into account the maximum and minimum. So that the longest ones fit in, and the shortest ones don’t fall between the guides;
- Calculate in such a way that the saw does not vibrate or play on the guides during operation;
- The power of the saw, in some cases you want it to be both more powerful and more economical. In this case, folk craftsmen do the following. Instead of a chainsaw, an electric motor is installed, and the tire is left for sawing, see photo below;
- The height of the sawmill. It is necessary to provide in such a way that the back does not hurt to bend over and the logs do not need to be lifted high. If the wood is not heavy, it is better to make it higher. If the forest is heavy, you can go lower.
- Sawing of wood can be carried out either by the upper part of the tire or by the lower part. When sawing with the lower part, they fly towards the chainsaw and clog it. The upper part throws out sawdust from the chainsaw, this allows you to increase both the service life of the saw and the downtime during sawing;
- During the sawing process, the chain very often stretches on the saw and needs tensioning. Therefore, when installing the saw, it is necessary to provide access to the chain tension and secure the saw with access to the mechanism;
- When sawing, it is better to fix the position of the chainsaw handle, this simplifies the process;
- The cable, clothesline or lace should not drag, since the sawing process should be uniform over time.
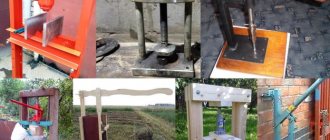
Mini
A further development of Logosol’s idea is a mini sawmill without a frame, guide and rails, see fig. on right. Instead of a guide, an existing saw cut is used; With careful manual sawing, its accuracy within the log is maintained. In this case, in addition to the tire and drive, only the support platform and handles for holding and moving remain on the carriage.
The pioneer cut is made according to a template (a flat board, top right in the figure), a channel, a frame from an angle, etc., longer than a log. Subsequent horizontal ones are the same as the previous one, in the center on the right. If a vertical cut is necessary, place a channel (bottom right), because in this case, a flat lateral supporting surface is needed. However, all this does not eliminate the last problems: installing the log on the carriage, leveling it and holding it.
Mini sawmill without a frame and how to use it
Step-by-step manufacturing process
So, our process will go as follows:
- We draw drawings based on the materials you have;
- Making the frame. To do this, we weld a corner or pipe into a frame;
- Making sleds. It can be made from a wooden board with the area of movement of the slide covered with a stainless sheet or galvanized. The second option is from the corner where the rollers will roll. The third option is from rails. Options are presented as the load on the sawmill increases;
The sled is made of 50 mm boards. The board is galvanized for less abrasion. A profile (square) pipe without a fourth wall rides on the slide.
- The next step is the mechanism for adjusting the thickness of the board. There are two options here. The first is like in the Logosol sawmill, the log is raised, and the cutting part is motionless. This option is more suitable for sawing small logs, so as not to bend over and hurt your back, and to make sawing faster. To use this method, ordinary mechanical jacks are well suited; you need to ensure that their lifting height is as high as possible. The second option is when the log is motionless, and the saw lowers and rises along the ruler. Which option you will implement needs to be thought out at the stage of creating drawings;
- Chainsaw mount. Checking the structure for strength. Elimination of backlashes;
- Making a mechanism for uniform advancement of a saw from a cable, clothesline or lace:
- Commissioning and modification.
Not everyone can afford the purchase of a ready-made sawmill, especially since it will only pay off with constant use (read commercial use). Is it possible to make a sawmill with your own hands? What difficulties will a do-it-yourselfer face if he decides to cut raw logs into industrial wood on his own?
Some useful tips
A sawmill is an impressively sized unit that is quite dangerous to operate , so before you start assembling it, you should carefully consider the place where it will be used.
It should be well lit, ventilated and have free space. The nearby warehouse for finished boards will greatly facilitate the process of processing the material. For a sawmill with an electric motor, you should very carefully install the necessary switches and automatic machines, as well as install the wiring.
Since the most dangerous elements of the unit are all its cutting and moving parts, when assembling the structure they should be given special attention.
Before starting to operate the assembled equipment, it is necessary to check all fastenings and components, as well as the stability of the structure.
Homemade band sawmill
Let’s make a reservation right away – making a band sawmill yourself is very difficult. It's not so much about the components, extensive turning and welding work, the need to sharpen and route the saw in a special way, but about the well-functioning performance of the entire complex.
It is necessary to ensure loading and stability of movement of up to 300 kg of one log, adjustment of cutting thickness, and most importantly, safety precautions. But if the availability of free wood wins, we make a band sawmill with our own hands.
Let us explain the principle of tape cutting with an example: take two spools of thread, stretch a threaded thin tape between them. By forcibly rotating the tape, we cut the log, the distance between the tapes is the maximum size of the beam. Band saws are convenient for cutting boards.
We start with choosing a production area or premises - at least 3x6 m, verified. The second most important thing is the metal wheels of the cart and band saw, this must be found or purchased. Order the frame of the belt mechanism with wheels, or it is better to buy a ready-made one. Self-production requires skills and a lot of high-precision tooling.
View 1
: 1 - stand;
2 - roller; 3 - plate; 4 - screw; 5 - chain; 6 — guide lug; 7 — movable comb; 8 - screw; 9 - fixed comb; 10 - remote control. Type 2
: 1 - pulley for starting the engine (if a three-phase motor is connected to a single-phase network); 2 - engine; 3 - pulley; 4 - shaft; 5 — housing with bearing; 6 - base; 7 - flywheel; 8 - finger; 9 — connecting rod; 10 - saw; 11 — M14x2 screw; 12 — roller; 13 — guide angle; 14 - stand; 15 — steering wheel; 16 — bushing; 17 — asterisk; 18 — nut M14x2; 19 — lock nut; 20 is an asterisk.
We install guides - any strong, flat metal: I-beam, channel, corner, under them, after 0.5 m, supports or anchors for stability. The distance between the guides is the diameter of the largest log with a margin of about 0.7 m. Maintaining the geometry, we weld everything together. We attach wheels, a belt mechanism frame, and an electric motor through a pulley to the cart.
Consider a mechanism for changing the horizontal movement of the saw relative to the log. Moving the cart relative to the fixed log, we cut off a horizontal layer of wood - we make boards.
Disc sawmills have received the greatest handicraft use due to their versatility and ease of manufacture. We will make a circular sawmill with our own hands. The most important thing is that we will need a circular saw - a disc larger than 500 mm (the larger the better). The propulsion device is usually an electric motor through a pulley that increases the speed.
1 — main sleeper (steel pipe 80x80x3, 5 pcs); 2 — lining (steel sheet, 40x10x1.22 pcs.); 3 — guide blade (steel channel No. 8, L1750, 4 pcs.); 4 - trolley (telpher carriage); 5 — bottom bracket (steel channel No. 18, 2 pcs); 6 - plate - base (stylish sheet s5); 7 — M20 bolt) (4 pcs.); 8 — Grover washer (4 pcs.); 9 — nut M20 (4 pcs.); 10 — three-phase asynchronous electric motor (220 V, 5 kW, 930 rpm); 11 — upper bracket (steel angle 45×45); 12 — circular saw blade; 13 — protective casing (steel sheet s2); 14 — steel pin (8 pcs.); 15 — circular saw hub (St5); 16 — thrust handle (water and gas pipe 3/4″); 17 — cut-off slab; 18 — thrust gusset (steel sheet s5); 19 — comb (steel angle 45×45, L400); 20 - log; 21 — M30 bolt; 22- split washer; 23 — retaining washer (steel sheet sЗ); 24 — thrust crossbar (steel angle 45×45); 25 — shortened sleeper (steel pipe 80x40x3, 6 pcs.); 26 — overlay for lengthening the blade (steel sheet 250x180x10, 2 pcs.).
A welded frame is prepared, a metal (less often wooden) plate with a slot for the disk is placed on the frame. The gaps between the disk and the plate are minimal. The saw shaft is attached to the plate from below on bearings and a pulley. The electric motor pulley and the saw are connected by belts (reinsurance when the saw jams) - a homemade circular sawmill can work!
one of the options for a homemade circular sawmill
To tension the belt, use the weight of the engine with the addition of weights. Make the supporting platform of the electric motor movable coaxially with the saw shaft, deflecting under weight in the opposite direction. The wheel of a working tractor with a drive to a saw pulley without belts is often used as a propulsion device.
The principles of cutting are the same as in band cutting - we feed the log to the cutting disc. After a disc cut, the surface of the lumber is of higher quality due to the speed of processing. Disc sawmills come in vertical and horizontal types - they are easier to use in mobile installations.
Operating principle, advantages and disadvantages
The operating principle of a sawmill made from a portable chainsaw is very simple. The saw is firmly attached to any surface, and then boards, beams or logs are “driven” through it. In this case, instead of a sawmill disk, a chainsaw chain acts.
Here are the main advantages of this homemade design:
- Possibility to mount anywhere. A sawmill from a chainsaw can be assembled absolutely anywhere: at a construction site, on a personal plot, or even at a logging site in the field.
- Easy to assemble. For installation, you only need a chainsaw and materials that are on hand.
And the main drawback is that the device’s power is not very high. When cutting long boards from a thick log, it can work unstably and get stuck.
Depending on the ability to move, homemade chainsaw sawmills are divided into two types:
The stationary device is a structure made of metal or wooden slats on which the saw is fixed. It has guides along which the logs move. The saw is motionless during operation.
The mobile device is a special attachment for a chainsaw, which is usually welded from steel slats. During operation, the saw moves along with this attachment along the log.
Depending on the material from which the sawmill is made, the devices are:
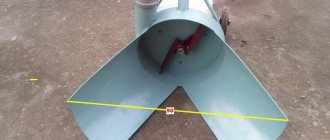
Tire sawmill
We need to start by understanding what and how much we will cut. If you need to cut 100 - 200 rafters for a house being built from free logs, then 400 boards, it is better to use a hand-held professional chainsaw. Let's make a homemade sawmill from a chainsaw, an inexpensive, simple and effective method.
drawing of a simple sawmill using a chainsaw (download full drawing)
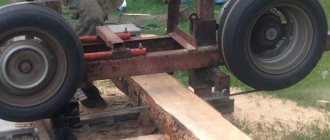
You will need any smooth metal profile, welding and a grinder. We start with the maximum length of the log - practically about 4 m. For this length you need to find a channel or I-beam, you can weld it from pieces with reinforcement - the main thing is that the resulting profile is even. We are starting to make our autonomous sawmill based on a chainsaw.
The design is a powerful profile at a working height - above the waist, along which a fixed chainsaw moves in a cart.
The height is determined by ergonomics; a prolonged knee-elbow position is not useful. A log is placed parallel to the main profile on a support frame, a running chainsaw moves along the log and makes the necessary trimming.
A few more details about the features. The main element is the main profile, which ensures the geometrically correct dimensions of the lumber, must be sufficiently strong and rigid, if the channel is at least 200. The profile rests on 3 or more supports connected to the support frame on which the log rests.
If you decide to make a chain sawmill with your own hands, be sure to look at the LOGOSOL sawmills. Drawings and documentation can be downloaded from the website and used as the basis for your homemade project.
The main errors during sawing are formed when the trolley with the chainsaw oscillates, so the trolley moves along the profile using at least four rigidly pressed metal wheels; it is necessary to provide a manual drive. The simplest is a well crank with a drive wheel along the main profile.
To install a heavy log, slopes are usually installed along which it is convenient to push the log successively from side to side onto the support frame, wedging it on the frame.
The most difficult thing is the adjustment mechanism for the thickness of the product. The simplest method is to install screw or any rigidly fixed jacks along the edges of a support frame movable in a vertical plane. We adjust the jacks - we adjust the thickness of the product. An example of the construction of a mobile tire sawmill based on a chainsaw can be seen in the photo.
Cutting wood can be done by one person: holding the chainsaw handle and adjusting the gas, we feed with the other hand.
Carriage, grips, clamps
There remains such a problem as a frame with additional components. The one on pos. 1 pic. the left is far from optimal. For one-time sawing for self-construction, it is too complex and expensive. It is also not suitable for long-term regular use: even if the supporting frame is made of a 200 mm channel, it will not sag after the first or second dozen logs, which means the machine is completely unsuitable. A stationary sawmill should be made with separate concrete rail tracks and a carriage for logs (item 2; in this case we will not focus on safety precautions - the topic of this article is different).
Irrational and rational designs of the frame, carriage and log grippers of a homemade sawmill
The next tasks are leveling and holding the log. In industrial woodworking, hydraulic jacks with hooks are used for this purpose. The log is hung on the hoist, lowered onto the carriage without touching it, the jacks turn on and grab it tightly. In automated carriages, a log is placed on it and hydraulics, based on sensor signals, immediately levels the timber.
In amateur conditions, the first is not feasible; the second is in no way feasible. In many homemade sawmills, log grippers are made as shown in Fig. below. The log is hung on automatic jacks (see below), hooks are brought to it, sliding along a guide (pipe, thick rod). The hooks are tapped with a hammer according to the principle of “lightly tapping with a sledgehammer”, they are wedged on the guides and hold the log.
An unreliable and inconvenient way to attach a log to a sawmill carriage
Firstly, such fastening is simply dangerous: vibrations during sawing can cause the grips to become wedged, and this is an accident most likely with serious consequences. Secondly, it is impossible to grab the wood by the very “bottom” in this way. This means that you will have to turn the log over before finishing it halfway. As a result, the cutting quality and material waste will be the same as on a vertical single-disc sawmill, see above.
Carriage
Let's try to develop technical requirements for a log carriage suitable, incl. for use with a portable mini sawmill when working on the road:
- materials – ordinary rolled metal without preliminary screening for evenness;
- for strength, reliability and durability - welded;
- the influence of the quality of welding and warping of the metal from it on the quality of sawing is absent;
- prepared base (support) surface – not required;
- weight and dimensions - suitable for transportation in a mini-truck, pickup truck and on the top trunk of a car;
- the maximum length of the processed log is 6 m;
- its maximum diameter is up to 1 m;
- leveling and hanging the log - in any way independent of the carriage, see below;
- the influence of the flatness of the carriage along the horizon on the quality of sawing - no;
- the reliability of holding the most clumsy, unrooted forest is absolute;
- the ability to dismantle the sawn blocks into edged measuring boards/beams without readjusting the sawmill - a must;
- security – sufficient for non-production conditions, when access to the site of untrained outsiders is easily controlled.
Drawings of a log carriage for a sawmill, incl. minis that satisfy the specified conditions are shown in Fig. (left/center – top view). Material – channel 120x60, rod 14 and 16 mm.
Exactly under the M14 holes in the upper flange of the channel, D15 holes are drilled in the lower flange for the passage of the shanks of the hook holders (on the right in the figure). The M16 holes in the bottom shelf (marked in green) are for threaded feet. The plan configuration and location of the grip holders make it possible to reliably hold both full-length logs and short logs. Use this carriage like this:
- the log is hung and leveled on a pair of auto jacks. An option is to use one jack at a time: put something suitable under the raised end, rearrange the jack and lift the other one;
- the carriage is slipped under the middle of the log with the widened part towards the butt and aligned along the axis of the timber. If the log was hung on a hoist, then the middle pair of legs should fall under its center of gravity;
- the holder hooks are turned out until they touch the log so that their points look inward exactly at each other. A slip by one turn (by M14 thread pitch) does not affect the cutting accuracy;
- the log is lowered onto the hooks. If the timber was hung on one jack and a support, then first release the jack, and then knock out the support with one sharp blow;
- to securely hold a thin light log, you can sit on it and jump;
- saw the log using any sawmill using horizontal cuts. The thickness of the last slab in the vast majority will not exceed 40 mm.
Clamps
Full functionality of this carriage will be ensured by 2-5 clamps (3 are almost always enough) for sawing blocks into dimensional lumber. The design of the clamp to the log carriage is clear from Fig. below. The clamps are bolted into the standard holes of the M14 carriage, so their bases and the distances between the axes of the mounting holes are different: unlike the hook holders, the clamps are not interchangeable! Before dissolving into boards/beams, the logs are first sawn into blocks. Then the blocks are sorted and collected into packages of blocks of a similar configuration to each other. The next package is clamped with clamps on a gun carriage and cut into boards/beams using horizontal cuts.
Design of a clamp for sawing unedged blocks into boards and beams with horizontal cuts on a sawmill
Owner reviews
Owners of sawmills made from chainsaws note the high efficiency, low cost and ease of installation of the structure. Most reviews about this device are positive.
They talk about the advantages of such an improvised sawmill. Thus, the famous video blogger Maxim Egorov assembled a sawmill from a chainsaw right in the forest. To do this, he used several boards and two roughly processed pine logs. Using the device, he managed to obtain boards in the required quantity, which were intended for the construction of a forest house. Maxim noted the simplicity and efficiency of the design, as well as the ability to quickly transform it back into a chainsaw.
Other types of construction
Homemade sawmill made of wood
In general, making a chainsaw sawmill from wood is no fundamentally different from installing a device from a metal profile or pipes. The difference is that wood is used instead. The main advantages of this design are simplicity and speed of assembly, lower cost of materials, and no need for a welding machine.
As for the service life of a wooden sawmill, it is quite high provided that it is protected from rain and other precipitation.
Mobile
To make a mobile sawmill, only a rectangular attachment-limiter is assembled from a metal profile. It is fixed to the chainsaw plate where the chain is attached. The attachment is lowered onto a firmly fixed log and the saw is passed along it. As a result, the board is cut off.
The main advantage of a mobile chainsaw sawmill is that it can be taken anywhere and can be quickly assembled and disassembled.
But it also has one very significant drawback - since it must be constantly held in your hands while working, it is very easy to make a mistake and end up with an uneven board with different thicknesses in different places.
Sawmill from a grinder or circular saw
To make a sawmill, you can use not only a chainsaw, but also a grinder. The device is assembled in exactly the same way. The only difference is that at the end of the base, a grinder with an appropriate attachment or a hand-held circular saw is attached in the center.