Design and operating principles
The main advantage of the sawmill is that it cuts logs lengthwise. Doing this manually is incredibly difficult.
To understand the principle of operation of the machine, you need to get acquainted with its structure. The design consists of several parts:
- saws;
- drive (usually electric, sometimes gasoline engine);
- saw carriages;
- guides;
- frames
The base of the U-shaped structure is metal beams or channels fastened together, along which rollers mounted on the frame move. On one side of the frame there is a stationary main wheel, on the other there is a movable one that moves along the frame.
At the base of the machine, above the rollers, there are guides, on which support posts are attached on top. The frame moves along the beams using a chain mechanism.
The cutting tool is a band saw approximately 6 cm wide. It is tensioned using hydraulics. The tape is held in place by special locks attached to the base of the main wheel.
The design is complemented by a ruler and a container with a special liquid that flows into the cutting area and protects the tape from the adhesion of sawdust.
There are several types of sawmills. The most common are belt, disk and chain. Almost any of them can be done independently, if you take as a basis a competent drawing of a homemade sawmill and carefully watch the video with step-by-step instructions. Mechanisms constructed using a chainsaw are also popular.
Note!
- DIY induction heater ♨️ - reviews of the best manufacturing options. Varieties of homemade device designs + step-by-step master class (160 photos)
- Do-it-yourself Gauss cannon: TOP-130 photos of the best ways to create it yourself. Design features + master class for beginners
DIY clamps - a step-by-step master class for beginners. Schemes for manufacturing different designs + 170 photos
Ready-made frames and mobile attachments
The modern market offers many options for frames for such sawmills, from the simplest clamps (attachments) costing about only 3,000 rubles. to frames similar to a band sawmill at a price of about 50,000 rubles. The latter are rather flimsy-looking structures with a high probability of vibration during operation. There's nothing complicated about it. It is quite possible to assemble such a structure on your own if you have available materials.
If you use more powerful rolled metal, the structure itself will be much stronger and more reliable than that offered at a fairly high price.
The simplest attachment for longitudinal sawing.
Alternatively, such an attachment can be used as a ready-made unit when assembling a homemade sawmill. It makes it possible to vertically raise and lower the cutting set relative to the log. All that remains is to organize the movement of the nozzle along the horizontal guides of the homemade frame.
Mobile carriage for longitudinal cutting of logs based on the Husqvarna 142 chainsaw
The author of the video tells how he made a mobile carriage for longitudinal cutting of logs based on a Husqvarna 142 gasoline saw. With this saw and carriage he sawed through a very large volume of material and built an entire house. The video contains everything you need to make the device yourself. We recommend viewing, very useful.
Video about the nozzle from the store
You can see what kind of devices they sell in the store in this video.
Homemade band sawmill
Self-assembly of a complex unit is not an easy process. It is necessary to correctly install and adjust all structural parts to ensure their smooth, uninterrupted operation. This will help you with instructions on how to make a homemade sawmill, following which you can acquire your own home woodworking complex.
To assemble the sawmill, a suitable site should be identified and prepared. Then the assembly of the frame of the future structure begins. First, a kind of rails are prepared along which the working saw will move with the help of rollers. The rails are fastened together with profile pipes that act as sleepers. Fasteners are welded to them to secure the logs.
At the next stage, a trolley is mounted on which special wheels for the tape are installed. Many craftsmen who assemble homemade band sawmills with their own hands have thought of adapting old car wheels for these purposes.
The assembly of the structure is completed by installing an electric motor connected to the moving mechanism using a drive belt.
Design Features
The main feature of the sawmill is that the cut in it is always longitudinal. It is well known how difficult it is to cut wood along the grain. Unlike a circular saw, a sawmill does not deal with measuring boards and beams, but with wild logs of generally irregular shape. Therefore, in sawmills, a saw carriage with a working element (the saw itself) moves along the log being cut; Otherwise, it is very difficult to ensure the accuracy and cleanliness of the cut. Large timber processing enterprises also have sawmills for sawing very long logs (up to 30, and in the tropics up to 60-70 m). In them, the carriage is stationary, and the log is moved by a hydraulic system; The centering of the line is ensured by a computer with sensors. But at home, such a solution is unrealistic.
Note: logs are always sawed in the direction in which the wood fibers converge, i.e. from the butt to the top. If you put the carriage in reverse, then any saw (see below) will certainly get stuck in the tree and/or break.
What to cut with?
How affordable, durable, convenient and safe to use a home-made sawmill will be is mainly determined by the design of its working part. Another essential condition is the requirements for the productivity of the machine and its operating mode (regularly, from time to time). The third is the resource of the working body and the possibility of replacing it. And finally, the energy supply at the place of work is important: what is more accessible there – electricity or motor fuel? There are also less significant additional conditions, see below.
In sawmills with small and medium productivity (up to 3-5 cubic meters of wood per 6-hour work shift), the following are used. types of working bodies:
- Reciprocating saw bar (old).
- Saw blade (item 1 in the figure below).
- Saw band (item 2).
- Saw chain (item 3).
- Continuous chain saw bar (new, item 4).
- Household chainsaw (item 5).
Types of designs for sawmills of small and medium productivity
How to drink?
The orientation of the cutting surface can be horizontal or vertical. Resp. and the cut will be horizontal or vertical, and the sawmill will be horizontal or vertical. Vertical cutting, firstly, reduces material waste, because It is enough to level the log under it only in the horizontal plane. When cutting horizontally, a log needs to be leveled both horizontally and vertically to minimize waste, otherwise too much wood will go into the slab (“hunch”). Secondly, when cutting vertically, the cut (the part of the log being sawed off) does not put pressure on the working part and clings to it much less. Therefore, to saw the same timber vertically, the drive power required is 2-3 times less than horizontally, see the video below:
Video: homemade vertical chain sawmill
But, firstly, the risk of injury with vertical sawmills is much higher than with horizontal ones. Secondly, the transverse feeding of logs under the saw of a vertical sawmill is structurally and technically very complex, and ensuring the maximum permissible sawing accuracy according to specifications of up to 6 mm per 6 m of log length on a homemade vertical sawmill is extremely difficult or even impossible. Therefore, it is better to build a sawmill with your own hands for a horizontal cut.
Structural composition of the sawmill
We’ll talk a little further about the features of a particular saw for a sawmill. First you need to understand the design of the sawing machine as a whole. It consists of:
- working body - saw (see above and below);
- drive to it from the motor;
- saw carriage;
- rail track (guide) for it;
- carriage (cradle) for logs;
- grip holders for him;
- a frame that combines all this into a single device and ensures its overall strength and reliability.
Note: certain structural components of the sawmill can be made integral with the frame.
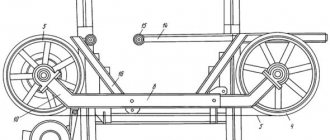
Drawings of the sawmill in full structural composition (layout diagram) are given in Fig.:
Structural composition (layout diagram) of the sawmill
Its features are, firstly, a frame made of wooden beams. Secondly, a minimum of welding work during assembly. This is an important point: metal structures conduct during welding; Because of this, it is very problematic to specify the cutting accuracy of a welded sawmill. Thirdly, the carriage rail (item 13 on the right) is made of angle steel, cheaper than a channel; the necessary stability of the track is ensured by rigid fastening of the rails to the frame. As a result, the support shoes of the carriage are pairs of ordinary rolling bearings, and the smoothness and accuracy of its movement are high; trembling of the carriage is the main cause of sawing defects. Another consequence is the carriage feed mechanism without a gear (chain, screw, etc.), which also increases the smoothness of its movement. Finally, in a carriage of this design it is possible to install a drive with any of the saws listed above for horizontal cutting; disc, with a continuous tire and a chainsaw also for a vertical one.
The disadvantage of this machine is the comb log holders. It is impossible to make them from a channel less than 60 mm, as they will not hold the wood. That is, the last unusable slab will be no thinner than 60 mm. Additionally, material waste will increase because it is impossible to align the log vertically in this machine. However, it is not so difficult to get rid of these shortcomings by using a separate carriage for logs of a simple design, see below.
The operation of the cutting thickness setting unit (in the inset) requires some explanation, which in this machine is quite simple, accurate and easy to use. The nuts 5 in the insert are welded to the support plate 4 and locked. After the first cut, the adjusting screws (item 1 in the inset and 11 on the right) rotate synchronously, because they are connected by a chain drive (item 20 on the right). There is no need to loosen the locknuts (item 2 in the inset): they will loosen on their own. When the saw is installed in a new position below the previous one, the locknuts are tightened by hand.
Saw like a saw – longitudinal
Drawing, tooth profile and routing diagram for a rip saw on wood
A reciprocating saw bar is nothing more than a carpenter's rip saw blade. Its drawing, tooth profiling and wiring diagram are given in Fig. on right. The drive in the sawmill is from a flywheel to a crank mechanism through a slider - a smooth steel rod sliding in a cage with bronze or Babbitt liners (this is exactly what is shown in the figure above with the layout diagram of the sawmill). In former times, craftsmen used carpenter's bow saw blades instead of a saw bar; They also saw along, and you could buy them in almost any tool store. In this case, the tension of the blade during the reverse stroke is ensured by a fairly strong return spring.
The advantage of a reciprocating saw bar is a smooth, clean cut with a width of no more than 3 mm, i.e. low material waste. The resource is very solid, no less than that of a saw blade, see below. But there are also a lot of disadvantages:
- Low productivity: if the feed of the carriage during the reverse stroke of the saw exceeds 1/3 of the tooth height, i.e. 4 mm, the saw gets stuck.
- It is impossible to saw a log with a diameter of more than 300-320 mm - the blade immediately gets stuck and wrinkles.
- Damp, unseasoned wood does not take, it also immediately gets stuck and breaks.
- Very often gets stuck on knots and strands.
- If there is insufficient tension on the reverse stroke, the cut sharply worsens - it becomes wide and torn.
- The same applies to an excessively strong return spring.
In professional forestry, reciprocating saw bars fell out of use by the end of the 19th century, and among amateurs, with the advent of chainsaws in everyday life.
Disk
A saw blade from a circular saw will not fit into a sawmill: it is made of steel of poorer quality than required in this case. When sawing raw logs, the disk material from the circular saw will soon release itself due to heating, the disk will quickly fail or be completely blown apart. Therefore, a saw blade for a sawmill is not a cheap pleasure. In some sources you can find advice: they say, cut out a round piece from galvanized (!) or duralumin (!!!), attach 2-4 teeth to it, and saw. Judging by the fact that the authors of publications of this kind seem to be alive and not mutilated, they themselves did not do this and have no idea what could come of it.
Disc sawing of wood is widespread in professional woodworking because... allows you to cut several pieces of measured lumber from timber in one pass; For this purpose, angle and multi-disc saw carriages are used (inset at the top left of the figure). However, an industrial circular sawmill is a complex structure, see Fig., which does not work on the “do-it-yourself” topic.
Construction of an industrial circular sawmill
If an amateur gets a sawmill blade (diameter from 600 mm, tooth profile the same as that of a rip saw, see above), he needs to keep in mind the following advantages and disadvantages:
- Long resource – up to 5000 hours or more; up to 1500-2000 hours between teeth regrinding.
- To sharpen, you definitely need a sharpening machine; you can’t do it by hand.
- The cut is not very even, 3-5 mm wide, i.e. material waste up to 10-12% by volume. A “clean cut” disc, which produces a waste of 2-5%, costs 3-10 times more than a simple one.
- You can cut without any technical breaks for 6 hours. shift; Maximum performance in this class of devices.
- High energy consumption, because the disc rubs against the tree both vertically and horizontally in a cut with the side surface of a large area. To obtain the required drive power in kW, multiply the diameter of the log in dm by 1.7.
- The quality and condition of the sawmill being processed have virtually no effect on the productivity of the sawmill.
- A disk with a diameter of 800 mm can cut a log with a diameter of up to 350 mm.
- Larger diameter discs in amateur designs are very dangerous, because... require a high-precision drive to avoid runout.
- The drive is only electric, because The disk should rotate absolutely smoothly at idle. In the tree he’s already got more than enough tugs.
In general, a DIY circular sawmill is definitely not an option. Let's look at the drawings in Fig. below. The first thing that catches your eye on the left is the carriage on rollers in channel rails. This is not a rail track made of milled profiles: a 1-2 mm misalignment of the rollers when moving the carriage is inevitable. The consequence is a disk misalignment of 6 mm or more. Right there he gets stuck in a tree. Considering the mass of the disk, its rotation speed and moment of inertia, the occurrence of an emergency and extremely traumatic situation is inevitable.
Drawings of homemade disc sawmills
Next, the lower edge of the disk must fit into the groove of the log carriage, otherwise it will not finish cutting it to the end. And so, we sawed off the first top. What's next? In theory, you need several grooves in the carriage, depending on the thickness of the resulting boards. After each cut, either the carriage is raised, moved forward and lowered back to the working position, or the carriage with the log must be moved under it in the same way. Can you imagine such a design made at home? No need, your head will hurt a lot.
What if it’s simple? Just move the log on the carriage? No, it's not easy. It must be laid again so that the next cut runs exactly parallel to the previous one. And on the carriage there’s not a stick, there’s a huge, heavy block of wood.
Well, let’s say we have a strong family/staff, we don’t care about moving logs, and the loss of productivity due to this is acceptable. Then look at what is marked in red in the drawing on the right in Fig. Yes, this is a log holder. Without it, it will either roll off the carriage, or tip over when 2-3 blocks are sawed off (unedged boards of the entire timber for cutting into measuring boards). The holder is located in the very middle of the log. You can't cut on it. In total, the most valuable, wide, strong and most evenly drying core block will most likely go to waste, because Due to the repositioning of the log, the thickness will be unacceptably converging on a wedge.
Note: an amateur single-disc sawmill for horizontal sawing is no more convenient or more productive than a vertical one, but it is structurally much more complex and dangerous.
So, making a circular sawmill with your own hands is an option in one and only case: if you have come up with an improvement to it that is a commercially promising invention and you need to test the idea in hardware in order to apply for a patent. In all other cases, it’s not necessary.
Band saw
The band sawmill is one of the inventions that produce significant results with trivial technical solutions. The reciprocating rip saw has a lot of advantages, and its disadvantages are due most of all to the presence of reverse motion. This means that you need to get rid of it in order to get a continuous saw blade. As a result, the operational properties of the band sawmill differ significantly from those of the prototype and machines for similar purposes:
- Productivity – up to average, 2-3 cubic meters. m of wood per shift.
- Saws both seasoned and raw freshly chopped round timber.
- The cleanliness of the cut is as high as that of a rip saw blade, and the material waste is just as low.
- The cutting accuracy is as high as that of a circular sawmill, provided that the saw blade tension is uniform and optimal.
- It is impossible to saw logs immediately into pieces of measured materials.
- Energy consumption per 1 cubic meter m of wood is 1.2-1.5 times lower than that of a circular sawmill.
- To avoid self-release of the tape material, technical breaks in work are necessary: after each wash for 5-10 minutes; after sawing 0.5 cu. m (2 logs with a diameter of 0.3 m and 6 m long) – 10-15 minutes; after 2 hours of work – half an hour to an hour; from 6 hour shift to next. the same - at least 2 hours.
- The full resource of the working body (belt) is 100-500 hours; re-sharpening is not possible.
- The cost of the tape per hour of work is much less than that of a simple saw blade.
- The cost of the entire machine is several times less than a disk machine with an angular carriage per cut.
- The drive is electric, because The idle speed of the belt needs to be as high as for a disk.
Due to these features, the band sawmill is most widely used in small sawmills. According to most advertisements: “We accept round logs/logs for sawing,” it is band sawmills that work. In Russia, band sawmills are produced in a fairly wide range (Taiga, etc.).
The simplest way to make a rip saw is to roll the blade into a ring and place it on pulleys, pos. 1 on next Fig.. To prevent injury from the non-working branch of the blade, a protective cover is put on the working part. Making a sawmill with a belt without it (item 2) is extremely dangerous!
Factory and homemade band sawmills
The second stumbling block for DIYers here is the belt pulleys. The branded ones have a special slightly convex profile of the side surface (working surface). The belt slides off the cylindrical pulley; flanges (edges) do not help. Some craftsmen tilt the entire sawing unit upward by 1-3 degrees. However, as soon as the tension of the tape weakens (which is possible during one cut), the tape will fly off from above; without a protective cover, this is even more dangerous than sliding down.
Smarter craftsmen have found a way out: they put the tape on the wheels of cars and motorcycles with tires, pos. 3 in Fig. and rice at first. Their profile almost exactly matches the required one, and the elasticity of the tightly inflated chambers ensures optimal belt tension, at least enough to cut a whole log. In addition, if thin, high-quality materials are being sawed, then you can get by with a simple friction drive, also pos. 3 fig. on right. The manufacture of the machine is also simplified, because auto-moto wheels are already quite balanced, see video:
Video: DIY band sawmill
Transfer to saw
When sawing raw, untreated logs and knotty/twisty and sticky fine-grained wood, the transmission from the drive to the belt (the main one) is also a stumbling block. The mechanical characteristics of the belt are too soft: the belt is elastic and can slip. Gear gear, on the contrary, is too rigid: for a moment before jamming, the gears give a sharp, strong jerk. In both cases, it is very likely that the tape will get stuck in the tree and become crushed, which immediately creates a dangerous situation.
The best final drive for a band sawmill is a chain drive. It provides idle speed of the belt almost as smooth as a belt one. And when sawing “bad” wood, the chain’s own inertia pulls the tape with small, frequent jerks, and the inhomogeneities of the wood are successfully overcome. The same property of chain transmission is used, for example. in screw wood splitters.
Chain instead of tape
The working body of a chain sawmill is a chain with saw teeth stretched on rollers. Its operational strength, service life and reliability (not prone to getting stuck on wood defects) are several times greater than tapes, and the cost per cut length before wear is lower. The saw chain can be re-sharpened (you need a sharpening machine!) and does not require any technical breaks during the shift. The drive can be energy-independent from a 1-2 cylinder 2-stroke internal combustion engine: the saw chain itself dampens its vibrations. In terms of safety, the chain sawmill is the best in this segment of production equipment.
Disadvantages: firstly, increased energy consumption compared to tape - the chain casing rubs against wood, although not as much as the disk. The second is a wide (4-6 mm or more) rather ragged cut: lumber from a chain sawmill needs sanding (that’s why a surface grinder is not often built into it) or will be sold as a second grade. Consequence: increased material waste, up to 15% by volume. Third, in continuous operation it is necessary to supply coolant (cutting fluid, emulsion) to the saw chain, see fig. The fourth is a long technical break between shifts for self-healing of the chain properties: at least 10 hours. And, finally, the high labor intensity of maintenance: re-sharpening and/or replacement of chain teeth is required every 10-50 hours of work, and fiddling with them - mom, don’t worry!
Appearance and design of an electric chain sawmill
Due to these circumstances, chain sawmills are used primarily. for primary sawing of timber at stock exchanges and harvesting sites. In the latter case, the energy independence of the machine with an internal combustion engine plays a decisive role: it is brought in by truck or tractor, the wood is unraveled onto the blocks and taken away. In remote regions of the Russian Federation and Canada, wood losses are often more than compensated by savings on round timber transportation by timber trucks. But this approach, of course, does not benefit the forest as a living community. Both from excessive cutting and from clogging with sawdust.
New tire
The continuous saw bar is a cantilever chain saw, i.e. does not require tension at the end farthest from the drive; it also does not require coolant supply. Do you recognize? This is the “blade” of the chainsaw. The use of modern materials and continuous improvement of design has made it possible to create chainsaws that are suitable in all respects for domestic use. A sawmill made from a chainsaw at home is also much easier to make than any other; drawings of a frame with rails and a log holder can be found at the link, and carriages for a household chainsaw can be found here. Its performance qualities and features (except for the resource) will be approx. the same as for a chain sawmill. Changeover from horizontal to vertical cutting is carried out simply by rearranging the carriage. But keep in mind:
- The service life of the saw motor will be reduced by approx. doubled.
- The full service life of the “canvas” of the best models will be no more than 20-30 hours, and of cheap ones – 10-12 hours.
- Every 2-3 hours you will need to re-sharpen, and every 4-6 hours you will need to replace the teeth (if possible for this sample).
- The total operating time during the day is 2-3 hours.
- Maintenance break until next shift – from 12 hours.
- The saw must be designed for both transverse and longitudinal cuts.
The last circumstance, as Comrade Sukhov would say, is a delicate matter. Models from leading manufacturers (Stihl, for example) have both cuts provided by default, but the resource for the longitudinal one is given for normal use: 15 minutes of work, half an hour of rest. It is impossible to withstand it in a sawmill, because... You cannot stop the carriage while cutting is in progress. In this case, the resource of the saw bar is reduced by half or three times. “Alternative” manufacturers often have the opposite: the default saw is only a cross-cut saw. If the user manual says “transverse and longitudinal”, “also longitudinal”, etc., then the resource for a longitudinal cut is not specified. Keep in mind.
Special continuous saw bars are produced for sawmills. Due to the refusal of a transverse cut, their offset (length) is greater, up to 1000-1200 mm, the cut is thinner (3-4 mm) and cleaner; virtually the same as a band saw. The resource and mode of use are the same as those of a saw chain. A sawmill with a tire can be of a conventional design (on the left in the figure), but in the context of homemade ones, the Logosol type tire sawmill, center-right in the figure, is of much greater interest. Spring edge supports keep the log from rolling away. The elevators are adjusted separately, which allows you to level the log horizontally.
Installation of different types of tire sawmills
The history of Logosol is interesting and inextricably linked with ours. In the USSR, since the 30s, the export of unprocessed wood was strictly regulated and produced in large quantities through established channels. After its collapse, the former Soviet republics, which had forest reserves, literally flooded Europe with cheap round timber, with standards equal to the size of a log. In the EU, the main domestic logging is carried out in Germany and Switzerland in the Alps. There are plenty of smart woodworkers here and there, and they are accustomed to working with an acute shortage of raw materials. Given the prices for timber there, calculating the income from the purchase of wild timber and sawing it into boards in one’s yard gave results that made one’s eyes pop. Plus - there is no headache with disposal of sawdust, but there is a significant additional benefit from selling it. It was then that the Swiss Bengt-Olof Byström came up with a sawmill, which he called Logosol. Its highlight is the replacement of a technologically complex rail track with a smooth guide along which the carriage is moved manually with a clamp. This requires more labor and some skill, but the design of the sawmill is greatly simplified, and its cost drops significantly. Hobbyists have developed many modifications of Byström's undoubtedly successful design. Their drawings of Logosols and components for them can be openly taken from here: https://www.logosol.su/files.htm. How to make a Logosol sawmill with your own hands, see the video:
Video: DIY mobile-stationary Logosol “Terya”
The appearance of Logosol is the direct reason for the development of saw bars for sawmills. There are models available for sale that are compatible with household chainsaws: remove the standard blade and install the bar. Thus, the issue with the cost and labor intensity of the drive was resolved: a chainsaw on the farm is already a necessary thing.
DIY chain sawmill
The design of this unit is simpler and smaller in size than its belt counterpart. It works on the same principle, differing only in the type of saw. In this case, a special chain stretched over a tire is used to cut logs.
It is much easier to make it; you just need to strictly follow the tips on how to make a homemade chain-type sawmill.
Note!
- Do-it-yourself electric scooter - a master class with step-by-step instructions for doing it yourself. Tips and simple patterns for beginners + the best photo reviews
DIY rocking chair: TOP-120 photos of the best manufacturing options. Master class on creating a rocking chair at home
- Smokehouse from a gas cylinder - the best master class on making a homemade smokehouse with step-by-step photo diagrams for beginners
Which sawmill is better
It's up to you to decide. Only you can determine what kind of design of the future installation you will need. To do this, you need to determine the available area where the sawmill will be located, and also understand the specifics of the work that you plan to carry out on this structure.
If you plan to work with small-sized boards that are used for containers and pallets, pay attention to a sawmill with a simplified design.
- If you need to get boards with clear geometric parameters, put in a little effort and make a stationary installation, with a frame on a concrete foundation.
- In order to make a portable homemade sawmill, you can use a gasoline saw made in the USSR. Models of that time are famous for the special strength of the body, which is made of aluminum alloys.
- The most popular series “Friendship” or “Ural” are equipped with engines with a power of up to 5 hp. This is enough to cut a log up to 6 meters long.
To cut logs into pieces, you can use a gasoline sawmill, which is equipped with a disk or belt mechanism. The disadvantages of such a sawmill include a large amount of sawdust that scatters around. The internal combustion engine has forced ignition.
Recommendation: Install an emergency switch in the operator's area. This will allow you to stop the motor in the event of a dangerous situation with just the press of a button.
Assembly of a chain (tire) sawmill
Before starting assembly work, prepare a flat, open area. Then a metal frame is assembled, onto which the racks are attached and the frame is installed as the basis of the chain structure.
At the next stage, the trolley is assembled, on which the mounts for the electric motor are mounted.
Next, the cart is installed on the frame, and the engine and saw are mounted on it.
The last assembly step is to tension the chain onto the bar, and the sawmill is ready for use.
Video: Band sawmill made at home
We hope we were able to convince you that building your own sawmill, although difficult, is quite possible. A self-made unit can work no worse than a factory sawmill only if you follow the recommendations of experienced craftsmen during the work process. Believe me, the care and scrupulousness shown will be reflected in perfectly straight cuts. Your site will acquire new, stylish buildings, built using warm and noble materials, obtained with your own hands.
Source
Homemade circular sawmill
A unit that is capable of sawing logs horizontally, vertically or at an angle is called an angle-rotating disc sawmill. This type of woodworking machines is very popular due to its versatility. Ready-made equipment of this type is not cheap, so it will be much more profitable to make a circular sawmill with your own hands.
Note!
- Do-it-yourself compressor: TOP-130 photo reviews of finished compressors. Step-by-step instructions + diagrams and drawings
- Do-it-yourself wind generator: TOP-170 photo reviews of finished devices. Detailed DIY instructions for beginners
- Do-it-yourself spot welding - the best master class on making homemade spot welding with step-by-step photo diagrams of do-it-yourself work
The design of this mechanism is not particularly complicated, so it will be easy to assemble it yourself. A drawing, instructions and visual pictures of a homemade disc-type sawmill will help with this.
The principle of operation of the sawmill
explain how a sawmill works using the example of spools of thread.
This device resembles the rotation of two spools with a thread stretched between them. It is this that acts as a saw, and the distance between the coils will be the optimal size of the log. A DIY sawmill allows you to:
- adjust logs to one shape and size;
- saw logs according to a specific pattern after the equipment is set up;
- After sawing, small defects often form that cannot be eliminated, so the wood has to be processed manually.
The work of the sawmill is carried out as follows : a log is fixed on the platform, which remains motionless, and at this time the mobile cart starts moving and cuts the tree. The saw must be in a horizontal position.
In order to obtain boards of the required size, the operator initially sets the necessary parameters. The saw blade acts as a saw, and it must be well tensioned.
Self-assembly of a disk unit
The work begins with the acquisition of the necessary parts, assemblies and components. Then you can begin assembling the frame. Metal pipes and high-strength guides are used, which are attached by welding. The next step is to assemble the carriage.
A powerful engine is required to rotate the metal disk, so in most cases a gasoline version is used. The working elements of the unit are connected to the engine through special holes.
This usually happens using a chain drive, but in this case the sawmill will not be able to operate continuously for a long time - the drive will constantly overheat.
A rapidly rotating saw blade is a source of increased danger, therefore, during installation, all risks should be taken into account and all safety conditions must be observed.
What you will need to build a sawmill
For those who think building their own sawmill is not a difficult task, let us say right away that creating a high-quality, efficient unit is not easy. And the point is not even that you cannot do without certain financial costs - as a rule, the budget of a homemade sawmill easily fits into the amount of 30 - 40 thousand rubles. Assembling a unit capable of producing high-quality lumber will require solving problems related to stability of operation, ensuring the strength of components and parts, setting up and adjusting mechanisms, making devices for sharpening a band saw and setting its teeth, etc. Are you not afraid of difficulties? Then check out what materials and tools you will need for the job.
As rail guides, you can use steel angles with a flange width of at least 50 mm, a channel or an I-beam. The main requirement for rails is their straight geometry. It must be borne in mind that any shortcoming of our miniature “railway” will affect the quality of the cut, since the tape blade will copy every unevenness, transferring it to the surface of the board. That is why the best option would be T, N or U-shaped rolled metal. Unfortunately, corners are most susceptible to bending during manufacturing and transportation. The most ideal case would be to use factory rails, for example, from narrow-gauge transport, which, with some luck, can be found at scrap metal collection points.
The rollers that provide longitudinal movement of the sawmill can be turned on a lathe and hardened. In some cases, the use of conventional ball bearings is allowed.
Excellent rollers are made from linear guides based on ball bearings, which can be found on sale. This solution cannot be called the cheapest, but there is no doubt about the reliability and durability of such a unit
Actually, the frame, saw carriage and bed for laying logs are made of square and rectangular profile pipes. It is best to use rolled metal with maximum wall thickness. This will provide the equipment with the necessary strength, since the operation of the machine is associated with variable dynamic loads.
For the mechanism for adjusting the height of the carriage (traverse), you will need guides made of steel pipes with sliders and two long screws with nuts. For these purposes, you can use parts from decommissioned screw-cutting lathes (unlikely, but never mind), mechanical presses, or threaded rods from a construction store (the most affordable, but least preferred option). You can also order the production of parts from a turner - it’s still unlikely to be possible without contacting a specialist. In addition, you will need a chain drive, which is often borrowed from the gas distribution mechanism of automobile engines. Alternatively, you can use a bicycle chain and sprockets.
Pulleys from old domestic combine harvesters of the Kolos, Niva brands and other agricultural machinery are best suited as impellers for the belt blade. By the way, you can also get shafts and bearing housings from there. Please note that the diameter of the guides must be at least 30 cm (optimally 50 cm), otherwise excessive mechanical stress will lead to cracks at the base of the saw teeth.
Pulleys from decommissioned domestic agricultural machinery can be used in the design of the band saw drive
There are designs of homemade installations with guide pulleys in the form of wheels from passenger cars. For skeptics, we note that such a homemade solution has a lot of advantages, starting from the possibility of using assembled hubs and ending with the fact that fine adjustment of the belt tension during operation can be done by inflating the tires.
You can buy a band saw new or used. It is best to have several blades in stock, which can be replaced with sharp ones as they become dull.
As for the tools that will be needed during the work process, every self-respecting owner should have one. In particular, you will need:
Don’t forget that you will need to prepare a strong, level foundation, so be prepared for concrete work - stock up on sand, crushed stone and cement, prepare a concrete mixer, tampers, formwork and a long rule.
Mobile chainsaw design
Complex structures are more often used in those cases when the harvesting of lumber reaches an industrial scale. In particular cases, simpler and smaller mobile devices are required, which can be made independently.
One of the best options for such a mini-machine is considered to be a homemade sawmill made from a chainsaw, which plays a major role in the design. The product is light in weight and compact in size, allowing it to be moved from one place to another.
Do-it-yourself band sawmill? Why not!
Added by: Victor Kaploukhiy July 6
The popularity of wood in private construction remains high even with the advent of the newest building materials. This is largely due to its reasonable cost, availability and ease of processing. Despite the fact that today you can easily buy a suitable board, beam or batten, the question of cutting logs yourself is of interest to every thrifty owner. And this is natural, because the costs of purchasing commercial timber cannot be compared with the cost of edged lumber. Of course, running your own sawmill just to fix a fence or repair a roof is not practical. If we are talking about starting construction on an empty site, then your own sawmill will be very useful. And you can save on its purchase if you build the unit yourself.
Making a homemade chainsaw machine
The main structural elements required for assembly are a chainsaw, a pair of channels, metal angles and rails.
First, a frame is assembled, in which holes are drilled for installing ties from metal pipes. During assembly work, it is imperative to ensure the accuracy of dimensions and observance of right angles. To strengthen the frame, it is recommended to weld several stiffeners.
At the next stage, the movable cart is assembled. Its basis is a steel plate, to which corners are welded from below and rollers are mounted. Fasteners for gas-powered tools are installed in the upper part.
At the last stage, a structure with fastenings for logs is installed on the frame.
Belt type
Installations using band saws are used in the production of lumber on an industrial scale.
Private production in most cases is equipped with homemade sawmills, made on the basis of drawings of factory units. The main advantage of such devices is the ability to quickly cut large logs weighing up to three hundred kilograms.
Manufacturing a band sawmill requires special training and the availability of a fairly large number of different building materials:
- pipes of various sizes and diameters;
- metal corners for mounting the rail system;
- channel;
- pulleys;
- profile pipes for sleepers.
In addition, you will need tools for working with metal - a welding machine, an electric drill, a grinder and a set of fasteners (bolts, nuts, screws).
Work on the manufacture of the device begins with the installation of the stationary part - the frame. The shape of this design resembles the letter “P”; the material is two channels or angles 50X100 mm.
The standard length of the channel is 8 - 9 meters, the height is at least 14 cm. After installing the frame, holes are drilled in it, the gaps between which must be at least one meter.
Afterwards, you need to tighten the channels with pipes 25 cm long, fastening is done using bolts of the required size and studs. After this, the racks on which the sawmill will be fixed are mounted. To increase stability, the structure is additionally strengthened with the required number of braces.
It is important to know: the proportions of all parts must match; for a sawmill 9 meters long, a saw measuring at least a meter is required.
A saw is attached to the trolley, and a steering wheel is installed on the side to control the operation of the unit. The clamps are made of pipes with a diameter of no more than 40 mm; movable hoses are installed inside. Clamps made of metal corners are installed on top of the pipes.
Lastly, the saw blade and motor are installed. It is best to build the structure directly at the site of future work, since the total weight of the band sawmill is very large.
You may also be interested in an article on how to make a vibrating table for paving slabs:
Homemade product based on the “logosol” principle
The idea of creating a machine of this type appeared thanks to a well-known Swedish company that produces portable sawmills of various types. The main features of such woodworking complexes include their mobility and an original way of adjusting the thickness of the board.
The machine can be moved from one place to another thanks to wheels mounted on the structure and a towing mechanism that allows it to be attached to a vehicle.
The thickness of the board on such a sawmill is adjusted both in the usual way by changing the height of the saw, and by changing the height of the log. The second option is convenient for small logs and comfortable work for the operator who does not need to work at an angle.
Otherwise, the assembly principle of a “logosol” type machine does not differ from traditional analogues. In this way, a gasoline band sawmill, an electric disk sawmill, and a chain sawmill can be assembled.
Sawmills for home use
To make timber and boards with your own hands, several types of devices are used:
- Frame, installed on a strong foundation. At least three people are involved in servicing. They are distinguished by high levels of energy consumption and performance. General view of the frame type sawmill:
- Band saws can cut large diameter logs. Some equipment samples are capable of dissolving a tree trunk with a diameter of 3 m. General view of the band sawmill:
- Disc saws are quite often used in private households for sawing wood. Some samples are capable of processing wood with a diameter of up to 1 m. General view of a disk sawmill (it can be seen that it uses disks installed perpendicular to each other. Cutting is performed in different planes in one pass):
- Tires as a working tool are tires for electric and chainsaws. With the help of such devices, users alone can turn logs with a diameter of about 60 cm into lumber. The simplest bus sawmill (in this design the saw moves along a guide made from a channel):
At logging enterprises, frame installations are most common. Setting up for the production of a certain format of lumber is quite simple; the required distances are set between the saw blades. It is quite difficult to use such sawmills on a personal basis. The installed power of the drives reaches 30…40 kW.
Tape equipment has been in use relatively recently (about 30 years). Typically, the saw blade thickness ranges from 0.8...1.0 to 2.5...3.0 mm. In practice, automatic machines are used that perform cutting according to a given program. To work, just enter the necessary data and install the workpiece. The auxiliary workers will remove the finished boards and timber from the table.
Some do-it-yourselfers make such machines on their own. They are attracted by the opportunity to create a relatively simple device. They can be used when going into the forest, organizing a wood processing workshop for logging.
Disc sawmills are structurally the simplest. A large diameter disc is used, which performs a long saw according to the specified parameters. In practice, double-disc machines are used that cut logs from both sides. This approach allows the use of relatively small disks.
Using a saw bar with an electric or gasoline engine allows you to use them for long rip cuts. Some craftsmen make mobile sawmills that can be transported to a construction site or to the forest. You just need to organize the layout of the logs on supports and install auxiliary devices that ensure the linear movement of the working body.
In practice, tires are used with and without fixation in the frame. If you fix the canvas on a rigid frame, it is easier to obtain a processed flat surface. The frame prevents movement to the side, which is often observed when creating simplified devices.
A special frame for installing a chain saw bar increases the rigidity of the structure and ensures a stable position of the blade when performing work:
Attention! Having made a homemade tire sawmill, the master will receive a machine that will allow him to create a small individual production. It will make it possible to produce the necessary products and receive a certain income.
Tips and tricks for making a sawmill
A woodworking unit is an object with a high level of danger due to moving cutting elements. It is also quite large in size. Therefore, the location for assembling the structure should be chosen very carefully.
The site for installing the sawmill should be level and spacious, allowing access from any side. For these purposes, you can use a well-lit garage, barn or other utility rooms. You can install the machine outdoors, but in this case you should build a canopy.
If the unit is equipped with an electric motor, it is necessary to follow all electrical safety rules and monitor the condition of power and grounding cables.
The machine must be in a stable position, and the log must be firmly secured so that it does not fall off during cutting and injure the operator.
Before starting the assembled unit, you must make sure that all components and connections are reliable.
A sawmill is a woodworking system that has a not very complex design. It is easy to assemble it with your own hands. You just need to carefully follow all the recommendations, carefully read the drawings and rely on the provided videos and photos of the homemade sawmill.
Disc type of sawmill
Considered the best view. This sawmill is easy to use and does not require much effort when making it yourself. The basis of this design will be a circular saw. It should be installed on an electric motor or on the machine spindle.
Today it is not difficult to find ready-made drawings of such a sawmill on the Internet or in books in order to make it yourself. The simplest type is considered to be “circular”. To do this, you will need a shaft with a circular saw, a table and a motor that will drive the saw.
Photo of a homemade sawmill
Tire mini sawmill
The design is based on the following main elements:
- machine frame. It is the most important because it holds all the equipment equipment. Reliability, durability and safety directly depend on the frame. Dimensions are selected individually, according to the needs of woodworking
- power unit. Without a drive, of course, the sawmill will not work. For domestic use, a three-phase motor is suitable; it requires a power supply of 380 Volts. However, you can also use a gasoline engine. Power supply from 220 V is not suitable in this case, because the power parameters are very low. The minimum power parameter is 3 kW
- fastening elements. Using stationary components, you can make a cut by securing the workpiece to them. Dimensions of hardware are selected according to the parameters of the workpieces being processed
- tire. Usually the tire is 50 centimeters. The best option is to purchase it together with the chain. Thus, the thickness of the cut is minimized, and, consequently, the volume of waste is reduced
- cutting element.
The metal frame must be connected to the sawmill bar. The gap between the frame and the tire is the size of the workpieces being processed, so the drawing of the mini sawmill must include this point. If you wish, you can make it possible to adjust this gap. This useful addition will make it possible to process a wide variety of workpieces.
On the base you need to create guides along which the workpiece will move. To mount the base to the racks, you need to weld plates with drilled holes. After installation is complete, secure the position with nuts and bolts.
When making a homemade sawmill, be sure to remember to follow safety precautions. See how a mini sawmill is made correctly; a video of this process is presented below.