Copper pipes are used in the installation of hot water supply, hot water supply, air conditioning, heating, and gas supply systems. They are expensive, but durable, flexible, and resistant to corrosion. But in order for engineering communications from them to last for decades, the connection of copper pipes must be done correctly.
We will tell you how to install copper pipelines that ensure the tightness of the transported medium or circulating coolant. The article presented for review describes installation technologies in detail. Taking into account our advice, the construction of the systems will be completed perfectly.
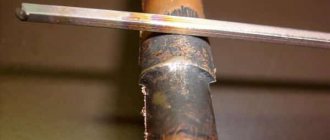
Copper pipe soldering process
The time needed to solder copper pipes will be helped by markings on the fitting itself with recommendations for the required solder size.
Before soldering begins, the outer part of the pipe end and the inner fitting are sanded to bare metal. Next, a thin layer of solder paste or flux is applied to the cleaned end of the pipe. These materials, in a molten state, dissolve oxide films on the elements being connected, protecting their surfaces from further oxidation, which is caused by high temperatures.
However, given the fact that flux destroys the surface of the metal, when soldering with your own hands, it must be applied just before starting work and only on the area that will go into the fitting. After hardening, the flux forms a film that does not require removal.
Next, the pipe is inserted into the socket of the capillary fitting until it stops. Places are heated evenly with the flame of a gas burner or a hot air gun. For this purpose, it is advisable to use a lamp equipped with two burners or nozzles with sprayers.
If the flux used contains tin, then when it is heated to the required temperature, silvery drops will appear. In other cases, you can make sure that the desired temperature has been achieved by touching the solder to the heated surface - the solder should spread. The molten solder must be injected into the joint immediately. Moreover, it does not matter at all from which side it will be introduced. Thanks to capillary action, the solder will evenly fill the entire joint. Remains of flux from the fitting are removed using a rag.
The use of a variety of fittings in which the manufacturer has applied a bead of solder of the required size inside will help reduce soldering time. The fitting is placed on a pipe coated with flux and heated with a torch or hot air gun until the solder becomes liquid. After cooling, the water supply and heating pipeline structure is ready for operation.
Assembling a pipeline using fittings
Copper pipes are connected using fittings only in places accessible for inspection. This rule is due to the fact that the connection is not completely sealed and leaks may form over time.
The advantage of a threaded connection is that, if necessary, repairs can be made without additional effort, since the resulting connection is detachable.
Tools and materials
To assemble the pipeline, you will need the following materials and tools:
- copper pipes of suitable diameter;
- connecting crimp or press fittings;
Special devices for pipeline assembly
The types and number of fittings are selected in accordance with the pipeline diagram.
- pipe cutter or hacksaw for metal;
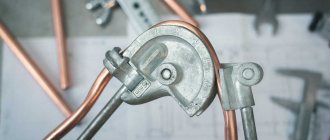
- pipe bender for copper pipes. The device is used to organize a pipeline with fewer connections, which increases the strength of the system;
- file for processing pipes after cutting (before joining). Additionally, you can use fine sandpaper;
- FUM tape for sealing threads. In addition to FUM tape, you can also use linen thread, Tangit Unilok thread or any other sealing material;
- wrench.
Assembly instructions
Assembling a copper pipeline with your own hands using fittings is done in the following way:
- cutting pipes for pipelines. The length of each pipe must fully comply with the diagram drawn up during the development of the system;
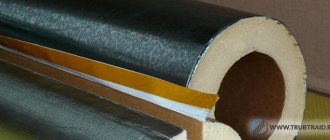
- removal of the insulating layer. If pipes with insulation are used for a pipeline system being installed for any purpose, then the insulating layer is removed for a durable connection. To do this, cut the desired area with a knife and clean the pipe;
- The cut edge is processed with a file and sandpaper until a smooth surface is obtained. If burrs, potholes or other irregularities remain at the end of the pipe, the connection will be less tight;
Cleaning the pipe before connecting to the fitting
- if necessary, pipes are bent;
- a union nut and a ferrule are put on the prepared pipe;
Installation of fitting elements for connection
- the pipe is connected to the fitting. Initially, tightening is done by hand and then with a wrench. During the tightening process, the crimp ring completely seals the connection, eliminating the need to use additional sealants. However, when connecting a copper pipe to a pipe or fitting made of a different material, additional sealing with FUM tape is required.
Fixing the fitting
It is important not to overtighten the threads, as soft copper is easily deformed.
Mounting choice: detachable vs permanent
To connect copper pipes into a single pipeline system, you can use several methods of joining them. Various plumbers use crimp and press fittings, welding or soldering. But before you start work yourself, you need to decide whether the pipeline should be permanent or detachable.
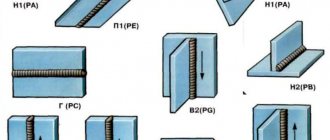
There are three installation technologies for connecting copper pipes:
- electric welding;
- soldering using a torch or electric soldering iron;
- pressing.
All these technologies can be used in the formation of both detachable and one-piece systems. Here it is more a matter of using a variety of fittings and adapters or refusing them.
If a structure cannot be disassembled without destroying its individual parts, then it is considered one-piece - it turns out cheaper, but it is more difficult to repair.
If the pipeline system needs to be detachable, and also easier to repair and add new elements, then the connections must be made detachable.
Fittings are used for this:
- compression;
- threaded;
- self-fixing.
It is easier to make detachable connections yourself; you can even do without soldering. They do not require excessively high qualifications from the master.
However, such units require constant inspection and tightening of the nuts to prevent leaks. Changes in pressure and temperature in the system lead to weakening of the fasteners. And from time to time it is recommended to tighten them.
If access to copper pipes is planned to be tightly closed with finishing or concrete screed, then it is best to connect them into an integral structure by soldering or welding. This system is more reliable, durable and resistant to abrasions.
Carvings are prohibited on copper products. This metal is too soft in its structure. When installing a detachable pipeline, all threaded connections must be made using fittings. The latter can be connected to a copper pipe by pressing or soldering.
Before making connections, copper pipes are prepared in a special way:
Image gallery
Photo from
Cutting copper pipe before connection
Removing burrs with a deburring tool
Degreasing and cleaning the external surface
Cleaning the bell of the coupling and fitting
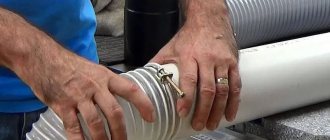
Sealed joining of copper pipes without soldering
Additionally, it is worth noting that, despite the fact that connecting pipes by soldering is considered the most reliable method in most cases, there are still situations when it is not possible to use this method. In such cases, you can resort to connecting copper tubes without soldering. Special fittings will be required that will ensure a reliable connection due to the clamping effect that is formed by the threaded connection.
In this case, the connection is made in the following sequence:
- First, the fittings are disconnected, which often have two components.
- One of the elements is put on the pipe. As a rule, this is a nut and a clamping ring.
- Next, thread the pipe into the fitting and tighten the nut.
It is worth noting that before connecting copper tubes without soldering, you should be aware of all the risks, since it is quite difficult to obtain a high-quality connection. Minimal distortions of the connected parts are not allowed at all, otherwise the technology is grossly violated. To make the threaded connection extremely tight, it is advisable to additionally seal it with special threads. At the same time, it is worth making sure that they do not end up on the inside of the pipe, since subsequently water may not pass through the system properly.
Threaded connections
To connect devices directly to the pipeline network, threaded connections are usually used, with which the devices are equipped at the enterprises where they are manufactured.
It is impossible to install them in a soldered copper pipeline. To do this, use all kinds of solder adapters, which have a thread of one size or another cut at one end.
Copper threaded adapters are also used when it is necessary to make a temporary break in the pipeline, but it must still function.
In this case, a temporary plug is screwed onto the thread using a rubber gasket. The same plugs (they are also called “water sockets”) are mounted in the socket for future installation of mixers.
Pipe connections made of various materials
How is a steel pipe connected to a copper pipe? For this, a fitting is used, at one end of which there is a thread for fixing to a steel pipe. There are no threads on the other end; it is completely smooth, since the copper pipe will be attached by soldering.
When installing a pipe into such a fitting, the threads should be wrapped with plastic sealing tape, after which the coupling is screwed onto the pipe. Such a sealing tape is necessary to prevent corrosion from starting in the area where two types of metal are joined.
Steel and plastic fitting
Another example is a fitting made of steel and plastic. It is also made of two parts. The first part looks like a nut with a threaded segment that screws into a steel pipe. The other part is plastic, with a gasket and nut also made of plastic.
Standard fitting consisting of steel and plastic parts
The nut is screwed onto another extension of the first part, which has an external thread. Next, a special solvent is used to attach the plastic insert to the plastic pipe.
Plastic and copper fitting
There is also a popular fitting made of plastic and copper, which also includes two components. The first component has two ends. One is made of copper and has a thread, but the other end is completely smooth - it is this that is attached to the copper pipe by soldering.
Plastic fitting with copper thread
The other component is a plastic nut with a spacer. The nut is screwed onto the copper thread, and its other end is glued to the plastic pipe.
Types of fittings
All connecting fittings are divided into several types according to their functions:
- Straight - for direct connection of two pipes of the same diameter. Such fittings are called couplings; the body usually has the shape of a cylinder.
- Transitional – for direct connection of two pipes of different diameters. Adapters, or gearboxes, have a complex shape: two short cylinders of different sizes are connected by a truncated cone.
- Angled, or rotary, - for connecting identical pipes at an angle. Such fittings are called bends or angles; the bending angle of the body is from 15 to 90 degrees.
- Branching - for combining two or more streams or dividing one stream into several. Tee bodies have three pipes, the diameters of which may vary. Cross bodies consist of four or more pipes connected at right angles.
- Sealing – for blocking free pipes. These shaped elements, called plugs, represent a lid or plug.
We recommend that you read: What is a fitting, its classification and scope of application
Capillary soldering method
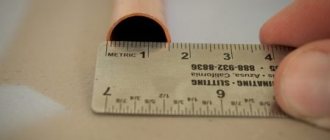
Before you begin laying the water supply, you need to cut the copper pipes to the required sizes.
This method is based on the capillary effect, which promotes uniform distribution of solder throughout the entire cross-section, regardless of the position of the pipe. To create a capillary effect, special fittings are used, the diameters of which must differ from the diameters of the pipe by a strictly defined value. For soldering over an open fire, a gap of 0.1-0.15 mm is recommended.
Connections using capillary soldering are carried out using special fluxes and solders - thin wires made of metal alloys with a low melting point, usually tin with small additions of copper and silver. Soldered joints are used in cases where water supply is carried out with one’s own hands in the floor or walls, or in other cases when visual control of the integrity of the joints is impossible.
There are two soldering methods: high temperature and low temperature.
High-temperature soldering, otherwise known as hard soldering, is used where the operating conditions of copper pipelines involve high temperatures. Such soldering is carried out using special fluxes and hard solders. For do-it-yourself pipeline installation, this type of soldering is practically not used.
Low-temperature, or soft, soldering is used for pipelines used for transporting liquid and gaseous media, the operating temperature of which does not exceed 110ºC. When doing low-temperature soldering with your own hands, the joints are heated to a temperature of approximately 300ºC.
High pressure crimp connections
Advances in bonded crimp technology and the development of O-ring materials are allowing bonded crimp connections to be used for high pressure applications. However, high pressure systems require a slightly different jaw configuration.
The result of manufacturing a connecting unit using the 360º double crimping technique
Bonded crimp connections for low pressure piping, process piping and non-medical compressed gas lines use a single standard hexagonal pressing shape.
Higher pressure bonding crimp connections require the use of specially designed press fittings and clamping jaws to provide a 360° double crimp on the fitting.
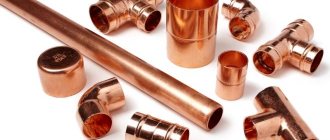
Communications made of copper pipes and fittings
High-quality copper pipes and fittings, the technical and operational characteristics of which comply with international standards ISO 9002, BS2 and DIN, are today produced by both foreign and domestic companies. Such pipes, as well as connecting elements for them, successfully withstand the high pressure of the media transported through them, high and low temperatures, and mechanical stress to which they may be subjected during operation, transportation and storage.
Unlike polymer pipes that are popular nowadays, copper pipe products do not deteriorate from exposure to sunlight; they are not afraid of corrosion, which is a real scourge for products made from ferrous metals. The service life of copper pipes and fittings cannot be compared with any similar product made from another material. It is noteworthy that copper products are practically eternal; the service life of communications from them is at least 100 years.
Heating and water supply system made of copper pipes in a private house
Pipe products, as well as fittings made of copper, are used for arranging utility networks for various purposes:
- heating systems;
- air conditioning;
- cold and hot water supply;
- gas communications.
Those consumers who decide to use copper pipe products and copper fittings primarily use them to build reliable and durable water supply networks. Fittings made from copper are more compact in size and look much neater than products made from ferrous metals. This is explained by the fact that when designing and manufacturing copper fittings, there is no need to make their walls thicker, taking into account their further corrosion, since they are simply not susceptible to it.
DIY installation of copper pipes in the heating system
There are several reasons explaining the high popularity of pipes and connecting elements for them made of copper:
- copper, as is known, has antiseptic properties, therefore, pathogenic microorganisms do not develop in water pipes made from this metal, and the quality of the water transported through them even improves;
- installation of pipelines for which pipes and fittings made of copper are used is much simpler than communications made of black pipes;
- due to the high ductility of copper, pipes made of this metal, when water freezes in them, do not burst, but simply deform; in order to destroy a copper pipe, it is necessary to apply an internal pressure of 200 atm to it, and such pressures simply do not exist in household communications.
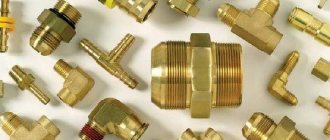
Connecting elements of compression and self-locking type
Fittings for connecting copper pipes, classified as compression or self-locking, are also called collet or crimp fittings. Such connecting elements are a good alternative to fittings that are connected to copper parts by soldering. A collet-type fitting is an element whose design consists of o-rings and gaskets, as well as a crimp ring, which, when tightened, helps to achieve the tightness of the connection being created. The material for the manufacture of compression or collet fittings can be not only copper, but also brass or metal-plastic.
Brass Collet Male Thread Fitting
Push-in crimp-type connecting elements are the best option for heating and water supply systems, for the installation of which copper pipes of different diameters or tubular products made of various materials are used. Recently, self-locking fittings, which have more preferable performance characteristics, have become increasingly popular.
Self-locking fittings can completely replace soldering in terms of the speed of connection and its reliability. The design of such fittings includes a whole set of rings, one of which is equipped with special teeth. The principle of operation of such connecting elements is based on the fact that when a ring with teeth is acted upon using a special mounting wrench, it is fixed in the adjacent element, thereby creating a reliable and durable connection between sections of copper pipes. Unlike soldering, dismantling a connection made with such a fitting is as easy as receiving it; the same mounting wrench is used for this.
It should be borne in mind that compression fittings are always made of copper, but they can be used to connect elements made of ferrous metal and polymer materials.
Applications of copper pipes
Installation of copper pipes in heating systems is possible due to their high resistance when working with high-temperature liquids. This property is especially relevant for a single-pipe heating scheme, in which to ensure the coolant temperature in the last radiator is about 70ºC, it is necessary that in the first it is equal to approximately 120ºC
Connecting pipes with compression fittings does not provide an absolute guarantee of reliability and requires constant monitoring during operation.
The maximum temperature that polymers used in heating systems can withstand does not exceed 95ºC, and media with temperatures up to 300ºC can be transported through copper pipes. An important property of a pipeline made of this metal is its ability to withstand pressure of 200-400 atm, while the soldered connection of copper pipes, made by hand, remains sealed. At the same time, metal-plastic products can withstand, on average, a pressure of 6 atm with a possible operating pressure in the system of 6 - 8 atm. Heating pipes made of soft copper can easily withstand 3-4 freeze-thaw cycles.
Thanks to its antibacterial properties, copper can resist the infiltration of contaminants in urban water supplies. Plumbing copper is resistant to chlorine. Moreover, chlorine, being a strong oxidizing agent, promotes the formation of a protective oxide film on copper, which extends the service life of the pipeline. However, it should be remembered that hidden laying of copper pipes with your own hands can only be done if there is a polymer shell on the pipes, which protects the copper from stray currents.
Copper pipes are universal: in addition to water supply and heating systems, they are used to transfer gases and refrigerants in refrigeration systems, and are used in air conditioning systems.
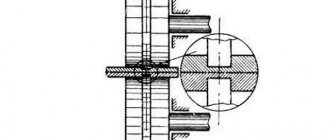
How a crimp fitting works and works
This device includes:
- Frame;
- Compression nut;
- Crimping ring. Often one or two rings are placed. They increase the tightness of the joint and provide resistance to high pressures. This also extends the life of the structure.
IMPORTANT! It is recommended to purchase parts in which the seal is not simple rubber, but EPD M. Such products will last longer.
To produce these elements the following is used:
- Brass;
- Copper;
- Plastic;
- Metal.
For copper pipe products, brass fittings are most often used. They are easy to process and have a low cost when compared to copper products.
And the strength of brass is equal to stainless steel, and it fits much easier. To increase the stability of brass fittings, they are plated with nickel.
When purchasing such parts, you need to take into account their weight (do not take light items). Experts also recommend purchasing them from a reputable manufacturer.
This way, finances will not be wasted, and the highway will operate smoothly and reliably.
Connecting pipes using soldering
Let's consider connecting copper tubes with fittings followed by soldering, which can be low- and high-temperature. In the first method, soldering is carried out at a temperature of 300 ºC. The second method is used when installing systems with high loads for industrial purposes.
Couplings are used as connectors for copper pipes; tin-lead solder and flux are additionally needed.
The pipe soldering technology will be as follows:
- First of all, a pipe of a certain size is cut. This process must be carried out carefully, taking into account the size of the existing fittings.
- The ends of the pipes must be inspected - there should be no defects such as chips, cracks or burrs. If they are not eliminated, there will be problems with the tightness of the connection after all the work is completed.
- After making sure that the ends are clean, you can start connecting. Due to the fact that several pipes will be connected, and they can be of different sections, the fittings must be selected accordingly.
- Next, the end of the pipe and the inner walls of the couplings should be treated with flux, which will degrease the surfaces to obtain the highest quality connection.
- Now the end of the pipe is threaded into the copper tube connector and heated. It must be selected so that the cross-section is 1-1.5 cm larger than the cross-section of the pipe. The pipes are heated with a gas burner. The gap between the pipe and the coupling is filled with molten solder. Currently, you can find any type of solder on the market to suit your needs, so there should not be any problems with the choice.
- After the solder is evenly distributed around the circumference, the parts to be joined must be left until it has completely hardened.
At the final stage, you need to check the connectors for the copper pipes and the entire system by running water into it. At this moment, not only the system will be checked, but it will also be cleaned of flux residues, which over time can cause metal corrosion.
What to consider when choosing
Let's look at a few tips to help you choose the right fittings for copper pipes:
- The density of copper is slightly higher than that of steel or cast iron. Therefore, when choosing, pay attention to the weight. When choosing, immediately ask the seller for a similar steel fitting to compare it with the weight of the spare part you want to buy. If the part is light, then it is made of alloys with a high content of alloying impurities. You should refrain from purchasing such a spare part, since its use is fraught with various risks (cracks, breaks, corrosion).
- Examples of reliable brands are Viega, Tiemme, MAJDANPEK, Mueller. Russian companies make quite passable parts that, in terms of price and quality, are suitable for home use. But you shouldn’t trust Chinese and Vietnamese products - they are often made from low-quality “dirty” alloys that contain additives and impurities.
Capillary method for connecting copper pipes
Soldering copper pipes, which is rightfully considered the most reliable and durable method of connecting copper parts, is carried out based on the principles of capillary technology. In accordance with this effect, which is based on the laws of physics, liquid can rise through a capillary, overcoming the force of gravity, if there is a certain distance between the lower and upper points of its rise.
Solder fittings
This physical effect allows copper pipes to be soldered in such a way that the solder melted by a gas torch is evenly distributed over the entire area of the joint being created. In order to effectively perform such soldering, the pipes can be placed in any spatial position, the main thing is that the molten solder is supplied from the bottom of the joint being formed.
In more detail, the capillary soldering process is as follows:
- Using a gas burner, the site of the future connection is thoroughly heated;
- molten solder is supplied into the gap between the ends of the pipes being connected or between the pipe and the fitting used, which completely fills it due to the capillary effect;
- the resulting compound is allowed to cool completely;
- After the formed joint has completely cooled, its elements are thoroughly cleaned using a special cleaning composition.
Using soldering, based on the capillary effect, pipeline elements not only made of copper, but also of ferrous metals are connected. If a steel fitting is used as a connecting element for copper pipes, then a layer of special flux is applied to the site of the future connection. When soldering using capillary technology, very current wire is used as solder, which can be made of tin, copper, and in some cases even silver.
Device and purpose
In practice, fittings made of copper, bronze and brass are suitable for installing copper pipelines. Only copper couplings and tees are suitable for soldering.
Fittings are produced according to shape:
- Direct.
- Angular.
- Tees and crosses.
- Transitional (for connecting workpieces of different diameters).
- Combined.
The industry produces many combined types of connectors that allow you to easily install pipelines of complex configurations.
By design there are:
- Threaded.
- Compression (collet)
- Press.
- For welding.
Installation of copper pipes
In the process of installing plumbing systems with your own hands, it often becomes necessary to connect copper pipes with products made from other materials. In heating systems, cold and hot water supply, copper connections with steel, plastic and brass are safe from the point of view of corrosion processes. But the contact of copper with galvanized steel is dangerous for galvanized pipes and leads to their destruction due to electrolytic processes. To avoid pipeline failure, the connection must be made using, and the water flow must be directed from steel to copper.
Before starting work, it is necessary to prepare a tool for installing copper pipes of a heating system or hot or cold water supply. To do this you will need: a pipe cutter or a hacksaw for metal, a file or scraper, and if there are areas of complex configuration - a pipe bender, a gas torch or a hot air gun.
Laying a copper pipeline with your own hands begins with sections of a pre-calculated length. Then it is necessary to clean the outer and inner parts of the pipe from burrs, and if necessary, level the cut. Using a pipe bender will prevent the pipe from flattening and the formation of creases, which can cause a decrease in the performance of the pipeline in these places.
If the diameters of the pipes do not exceed 15 mm, then their bending radius should be at least 3.5 diameters, and if more than 15 mm, then four diameters. When bending by hand, a high-quality bend can be obtained only with a radius equal to 8 diameters.
Despite their resistance to corrosion, copper pipes, due to violations of manufacturing technology, improper soldering and severe contamination of water with abrasive inclusions, can be subject to very dangerous pitting corrosion. The pipe corrodes where the oxide film is destroyed. One way to avoid this process is to install filters on water supply and heating pipelines.
In the modern construction market, copper pipes, due to their unique performance qualities, quite successfully compete with products made from steel, plastic and metal-plastic, despite their high cost.
Even taking into account the fact that polymer pipes are being used more and more often, metal products are still enjoying considerable success. Typically, the metal used is copper, brass and steel. Copper is superior in terms of resistance to corrosion and high temperatures. Actually, the connection of copper pipes will be discussed in this article.
Even though copper pipes are expensive, taking into account all the characteristics of the material, their use is quite justified.
First of all, before connecting copper pipes, you should decide how to connect them, by soldering or another method.
Installation and replacement rules
The use of each type of fitting has its own limitations:
- For gas, only soldering or press connections are permitted.
- The compression connection cannot be poured into a screed with a heated floor system and used for gas pipelines (do not forget - installation of gas pipelines is permitted only to specialized organizations with a license).
- Soldering is used in all cases where the pipeline cannot be observed visually - when laying pipes behind drywall, in walls, floors.
You can only replace the compression fitting - unscrew it and install a new one. If the solder and press connector fails, you will have to cut the structure, build it up using a fitting and pipe, and install a new connector.
Connectors coated with chrome and nickel are not used for aesthetic reasons, but there is no prohibition on the use of such elements.
Installation technology
For any installation method, it is necessary to prepare the workpiece:
- Use a pipe cutter to cut the piece to the required length.
- Clean off any burrs using a file.
- Clear away any shavings.
- Degrease.
- Calibrate with a calibrator.
For soldering, the connector and workpieces are coated with flux, connected (the workpiece is inserted into the connector), heated with a gas burner to 250-500 °C, and a solder rod is passed along the joint of the tube and the connector. The solder melts and is drawn between the parts by capillary action. The connection is then cooled.
The unscrewed crimp nut is put on the workpiece, the workpiece is put on the collet and rests against the support ring, the nut is tightened and the workpiece is clamped, and the o-ring seals it. The nut is tightened by hand, then using a wrench one turn/turn and a quarter.
The sleeve is placed on the end of the workpiece, the pipe is placed on the body, after which the sleeve is pressed with a special hand press (press pliers). Characteristic ridges form on the sleeve above the sealing ring.
Necessary materials and equipment: tin and others
The following tools are required for working with copper pipes:
- pipe cutter, hacksaw or grinder with a thin disk;
- chamfer;
- pipe expander (expander);
- soldering flux;
- solder;
- soldering iron for copper, for example, a propane torch for soldering copper pipes;
- rubberized gloves;
- paper napkins.
Pipe cutters of various sizes are used to cut pipes. Larger samples have a large turning radius and are inconvenient to use in hard-to-reach places, so if there is a need to cut off a section of a finished installed water supply, use a small pipe cutter. You can cut the pipe with a hacksaw or a grinder with a thin disk, but a better cut can only be achieved using a pipe cutter.
After the pipe is cut, the burrs are removed. This is necessary to ensure that there is no turbulence in the fluid flow in the system. When there are no obstacles, the water supply does not experience stress and works like a clock.
Before welding the copper, the ends of the pipe are polished with fine-grained sandpaper, which can be purchased at hardware stores. They clean both surfaces that are preparing for soldering. Sometimes small brushes with a diameter of Ø 22 mm are used for these purposes; they are suitable for almost all pipes. For cleaning, the stem of the brush is inserted into a screwdriver or drill, with the help of which the process is carried out faster and with better quality.
Flux is applied to the cleaned, smoothed outer surface - a composition that prevents the oxidation process of copper.
Flux can be used from various manufacturers, for example, Sanha
Rubberized gloves are used to protect hands, since when cutting copper and burrs, many small metal elements are formed that dig into the skin like splinters. In addition, when cleaning the surface with a drill, the rotating brush chews on rag gloves.
To solder copper correctly, you need to take into account that from the moment of stripping and applying flux to soldering, no more than half an hour should pass, otherwise the stripping must be repeated again. If the flux is applied with a brush, there should be no bristles or hairs from it left on the surface - otherwise the connection will not be tight and the pipeline will leak after water is supplied.
After inserting the pipe into the socket, the remaining flux is not completely removed with a napkin, it remains on the connection in the form of an edge of 1–2 mm, and when soldering, the solder is drawn inward - the capillary effect is triggered. First, the joint is heated with a burner, and the moisture between the walls is evaporated. Then the burner is brought up a second time, the copper gradually heats up, and the flux takes on a tin appearance. At this moment, solder is placed on the front side, soldering occurs, and the molten alloy flows down to the back side, solidifying as it moves. The excess metal overhangs that form below are separated on their own. Soldering copper can be done in different ways.
Calculation of diameter for a two-pipe heating system
We will calculate using the example of a simple two-story house. On each floor we have two wings. The house itself will have a two-pipe heating system with the following parameters:
- total heat loss – 36 kW;
- loss on the 1st floor – 20 kW;
- loss on the 2nd – 16 kW;
- polypropylene pipes were installed;
- system operation in 80/60 mode;
- temperature – 20 C.
Below is table (a) based on the data from which we will determine the required pipe diameter. In the table, cells with the best (optimal) fluid velocity are marked in green.
Let's count. Through the section of pipe that connects the first fork and the boiler, the entire volume of liquid passes through, therefore, all the heat, and this is 38 kW. Let's determine which pipe we need to take here.
We take our table, look for the corresponding line in it, then go through the green cells and look up. What do we see? And we see that with such parameters two options suit us: 50 and 40 mm. Naturally (this was written about above), we choose a smaller diameter of the pipe for heating the house, 40 mm.
Next we look at the fork, which divides the coolant movement into the second and first floors (16 and 20 kW). Again we look at the values from the table and find that in both directions a pipe diameter of 32 mm is needed.
We have two wings on each floor. The circuit is also divided into two branches. We count the first floor:
20 kW / 2 = 10 kW per wing
Second floor by analogy:
16 kW / 2 = 8 kW per wing
Again, we take our table and determine that in these areas we need a pipe with a cross-section of 25 mm. It is also clearly seen from the table that we will use this diameter until the load drops to 5 kW, then we will use 20 mm pipes.
In this simple way, we calculated all the pipe diameters for heating the house of the polypropylene pipes we needed for a two-pipe heating system.
For the reverse supply of water, you do not need to calculate anything, everything is much simpler: you do all the wiring with pipes of the same diameter as for the direct supply. As you can see, there is nothing complicated. All you need is a good table suitable for a specific case.
Some nuances of calculating the diameter for metal pipes
But on extended systems, it may happen that the very last heating elements in the chain will be cold or slightly warm. This is also a consequence of incorrect choice of pipe diameter. Fortunately, heat loss can be easily calculated:
q = k * 3.14 * (tv-tp) q - heat loss per 1 meter (W/s); k – heat transfer coefficient (W * m/s); tв - temperature of hot supplied water (C); tп — ambient temperature (C).
Let's take a pipe with a diameter of 40 mm. Let's say the wall is 1.4 mm thick. Material – steel. Let's calculate:
q = 0.272 * 3.15 * ( 80 – 22 ) = 49 W/s
Here is another proof of why you need to take a pipe diameter for heating a house with a smaller diameter. After all, it is clear that the thicker the pipe, the much more heat we will lose.
And in this example, we received losses of almost 50 W per 1 meter of distance. And if the system is quite extended, then all the heat can be lost.
But don't be upset! Such accurate calculations are needed only for multi-storey residential buildings. For individual heating systems, everything is simpler: calculations are rounded up and this gives a certain margin.