Equipment. Inverter welding machine
Heavy transformers with generators for welding work do not fully meet modern requirements, and for the most part are a thing of the past. We will look at the process of manual arc welding using an inverter-type welding machine.
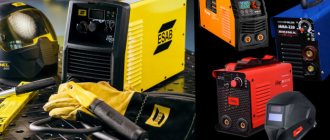
An inverter welding machine is a compact semiconductor device with control and protection systems.
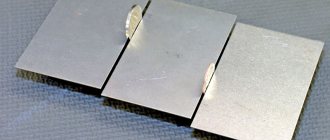
Advantages of an inverter welding machine in comparison with transformers and generators:
- low weight and dimensions;
- less electrical energy consumption;
- smooth adjustment of current strength;
- arc stability when welding at low currents;
- low spattering of electrode metal during welding.
Inverter machines differ in the maximum current strength and, accordingly, in the diameter of the welding electrodes used, which can be used to weld with this device. Also the most important parameter characterizing the inverter is the switching duration or PV%.
The higher the percentage of PV, the longer the device can cook without stopping. A value of 100% corresponds to 10 minutes of continuous operation of the inverter at maximum current. Let's give an example if the duty cycle is 80% for an inverter with a maximum current of 120A. This means that it will be possible to carry out the welding process for 8 minutes continuously, with a current of 120A. If the current is below the maximum, then the device will be able to cook longer without interruption.
If you need to weld long seams or thick metal more than 10 mm, you need the PV to be 80% or more. If it is boring for a home, garage, cottage or for training, then you can use PV 40 - 70%. Most welding inverters (Resanta, Svarog, Esab, Fubag and others) have these PV parameters.
Some recommendations for choosing an inverter for welding
You should not take an expensive welder with a large duty cycle for training. After all, you won’t be able to cook continuously for more than 5 minutes because the electrode will simply burn out, and during the learning process, your hand will quickly get tired.
For most welding tasks with an inverter, electrodes with a diameter of no more than 3.6-4 mm are sufficient; for beginners, we advise that based on this, an appropriate apparatus is selected that can pull such diameters.
In the meantime, buy the simplest and cheapest ones.
The diameter of the selected electrode depends on the thickness of the product being welded. Approximately equal to it, or slightly less. It is better to learn to weld with welding electrodes with a diameter of 2.5 mm - 4 mm, with a basic coating.
Welding electrodes must be stored in a dry and warm place, in a hermetically sealed container.
A welding helmet is one piece of equipment that you should not skimp on if you are going to practice professionally and preserve your eyesight. A good mask with a substitute will serve you for many years.
The sales consultant in the store will help you with the right choice. It's better to pay a little more and get the Maxa Chameleon, which automatically dims. This is convenient; you can see where the electrode is before the process begins. A regular mask with a dark glass filter will not provide this opportunity. Another advantage of the chameleon is that you can beat off slag without a shield. The mask itself will be used instead.
If you plan to become a pro and work in this field, take yourself an expensive mask, it’s all about your eyesight. It’s best, of course, with an air purification system, but the prices there are simply astronomical.
When performing welding work, you will need auxiliary tools and materials:
- Electric angle grinder (“grinder”) with a set of cutting or grinding discs. With its help, the surfaces to be welded are prepared, as well as the finished seam.
- Hammer for removing scale.
- Metal brush, for cleaning surfaces from metal splashes and scale residues.
- Means for degreasing welded surfaces.
- Wiping material (rags).
Be sure to take care of your safety, as well as your equipment; for this you need:
- Fully enclosed overalls made of fire-resistant material;
- boots with rubber soles;
- thick leather or suede welding gloves (gaiters);
- safety glasses for working with a grinder or a protective shield;
- protective gloves for working with power tools;
Common mistakes made by newbies
Always make sure that consumables are completely dried and, if possible, calcined. The fact is that it will be extremely difficult for an inexperienced person to ignite an arc using unheated electrical conductors. First, read in detail about how to properly weld and operate an inverter welder - for beginners, it is recommended to use a Resanta-type inverter welding machine when learning. First theory, then practice.
Another common mistake is choosing a unit that is not easy to handle. There are devices whose control system requires in-depth knowledge. A novice master should start with the simplest models.
A beginner should only use masks in which the light filter is adjusted automatically. The problem is that products without this function must be configured again each time, and without the proper experience, you can make mistakes and get an eye burn.
Preparation of the workplace
Before starting work, think about what, how and in what order to do so that it is safe for you and others. Before you start work, you need to prepare your workplace:
- Check the completeness of the equipment: welding cables, the condition of the insulation of wires, power supply cables from the network to the inverter, the device itself;
- remove foreign objects;
If a violation of the integrity of the insulation of wires, power supply cables, as well as a violation of the integrity of the connectors for connecting them to the network is detected, you cannot begin work until the faults are eliminated!
- Prepare the parts to be welded;
- check whether there is sufficient ventilation of the workplace;
- check whether the work area is sufficiently illuminated; if there is insufficient natural light through window openings, provide additional lighting by installing lamps;
- prepare a place where you will sit while working;
- prepare to inspect the necessary auxiliary tools;
- check the electric grinder (electrical safety requirements are the same as indicated above);
- prepare the necessary abrasive wheels (grinding, cutting), the wheels must be marked, there should be no cracks or chips on them;
- Check the availability of fire extinguishing means (fire extinguisher, sand) at the workplace.
After completing these routine but mandatory activities, you can begin preparing the parts to be welded.
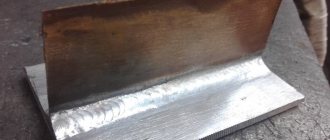
Welding thin galvanized steel and its features
To weld galvanized steel, you must first remove the zinc layer from the edge of the metals being joined. This layer is removed manually or by using a machine that performs sanding.
The edge of the metal is also burned out by welding, but this is done very carefully. Zinc tends to emit very toxic fumes when welded, and if they are inhaled, they can cause serious harm to the body. It is recommended to carry out all work in the presence of a hood, or to weld surfaces in the fresh air.
Cleaning and preparing surfaces for welding with an inverter
It is much easier to weld parts, as well as to train, if you properly and properly prepare the metal surface for welding, for this:
- Clean the surfaces to be welded with a grinding machine from rust, paint and other contaminants to bare metal. Be sure to use safety glasses or, even safer, a protective shield when working;
- degrease the surfaces with the product you have;
- Using a grinding machine, remove the edges (chamfers) on the parts to be joined to the required seam depth.
Processing of thin materials
When working at home, preference is given to small details. In this case, even minor mistakes should not be made, as they will instantly lead to burning of the surface. To achieve a perfectly even seam, you first need to practice on thicker metal.
- Welding operations should be carried out with a set current value close to the minimum.
- Create the seam at an angle forward.
- One of the main problems when joining thin parts is their deformation. Make sure that the canvas does not overheat.
Preparing to weld with an inverter for beginners
Before starting work, it is necessary to fasten your overalls tightly and put on a welding mask; this is mandatory not only for beginners, but also for experienced ones who forget to do this.
Depending on what type of weld you will weld the parts (horizontal seam, ceiling seam, and vertical seam), you need to position and securely fasten the parts at the workplace.
This is achieved in various ways:
- by “tacking” the welded parts to each other and to a massive metal structure (slipway, beam);
- using special clamps;
- using mandrels and conductors.
Now you need to connect the welding machine to the network. Turn on the inverter and set the mode parameters, which are different in each specific case. They depend on the welding position and the thickness of the workpiece.
In this article we present welding and surfacing data for a sheet of metal 10 mm thick.
Welding modes
Selection of electrodes
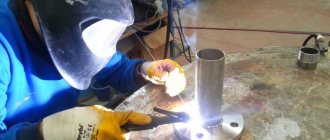
After positioning and securing the parts, proceed to ignite the electric arc between the welding electrode and the parts being connected.
Before ignition, be sure to pull the welding helmet over your eyes to avoid harmful light exposure from the arc to your eyes and metal splashes on your face.
For beginners learning how to weld with an inverter, it is better to practice lighting the arc and applying weld beads not on the parts to be joined, but on a solid sheet 10 mm thick or more. After developing the skills of applying the correct beads, you can begin welding parts.
Welding process technique
To prevent burning of the sheet material, the operation should be performed as quickly as possible. The electrodes are passed along the seams once, avoiding delay. To weld metal sheets without difficulty, you need to reduce the operating current as much as possible.
All inverter devices with which we perform these operations must be equipped with smooth adjustment of output power. In order to avoid difficulties with arc ignition, use a device that gives an idle voltage of at least 70 V at voltage. When performing work, always pay attention to the geometry of thin sheets, which can become deformed when exposed to strong heat.
To ensure a strong butt joint, it is worth cleaning the edges of the material from rust. It is also necessary to level the workpiece and secure it if required to perform the operation. Only with a smooth and clean metal sheet can a high quality weld be achieved. After completing the preparatory work, tack welding is applied to the item every 7-10 cm, after which the final welding of the product is performed.
When connecting two thin sheets with an overlap, you need to remember that this welding method makes it possible to use more current, then the effect of high temperature on the surface of the product is reduced.
At the same time, the risk of burning through materials is reduced several times, and there are almost no changes in geometry. To reduce the effect of high temperature on the product being welded butt or overlap, you should place a sheet of copper under it. Copper removes excess heat well from the surface of the product, which protects the work from bending and prevents thermal expansion from occurring when welding surfaces. Sometimes, for the same purpose, you can take a wire and place it at the junction of two metals.
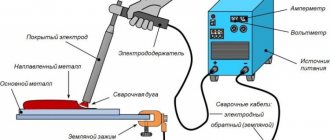
How to strike an arc
What creates an arc? An arc is formed between the parts being welded and the electrode, which is supplied with voltage from the welding machine (inverter).
The second cable from the device (“ground”) is fixed to a metal plate on which welding work will take place or directly to one of the parts. A voltage of about 80 V is created between the holder and the ground of the inverter.
First, touching the metal, we close the circuit. A strong current arises in the contact area, heating the contact area. When the electrode is separated from the metal, the voltage between them is quickly restored, since the heated areas emit electrons.
Electrons are accelerated by voltage and strike neutral atoms, knocking out electrons from them and turning them into ions. As a result, an ionized (plasma) channel with a high temperature appears between the metal and the welding electrode.
Current setting
The current strength, as mentioned earlier, on the device (inverter) is set according to the diameter of the electrode; usually the device has a corresponding table. Take the average value from the recommended range.
Over time, you will learn to determine whether you need more or less current when performing specific jobs. For practice, it is better to choose large pieces of metal.
Below are video lessons on how to weld metal for a beginner in welding. We recommend that you read them in detail. It provides answers to many of your questions, for example: “How to light an arc correctly?”
Arc ignition
To light the arc correctly, we place it above the future seam and tilt it 15-45° towards the seam where the process will take place - it’s better to learn this way. There are two ways to ignite an arc in manual arc welding:
- “peck” - the electrode hits the metal lightly and bounces off, like a bird pecking;
- striking metal.
Sparks fly, we slightly withdraw the electrode - our arc burns!
How to hold the arc correctly when welding
To maintain a normal arc, the distance from the electrode to the metal surface should not be less than 0.5 and more than 1.5 mm. During the execution process, the electrode material is consumed. It must be constantly moved closer to the melt zone.
Maintaining the correct combination of the speed of the welding process, the distance from the electrode to the metal, and the angle of inclination at which a stable powerful arc burns is the skill of an electric welder.
This is the skill of a professional, this is what you must learn. The video will help you improve your skills and understand how to hold an arc.
At first glance, it seems like there is so much to control, everything is so complicated. This is only at first glance. Just start doing it. When you make the first seams, everything will become clear even if you learn to weld metal from scratch. You will definitely succeed!
How to cook using inverter welding - choosing a technique
Before answering this question, it is important to understand whether you really need such a unit for joining metal parts. There are household, semi-professional and professional. An inverter is a machine for using electrodes. We recommend choosing a device for occasional use at home, in the country or in the garage. It’s better to buy an inexpensive one, but we don’t recommend buying very cheap models from little-known brands.
Since this practice is a whole science that is taught in colleges, you should not immediately do a large project such as a workbench or gazebo. It's better to try yourself on scraps. And then try to build a simple thing, for example, a bookshelf.
How to properly guide the electrode when welding metal.
If we move the electrode evenly, we get a “thread” seam. It may be enough to weld the metal through its entire thickness. If the products being welded are thick, then to warm them up, various manipulations must be done: from reciprocating movements in a spiral to moving in arcs across the seam.
As a result, we linger longer over each section of the seam, warming up and filling it better. There are single-pass welds (usually on metal up to 3 mm thick) and multi-pass welds, when several passes are required to fill the entire volume of the weld.
Below are video lessons: welding metal with an inverter for beginners, how to weld with inverter welding and other useful things.
What is a welding inverter and how does it work
This device was called an inverter because it converts alternating current of a 220 V network with a frequency of 50 Hz into high-frequency oscillations, and then into direct current. At the same time, the device has a high efficiency: about 85-90%, and even under fairly heavy loads the counter “winds” a little. In any case, you won’t have to pay crazy bills. The consumption will be slightly higher than without welding, but not by much.
This small box is an inverter welding machine
Most inverter welding machines operate from a 220 V household network (there are also devices from 380 V). And this is one of their advantages. Moreover, they have practically no effect on it, i.e. do not reduce tension. Rest assured about your neighbors: they won’t even know that you are welding. The second important advantage is that they can work more or less normally at reduced voltage. Of course, you need to look at the specifications, but at 170 V, most of them still allow you to work with a 3 mm electrode. This is very important especially for rural areas, where low voltage is the norm rather than the exception.
What’s also good for beginners is that it’s easier to get and hold an arc when using inverter welding. And in general, according to many, it cooks “softer” and has a “lighter” arc. So if you want to learn how to cook, try inverter welding first.
Read about choosing welding inverters for your home and garden here.
Welding lesson. How to weld metal with an inverter.
As soon as the arc starts to ignite. Let's start training with the following exercises.
Down position
Circular movements on a thick horizontal plate, pass after pass, while the angle of inclination is 45°, looking back. You need to pay attention when the electrode runs out. You should go back a little on the seam to avoid creating a crater. Light the arc in the center of the ring, go back a little and continue the circular movement.
Below is a video on how to learn how to properly weld with a welding inverter.
Vertical position
The “vertical” seam is first worked on a plate set at an angle of 45°. We start zigzag movements from the bottom and move up. The distance to the electrode is approximately 2 mm, the angle of inclination is backward. At the top of the plate, we stop the process and go through the zigzag again to deposit additional metal on the edge.
Next - video lessons on how to learn manual arc welding of metal for beginners.
A true vertical seam on a vertically mounted plate. The same zigzag movements with the electrode. The exercise is difficult, and usually you can’t do it right away.
Horizontal seam
Horizontal weld on a vertically mounted plate. Perform circular oscillatory movements and cook in a backward direction. The first roller is at the junction with the horizontal plate, then up, roller after roller. To get a better “horizontal”, you can first draw it with chalk.
Vertical seam with a tear.
Vertical pull-off weld, the initial position of the plate is at an angle of 45°. We light an arc from the bottom of the plate, left, down, right, up, left, back to the middle - we draw such a closed oval. We tear off the electrode, move up, make an oval again, tear off, up. So until the end of the plate.
Vertical pull-out weld on the plate.
The same oval oscillatory movements, when performing which, if possible, it is better to rest your hand on a table or something. The final “outer” seam is the most difficult; the metal can overheat and leak. Therefore, we take a longer pause after the takeoff. Of course, these exercises are not all that exist for novice welders. On our website, in addition to them, you can familiarize yourself with the following materials:
- electric welder manual welding training program;
- how to learn how to cook using inverter welding, tips for beginners and others.
A good criterion for the quality of a weld is its beauty. If the weld is beautiful, then there is a high probability that there are no voids inside it and the weld is filled evenly.
What are the types of polarity?
Melting occurs under the active influence of heat emanating from the arc. The process can be carried out in two versions, differing in the type of connection.
Straight polarity means that the electrical conductor is connected to the minus, the surface to be processed to the plus. This allows for a reduction in heat transfer levels. There is also reverse polarity; here, accordingly, the connection completely changes. Our article will help those who want to understand the issue of how to learn how to properly weld a seam using an inverter welding machine for beginners.
How does the conductor feed speed affect
For work to proceed normally, it is important that the required amount of molten metal enters the weld pool. If there is too little of it, undercutting occurs.
If you move the electrode very quickly, the arc will not be able to produce enough power to heat the alloy. This leads to the formation of a shallow adhesion. If you move the rod very slowly, there will be overheating, and the risk of burning the surface increases.
How does current influence
The pace of movement and the set current influence the weld simultaneously. The higher the voltage, the greater the depth of penetration. Accordingly, in this case, it is possible to increase the speed of movement of the electrode element through the material. If you combine the optimal wiring speed and current strength, you get an even connection of the required penetration depth.
We will help everyone understand how to use inverter welding correctly. All you need to do is carefully study the information received and put everything into practice.
M. Gladwell's “10,000 hours” rule
Of course, you won’t succeed in everything right away. Take it calmly. When learning to weld metal, it is recommended to follow the 10,000 hour rule developed by Malcolm Gladwell. To achieve a level of unsurpassed skill, you need to devote that much time to your craft. Yes, for most of us this is very far away. Here are the intermediate steps:
- one thousand hours to master level;
- one hundred hours to the professional level;
- and at least ten hours to master the basics - they look quite realistic!
You are at the very beginning of your journey. Train, study, and with every hour you spend studying, your skills in metal welding will become stronger. Good luck!
Conclusion
In the article we looked at the main points about how to weld thin metal with an inverter. To do this, we prepare the workpieces according to the instructions, remove excess temperature, prepare a selection of tools, set the current and begin work . At the time of welding, special attention must be paid to the quality of the seam; for this, it is necessary to remove the electrode for a few seconds from time to time to prevent burn-through, and it is also necessary to use heat-removing plates with wire. Only practice can help in mastering these processes.
GENERAL OCCUPATIONAL SAFETY REQUIREMENTS
1.1. This Instruction provides basic labor protection requirements when working on an inverter welding machine for electric arc welding (hereinafter referred to as the welding machine). 1.2. When working on a welding machine, you must perform your duties in accordance with the requirements of these Instructions. 1.3. Persons at least 18 years of age who have passed a mandatory preliminary medical examination in accordance with the order of the Ministry of Health and Social Development of Russia dated April 12, 2011 No. 302n (Appendix No. 1, clause 1.1.4.8 (Welding aerosols), clause 3.3 (Ultraviolet radiation) are allowed to work on a welding machine ), introductory and initial workplace safety briefings, training in safe methods and techniques for performing work, on-the-job training and testing of knowledge in the prescribed manner and having received permission to work independently. 1.4. When working on a welding machine, the employee must undergo training in labor protection in the form of: introductory briefing, initial briefing at the workplace, repeated briefing, unscheduled briefing, targeted briefing and special training within the scope of the training program for the profession, including labor protection issues and requirements of job responsibilities in the profession. 1.5. Introductory briefing is carried out by a service employee labor protection or the employee replacing him, with all those hired under a program approved by the employer and agreed upon with the trade union committee or other representative body of workers. 1.6. Initial briefing at the workplace is carried out by an official determined by order individually before the start of the employee’s production activities under the occupational safety program for the profession. 1.7. Repeated instruction is carried out according to the initial instruction program once every six months by the immediate supervisor of the work individually or with a group of workers of similar professions, including combined work. 1.8. Unscheduled briefing is carried out by the immediate supervisor of work when there is a change in instructions on labor protection, technological process, technological equipment, at the request of supervisory authorities, etc., which determine the scope and content of the briefing. 1.9. Targeted instruction is carried out by the immediate supervisor when performing one-time work that is not related to the direct responsibilities of the employee by profession. 1.10. Before being allowed to work independently, an employee must undergo an internship under the supervision of an experienced worker (for 3-14 shifts, depending on length of service, experience and the nature of the work). 1.11. When working on a welding machine, a worker may be exposed to dangerous and harmful production factors: - a dangerous level of voltage in the electrical circuit, the closure of which can occur through the human body; — increased level of electromagnetic radiation (pulse); — increased content of harmful vapors and aerosols in the air of the working area; — intense radiation from the welding arc in the optical range (ultraviolet, visible, infrared); — intense thermal (infrared) radiation of welded products; — sparks, splashes and emissions of molten metal and slag; — increased surface temperature of equipment, workpieces and parts; — increased noise level in the workplace; — increased level of local vibration; — sharp edges, burrs and roughness on the surface of workpieces, equipment parts and tools; — flying fragments from the working parts of the equipment in case of their possible destruction, deformable material and scale; — insufficient illumination of the working area; — static load on the shoulder girdle; — physical overload; - fire and explosion hazard. 1.12. Sources of harmful and dangerous production factors: - faulty production equipment or its improper operation; — faulty electrical equipment or improper operation; — sharp edges, burrs and roughness on the surface of equipment and tools; — absence, malfunction, improper use of personal protective equipment; — absence, malfunction, improper operation of lighting devices; — non-fulfillment or improper fulfillment by an employee of a job description, labor protection instructions, internal labor regulations, local regulations regulating the procedure for organizing labor protection work, and working conditions at the site. 1.13. When working on a welding machine, the employee notifies his immediate supervisor about any situation that threatens the life and health of people, about every accident that occurs at work, about a deterioration in his health, including the manifestation of signs of an acute disease. 1.14. When working on a welding machine, the employee is provided with special clothing, safety shoes and personal protective equipment in accordance with current standards. 1.15. Issued special clothing, special shoes and personal protective equipment must correspond to the nature and conditions of work, ensure labor safety, and have a certificate of conformity. 1.16. Personal protective equipment for which there is no technical documentation is not allowed for use. 1.17. Personal clothing and workwear must be stored separately in lockers and a dressing room. It is prohibited to take protective clothing outside the enterprise. 1.18. When working on a welding machine, the employee should: - perform work that is part of his duties or assigned by the administration, provided that he is trained in the rules for the safe performance of this work; — strictly follow the operating rules of the welding machine established by the manufacturer; — correctly use workwear, safety shoes and other personal protective equipment (gloves, protective mask, welding helmet, earplugs, etc.); - be attentive, do not be distracted by extraneous matters and conversations; — when working together, coordinate your actions with the actions of other workers; — having noticed a violation of labor protection requirements by another employee, warn him about the need to comply with them; - keep the workplace tidy and clean throughout the working day, avoid cluttering the approaches to the workplace, use only designated passages; — know and strictly comply with the requirements of labor protection, fire safety, industrial sanitation, Rules for the technical operation of consumer electrical installations; — comply with the requirements of this Instruction, other local regulations on labor protection, fire safety, industrial sanitation, regulating working conditions and the procedure for organizing work at a specific facility; — timely and accurately comply with internal labor regulations, observe labor discipline, work and rest regime; - observe the established working hours, regulated breaks in work; - strictly carry out, within the established time frame, the orders and instructions of the enterprise management, officials responsible for the implementation of production control, as well as instructions of representatives of state supervisory authorities; — apply safe work practices; - treat the employer’s property with care; - be able to provide first aid to victims, use fire extinguishing equipment in the event of a fire, call the fire department. 1.19. Smoking and eating are permitted only in areas specially designated for this purpose. 1.20. Persons who violate the requirements of this instruction may be held accountable in the manner prescribed by the legislation of the Russian Federation.
Inverter device
Speaking of how to weld thin metal with an electrode, we note that relatively complex equipment is used for this. This is a device that must support at least several modes, each with its own frequencies and other operating parameters. To ignite the flame, it must also convert the current twice - first to direct from alternating, and then to high-frequency.
The general scheme and principle of its operation are as follows:
This shows the nature of the change in momentum. The wave passes through the bridge, the filter capacitor, the inverter itself, enters the transformer and conductor and only after that creates the necessary heating.
To make it easier for a beginner to figure out how to weld thin metal using electric welding, the body of the device must have a modern level of ergonomics. To do this, it must contain the following structural elements:
- toggle knobs - for smooth adjustment of the current strength in the required range;
- indicators - mains, overheating protection;
- connectors – for connecting cables with a cross-section of 50 sq mm or less.
In the design adopted today, its body is necessarily equipped with side ventilation grilles - for quick cooling - and, optionally, a belt for easy carrying on the shoulder.
Features of electrode connection
If you are going to learn how to weld with a welding machine, then it is recommended to do this using a universal electrode with a diameter of 3 mm. Before starting work, it is necessary to install the electrode in a special holder of the welding machine. There are different types of holders - spring and screw. To secure the electrode in the spring holder, you will need to press the button and insert the device into the opened hole. If the device uses a screw type of fastening of the holder, then you need to unscrew the handle and insert the electrode into the hole.
This is interesting!
The main requirement when installing an electrode into a clamp is to ensure its effective fastening.
Once the electrode is installed, the cables should be connected. One cable with an electrode is attached to the positive contact, and the second wire is connected to the negative contact on the welding device, which has a clamp at the end for connection to the part being welded. This connection polarity is the most common, and it is called straight. If it is necessary to cook stainless materials, then a clamp is connected to the plus, and an electrode to the minus.
Base current
An indicator that, in combination with the peak current, produces a pulsed arc with a certain frequency that can be adjusted. The base current sets the lower limit of the pulse. Used when welding thin sheet metal to prevent overheating, burnout of alloying elements, burns and warping. The base current allows you to keep the weld pool from failure and from burning through. The standard adjustment range is from 5–15 Amps to the maximum value of the welding current of the machine.
This parameter will only be active in AC Pulse and DC Pulse mode, i.e. when welding with a pulsed arc, in other modes this parameter will not work.
Gas supply time before welding
This is a parameter that increases the delay time for the high-frequency oscillator to operate, while the gas valve in the device is in the open position, thereby supplying shielding gas to the burner. Typically has an adjustment range from 0.1 to 10–15 seconds. Adjusting this parameter allows you to expel excess oxygen from all channels of the argon-arc torch so that it does not enter the welding zone and fill the welding seam with vapors, because inert gases are heavier than air and displace oxygen from the welding zone.
Advice. The recommended gas supply time is from 1.0 to 2.0 seconds. This is quite enough to expel air from all channels and not waste shielding gas in vain.
Working with thin metal
Welding of thin-walled metal products with an inverter is carried out by connecting the terminals according to a circuit corresponding to reverse polarity and placing the electrode at an angle forward. This welding technique provides a smaller heating zone with sufficient seam width.
Ignition of the electrode should be done extremely carefully, because the beginning of the pool when welding thin metal is often accompanied by a burn-through. Welding thin metal with an inverter must be carried out gradually, welding small areas with a short-term removal of the electrode from the bath. At this moment, you need to make sure that the yellow glow of the electrode tip does not go out.
The quality of the weld directly depends on the quality of the electrodes, which will help avoid excessive formation of slag in a small-section weld. Also, the use of small-diameter electrodes avoids burning through the metal.
When completing a weld, you should not abruptly tear off the electrode to extinguish the arc, because in this case a noticeable crater will form at the end of the seam, which will worsen the strength of the metal of the welded joint and the result of the welding equipment will be unsatisfactory.
Another defect that often occurs when welding thin metal is deformation of the product. To prevent its occurrence, it is necessary to carefully secure the parts being welded before welding.