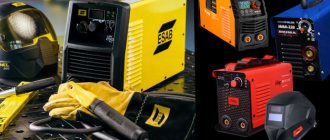
Working with a welding machine is a skill that comes with practice. Selecting the right electrodes and welding amperage is considered an equally easy process due to the wide range of electrodes available. It all depends on the type of metal and its mechanical properties. The electrodes work with a specific type of welding power source. Before turning on the welding and starting work, you need to decide on the factors for choosing electrodes and calculating the welding current.
In this review, we will look at the basic principles of calculating current strength when welding with an electrode and consider the theory and recommendations of experts that will help in practice to avoid common mistakes. If you are working with a welding machine with manual settings, pay due attention to this issue. Modern models have an automatic mode.
Preparing, purchasing, stocking up
The most important thing is to know that everything will work out perfectly, because inverter welding technology is very easy to learn and use; experience and skill are not particularly needed here.
Safety precautions
Any welding activity, including an inverter, is directly related to electrical current.
This means that without knowing and following safety rules on how to weld with a welding inverter, you should not start; this is not even discussed.
These rules are simple and straightforward:
- It is necessary to check the cables for integrity and serviceability before connecting to the inverter. It is important to remember: the return cable with a clothespin goes to the negative pole. We attach the cable, where there is an electrical holder, to the positive connector.
- After a visual check, set the current control knob to the minimum value. Then we connect the device to the network. We listen to the operation of the fan when it turns on: if the noise is smooth and without crackling, everything is in order.
- Now let's take into account the considerable weight of the metal with which you will have to work.
Workwear
Welding with an inverter.
First of all, you need to take into account the effect of high temperature and have the following items:
- welder's mask with special light filters;
- protective gloves or gaiter;
- suit made of protective fabric;
- shoes with rubber soles;
- if necessary, a respirator if welding takes place in a closed room without ventilation.
Equipment
List of required equipment:
- inverter welding machine;
- hammer;
- electrodes selected for the type of work, taking into account the nature and thickness of the metal;
- metal bristle brush
Household inverters
A household or home welding inverter is selected according to several parameters. Since it is the simplest, it has few selection criteria.
- Power (welding current rating).
- Power supply parameters.
- Unit price.
- Model.
As for power, there is one important nuance. Dependence on operating conditions applied to the device. What thickness of metal blanks will be welded with it. If you are welding sheets with a thickness of 2-3 mm, then you will have to use an electrode with a diameter of 3 mm. This means that for these works you will need a device with a rated current of 120 amperes. This is the current at which the device will not overheat. In this case it is the maximum value. But you will have to choose this figure 30-50% more. In fact, you should have 160-180 amperes. Why do they do this?
- Domestic power lines cannot provide stable network parameters. This is especially true in rural areas and small towns. Therefore, voltage drops in the network are common. The voltage has dropped, the power of the welding inverter has dropped. The rated current becomes lower, the quality of the weld decreases. The drop in welding current is also affected by the supply cable. A length of more than 15 m and a small cross-section of the wire also affects this indicator not for the better.
- We would like to add that not all manufacturers indicate exact parameters and technical characteristics in the product passport. So it's worth being on the safe side.
- In addition, we note that all household welding inverters have the same functionality. By purchasing a device with more power, no one loses.
The network parameters for household appliances are as follows: voltage 220 volts, drawdowns within 20-30%. Here the minimum value is 150 V, the maximum is 264 V.
There are inverter models on the market that are intended for stable networks. They have different drawdown indicators: from 180 to 253 volts. Such models are best used in urban operating conditions.
Please note that these welding units are immediately switched off when voltage values decrease or increase above those indicated above. And this saves them from failure
True, automatic shutdown is not available on all models.
Not the last word on the question of how to choose a welding inverter for your home and garden will be its price. Here, as in many other things, price determines quality. Although on the market today you can find good welding machines with an optimal ratio of quality and price. But the cheapest ones are Chinese welding devices. These include single-board models. In them, the main parts and elements are collected on one plateau. If it burns out during overload, the cost of repair will be equal to purchasing a new inverter. This model can be identified by the vertically located power connectors for connecting the power cable.
Additional functions
Today, welding inverters with additional functions that simplify the welding process are increasingly appearing on the market.
This is important for beginner welders (as they say in Ukraine).
- The function is called “ARC FORCE” - arc force. It allows the electrode not to stick to the surface of the metal being welded. The rated welding current increases automatically.
- HOT START is a function that simplifies ignition of the arc. If this is done using a conventional welding transformer, then even experienced welders sometimes have difficulty doing it. In the inverter, the current at the electrode increases momentarily, so the arc burns stably.
- ANTI STICK is a necessary feature. With its help, you can get rid of the sticking of the electrode to the surface of the metal parts being welded. The device immediately turns off if the electrode is stuck, because this can cause a short circuit.
And one more selection criterion. Before choosing an inverter welding machine for your home, you need to collect information about service centers in your city that, if necessary, can repair the model you have chosen. If such a center exists, then you can safely buy the device you have chosen.
Let's start cooking
First we set the correct current strength on the inverter. We remember that in inverter technologies, alternating current welding is the main type. The strength of the welding current depends on the composition of the electrode and the diameter of its tip, the position of the workpieces during welding and the type of seam in the planned joint.
All these dependencies can be found in the comprehensive instructions for the device itself and in the inserts in packs of electrodes. Theoretically, the welding current can be selected according to the diameter of the electrode rod: for each millimeter of diameter there should be about 30 A.
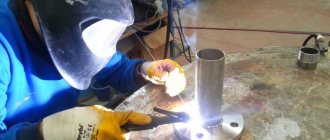
We find a comfortable and stable position, put on a mask and begin work with the elbow abducted. It is better to wrap the forearm with a cable. If this is not done, your hand may get tired during welding, and the cable will begin to dangle, which will negatively affect the quality of the weld.
Direction of electrode movement for a novice welder.
For debut work, it is better to choose metal blanks that are not the smallest size - more than 20 cm, this will be more convenient. As beginners usually do: put on a mask, ignite an electric arc and immediately, with one breath, pass the workpiece along the entire length of the seam.
If your part is short and you weld it in one breath, you may develop the unnecessary habit of welding the seam in one breath. Therefore, train on long parts with proper breathing.
Now about the arrangement of objects during work. It is better to place the workpieces on a work table - a horizontal surface. The electrode in the holder should be at right angles to the table plane, then the angle of inclination should be approximately 30°.
Now you need to ignite the arc to move along the planned weld.
Welding can be done at a backward angle, in which case a 30° tilt goes in the direction of the seam. If the angle is forward, the electrode tilts in the opposite direction from the seam. The electrode should be held approximately like a pencil - at a height of 2 mm from the surface of the workpiece.
It must be remembered that when burning, the electrode shortens, so the distance above the surface must be constantly monitored.
general information
The main role in welding is played by the arc discharge, which has a high temperature. To create it, the electrode and the workpiece are connected to a voltage source. The discharge melts the metal of the edges of the parts, and it merges into one whole.
The charge carriers in the arc are ionized atoms, molecules and free electrons. As their quantity increases, combustion improves. To do this, components with low ionization potential are introduced into the electrode coating.
According to Ohm's law, the same amount of charge flows through the cross section of any section of an unbranched chain per unit time. It follows that the welding current is limited to the maximum permissible value for this device.
To connect workpieces using the melting method, 2 types of voltage are used:
- permanent;
- variable.
The first provides better quality seams and connections, and less metal spatters.
To connect workpieces, direct and alternating voltage are used.
Now about the arc and electrodes
Quickly igniting and holding the arc correctly is perhaps the most important thing for successful welding with an inverter. The arc should not be interrupted - this is what you need to watch out for when the electrode approaches the workpiece plane.
The electrode is ignited in two ways: by tapping or striking. If the electrode is new, it ignites easily. If it has already burned, it is covered with a film of slag, which prevents the consumable from quickly igniting.
In this case, you should tap the electrodes longer so that the film breaks. The relationship between welding current and electrode diameter can be easily calculated using tables that are available in large numbers on the Internet.
Functional diagram of welding with an inverter.
If you have an advanced inverter model, then it is equipped with additional functions that make life easier for beginners and everyone else.
These advanced features are:
- The Hot Start or HotStart function makes it easier to ignite the electric arc.
- Anti-sticking or arc forcing is activated when the electrode approaches the metal surface too quickly. This function increases the current level.
- Antistick or AntiStick, on the contrary, turns off the current to prevent overheating of the welding machine.
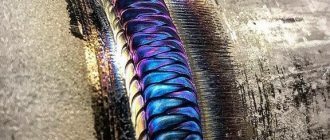
It is better to learn from the simplest form of seam - a thread seam, for which the electrode must be guided evenly without any oscillatory movements.
Once you start to feel comfortable with the thread technology, you can start welding metals with oscillating movements in different configurations - there are several of them.
In such cases, you need to make the first few oscillatory movements to form a weld pool. We tilt the electrode at an angle of 30°, no more and no less. Once the pass is completed, you need to beat off the slag crust with a hammer to clean the new seam using a wire brush.
In order for the seam to come out high-quality and aesthetically pleasing, at the end you should make a couple of oscillatory movements towards the metal surfacing. In this way, crater formation can be avoided.
How to learn?
How to learn to cook with electric welding yourself? For training, you will need to properly prepare your workplace. It should be spacious, well lit and equipped with exhaust ventilation. Personal protective equipment for the welder will also be required:
- clothing and footwear made of non-flammable materials;
- split leather gaiters;
- a welder's mask with an adaptive light filter that protects the eyes from arc welding flashes;
- respirator for respiratory protection;
- Safety glasses or a clear face shield for stripping workpieces and seams.
Tools you will need are a wire brush, a hammer, and an angle grinder.
How to connect the electrode?
It is better to start mastering welding technology with electrodes with a diameter of 3 mm. The rod is inserted into the holder with the end cleared of coating and securely fixed with a screw or spring. The cable from the holder is connected to the inverter terminal. The second cable, which has a clamp at the end, is connected to the second terminal. Ferrous metals are welded using the so-called straight polarity - the positive wire is connected to the workpiece with a clamp, and the negative wire is connected to the electrode.
Two types of connection polarity.
Reverse polarity is used for welding stainless steel and other materials.
Beginning: lighting the arc
The arc is ignited using one of two main methods:
- striking with an electrode along the future seam;
- tapping the workpiece.
For beginners, the first method is recommended. If the electrode has already been welded, tapping helps knock off a thin layer of slag from the tip of the rod.
Electrode tilt
The angle of inclination of the rod to the vertical depends on the type of seam
The “backward angle” position is most often used. The working zone follows the tip of the rod, in this case the greatest heating of the metal is obtained. If you tilt the rod in the opposite direction, the heating decreases. This position is used at the end of the seam and when manually welding thin-sheet structures to avoid the appearance of burns and craters.
Movements
The welder must maintain the gap between the electrode tip and the workpiece within 2-3 mm. If it is necessary to ensure a seam width greater than the thickness of the electrode, complex trajectories for its guidance are used.
A novice master needs to master soft and even straight-line driving at a constant speed. After you begin to get even rollers, you can move on to more complex trajectories.
The main task at the training stage is to learn to “feel” and control the state of the weld pool, without overheating or cooling it excessively.
Trajectories of electrode guidance. It is better to learn on workpieces with a thickness of 4-5 mm. After mastering the welding of beads on the plate, you can begin welding two parts.
About welding seams
The seams that are formed using inverter welding are as follows:
- single-pass, in which the thickness of the metal workpiece is replenished in one pass;
- multi-pass, in which one pass of electrodes is not enough. Used when welding thick edges.
The most famous and simple way to check the quality of a seam after welding is to tap it with a hammer. At the same time, the slag layer bounces off - provided that the seam is even and smooth. Also, the quality of the seam depends on the temperature: it must be correct.
If the seam is overheated, it may break; if the heating is insufficient, a very unpleasant thing will happen - lack of penetration.
What is the influence of welding current?
This value determines the amount of heat released: Q=(I^2)*R,
We recommend reading: How to treat an eye burn from welding
Where:
I – amperage;
R – arc resistance.
Thus, the depth of metal melting depends on this parameter. If you choose it too low, the seam will be weak and there will be uncooked areas.
Excessive amperage leads to through burning of the workpiece with subsequent leakage of metal from the weld pool.
Polarity forward and reverse: what is the difference
Polarity in welding on an inverter machine is an extremely important thing that you need to understand.
If the welding current is constant, then the movement of electrons is also constant. And in this situation, there is almost no splashing of drops and pieces of molten metal, as a result of which the seam comes out neat and of high quality.
At its core, polarity is the direction of electron flow, which depends on the order in which the cables are connected to two different connectors on the device. Inverters have the ability to select the type of polarity. The welding current can also be adjusted.
Reverse polarity
Types of polarity for welding.
This is the negative pole on the metal workpiece, and the positive pole on the electrode. The current thus moves from minus to plus, that is, from the metal to the electrode. With this method, the electrode gets quite hot. The method is good when welding thin metals as the risk of burn-through is reduced.
Straight polarity
Here it’s the other way around: the negative pole is on the electrode, and the positive pole is on the metal of the workpiece. The current now flows from the electrode to the part being welded, which in this case heats up more than the electrode. This is how they work with thick metal edges.
It should be noted that the polarity is always indicated in the instructions on the packs of electrodes.
One of the main “inverter” questions from debutants is what is the most optimal polarity when welding with an inverter? The answer depends on many criteria, but from the point of view of cutting metal, the polarity should be straight.
The fact is that with this type of polarity, the molten area turns out to be deep and narrow - just what is needed when cutting.
With reverse polarity, the opposite is true: the melting zone is shallow and quite wide.
Does the electrode brand affect the choice of current strength?
The composition of the coating is determined by the brand. For example, Uoni-13 and TsU-5 consumables have a basic type of coating. They provide high quality and strength of the weld due to the absence of hydrogen in the metal, but burn worse than others. Therefore, they are welded only at constant voltage, the amperage is increased by 20-30 A. Other consumables are not so demanding on the welding mode.
Recommended parameters for all products are indicated on the packaging.
Knowing how to select the welding current, the master will perform the job efficiently with any electrode and in all spatial positions.
Cook, cut
If you are working with thin sheets of metal, you need to choose the right small diameter electrode and welding current. If, for example, the edge thickness of your part is 0.8 mm, the diameter of the electrodes should be 1.8 mm. Well, the welding current should reach 35 A. You need to cook using intermittent movements.
The question of which electrodes to weld with is decided taking into account the type of welding and the nature of the metal.
Using an inverter, you can cut metals and even make holes in pipe walls. In order to do this competently and quickly, you need to set the correct parameters on the device. An electrode diameter of 2.5 mm and a current of 140 A are just such indicators.
We ignite the electrode and place it exactly at the location of the planned hole. Press for good heating. We rearrange the electrode, press and heat again. And so on until a hole of the desired shape and size is cut.
If you are cutting sheet metal, the sheet must be fixed vertically. In this case, drops of molten metal will flow down, otherwise you risk getting frozen metal icicles at the bottom of the cut.
To be honest, all cutting of metals with a welding machine, even with the most advanced inverter, is not the best idea from a technical point of view. There is always a risk of metal melting at the cut site - the metal can simply melt out. The best way to cut metal is with a grinder.
More information about choosing current for electrode welding in practice
Recommendations from experienced welders will help you find the optimal value.
Influence of welding mode
The parameters that regulate the process are divided into basic and additional. The first group includes:
- speed of movement of the consumable;
- its diameter;
- arc voltage;
- type, polarity and current.
We recommend reading: How to get a NAKS certificate
Arc voltage, polarity and current control the welding process.
Additional options are:
- position of the consumable;
- composition and thickness of its coating;
- part orientation.
All of these factors are called welding mode. They are interconnected: a change in one value entails a correction in the other. For example, if you need to reduce heat input, you can do it in 2 ways:
- Reduce amperage.
- Increase the speed of movement of the consumable.
This relationship is taken into account and, if necessary, productivity is increased. Set the speed to a higher speed while simultaneously increasing the amperage.
It is impossible to evaluate the influence of each factor mathematically and derive the corresponding formulas. In each case, it is important to adapt and select the optimal amperage experimentally.
Arc length
There is a linear relationship between arc length and arc voltage. As the first indicator increases, so does the second. In this case, the current strength and heat generation change little.
Arc length affects voltage.
As the length of the arc increases, the quality of the seam decreases. The reasons are as follows:
- The discharge “walks” along the surface, as a result of which heat spreads over a large area. Accordingly, the edges in the joint zone warm up worse.
- The molten metal from the consumable rod bounces off the poorly heated surface. Spattering increases and the seam becomes dirty. Only part of the alloying elements enters the weld pool.
The optimal arc length in mm is determined by the formula L=d+0.5, where d is the electrode diameter in mm.
The melting consumable is gradually shortened during operation, so the holder is gradually brought closer to the workpiece.
Forward or reverse polarity
When welding with direct current in an arc, 2 zones are distinguished:
- Anode spot. Located on the positive pole side of the source.
- Cathode. It is located on the minus side.
The zones have different temperatures. When using a consumable electrode, the anode spot is colder than the cathode spot, so to connect thin-walled workpieces proceed as follows:
- “Plus” is connected to the part being welded (straight polarity).
- Set the minimum current from the recommended range.
In the argon arc method, direct polarity is used.
This prevents burning of the workpieces.
To connect thick-walled parts, strong heating is required. For this:
- A “minus” is connected to them (reverse polarity when welding).
- Set the maximum amperage from the proposed range.
This ensures deep penetration, making the connection strong and reliable.
When using a refractory electrode (argon-arc method), an inverse temperature distribution is observed: the anode spot is hotter. This technology provides only direct polarity, since in reverse the arc hits the consumable and it quickly becomes clogged. When connecting thin-walled parts, heat input is controlled by amperage and welding speed.
Electrode coating
Based on their composition, there are 4 types of coating:
- Rutile.
- Main.
- Cellulose.
- Sour.
The electrode coating can be rutile.
The main coating differs from the others in the presence of a deionizing element - fluorine. It reduces the number of charge carriers, which makes arcing more difficult. To stabilize this process, it is necessary to increase the amperage by 20-30 A. So, if for welding with a rutile consumable with a diameter of 2 mm, the device is set to 40-70 A, then for the main consumable of the same thickness - to 60-100 A.
Direct and alternating current
The type of current does not affect the amperage. It is selected according to the following criteria:
- If high demands are placed on the quality and strength of the seam, constant tension is used. It is characterized by slight arc deflection and weak metal spattering. The seam turns out smooth and clean. On direct current, the arc burns better; it is possible to regulate the temperature distribution by changing the polarity. This is used when working with thin-walled workpieces and non-ferrous metals.
- If the requirements for the quality and strength of the connection are low, alternating voltage is used. It allows you to reduce costs, because equipment for this type of welding costs 1.5 times less. It is also smaller in size and weight.
Recommended reading: The difference between AC and DC welding
In addition, preference is given to alternating current in the following cases:
- The workpiece material contains oxides. Frequent changes in the direction of current contribute to their greater destruction. For example, aluminum is welded using alternating voltage, because an oxide film forms on its surface.
- The surface of the part is so dirty that it cannot be cleaned.
With constant current, the seam is smooth.
When choosing the type of voltage, the coating material of the consumable is also taken into account. On electrodes with a basic coating, the arc burns worse due to the deionizing effect of fluorine, so they can only be welded with direct current. For other varieties, any genus is suitable.
Features for inverters
The main difference between devices of this type is the presence of a special electronic unit that increases the frequency of the mains current to tens of kHz. This gives the following result:
- The size and weight of the transformer are reduced.
- Its efficiency increases.
- The price is reduced (due to reduced material consumption).
Electronic control makes it easy to adjust the current strength. It is set by a switch on the inverter, and the device selects the voltage automatically. Models with smooth adjustment are the most convenient to use.
The electronics independently adjusts the amperage when:
- Arc ignition. The function is called “Hot Start” or Hot Start. The current briefly increases by 5-100% of the rated current, which facilitates the occurrence of an arc discharge. On cheap models, the manufacturer sets the excess value at its discretion, and it cannot be changed. On expensive ones, the parameter is set by the user. The function is in demand when welding with poor consumables, the presence of rust and scale on parts, and unstable voltage in the network.
- Breaking the arc or connecting the electrode to the workpiece using a drop of molten metal (the consumable is welded). A surge of current also occurs. This promotes the resumption of discharge combustion or the separation of a drop from the rod. The function is called Arc Force.
- Touching the workpiece with the rod. The amperage is reset, which allows you to tear off the consumable. The name of the function is “Antistick”.
The required mode for welding with an inverter is selected taking into account its power. Many models belong to the household class and are not designed for high currents. The maximum diameter of the consumable for them often does not exceed 2 mm, the recommended amperage is 30-45 A.
We choose, we buy
Table of characteristics for welding with an inverter.
It would be useful to google and read about domestic and foreign manufacturers whose products are offered on the Russian market. These are mainly European and Asian countries.
Equipment from Asia is usually inexpensive and of very decent quality, with the exception, of course, of handicraft fakes.
European inverters are distinguished by qualities with the obligatory adjective “high” in front: high price, high reliability, high quality. There are few Russian devices on the market.
Understand the brand of welding cable and its cross-sectional area. The right choice will help you avoid difficulties with power surges if they occur during welding.
The second thing to do is figure out the availability of service centers around the country. If you live in a city with a population of one million, a service center for a specific product is unlikely to be a problem for you. But if you live in a remote region, this issue will become one of the most important for you.
To be honest, you won’t be able to buy one device. Be sure to buy a welding helmet with a light filter. You need to protect yourself from splashes of molten metal and combustion products.
But the main thing is protection from ultraviolet radiation from a hot arc. The most primitive option is a mask made of plastic and a light filter, which is selected depending on the current strength, lighting and your vision.
A more expensive and much more comfortable option is a mask with a Chameleon-type light filter, which automatically changes its characteristics and can be adjusted to suit the ambient light and the condition of your eyes.
There are many tables on the Internet with data that will help you choose the right filters. It is better to choose them for a number larger or smaller. The best solution would be to check the lighting in the work area and your vision.
Okay, we agree, you don’t have to buy a whole suit made of special fabric. But a canvas apron with gloves is not a whim, but your protection. It is better to choose mittens from split leather. Pay attention to your shoes: be aware that drops of molten metal may fall on your feet.
Design and advantages of inverter welding machines
The great popularity of inverter equipment among home craftsmen is explained by the fact that with the help of such compact devices, which are also lightweight, it is possible to make high-quality, reliable and accurate welded joints, even without high qualifications.
The design of any welding inverter consists of such elements as:
- power supply with rectifier unit and filter;
- inverter unit that converts direct current into high-frequency alternating current;
- transformer for reducing the voltage of high-frequency current;
- power rectifier designed to produce direct current at the output of the device;
- an electronic unit that performs device control functions.
Controls and structural elements of a welding inverter using the Fubag machine as an example
Innovative technologies implemented in the design of inverters make it possible to obtain high-quality welded joints without any problems. Due to their compactness, such devices do not take up much space, and due to their light weight (5–15 kg), they can be moved anywhere without much difficulty.
If you learn how to operate an inverter welding machine correctly, you can use it to weld any metal structures. Each new inverter comes with instructions, from which the owner of the equipment can glean a lot of useful information: how to properly connect the device, which electrode to choose in order to weld products from a particular metal, etc.
Patterns of electrode movement depending on the type of seam (click to enlarge)
However, often an inverter device falls into the hands of a home craftsman, the instructions for which are not translated into Russian or are missing altogether. It is very important to learn how to work correctly on such an inverter, because if you act at random, it will be difficult to weld metal well. In addition, you may encounter equipment failure.
However, if you follow generally accepted rules, you can work on any model of inverter and effectively solve all the tasks. After carefully studying these rules, watch the training video, which will help reinforce the theoretical material with visuals.
How to care for the inverter?
Any equipment loves care and order, your inverter is by no means an exception. The rules on how to properly cook using inverter welding and how to store it correctly are simple.
Selecting an electrode for welding various metals.
Before work you need to do the following:
- carry out a visual inspection of the device and prepare the place where you are going to work;
- install the inverter in a horizontal position with the desired protection from dust, precipitation and other contaminants;
- connect the cable to the connectors in accordance with your plans, usually this is plus to the electrode and minus to the metal;
- connect power supply. The most important nuance: if you use an extension cord, the cross-section of the welding cable must be at least 2.5 mm².
- ignite the arc at separation as a test test;
- make sure the casing is intact, because cooking without it is strictly prohibited;
- adjust the current mode. You can start cooking.
You must store your device according to the following rules:
- Constantly check all components of the device. The frequency of checks depends on the intensity of use of the device and the degree of dust in the work area;
- Clean the device from dust using compressed air and low pressure. Do not clean the electric plateau with a jet of air, but use a soft brush;
- check the strength of power connectors, the integrity of the plug, socket and insulating coating of electrical cables;
- It is better to store the inverter in dry conditions, the air temperature should be within the range from -15°C to +50°C, the optimal air humidity is about 70 - 80%.
- Remember to disconnect the inverter from the network when it is not working.
Universal table for determining current strength
It is convenient to present the dependence of the amperage and diameter of the consumable on the thickness of the workpiece in tabular form. In this case, the relative position of the parts is taken into account.
For butt joints
The surfaces to be welded are located parallel to each other. Set the following amperage:
| Edge thickness, mm | Consumable diameter, mm | Amperage, A |
| 1,5-2,0 | 1,6-2,0 | 30-45 |
| 3 | 3 | 65-100 |
| 4-8 | 4 | 120-200 |
| 9-12 | 4-5 | 150-200 |
| 13-15 | 5 | 160-250 |
| 16-20 | 6-8 | 200-350 |
| Over 20 | 6-8 | 200-350 |
For corner and T-joints
The surfaces of the workpieces are located perpendicularly. The cross section of the surfacing has the form of a right triangle with a convex hypotenuse. The amperage is set in accordance with the table:
| Seam leg, mm | Consumable diameter, mm | Amperage |
| 3 | 3,0 | 65-100 |
| 4-5 | 4,0 | 120-200 |
| 6-9 | 5,0 | 160-250 |
Physical principles of the process
Before learning to weld independently at home, a novice electric welder must gain an understanding of the basic principles of electric arc welding (hereinafter referred to as ES) and master the theoretical basics of welding with an inverter or welding transformer, so as not to weld “blindly” without understanding the essence work being performed. Electric welding is one of the most common technologies for creating a permanent monolithic connection of metal parts by fusion.
A similar fusion method is currently widely used when joining polypropylene pipes. The only difference is in the melting temperatures of the metals being welded and polypropylene and the type of corresponding equipment, which is why welding of polypropylene elements is often called soldering, and the heating devices used are called soldering irons.
This technique is based on melting the edges of the elements being connected due to the temperature of the electric arc (hereinafter referred to as ED) igniting in the space between the electrode and the base metal. ED is a long-term high-power discharge in a gaseous environment between the electrode and the base metal. The combustion temperature of ED reaches 7000 degrees. C, which exceeds the melting parameters of existing structural metals and their alloys.
The initiation and combustion of ED proceed in the following sequence:
- When the welding electrode rod comes into contact with the prepared edge of the product under the influence of an electromagnetic field, a short circuit is created in the welding electrical circuit.
- When the electrode is removed from the edge of the product by 2-4 mm under the influence of an electromagnetic field, the ED is ignited. The burning arc ensures the conversion of electrical energy into thermal energy, the power of which is sufficient to melt the end of the electrode rod and the edge of the metal being welded.
- In a stable ED combustion mode, stable melting of the material of the electrode rod and the metal of the part/workpiece occurs. Drops of molten metals form a so-called weld pool in the melting zone, which is a layer of molten metal on the surface of the product.
- Together with the electrode rod, the electrode coating melts, creating a gas or gas-slag protective shell around the weld pool and the ED itself, isolating them from the effects of atmospheric nitrogen and oxygen.
- After hardening and crystallization of the weld pool, a strong permanent welded joint is formed.
Important! When welding two parts, the materials of both parts are mixed in the weld pool. This mixture is endowed with the same strength indicators as the metals of the products being joined, which creates a certain advantage of this method compared to other methods of joining products that prevent melting of the material.
- As the ED progresses and the weld pool crystallizes, a weld seam is formed that directly connects both parts.
- pos. 1 – electrode coating, providing gas protection of the weld pool;
- pos. 2 – welding electrode;
- pos. 3 – gas-protective shell formed during evaporation of the electrode coating;
- pos. 4 – local zone of melting of the electrode rod and the workpiece metal;
- pos. 5 – workpiece;
- pos. 6 and 7 – weld surfaces. Dark shade pos. 7 the solidifying, colder part of the weld is highlighted
In practice, electric welding for beginners is implemented as follows:
- the ED is ignited and subsequently maintained at a certain length;
- the electrode is manipulated to give the seam the desired shape;
- the electrode moves along the welding seam guide line;
- stopping the welding process.
Preparation of the workplace
How to learn to cook with electric welding in a short time? You won’t be able to do this in one day, but by applying tips from various videos and preparing everything you need at your workplace, you can quickly start practicing.
To learn how to weld with a welding inverter, you need a plate for igniting the electrode. It is not always possible to attach the mass to the product, so you will need a small metal table or base
The welder should have a hammer on hand to adjust the correct fixation of metal parts, a slag separator, and a fire extinguishing agent (sand or fire extinguisher). It is important to weld metal with an inverter, being well protected from harmful influences. Regardless of the place of work (home or industrial conditions), each welder must have:
- a protective mask with a light filter corresponding to the lighting in the workplace (with filter No. 5 it will be difficult to see indoors, with filter No. 3 it will be very blinding to the eyes on the street);
- canvas mittens for protection against heat and splashes;
- thick, non-flammable clothing not tucked into the waistband;
- boots;
- headgear to protect against flying drops of slag.
How to weld metal correctly
Learning to hold the electrode correctly and move the bath is not enough for a good result. It is necessary to know some of the subtleties of the behavior of the metals being joined. The peculiarity is that the seam “pulls” the parts, which can cause them to warp. As a result, the shape of the product may differ greatly from what was intended.
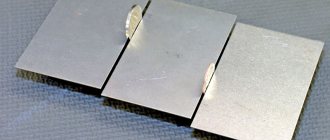
Electric welding technology: before starting to apply a seam, the parts are connected using tack welds - short seams located at a distance of 80-250 mm from each other
Therefore, before work, parts are secured with clamps, ties and other devices. In addition, tacks are made - short transverse seams laid every few tens of centimeters. They hold the parts together, giving the product its shape. When welding joints, they are applied on both sides: this way the resulting stresses are compensated. Only after these preparatory measures do welding begin.
How to choose a current for welding
It is impossible to learn how to weld using electric welding if you do not know what current to set. It depends on the thickness of the parts being welded and the electrodes used. Their dependence is presented in the table.
But with manual arc welding, everything is interconnected. For example, the voltage in the network has dropped. The inverter simply cannot produce the required current. But even under these conditions you can work: you can move the electrode more slowly, achieving good heating. If this does not help, change the type of movement of the electrode - passing over one place several times. Another way is to use a thinner electrode. By combining all these methods you can achieve a good weld even in such conditions.
Now you know how to weld properly. All that remains is to practice the skills. Choose a welding machine, buy electrodes and a welding helmet and start practicing.
To reinforce the information and make fewer mistakes, watch the video lesson on welding.
Welding thin metal with an inverter
The capabilities of the inverter are fully realized when welding rolled metal with a thickness of less than 2 mm. Welding of such materials is carried out at low welding currents and requires high stability of the welding process, which can be implemented without problems when using a device with an inverter current source. Thin metal sheets can easily be burned when a short circuit occurs in the welding arc. To prevent this phenomenon, inverters have a special function that automatically reduces the current value during the occurrence of a short circuit. Another useful feature of inverters is the selection of optimal parameters when igniting the arc, which allows you to avoid lack of penetration and burns in the initial section of the weld. In addition, during the welding process, the inverter is able to adaptively maintain the required operating current when the size of the welding arc fluctuates.