In everyday life in your own home, at your dacha or in your garage, there are always many tasks that require the skills of a welder. This skill is especially useful in DIY construction. In nature, there is no more reliable way to connect two metal parts than welding. And it is quite possible to learn this skill on your own and put the acquired skill to good use. Today we’ll figure out how to learn how to cook with electric welding and independently master the basics of this specialty.
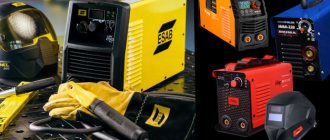
Equipment. Inverter welding machine
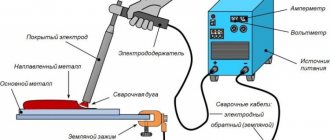
Heavy transformers with generators for welding work do not fully meet modern requirements, and for the most part are a thing of the past. We will look at the process of manual arc welding using an inverter-type welding machine.
An inverter welding machine is a compact semiconductor device with control and protection systems.
Advantages of an inverter welding machine in comparison with transformers and generators:
- low weight and dimensions;
- less electrical energy consumption;
- smooth adjustment of current strength;
- arc stability when welding at low currents;
- low spattering of electrode metal during welding.
Inverter machines differ in the maximum current strength and, accordingly, in the diameter of the welding electrodes used, which can be used to weld with this device. Also the most important parameter characterizing the inverter is the switching duration or PV%.
The higher the percentage of PV, the longer the device can cook without stopping. A value of 100% corresponds to 10 minutes of continuous operation of the inverter at maximum current. Let's give an example if the duty cycle is 80% for an inverter with a maximum current of 120A. This means that it will be possible to carry out the welding process for 8 minutes continuously, with a current of 120A. If the current is below the maximum, then the device will be able to cook longer without interruption.
If you need to weld long seams or thick metal more than 10 mm, you need the PV to be 80% or more. If it is boring for a home, garage, cottage or for training, then you can use PV 40 - 70%. Most welding inverters (Resanta, Svarog, Esab, Fubag and others) have these PV parameters.
Some recommendations for choosing an inverter for welding
You should not take an expensive welder with a large duty cycle for training. After all, you won’t be able to cook continuously for more than 5 minutes because the electrode will simply burn out, and during the learning process, your hand will quickly get tired.
For most welding tasks with an inverter, electrodes with a diameter of no more than 3.6-4 mm are sufficient; for beginners, we advise that based on this, an appropriate apparatus is selected that can pull such diameters.
In the meantime, buy the simplest and cheapest ones.
The diameter of the selected electrode depends on the thickness of the product being welded. Approximately equal to it, or slightly less. It is better to learn to weld with welding electrodes with a diameter of 2.5 mm - 4 mm, with a basic coating.
Welding electrodes must be stored in a dry and warm place, in a hermetically sealed container.
A welding helmet is one piece of equipment that you should not skimp on if you are going to practice professionally and preserve your eyesight. A good mask with a substitute will serve you for many years.
The sales consultant in the store will help you with the right choice. It's better to pay a little more and get the Maxa Chameleon, which automatically dims. This is convenient; you can see where the electrode is before the process begins. A regular mask with a dark glass filter will not provide this opportunity. Another advantage of the chameleon is that you can beat off slag without a shield. The mask itself will be used instead.
If you plan to become a pro and work in this field, take yourself an expensive mask, it’s all about your eyesight. It’s best, of course, with an air purification system, but the prices there are simply astronomical.
When performing welding work, you will need auxiliary tools and materials:
- Electric angle grinder (“grinder”) with a set of cutting or grinding discs. With its help, the surfaces to be welded are prepared, as well as the finished seam.
- Hammer for removing scale.
- Metal brush, for cleaning surfaces from metal splashes and scale residues.
- Means for degreasing welded surfaces.
- Wiping material (rags).
Be sure to take care of your safety, as well as your equipment; for this you need:
- Fully enclosed overalls made of fire-resistant material;
- boots with rubber soles;
- thick leather or suede welding gloves (gaiters);
- safety glasses for working with a grinder or a protective shield;
- protective gloves for working with power tools;
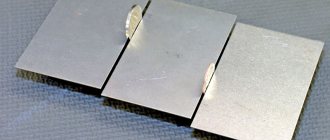
Weld defects
Novice welders often make mistakes when making welds, which lead to defects. Some of them are critical, some are not. In any case, it is important to be able to identify the error in order to then correct it. The most common defects among beginners are unequal seam widths and uneven filling. This happens due to uneven movements of the electrode tip, changes in speed and amplitude of movements. As experience accumulates, these shortcomings become less and less noticeable, and after a while they disappear altogether.
Other errors - when choosing the current strength and arc size - can be determined by the shape of the seam. It is difficult to describe them in words; it is easier to depict them. The photo below shows the main defects in the form - undercuts and uneven filling, and the reasons that caused them are described.
Errors that may occur during welding
Lack of penetration
One of the mistakes that novice welders make: lack of penetration
This defect consists of incomplete filling of the joint of parts. This deficiency must be corrected, as it affects the strength of the connection. Main reasons:
- insufficient welding current;
- high speed;
- insufficient edge preparation (when welding thick metals).
Eliminated by adjusting the current and reducing the arc length. By selecting all the parameters correctly, this phenomenon can be eliminated.
Undercut
This defect is a groove along a seam in the metal. Usually occurs when the arc is too long. The seam becomes wide, the arc temperature is not enough to warm up. The metal around the edges quickly hardens, forming these grooves. It can be “treated” with a shorter arc or by adjusting the current strength upward.
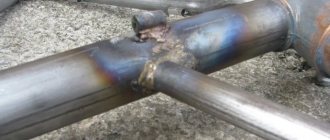
Undercut in corner joint
With an angle or T-joint, an undercut is formed due to the fact that the electrode is more directed towards the vertical plane. Then the metal flows down, a groove is formed again, but for a different reason: too much heating of the vertical part of the seam. Eliminated by reducing the current and/or shortening the arc.
Burn-through
This is a through hole in the weld. Main reasons:
- too high welding current;
- insufficient driving speed;
- There is too much gap between the edges.
This is what a burn through a seam looks like during welding
The correction methods are clear - we try to select the optimal welding mode and speed of the electrode.
Pores and sagging
Pores look like small holes that can be grouped in a chain or scattered across the entire surface of the seam. They are an unacceptable defect, as they significantly reduce the strength of the connection.
Pores appear:
- in case of insufficient protection of the weld pool, excessive amounts of protective gases (poor quality electrodes);
- a draft in the welding zone, which deflects shielding gases and oxygen enters the molten metal;
- in the presence of dirt and rust on the metal;
- insufficient cutting of edges.
Sagging appears when welding with filler wires with incorrectly selected welding modes and parameters. They are numb metal that is not connected to the main part.
Main defects in welds
Cold and hot cracks
Hot cracks appear as the metal cools.
Can be directed along or across the seam. Cold ones appear already on a cold seam in cases where the loads for this type of seam are too high. Cold cracks lead to destruction of the welded joint. These defects can only be cured by re-welding. If there are too many imperfections, the seam is cut off and reapplied. Cold cracks lead to product destruction
Preparation of the workplace
Before starting work, think about what, how and in what order to do so that it is safe for you and others. Before you start work, you need to prepare your workplace:
- Check the completeness of the equipment: welding cables, the condition of the insulation of wires, power supply cables from the network to the inverter, the device itself;
- remove foreign objects;
If a violation of the integrity of the insulation of wires, power supply cables, as well as a violation of the integrity of the connectors for connecting them to the network is detected, you cannot begin work until the faults are eliminated!
- Prepare the parts to be welded;
- check whether there is sufficient ventilation of the workplace;
- check whether the work area is sufficiently illuminated; if there is insufficient natural light through window openings, provide additional lighting by installing lamps;
- prepare a place where you will sit while working;
- prepare to inspect the necessary auxiliary tools;
- check the electric grinder (electrical safety requirements are the same as indicated above);
- prepare the necessary abrasive wheels (grinding, cutting), the wheels must be marked, there should be no cracks or chips on them;
- Check the availability of fire extinguishing means (fire extinguisher, sand) at the workplace.
After completing these routine but mandatory activities, you can begin preparing the parts to be welded.
What errors might there be?
Welders who do not yet know enough how to use welding correctly often make the following mistakes:
- uneven connection line when moving the electrode quickly;
- a large number of burns when driving is slowed down;
- flat seam when the angle of inclination of the rod is violated;
- lack of penetration due to underestimation (or overestimation) of the distance from the tip of the rod and the workpiece.
These are just some of the mistakes that insufficiently experienced workers make. Using an inverter source, you can quickly learn to avoid them.
It will take much more time to learn how to weld thin-sheet workpieces, profiles or water pipes. There is a technique of applying a piece freed from coating to thin workpieces and welding directly over it.
Welding alloyed, stainless and tool alloys, as well as non-ferrous and light metals is much more difficult. They are welded in an environment of inert or low-active gases, such as argon, helium or carbon dioxide. The operating device is an inverter power source, supplemented by a gas supply system through a welding torch. Instead of rod electrodes, welding wire is used, fed into the working area at a constant speed by a special mechanism. Such a device is called a semi-automatic device.
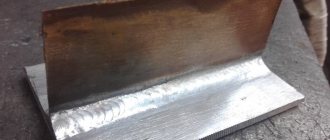
Cleaning and preparing surfaces for welding with an inverter
It is much easier to weld parts, as well as to train, if you properly and properly prepare the metal surface for welding, for this:
- Clean the surfaces to be welded with a grinding machine from rust, paint and other contaminants to bare metal. Be sure to use safety glasses or, even safer, a protective shield when working;
- degrease the surfaces with the product you have;
- Using a grinding machine, remove the edges (chamfers) on the parts to be joined to the required seam depth.
Ceiling seam
Now you can figure out how to weld a ceiling seam using electric welding. It is necessary at a small distance from the surface using a refractory electrode. Because of this, a cap appears at the end that can prevent the material from spreading. As the seam is created, the end of the electrode is evenly removed, and then approaches the arc. As it moves away, it goes out and the metal hardens. To know how to weld a ceiling seam, you should familiarize yourself with the information about what electrodes are used for it. Regardless of the direction of the seam, it should be of small diameter.
When working with ceiling welding, gas bubbles float up at the root of the seam. This could lead to marriage. It is recommended to use it only when it is impossible to complete the bottom seam.
Ceiling connection Source i.ytimg.com
Preparing to weld with an inverter for beginners
Before starting work, it is necessary to fasten your overalls tightly and put on a welding mask; this is mandatory not only for beginners, but also for experienced ones who forget to do this.
Depending on what type of weld you will weld the parts (horizontal seam, ceiling seam, and vertical seam), you need to position and securely fasten the parts at the workplace.
This is achieved in various ways:
- by “tacking” the welded parts to each other and to a massive metal structure (slipway, beam);
- using special clamps;
- using mandrels and conductors.
Now you need to connect the welding machine to the network. Turn on the inverter and set the mode parameters, which are different in each specific case. They depend on the welding position and the thickness of the workpiece.
In this article we present welding and surfacing data for a sheet of metal 10 mm thick.
Welding modes
Selection of electrodes
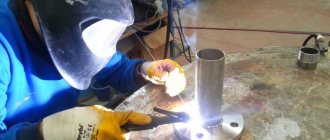
After positioning and securing the parts, proceed to ignite the electric arc between the welding electrode and the parts being connected.
Before ignition, be sure to pull the welding helmet over your eyes to avoid harmful light exposure from the arc to your eyes and metal splashes on your face.
For beginners learning how to weld with an inverter, it is better to practice lighting the arc and applying weld beads not on the parts to be joined, but on a solid sheet 10 mm thick or more. After developing the skills of applying the correct beads, you can begin welding parts.
Basics of electric welding
A weld seam connects two metal pieces into a single unit. To do this, their edges must be heated to the melting temperature. This is done using an electric arc. A zone of molten metal forms between the edges; after cooling, it crystallizes, connecting both parts together.
Kinds
The electric arc can be maintained by either direct or alternating current . The source of alternating current is a welding transformer, which lowers the mains voltage of 220 or 380 volts and accordingly increases the current. Transformers are an obsolete type of welding equipment; they are bulky, weighing several tens and even hundreds of kilograms.
The stability of the electric arc strongly depends on the parameters of the electrical network; in addition, the operation of the welding transformer causes voltage surges in the network. This technique requires the welder to be highly qualified and have solid experience.
It is better to start training with a welding inverter . This source performs double conversion of the input voltage. Thanks to the use of a high-frequency generator, the dimensions of the entry-level inverter apparatus have been brought to the size of a shoe box, and the weight has been reduced to several kilograms. The device is not affected by fluctuations in input voltage and does not affect the power grid. It is undemanding to the welder’s level of training and has subsystems for stabilizing the arc and facilitating its ignition.
Work technology
To excite an electric arc, it is necessary to create a potential difference between the workpiece and the tip of the electrode . The electrode consists of a straight piece of welding wire coated with flux coating. When the electrode is brought to a distance of several millimeters from the workpiece, a discharge passes between them.
This constant discharge is called an electric arc. It generates a large amount of heat, which melts the electrode core and the edges of the workpieces. A zone of molten metal is formed, called a weld pool. As the electrode moves along the weld line, the weld pool moves along with the arc. The molten metal, as it cools, crystallizes and forms a weld that connects the two workpieces together.
The electrode coating melts and evaporates, and forms a gas cloud that protects the weld pool from contact with air and the formation of oxides.
A slag layer appears on the surface of the cooling weld. This is waste from burning the coating. After cooling, this layer is removed by mechanical treatment.
How to strike an arc
What creates an arc? An arc is formed between the parts being welded and the electrode, which is supplied with voltage from the welding machine (inverter).
The second cable from the device (“ground”) is fixed to a metal plate on which welding work will take place or directly to one of the parts. A voltage of about 80 V is created between the holder and the ground of the inverter.
First, touching the metal, we close the circuit. A strong current arises in the contact area, heating the contact area. When the electrode is separated from the metal, the voltage between them is quickly restored, since the heated areas emit electrons.
Electrons are accelerated by voltage and strike neutral atoms, knocking out electrons from them and turning them into ions. As a result, an ionized (plasma) channel with a high temperature appears between the metal and the welding electrode.
Current setting
The current strength, as mentioned earlier, on the device (inverter) is set according to the diameter of the electrode; usually the device has a corresponding table. Take the average value from the recommended range.
Over time, you will learn to determine whether you need more or less current when performing specific jobs. For practice, it is better to choose large pieces of metal.
Below are video lessons on how to weld metal for a beginner in welding. We recommend that you read them in detail. It provides answers to many of your questions, for example: “How to light an arc correctly?”
Arc ignition
To light the arc correctly, we place it above the future seam and tilt it 15-45° towards the seam where the process will take place - it’s better to learn this way. There are two ways to ignite an arc in manual arc welding:
- “peck” - the electrode hits the metal lightly and bounces off, like a bird pecking;
- striking metal.
Sparks fly, we slightly withdraw the electrode - our arc burns!
How to hold the arc correctly when welding
To maintain a normal arc, the distance from the electrode to the metal surface should not be less than 0.5 and more than 1.5 mm. During the execution process, the electrode material is consumed. It must be constantly moved closer to the melt zone.
Maintaining the correct combination of the speed of the welding process, the distance from the electrode to the metal, and the angle of inclination at which a stable powerful arc burns is the skill of an electric welder.
This is the skill of a professional, this is what you must learn. The video will help you improve your skills and understand how to hold an arc.
At first glance, it seems like there is so much to control, everything is so complicated. This is only at first glance. Just start doing it. When you make the first seams, everything will become clear even if you learn to weld metal from scratch. You will definitely succeed!
Preparing the tools
Before electric welding, you need to prepare all the tools and uniforms for protection:
- Welding machine and electrodes for it. We recommend stocking up on enough electrodes for practice. The proverb “the first pancake is lumpy” in the field of welding training works without exception;
- Protection: welding mask, protective clothing and gloves made of thick materials. Protection should not be neglected during welding work. It's a matter of health and safety!
- Auxiliary tools - a hammer and a metal brush - to remove weld slag;
- Object for training – metal elements;
- Bucket with water. Literally, just in case of fire.
The choice of electrodes is made in accordance with the thickness of the metal being welded, and the setting of the current depends on the electrode. 1 mm of electrode takes about 30-40 A, it is important not to exceed these values, otherwise the arc will not cook, but cut metal.
How to properly guide the electrode when welding metal.
If we move the electrode evenly, we get a “thread” seam. It may be enough to weld the metal through its entire thickness. If the products being welded are thick, then to warm them up, various manipulations must be done: from reciprocating movements in a spiral to moving in arcs across the seam.
As a result, we linger longer over each section of the seam, warming up and filling it better. There are single-pass welds (usually on metal up to 3 mm thick) and multi-pass welds, when several passes are required to fill the entire volume of the weld.
Below are video lessons: welding metal with an inverter for beginners, how to weld with inverter welding and other useful things.
Induction heater operating diagram
The inductor type heater contains the following elements.
- Current generator. Thanks to this module, alternating current from the household electrical network is converted into high-frequency current.
- Inductor. Made from copper wire twisted into a coil to create a magnetic field.
- A heating element. It is a metal pipe placed inside the inductor.
All of the above elements, interacting with each other, work according to the following principle. The high-frequency current generated by the generator is supplied to an inductor coil made of copper conductor. The high frequency current is converted by the inductor into an electromagnetic field. Next, the metal pipe located inside the inductor heats up due to the effect of vortex flows arising in the coil. The coolant (water) passing through the heater picks up thermal energy and transfers it to the heating system. The coolant also acts as a cooler for the heating element, which extends the “life” of the heating boiler.
Below is an electrical diagram of an induction heater.
The following photo shows how an induction metal heater works.
Important! If you touch two turns of the inductor with a heated part, an interturn short circuit will occur, which will instantly burn out the transistors.
Welding lesson. How to weld metal with an inverter.
As soon as the arc starts to ignite. Let's start training with the following exercises.
Down position
Circular movements on a thick horizontal plate, pass after pass, while the angle of inclination is 45°, looking back. You need to pay attention when the electrode runs out. You should go back a little on the seam to avoid creating a crater. Light the arc in the center of the ring, go back a little and continue the circular movement.
Below is a video on how to learn how to properly weld with a welding inverter.
Vertical position
The “vertical” seam is first worked on a plate set at an angle of 45°. We start zigzag movements from the bottom and move up. The distance to the electrode is approximately 2 mm, the angle of inclination is backward. At the top of the plate, we stop the process and go through the zigzag again to deposit additional metal on the edge.
Next - video lessons on how to learn manual arc welding of metal for beginners.
A true vertical seam on a vertically mounted plate. The same zigzag movements with the electrode. The exercise is difficult, and usually you can’t do it right away.
Horizontal seam
Horizontal weld on a vertically mounted plate. Perform circular oscillatory movements and cook in a backward direction. The first roller is at the junction with the horizontal plate, then up, roller after roller. To get a better “horizontal”, you can first draw it with chalk.
Vertical seam with a tear.
Vertical pull-off weld, the initial position of the plate is at an angle of 45°. We light an arc from the bottom of the plate, left, down, right, up, left, back to the middle - we draw such a closed oval. We tear off the electrode, move up, make an oval again, tear off, up. So until the end of the plate.
Vertical pull-out weld on the plate.
The same oval oscillatory movements, when performing which, if possible, it is better to rest your hand on a table or something. The final “outer” seam is the most difficult; the metal can overheat and leak. Therefore, we take a longer pause after the takeoff. Of course, these exercises are not all that exist for novice welders. On our website, in addition to them, you can familiarize yourself with the following materials:
- electric welder manual welding training program;
- how to learn how to cook using inverter welding, tips for beginners and others.
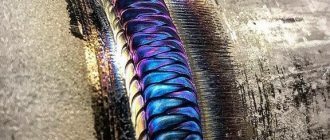
A good criterion for the quality of a weld is its beauty. If the weld is beautiful, then there is a high probability that there are no voids inside it and the weld is filled evenly.
Useful video
Watch the video, which shows how to weld a ceiling seam without tearing off with UONI electrodes for novice welders:
This video demonstrates the technique of welding a ceiling seam:
Conclusion
So, ceiling welding is a rather complex process that requires a certain skill and experience. However, even a beginner can cope with it if we are talking about a not too labor-intensive operation.
It’s better to start small, connecting simple metal plates and parts. If we are talking about welding pipes under pressure, then it is better to entrust this work to specialists. Without appropriate experience, it is difficult to achieve the required result, and the risk of injury increases significantly.
M. Gladwell's “10,000 hours” rule
Of course, you won’t succeed in everything right away. Take it calmly. When learning to weld metal, it is recommended to follow the 10,000 hour rule developed by Malcolm Gladwell. To achieve a level of unsurpassed skill, you need to devote that much time to your craft. Yes, for most of us this is very far away. Here are the intermediate steps:
- one thousand hours to master level;
- one hundred hours to the professional level;
- and at least ten hours to master the basics - they look quite realistic!
You are at the very beginning of your journey. Train, study, and with every hour you spend studying, your skills in metal welding will become stronger. Good luck!
Step-by-step preparation of boiled beef tongue, recipe with photo:
1. Before cooking, rinse your tongue thoroughly with running cold water and cut off any remaining dried blood. Some housewives immediately clean it of film. However, this should not be done, because You will cut off the tasty pulp along with the film.
2. Fill your tongue with clean drinking water and leave it to soak for 30 minutes to make it more tender and soft.
3. Then drain the water, fill the product with clean water and put it on the stove to cook. After boiling, remove all film from the surface of the broth.
4. Continue cooking the offal over low heat, covered, for 15 minutes.
5. Then remove it from the pan and rinse thoroughly with running water.
6. Return the tongue to the clean pan.
7. Change the water, fill it with fresh water, and cook until done. Changing the water will remove harmful substances with an unpleasant odor.
8. After 1.5 hours, season your tongue with salt and pepper, add bay leaf, allspice and clove buds. You can add carrots, celery or parsley root, onions, dill and parsley to the broth. The spices of thyme, basil, and Italian herbs diversify the taste of the delicious by-product.
Continue cooking beef tongue until tender and cooked through. The total cooking time is 2-4 hours. It depends on the size of the offal. If the beef tongue weighs 1 kg, cook it for 2 hours, if its weight is more than 1 kg, it will take 3 hours of cooking.
During cooking, do not allow it to boil strongly, the water should only bubble a little. Also, periodically remove the foam with a slotted spoon and monitor the water level, and if it boils over, add it. But add not just water, but boiling water so as not to reduce the overall temperature of the broth.
9. Using a slotted spoon, remove the finished tongue from the broth and keep it under cold water for several minutes.
10. Return the peeled tongue without skin back to the salty broth with spices and cook for another half hour. This meat will give aroma and a delicate texture that melts in your mouth.
Continuing to keep it under cold water, remove the skin. If the tongue is completely ready, then it will be easy to clean. If it doesn't clean well, return it to the broth and continue cooking for another half hour. Then repeat the skinning process.
11. You can cut the finished tongue into thin slices, like regular sausage, starting from the tip, and serve as slices. Make a salad out of it, it goes well with potatoes, avocados, cucumbers, mushrooms, cheese, green peas, carrots, garlic, eggs, herbs, mayonnaise... In any meat salad recipe, you can replace meat with tongue.
12. If you cook the tongue over low heat, the broth will turn out clear. Then it can be used to make soup or stir fry. If the broth turns out cloudy, unsightly and has an unpleasant appearance, strain it several times through a fine sieve or double-folded cheesecloth.