Basic methods of forging metal
Hot forging
As already mentioned, hot forging is possible if the metal is heated to temperatures where it changes its strength characteristics and becomes plastic, which makes it possible to process it relatively easily using impact tools and other devices.
The hot processing method involves the use of special metal processing technologies, which make it possible to make the finished products more diverse. But besides the advantages, there are also some disadvantages of the method. These include the fact that heating the metal requires the presence of a forge or muffle furnace. Let us note that such equipment, in addition to its price, will be expensive in the future when used, since you will need to pay for its maintenance and fuel.
Also, using an open source of fire is far from a safe activity and requires craftsmen to adhere to increased safety measures. In addition, hot forging requires that the craftsman have certain knowledge and skills to understand the temperature parameters of different types of metal.
Hand forged
Hand forging of metal must be done in special workshops that are equipped with everything necessary.
The list of equipment includes the following equipment:
- Air exhaust system.
- Muffle furnace or forge.
Cold forging
Most cold forging work is performed on equipment designed according to special drawings. You can list a specific list of equipment that should be used in cold metal processing. Typically, such equipment can show its effectiveness when performing a large volume of work for the architectural design of structures and buildings.
Among the equipment that is used to produce products using the cold forging method, we name the following:
- Torsion bar, with it you can twist the rod around its own axis.
- Wave, wavy parts are made on it.
There are only a dozen units in the equipment park for cold forging. Some of them can work from the operator's muscular system, while others work from the drive. Some craftsmen make similar equipment themselves, and also create modifications.
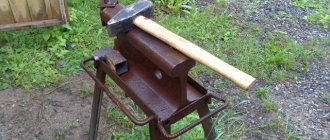
Anvil elements
A blacksmith's anvil is a mandatory attribute of his workshop. With its help, a number of technological operations with metal are performed. This tool is used for forging, giving metal the required shape, hardening, etc.
This item is made of durable alloy steel, and its weight can exceed 300 kilograms, especially if we are talking about a stationary forging anvil.
It must be stable and durable, as it bears significant loads. Hitting the anvil with a hammer produces a smooth, clear sound. A dull ringing indicates the presence of cracks or voids in the instrument.
As noted earlier, there are one-horned and two-horned models. Why does the anvil have this shape? The point is this: the horn allows you to make bends with the necessary curvature, and the flat surface serves to do the main work.
Anvil mounting diagram.
The main elements of the device include:
- horn;
- shank;
- recess for forming holes;
- holes for installing tools and other forging equipment on the anvil;
- face;
- shoe;
- platform for cutting metal.
The protrusion on the side of the instrument is called a horn. Its shape varies depending on its purpose. In one-horned models it is cone-shaped. Used in forming metal bends and rolling out rounded parts.
The second horn is used in bending products at angles less than normal and is made in the shape of a truncated cone.
A face is a flat surface. It is on it that the main operations are performed.
The anvil should absorb the impulse from a blow to the front part. For these purposes, the device is installed on a durable wooden or sand cushion.
It is important that the face is positioned strictly horizontally. This will allow you to do the work with the highest quality. Many people are interested in the question of how to install an anvil in height
The height of the anvil from the floor is correct if the hammer strikes the casing horizontally
Many people are interested in the question of how to set the anvil in height. The height of the anvil from the floor is correct if the hammer strikes the casing horizontally
In addition, it is important that the blacksmith does not have to make additional efforts to adjust the blow, bend down or lift the tool too high
The most important blacksmith tool
Anvils are the most important tool that allows you to perform various forging works associated with cold and hot forging of metal. This element of the workshop is quite specific, but it is simply irreplaceable in the case of professional production of forged products.
Such a tool may vary depending on the type of problem being solved. It can have a variety of structural elements, sizes and shapes. There are mainly two types of forging anvils: one-horned and two-horned.
The first version of the device is in greatest demand. The horn is used in shaping the bends of metal products in figured forging.
What does the anvil consist of?
The sides allow you to make bends at right angles. The surface of the device itself is smooth and even, and also ground and hardened. This is the working part.
It contains two square and round holes, which are used when performing additional operations with products and when supporting the tool.
Based on weight, anvils are divided into small, medium and large. The best option is the heaviest models weighing 95 kg or more. Such devices allow you to work with large workpieces.
At home, such a tool is not one of the most necessary. However, its presence allows you to easily align various products, such as nails, wire or sheet metal.
Naturally, use for domestic purposes does not require the mandatory purchase of such a tool. However, if necessary, a homemade anvil can be made. It will easily allow you to perform all the simplest functions that are required of it.
Of course, it is extremely difficult to make a high-quality figured product using a homemade version. In this case, it is better to pay attention to professional models. But for all other needs, a hand tool will be the best choice.
Video lessons
The item is a solid block type that has physics. Explosion resistance is 6000, and there is no luminosity. This item is renewable, transparent, and foldable. Many players, unfortunately, do not know how to make an anvil in Minecraft and repair objects on it. However, this is not all the capabilities of this object.
With the help of an anvil, you can not only repair an item, but also slightly change its purpose. Two enchanted artifacts placed there will accumulate enchantments. This will only happen if they do not contradict each other. Therefore, an anvil is different from a simple workbench or implement.
How to make an anvil from a rail
Homemade anvil made from a piece of rail. How to make it yourself with your own hands.
I had a need for a small anvil. Sometimes I make steel flowers and things like that, so I used really weird methods and banged on all the metal I found. Finally I decided to make a good tool for this. This anvil is mainly for this use. Of course, it will have many other uses.
- Material – 200mm (8”) long piece of railway that I found a while ago.
- Tools:
- 40 and 80 grit discs (use a little of both, can use more).
- For the stand: axe, drill, hammer.
I used a piece of log as a stand. 2mm thick sheet metal, screws and two 150mm long pieces from the rack. L-profiles 30 x 20 mm are coated with a layer of linseed oil. Angle grinder. (850 W 125 mm). 2mm cutting wheel (use 2 + old scraps first) 8mm sanding wheel. steel brush (wheel).
Step 1: Video
The video shows the process. More photos starting from step 2.
DIY electronics in a Chinese store.
Step 2: Rough Shaping...
I had the shape for the anvil in my head, I had a pretty good idea of what shapes I wanted so I came up with it following that idea.
Rough grinding with a rough grinding wheel and when the shape is close to the desired one. Smoothing. Since this anvil is primarily designed to create round or grooved objects, I won't need a very long "sharp edge". So I did it in the back. Sand and use a right angle to check when the surface is straight.
Then remove the rust with a steel brush. (this can be done first, personally I leave the rust in place for as long as possible because it gives a little protection to the surface).
Step 4: Rack - Base
For the stand I used a piece of log.
It's a pine tree, I fell it last year, it wasn't quite dry, but it was dry enough. I cleaned the log and smoothed the ends using an angle grinder with a hinged disc. I then cut the "clamps" out of 2mm thick steel sheet, drilled holes in it and attached the clamps to the log with screws. I cut off the excess and scored a smooth seam.
Step 5: Connecting the Anvil to the Stand
To connect the anvil to the stand I used two 150mm long pieces of 20 x 30mm L-profile. I copied the shape from the anvil, made the cuts and sanded it down using an angle grinder. I drilled holes and screwed the “holders” to the log using long screws. Then I drove the "fingers" into the anvil. The result was very strong. Finally we greased the stand with linseed oil.
Finished! Source
How to make an anvil
When it comes to a forge, the imagination immediately draws a picture: two broad-shouldered good fellows with a handbrake and a sledgehammer, in the background there is a hot forge, and in the foreground, in the center of the workshop, there is an anvil. She is a symbol of blacksmithing.
Purpose of the anvil
All manual and forging operations are performed on the anvil:
- forging;
- hardening;
- giving the workpiece the required shape, etc.
There is no way to do without an anvil. But store prices are steep and you have to think: how to make an anvil with your own hands. There are many recommendations on the Internet, we will offer ours too.
The design of a homemade anvil
It should be taken into account that the anvil is subjected to high shock loads and high temperatures. Therefore, it must have increased stability and mechanical strength. Its weight can reach several tens of kilograms. The professional anvil is made of 35L alloy steel.
To make a homemade anvil, scraps of crane rails are often used.
Rail anvil
On the “face” (this is the flat surface of the anvil on which the main operations of flat forging are carried out), an alloy steel plate - a platband - is installed by welding.
Double anvil
For ease of use, the anvil should have the following structural elements:
- horn. This is the name of the cone-shaped protrusion on its side. The main purpose is rolling and bending of workpieces. Often the anvil has two horns;
- tail. This is a rectangular protrusion on the side of the anvil opposite the horn. It is designed for bending workpieces at right angles;
- rectangular socket for backing tool and shperak.
Strictly speaking, a shperak is an all-metal coin with a double-sided tip and a flow. It is used as a mini-anvil for decorative and artistic forging; Mini anvil - round hole. For restraining the workpiece during bending.
You may not need all these design elements. So, choose the ones you need, and, using the plumbing tools available to you, create an anvil.
For example, this one.
For a video of a primitive homemade anvil made from a piece of rail, see this article.
Base for a homemade anvil
A massive base is used to compensate for the impact energy. One of the following designs is used:
- the anvil is mounted on a solid wooden base using ties (bolts, studs, staples, etc.) and placed in a barrel of sand dug into the ground.
Scheme of installing an anvil in a barrel - the anvil is installed with ties on a pole, at least half a meter of which must be buried in the ground. The upper part of the pillar must be tightened with steel hoops so that it does not break when struck. For more information about the base for the anvil, see here.
Anvil Location
From an ergonomic point of view, it is most convenient to place the anvil in the central part of the forge and not far from the forge. This will allow the workpieces to be delivered from the forge to the anvil along the shortest possible path. There should be containers with coolants nearby.
Where to buy an anvil
;
Forging anvil - “KERN-ANVIL”
The company offers a forging anvil “KERN ANVIL” worth 9,000 rubles. Contacts of this and other companies selling anvils can be found on this page.
Types and types of anvils
Types of anvils, their shape and weight can vary significantly.
They are divided into several categories according to the above criteria, namely:
- hornless – massive instruments with a large weight, the value of which is in the range of 96 – 210 kg;
- one-horned - have only one cone-shaped horn, their weight varies from 70 to 210 kg;
- two-horned anvil - a device weighing from 100 to 270 kg;
- single-horned cantilever;
- shperaks are mini anvils weighing up to thirty kilograms.
The choice of anvil for hand forging is made based on the work that is planned to be performed. Heavier models are perfect for working with large and massive workpieces. Simple, lighter options with one horn are a good choice when working with small-sized structures.
Lightweight models are suitable for small jobs at home. If you need to make any homemade product, there is no better option.
An important criterion is the type of work performed. Here you should decide which option is better: a two-horned or one-horned model. In addition, anvils may have additional elements, for example, a vice, which allows you to perform work alone.
It is worth paying attention to the presence of holes used to place hammers and sledgehammers. Shperaks, small in size and weight, are widely used in jewelry. In this area, products do not require serious impact processing, so they need an appropriate tool
In this area, products do not require serious impact processing, so they need an appropriate tool
Shperaks, small in size and weight, are widely used in jewelry. In this area, products do not require serious impact processing, so they need an appropriate tool.
Drawing of an anvil for making it yourself.
Quite often, devices for performing jewelry work are made to order. They have various functional elements necessary to solve certain problems.
Sometimes one anvil may not be enough. In large workshops, it is advisable to have two options for devices: one stationary and the other portable.
Don't forget about proper installation. The quality of work directly depends on this
Despite everything, this device is quite heavy, its installation should be given due attention
Falling and tipping over are common problems caused by improper installation. In addition, the stand must fulfill its direct functions: in addition to securely fixing the device, it must be able to absorb hammer blows.
A wooden block is the most commonly used type of stand. Its diameter usually ranges from 500 to 600 mm. Hard woods are used. These include oak, birch, ash, etc.
The installation height is determined by the height of the master. To prevent the wooden stand from creating additional unnecessary vibrations, it is buried in a hole more than half a meter deep. The bottom of the pit is compacted with a sand lining.
It is important that the chair is installed horizontally. This parameter can be easily checked using a level. If buying an anvil is not affordable, then it can be replaced with a homemade device
It can be made, for example, from a rail, channel or I-beam
If buying an anvil is not affordable, then you can replace it with a homemade device. It can be made, for example, from a rail, channel or I-beam.
Such devices, made with your own hands, will last for decades. However, you should not think that they can fully replace a real, professional instrument. Hand anvils will not produce the same quality work as production models.
In this case, it is important to understand: the factory version, produced using casting technology, will be significantly better than homemade ones. Its design contains all the necessary components with a hardened surface. In addition, in this model the horn has the correct shape, necessary, for example, in skillful figured forging
The factory model will last quite a long time
In addition, in this model the horn has the correct shape, necessary, for example, in skillful figured forging. The factory model will last quite a long time.
How to choose a blacksmith anvil?
According to their design, anvils come in the following types:
- Hornless
- One-horned
- Bicorns
- Single-horned console
- Shperak
Hornless anvils GOST 11396-75 are a massive rectangular anvil weighing from 96 to 200 kg.
Single-horned anvils GOST 11397-75 have a cone-shaped ledge on one side, which is called a horn. It is used for bending and straightening rings, bending metal rods of various sections, profiles or metal strips. The opposite side with a flat surface is used for right angle bending. The mass of one-horned anvils is from 70 to 210 kg.
Double-horned anvils GOST 11398-75 are the most common type; this form has the greatest functionality and convenience. They have 2 conical ledges on opposite sides, one is a horn, the other is more pyramidal in shape, it is called the tail. The tail is used to straighten closed workpieces or bend them at right angles. The mass of two-horned anvils is 100-270 kg.
Single-horned cantilever anvils GOST 11399-75 weighing up to 95 kg.
Shperaks GOST 11400-75 are mini-anvils weighing up to 30 kg. They are used to perform small metal work in the workshop.
The top of the anvil is called the clypeus or face. To perform high-quality work, it must be positioned strictly horizontally, perpendicular to the sidewalls. The top and side surfaces must not have damage, chips, dents or cracks, as this can lead to defects in the metal workpieces. The surface must be sanded until completely smooth.
On the front side of the anvil there is a special through hole for installing a tool or anvil-sperak. The classic type also has a second, round hole located near the horn; it is used for punching holes in metal sheets or plates and securing the wire when curling it.
The lower part of the anvil is called the base or shoe.
To muffle the sounds from work, the anvil is placed on a rubber pad about 1 cm thick.
Often, special oak or birch blanks are used for installation, with which you can adjust the height convenient for work. It is calculated by the height of the master's thumb with his hand down.
The choice of anvil depends on the work that will be performed on it. For small jobs, a mini anvil that can be placed on a table is suitable. To work with large and massive workpieces, you will need a professional anvil.
We recommend paying attention to the two-horned anvils of the American manufacturer Ridgid , which are produced at the oldest German plant PEDDINGHAUS. These are high quality forged steel anvils with a perfectly ground top surface and induction hardening. When used, these anvils do not lose their smooth surface for as long as possible.
The manufacturer offers a choice of three options:
- No. 5 – weight: 35 kg, base size: 170×195 mm
- No. 9 – weight: 75 kg, base size: 235×275 mm
- No. 12 – weight: 125 kg, base size: 270 x 345 mm
How to use an anvil in Minecraft?
An anvil is an object for repairing and changing the name of things, as well as for summing the enchantments of two objects. In addition, an anvil can be used to transfer enchantments from an enchanted book to an object.
To create an anvil, you need iron blocks and iron ingots. The workbench contains three iron blocks in the top row, one ingot in the middle, and 3 ingots in the bottom row. After this, the anvil is installed on the surface.
To repair a tool, you need to click on the anvil, which will open an interface with three cells. In the first two you need to put two items of the same name. In the third, one item will appear 7% stronger than the sum of the original strengths. For example, when combining two pickaxes with strength 50% and 20%, we will get one pickaxe with strength 77%. The second way is to place the armor or tool in one cell, and the material in another (rational when repairing armor).
When combining two items with consistent enchantments, you can obtain an enchantment level that is 1 higher than the original, as well as the summation of two different enchantments. The amount of experience required to cast an enchantment increases with the strength of the enchantment and with repeated repairs. If you want to give your horse a courageous name, it will cost 5 experience points. An anvil refers to destructible objects that are subject to wear and tear through use.
Video guide:
Anvil
The anvil is the base necessary for blacksmithing. But this device can also be used to perform other activities, for example, cutting or bending metal material. I choose an anvil depending on what types of work are supposed to be performed with its help. So, for example, in everyday life, a small and compact anvil that is installed on a table may be sufficient. A workshop or forge will require a real professional anvil, the weight of which can exceed 300 kg.
The anvil has two ledges at the ends. On one side of the anvil there is a conical ledge, which is called a horn, on the other side of the anvil there is a pyramidal ledge, it is called a tail. For a master engaged in artistic forging, it is best to purchase a real two-horned anvil, which has both of these ledges. The one-horned anvil lacks such an element as a tail. The upper flat surface of the anvil, the base on which all work is performed, is called the face of the anvil. To perform the work efficiently, the face of the anvil must be positioned strictly horizontally, perpendicular to the sides. The edges of the anvil should be sharp enough without damage, nicks or chips. Often the strength of the base, namely the face of the anvil, is increased by coating with high-strength steel. For chopping workpieces, a small area of unhardened steel can be created on the anvil; it is usually located between the conical horn and the face. The anvil may have holes in the horn area, which can be used to punch holes of any diameter in metal sheets or plates. A place in the form of a square hole can be equipped on the tail of the anvil, intended for placing a backing tool or placing a shperak anvil. The size of such a platform on a large anvil can be about 35x35 cm. The lower part of the anvil, with which it rests on the floor, is called a shoe. To muffle sounds, the anvil is usually mounted on a rubber gasket.
Each part of the anvil has important functional significance. The majority of the work, including the forging itself, is carried out on the face of the anvil. The horn is designed for bending metal rods of various sections, strips or profiles at an acute angle. Here, on a large anvil, workpieces are welded or rolled out. Bending and other auxiliary work are carried out in the rib area. The tail helps straighten closed workpieces and bend them at right angles. If the anvil does not have a tail, bending at right angles can also be done on the edge.
For the manufacture of various types of anvils, high-strength alloy steel is used, usually grade 45L. The surface of the anvil, that is, its face, is processed to achieve a certain hardness and ground to absolute smoothness. For small jobs, so-called shepar anvils or mini anvils are used. They differ from a professional anvil only in their size and weight. Sheparks usually weigh about 4 kg. They are equipped with a special quadrangular base, which should be sized to fit the opening of large anvils. Instead of a four-sided base, a small anvil may be equipped with a pointed extension, which is used to drive the anvil into the ground or wooden base to provide stability. Shepard anvils are made in a variety of shapes and can be used for a wide range of jobs in the workshop.
Anvil at ProfTehSnab
Step-by-step instructions for making an anvil from a rail
Prepare the work site. Place a piece of rail on the table, mark it with a marker and ruler as follows:
- Measure 40% of the total length of the rails, draw a line;
- Measure half the width of the rail, make a mark;
- Connect the lines and the mark so that you form a triangle or the so-called “anvil horn” on the rail site.
Secure the future forging anvil in a metal vice. Turn on the grinder and cut the horn according to the marking lines.
Important! When working with power tools, be extremely careful. The metal vice must be securely fastened to the table surface
The work table should not be loose. To protect your own health, wear a welding mask, protective apron and gloves.
After making deep cuts with a grinder, take a hammer. It will help you speed up the process: use it to beat off the left and right edges of the metal triangle. Be prepared for the edges to be uneven - there is nothing wrong with that, we will process them later.
Take the rail out of the vice, turn it on its side so that the broken triangle is “looking” at you. Use a marker to mark lines leading from the edge of the rail to the inner hole (closest to you). Beat them off with a hammer.
Stepping back an inch from each raw “back” end, draw lines with a marker. Your task is to mark the “tail” of the anvil. Use a grinder to make cuts on the metal, then beat the metal into pieces with a hammer. The "tail" is the functional part of the tool. But since we are creating a home, and not a professional, anvil, whether to carry it out or not is only your desire.
Horns
A blacksmith’s “work table,” depending on the type, may have one or two horns; their number determines the shape of the product. If only one is present, it has a cone-shaped, rounded configuration. In the case of two horns, one is rounded, and the second may have a pyramidal shape (more often called the tail).
The purpose of such an element is to perform the function of a mandrel on which bending of strips or rods is performed, as well as rolling or welding. If there is a second pyramidal one, then bending and straightening of blanks is carried out on it, or products of other complex shapes are forged.
Some types of anvils between the face and the horn have an unhardened part of the platform; metal is cut on it with chisels.
There is often a round hole near the horn and a square hole in the tail. A circle-shaped section (15-25 millimeters in diameter) is used for stitching workpieces (instead of drilling), a square section is a kind of installation point for additional devices (lowers). There may also be two round holes with different diameters (depending on the type of product).
Artistic forging > Articles> Artistic forging. Tools and devices for forgingThe tools that a blacksmith has to use are divided according to their purpose into supporting, impact, clamping, backing, gripping, measuring and auxiliary.
Supporting tools: main anvils, small anvils for small items and shperaks.
Double anvil
| Rice. 32 Two-horned anvil: 1 - face of the anvil; 2 - square hole; 3 - tail; 4 — staples; 5 — stand; 6 — paws; 7 - conical horn; 8 - unhardened platform; 9 - round holes |
Modern anvils are made from 45L steel by casting. The most convenient and versatile to use is the two-horned anvil (Fig. 32). The upper horizontal plane 1 is called the face, or platband, on which all basic forging work is performed. The surface of the face is heat treated to a hardness of 45-50 HRC and ground. The side edges of the anvil should form an angle of 90° with the front surface, and the edge should be quite sharp and free of chips and nicks. Bending of products, distribution of material, and other auxiliary operations are carried out on the edge.
Conical horn 7 is designed for bending strips and rods, as well as rolling and welding ring blanks. In some types of anvils there is an intermediate rectangular platform 8 between the horn and the face, which is not hardened and is intended for chopping workpieces on it.
On the opposite side of the horn there is a tail 3, which is a cantilever rectangular pyramid; it is intended for bending and straightening closed rectangular workpieces. In the tail there is a square hole 2 measuring 35x35 mm, which is used for installing a backing tool (lowers) and other devices. Near the conical horn there is a round hole D15 mm. In some types of anvils, two round holes of different diameters are made. At the bottom of the anvil there are paws 6, for which it is attached with special brackets 4 to a block of wood - a chair 5 or a metal stand. A massive wooden block or stump from oak, maple or birch with a diameter of 500-600 mm is usually used as a chair. You can also assemble a chair from individual parts, tightening them with iron hoops. When it is not possible to select the required block of wood, you can use a metal or wooden barrel, into which sand, clay, earth is filled, compacted well, and a wooden spacer is placed on top and an anvil is installed on it.
Great attention should be paid to the installation of the chair; it should stand upright and not vibrate during work. The chair is buried to a depth of at least 0.5 m, and the earth around it is well compacted. The upper end of the chair can be covered with roofing iron, which will protect it from burning when it gets in contact with scale or hot stumps of the workpiece. The height of the chair depends on the height of the blacksmith and is 600-700 mm from the floor level, or more precisely, it should reach the tips of the slightly bent fingers of a standing blacksmith.
When a good anvil is struck lightly, a high, clear sound is heard, and the hammer bounces off with a ringing sound when struck.
Anvil-speraks
| Rice. 33 Shperaks: 1 - inserted into the anvil (low); 2 - inserted into the ground (high) |
For small jobs, blacksmiths use anvils of small size and weight or special anvils-speraks (Fig. 33), which are installed with a tetrahedral shank in the square hole of the main anvil. Some shperaks have an elongated vertical post and are driven with a pointed end into a wooden block or the ground. Shperaks are made by forging from carbon steel 45-50, followed by hardening of the working surface to a hardness of 40-47 HRC. Percussion instrument
Percussion instruments include hammers: handbrake hammers, war hammers and sledgehammers. The handbrake is the main tool of a blacksmith; he uses it to forge small products. A blacksmith working without assistants was called “one-armed,” forging with one hand. Handbrake have a mass of 0.5-2 kg, but there are also up to 4-5 kg (Fig. 34). To control the forging process when working with hammers, blacksmiths used hand-operated handles with a light head and a spherical tail. For forging products, blacksmiths use handbrake handles with a heavy head with a wedge-shaped longitudinal and transverse back. This form is quite universal, since in addition to working with the head, blacksmiths also work with the back - accelerating the metal. Handbrake heads are forged from carbon and alloy steels (steels 45,50, 40X), the head and tail are heat treated to a hardness of 48-52 HRC.
The handles are made from thin-layered wood: hornbeam, dogwood, maple, birch, ash, rowan, 350-600 mm long. The handle should be free of cracks and burrs and fit comfortably in the hand.
| Rice. 34 Handbrake and hammers: 1 - handbrake with longitudinal rear; 2 — handbrake with transverse rear; 3 — handbrake with a ball-shaped rear end; 4 — hammer with a one-sided wedge-shaped back; 5 — hammer with a transverse double-sided back; 6 — hammer with a longitudinal double-sided back; 7 - sledgehammer; 8 - closed wedge |
War hammers are heavy two-handed hammers weighing 10-12 kg. Combat hammer heads come in three types: with one-sided back, with double-sided longitudinal and transverse back. The hammer head is intended for the main forging, and the upper wedge-shaped tail is for accelerating the metal along and across the workpiece. The hammer head is forged from steel 45, 50, 40X, U7, the hardness of the head and back is 48-52 HRC to a depth of 20-30 mm. The hammer handle is made from the same types of wood as the handbrake; the length of the handle is selected depending on the height of the hammer and the weight of the hammer head and is equal to 70-95 cm.
The work of a blacksmith with hammers (one or two) is carried out when forging large products and the blacksmith is called “two-handed” or “three-handed”.
Sledgehammer - a heavy hammer up to 16 kg with flat heads is used for heavy forging work, where a large impact force is required. Percussion instruments must be as reliable as possible. Particular attention is paid to attaching the handle to the head. The hole in the hammer head - the insertion into which the handle is inserted - must be elliptical in shape and have a slope from the middle to the side edges of 1:10. This ensures its reliable fastening after driving the wedge and makes it easier to fit the head onto the handle. Practice has shown that the most reliable are metal “jarred” wedges, which enter to a depth equal to 2/3 of the width of the hammer head; The wedge should be driven in obliquely to the vertical axis. This allows the wood to expand in two planes.
Strikes with war hammers are divided into three types: elbow or light, shoulder or medium, hinged - strong, when the hammer describes a full circle in the air. Hammers use such strong overhead blows when forging large masses of metal and forge welding massive parts.
Backing tools
(Fig. 35)
The backing tool is divided into three groups:
I. A tool that is installed under a hammer or handbrake;
II. Tool mounted on an anvil;
III. Paired instrument.
The backing tool includes a massive steel plate measuring 300x400 mm and 150-200 mm high, on the four side faces of which there are recesses of various shapes and heights: semicircular, triangular, etc. This plate is used when forging various shaped elements instead of backing dies. On the end surfaces of this plate there are through round, square and shaped holes of various sizes, which are used for punching various holes on products. In large forges where garden fences, balcony gratings and other large products are made, there should be a large steel or cast iron plate - usually 50-200 mm thick and 1.5 × 3 m in plan with a flat, smooth surface. It is installed on special metal trestles in the center of the forge. This plate must have through holes for installing pins, bolts and other various devices for shaped bending of profiles, assembly of structures and other technological operations.
| Rice. 35. Backing tools: 1 - rolling out, 2 - trowel with a cylindrical surface, 3 - trowel with a square surface; 4 — smoother with one sided rectangular surface, 5 — smoother with an enlarged surface, 6 — punch; 7— shaped chisel; 8 - chisel for longitudinal cutting, 9 - chisel for transverse cutting; 10 - conical piercing, 11 - cylindrical piercing; 12 — trace of working surfaces of smoothers 3, 4, 5 |
All backing tools of group I must have handles made of wood or thick wire.
Note that the handles of the backing tool are driven into the heads and are not wedged, so that vibration and shocks through the handle are not transmitted to the blacksmith’s hand. The wire handle is twisted around the head while hot. Blacksmith chisel - for chopping workpieces in a hot or cold state. The chisel head consists of three parts: a convex surface on which blows are struck with a hammer; the middle part with a hole on the side for installing the handle; knife - the main part that cuts through metal. For cold cutting, the sharpening angle is 60-70°, for hot cutting - 15-30°. The chisel is made from high-carbon steels U7, U8, alloyed 6ХС or steel 45; 50. The shape of the chisel knife can be straight, with curvature in a horizontal plane or in two planes. A chisel with a straight knife is used for transverse and longitudinal cutting. The knife of the chisel for transverse cutting is located parallel, and the knife of the chisel for longitudinal cutting is perpendicular to the axis of the handle.
One-sided sharpening of the chisel is done when it is necessary to obtain a product with a straight end, i.e. without a slope, if a slope is allowed or a chamfer needs to be given, then a chisel with double-sided sharpening is used.” Chisels with a radius knife are used for cutting various curved elements such as flowers, leaves, etc. from sheet metal. Chisels with shaped chisels are used for cutting out curved contours from curved workpieces. Depending on the size of the products and the patterns being cut out, it is necessary to select the correct size chisel. The pattern of the ornament is applied to the forging with a chisel with a blunt cutting edge. When working with a chisel, a gasket made of iron or copper sheet is placed under the workpiece, which protects the front part of the anvil from damage and the knife blade from dulling. You can chop off workpieces on an unhardened anvil platform, i.e. near the conical horn. It should be remembered that the first and last blows to the chisel are weak. The first ones are so that the chisel cuts smoothly into the workpiece, and the last ones are so that the part being cut off does not fly off and injure someone.
Punchers are used for punching holes, recesses in forgings and sheet blanks. The punch consists of three parts. The blow is applied to the upper part of the punch - the head; the middle part of the punch with a hole - a hole for the handle, the working part is called a beard. The bits themselves are made conical, which makes them easier to come out of the mold during manufacturing and makes it possible to obtain holes of various diameters or sizes depending on the depth of penetration into the metal.
Punchers are made of steel 40, 45, U7, 6ХС with a hardness of the working part of 45–50 HRC over a length of 30 mm and a hardness of the upper part of the head of 30–40 HRC.
To punch holes in thick forged products, firmware and special punches are used, which, unlike punches, do not have handles, but are held by pliers. In the heads of hammers and sledgehammers, the holes are oval in shape and have a double-sided taper, which is formed when holes are punched using oval-conical broaches. First, the hole is pressed on one side of the workpiece, and then turned 180° and the hole is stitched on the other side. In a similar way, oval cylindrical holes are stitched in the heads of backing tools - punches, smoothers, rollers, etc.
It is known from blacksmith experience that to ensure that the piercing is removed from the hole being punched, a little fine coal is poured into a pre-marked recess and the gases that arise during the piercing seem to push the tool out.
Planers are designed to smooth out roughness on the surface of a forging after it has been processed with a hammer. Smoothing irons have flat and semicircular working surfaces of various shapes and sizes. Large surfaces are leveled with a trowel with a square working surface measuring 100 mm, and for small areas, trowels measuring 50x50 mm or with a rectangular surface are used. Flat irons with a cylindrical surface are used when smoothing dumbbells and radius surfaces, selecting the appropriate size. The material of the blades is steel 40, 45, 50. The surface hardness is 40-50 HRC, and the hardness of the upper part of the head is 30-40 HRC.
Rolling machines (pressures) are designed to accelerate the crushing of metal along or across an axis, as well as to knock out cylindrical grooves on workpieces.
| Fig.36 Backing tool of the second group: 1, 3, 4, 5—special tool; 2 - cone, 6 - fork; 7 - cutting |
The backing tool of group II (Fig. 36) has a square shank, which is inserted into the corresponding socket of the anvil. Cuttings are used for chopping workpieces or cutting off parts of it using handbrake. The blacksmith places the workpiece on the cutting knife and, hitting it with a handbrake, chops off the necessary part, but not completely, so as not to spoil the cutting blade. Therefore, a deep hem of the workpiece is carried out, and the parts of the workpiece are finally separated at the edge of the anvil with a light blow of the handbrake. The cutting material is steel 50 with a working surface hardness of 50-55 HRC. The blade is sharpened at an angle of 60°.
Tapered mandrels are designed to widen holes in forgings, distribute rings and perform bending operations.
Forks are designed for bending and curling workpieces.
Mandrels - for forging slopes, bending and forge welding of chain links. Paired backing tool of group III (Fig. 37). Designed to increase the productivity of blacksmiths and improve the shapes of forgings. The tool consists of a nizhnyak (lower tool), which is inserted into a square hole in the anvil with a square shank, and a upper part (upper part of the tool), which has a handle for holding.
This group includes paired crimps, for giving the pre-forged workpiece the correct cylindrical, rectangular or polyhedral shape, and tamps, intended for flattening (distributing) metal, both longitudinal and transverse. For work, tampers of various radii of the working part from 8 to 30 mm are used. Special artistic works are performed using crimps - stamps of complex relief shapes. Material of crimps, tamps and dies: steel 45, 50, U7. The hardness of the working parts is 45–50 HRC, and the hardness of the upper impacted part is 30–40 HRC.
| Rice. 37 Backing tool of the third group: a - crimps: 1 - hexagonal; 2 - cylindrical; 3 - square; 4— tamper; b - nail shops; c - forging molds |
A nail machine with flat hammers is designed for landing heads of various sizes and shapes of nails, bolts and rivets. The nailer itself is a separate form with a handle or a special plate with holes. To give the head of a nail, bolt or rivet the desired shape (sphere, prism, hexagon, etc.), flat hammers are used. Nailers are made by forging from steels 45, U7, U7A and heat treated to a hardness of 45-50 HRC.
Exciting Tools
(Fig. 38). This class includes various types of mites. They are designed to remove heated workpieces from the forge and hold them during forging. The pliers consist of two castor beans connected by a rivet; The head part of the pliers with jaws is designed to grip the workpiece, the back part is the handle. According to the shape of the sponges, pliers are divided into longitudinal, transverse, longitudinal-transverse and special. Forging pliers should be as light as possible with springy handles, and for reliability during operation, the pliers' handles are tightened with a special ring - a spandrel. The length of the forging tongs is 300-1500 mm, the material is steel 15, 20, 25. The workpiece must be tightly grasped by the tongs. But if this does not happen, you need to adjust the sponges to the shape. To do this, the jaws of the pliers are heated in a forge, holding the workpiece with them, and they are compressed with blows of a handbrake or hammer. Well-fitted pliers significantly increase productivity and reduce injuries.
| Rice. 38 Types of blacksmith pliers: 1 - handle; 2 — clamping ring (spandrel); 3 - rivet; 4 - sponges; 5 - blank; 6 - longitudinal-cylindrical; 7 - longitudinal rectangular; 8 - transverse rectangular; 9 - coal; 10 - ring; 11 - for axes; 12 - T-bars; 13 - for gripping the cylinder from the inside; 14 — rod-transverse |
Clamping tools
(Fig. 39) are designed for clamping heated and cold workpieces before bending, upsetting, upsetting and other operations. These are various clamps, chair vices. The vice is fastened with powerful screws, bolts or rivets to the main support of the bench or on a separate chair - a stump, securely fastened to the floor. The upper level of the sponges is at a height of 900-100 mm from the floor. To increase the rigidity of the attachment, the lower rod is attached to a chair or stand. Chair vise jaws are cast from steel 35L, 45L or forged from steel 20, 25.
| Rice. 39. Chair vice: 1 - fixed jaw; 2 — fastening strip; 3 - lower rod; 4— hinge; 5— handle; 6— spring; 7— movable sponge |
Test tools
(Fig. 40) are necessary for measuring blanks and forgings both during the forging process and after finishing processing and cooling. A universal measuring tool - a steel ruler for measuring linear dimensions. Various rulers are used: 250, 500, 1000 mm; A steel metal meter is used for the same purposes as a ruler, but for compactness it consists of individual links connected by a hinge. The measurement accuracy of such a ruler and meter is 0.5 mm.
The caliper is designed for linear measurements, both external and internal, and for measuring the diameters of workpieces and forgings using small jaws and using a depth gauge 5. The measurement accuracy of the caliper is OD mm. Tenths of a millimeter are determined using a vernier scale 6.
Goniometers and squares are designed for measuring angular dimensions. Squares with constant angles of 30, 60, 90° are widely used in blacksmithing.
| Rice. 40 Inspection and measuring instruments: I - calipers: 1, 2 - small jaws for measuring internal dimensions; 3— locking screw, 4— movable frame; 5 — depth gauge; 6 — vernier scale; 7—movable sponge; 8—fixed sponge; II - compasses: 9, 10 - bore gauges; 11 — calipers |
Calipers and bore gauges are used to measure external and internal linear dimensions, as well as the diameters of blanks and forgings. Some types of calipers and bore gauges are equipped with measuring scales. Most of these tools are used to control the dimensions of workpieces during forging by pre-setting a ruler to specific dimensions. For greater accuracy in determining dimensions and reliability in operation, adjusting screws are installed on calipers. In addition to the listed tools, templates and gauges are used - combs, which are an elongated steel plate with cutouts on the sides, and each cutout is made wider than the size indicated on it by 1%, taking into account the thermal expansion of the steel.
It is impossible to list all the tools and devices that are necessary for the work, because the master himself, in the process of work, makes the tools necessary for forging any product.
Auxiliary blacksmith tools (for forge maintenance)
: coal shovel - for adding coal and removing slag and other combustion products from the hearth (scoop soldered to the handle); a poker for raking coal to the hearth during combustion and cleaning the nest from slag; it is made from a rod with a diameter of 12-16 mm, and its end is forged to a width of 20-35 mm; a lance for cleaning the tuyere, for punching through baked coal (crust); a brush made of steel wire to clean the fireplace from fine coal and slag dust and debris; splashed to wet the coal during sintering (crust or cap) over the hearth; to make a sprinkler, take a rod with a diameter of 10-15 mm, make a handle on one side, and a loop on the other, into which a piece of tow or sponge is inserted and moistened with water; tongs - for placing large pieces of coal into the furnace and removing caked slag.
The blacksmith's tool should be located on a special table in close proximity to the workplace. The height of the table should be 500-700 mm from the floor level.
Classification and types
Depending on the type of energy carrier used, the following types of units described are distinguished:
- Steam-air hammer, which uses the energy of superheated steam.
- A pneumatic hammer whose energy source is compressed air.
- A hydraulic hammer that deforms the workpiece by the force of the flow of a working liquid medium (water or oil).
- A hydraulic screw hammer, where, along with fluid energy, mechanical energy is also used.
- A mechanical hammer for which the principle of direct conversion of potential energy/work into kinetic energy is implemented.
Classification is also carried out according to technological purpose; this determines the design features of the hammers. In particular, a forging hammer has free-standing racks, and a steam-air hammer is distinguished by the design of racks connected to the hammer using fasteners, spring-loaded parts.
The layout principle of all hammers is mainly vertical. The few variants of horizontal hammerless hammers - impactors - have not gained much popularity. The reason is the difficulty of holding a heated workpiece during pressure treatment. At the same time, shaking of the ground and foundation is significantly reduced, which makes working with such equipment more comfortable.
Blacksmith craft. Materials. characteristics of forging steels
- About the studio
- Photo galleries
- Articles about forging
- Price list. Prices
- Contacts
The main thing that should distinguish materials, that is, metals used to create products using the artistic forging technique, is plasticity, the ability to be malleable.
Chapter 2. Materials. characteristics of forging steels
The main thing that should distinguish materials, that is, metals used to create products using the artistic forging technique, is plasticity, the ability to be malleable.
According to these parameters, the most suitable ferrous metals for forging are steel with a minimum amount of carbon (up to 0.25%) and harmful impurities, for example, chromium and molybdenum (impurities of sulfur and phosphorus are extremely undesirable), as well as structural steels with a carbon content of 0. 2 to 0.6% (Table 1). In tool steels this figure is even higher: from 0.6 to 1.35%. As the carbon content increases, steel becomes less ductile and less weldable.
Table 1. Steel marking colors
| Group | Paint color |
| Plain steel | Red and green |
| St1,St1kp | White and black |
| St2, St2kp | Yellow |
| StZ, StZkp, StZ, StZkp, StZ | Red |
| St4, St4kp, St4, St4kp, St4 | Black |
| St5, St5 | Green |
| Quality carbon steel | |
| 08, 10, 15,20 | White |
| 25, 30, 35, 40 | White and yellow |
| 45, 50, 55, 60 | White and brown |
| Alloy structural steel | |
| Chrome | Green and yellow |
| Chromium-molybdenum | Green and purple |
| Chrome vanadium | Green and black |
By touching a rotating emery wheel with a steel sample, the master receives a beam of sparks and compares their color with the marking standard.
The degree of suitability for hardening is established by heating to 900°C and immersing it in water. Low carbon steel is easy to file.
| Temperature | Color |
| 550-580 | Dark brown |
| 580-650 | Brown-red |
| 650-730 | Dark red |
| 730-770 | Dark cherry red |
| 770-800 | Cherry red |
| 800-830 | Light cherry red |
| 830-900 | Light red |
| 900-1050 | Orange |
| 1050-1150 | Dark yellow |
| 1150-1250 | Light yellow |
| 1250-1300 | Bright yellow |
Table 3. Marking standards
| Steel group | Spark beam color and characteristics |
| Low carbon unalloyed (carbon up to 0.15%) | A short dark yellow beam of sparks that take the form of stripes and become lighter in the combustion zone; few star-shaped branches |
| Medium carbon unalloyed (carbon 0.15-1.0%) | As the carbon content increases, a denser and lighter yellow beam of sparks with numerous stars and branching rays is formed |
| High carbon unalloyed (carbon over 1.0%) | A very dense yellow beam of sparks with numerous stars. As the carbon content increases, the brightness decreases and the spark beam shortens |
| Unalloyed with high manganese content | A wide, dense bright yellow beam of sparks; the outer zone of the spark lines is especially bright. Numerous branching rays |
| Manganese (manganese 12%) | Predominance of umbrella-shaped sparks |
| Structural (manganese up to 5%) | Bright yellow lines of sparks in the form of tongues, split at the end; increase in brightness in the combustion zone. As the carbon content increases, stars appear at the ends of the sparks |
| Chromium with low carbon and high chromium content | Short, dark red spark pattern without stars, slightly branched, sparks sticking to the surface of the grinding wheel |
| Nickel high alloy | With a nickel content of up to 35%, the beam color is red-yellow. At a higher content (about 47%), the brightness of the sparks is significantly weakened |
| Chrome-nickel | Yellow-red sparks with brighter stripes in the combustion zone. With a higher content of chromium and nickel, the spark beam is darker |
| Tungsten | Red short sparks; the lines of sparks clearly bend downwards. There is no branching of carbon stars. The higher the tungsten content, the weaker the spark formation |
| Molybdenum | Bright yellow sparks in the form of tongues. At low silicon content, tongues are visible in front of the carbon stars; at higher contents - behind the carbon stars |
ART FORGING TECHNOLOGY
Heat treatment of metals
Any material used in forging has its own properties and characteristics. They correspond to its internal structure and chemical composition. If the characteristics need to be changed, this can be achieved by heat treatment. In modern metallurgy, tables have been developed for each type of material indicating the required processing.
In the practice of artistic forging, there is no equipment for such processing, and in many cases even the chemical composition of the material being processed is unknown.
In artistic forging, metal materials are divided into malleable steel. To make decorative locks, shields, hinges, leaves and flowers, a very plastic and soft material is required. In this case, annealing will help. The material being processed is heated at a temperature of 650-720 °C for 2-3 hours. In conditions where there is no electric furnace, heating is carried out in a forge using charcoal, under which air is gradually blown. The material should be cooled as slowly as possible. When using an electric oven, the material is cooled along with the oven after it is turned off. If annealing is carried out on charcoal, then the best medium is sieved ash. The ash is heated in a furnace, the annealed workpiece is buried in it and left to cool. After such processing, the material becomes very viscous and the most complex shapes can be obtained from it. If you need to soften copper, do the opposite. Copper is heated to 500-600 °C and quickly cooled in water. The material turns out to be very viscous.
A master of artistic forging is usually placed in such conditions that he has to make most of the tools himself. In this matter, you cannot do without hardening - the most common method of processing steel. The main purpose of this treatment is to obtain steel with the highest hardness. Hardening consists of slowly and uniformly heating the steel to the hardening temperature and then rapidly cooling it. Rapid cooling is necessary in order to prevent changes in the metal that occur during slow cooling, i.e. release of enzyme and transformation of austenite into permit. During quenching, all austenite turns into martensite, which, after cementite, is the hardest and most brittle component. The cooling method depends primarily on the grade of steel.
The cooling media used have different cooling capacities. The highest cooling rate is provided by cold water, a more moderate cooling rate by oil, and the most moderate by air. The cooling capacity of water can be increased by adding table salt or hydrochloric acid (approximately 1:10), and reduced by heating or adding limestone substances. As the cooling medium moves, its cooling effect increases. Carbon steels are cooled in water, alloy steels are cooled in oil, and high alloy steels are cooled in air flow. As a rule, only the working part of a tool used in artistic forging or metalworking is hardened, which directly serves to process the product.
As already noted, hardening is characterized by the transformation of austenite into hard and very brittle martensite. With low heating, martensite transforms into other structural components - bainite, troostite or sorbitol, which, although not as hard as martensite, are not brittle. A hardened tool in this state is called tempered. A tool heated for hardening is not cooled as a whole, but only its working part. After cooling, the tool is removed from the coolant and cleaned on a stone. In the cleaned area, observe the color of the metal, which changes due to the heat from the still heated part of the tool (see table). When the desired color appears, the hardened part of the tool is again dipped into the coolant and the entire tool is allowed to cool.
Table 4. Temperature scale and color of steel during quenching and tempering, developed by Czech forging masters
| Temperature, °C | Heated steel color |
| 405 | Red, barely visible in the dark |
| 480 | Light red, visible in the twilight |
| 530 | Dark red, visible in the light |
| 535 | Red, visible in sunlight |
| 576 | Red, dark cherry color |
| 580 | Red, mid-ripe cherry color |
| 746 | Cherry red |
| 800 | Red, ripe cherry color |
| 843 | Light red |
| 900 | Red (medium brightness) |
| 940 | Bright Bloody |
| 1000 | Lemon yellow |
| 1080 | Light yellow |
| 1209 | Yellow-white |
| 1400 | Bright white |
| 1660 | Dazzling blue and white |
| Tempering color of steel | |
| 220 | Bright, straw yellow |
| 230 | Medium straw yellow |
| 240 | Straw yellow |
| 245 | Dark straw yellow |
| 250 | Dark yellow |
| 255 | Yellow-brown |
| 260 | Brown-yellow |
| 265 | Red-brown |
| 276 | Purple |
| 282 | Bright purple |
| 287 | Bright blue (slightly) |
| 293 | Bright blue (full) |
| 305 | Glossy blue |
| 315 | Dark blue |
they will not create that unique touch applied by a cutter to the product, they will not repeat the foundry artist’s idea embodied in the original casting, they will not make the forging pattern of an openwork lattice or metal sculpture so precise and full of unique charm.
Methods for deforming malleable metal
The main method by which deformation of malleable or ductile metals is achieved is forging. Forging can be manual or machine. We are interested in the first method. By blowing a handbrake or a sledgehammer, the desired shape of the workpiece is achieved in a cold or heated state (depending on its thickness). There are free forging and stamped forging. The first is carried out by arbitrary hammer blows at the discretion of the blacksmith. The second is by hitting the stamp, pressing soft metal into the prepared form with blows of a sledgehammer.
Artistic forging is mainly done by hand. The desired shape is given to the workpiece by sequential mechanical impact on it with impact tools.
Hand forging requires from the blacksmith not only artistic taste, dexterity and painstaking work, but also certain physical abilities and endurance. Since the handbrake is not that heavy, you will have to apply a countless number of blows during the manufacturing process of the forged product. And to swing an 8-10 kg sledgehammer, you need to have remarkable strength. Previously, blacksmiths worked in pairs - a senior (main) foreman and an assistant (hammer): the senior, with a handbrake, indicated to the assistant the place where the sledgehammer would be hit, and directed the entire forging process. In an individual forge, you have to perform all the forging processes alone, that is, to be a generalist, as, indeed, in other types of artistic metal processing.
Since many forging operations have to be performed with heated metal, it is very important to properly heat it, which is done in a workshop with a torch or in a forge - depending on the size of the part and the thermal properties of the material. The most favorable temperature range for forging is within 800-900°C.
The air required for the fuel combustion process is supplied to the forge by an electric fan. The fire in the forge must be maintained evenly, not allowing a high flame, pouring water, if necessary, in order to knock down the long tongues of flame in the forge and so that the strongest heat is concentrated inside the forge shaft - in the forge nest. The ash is scooped out with a poker without splitting it. Coal is placed not on top, but along the edges. The workpiece is placed under the top layer of coals - there is the greatest heat (in the lower part of the nest the heat is weaker due to the flow of incoming air). The metal is heated slowly so that it warms up evenly and sufficiently, but does not overheat, especially for tool steel, overheating of which is fraught with cracks in the workpiece and destruction during forging.
If any part does overheat, it needs to be cut off. At the optimal temperature for forging (800-900 °C), the plasticity of steel increases to the maximum and its strength decreases by 20 times.
Broaching of a heated workpiece in a personal workshop is carried out on the edge of the anvil at an angle of 40-45° with handbrake blows on the opposite edge of the workpiece. After broaching, the workpiece is leveled taking into account the specified dimensions, and irregularities are eliminated with a smoothing iron.
Rounding the edges of the workpiece. A workpiece of square or rectangular cross-section is placed edge-on on the anvil mirror and forged into an octahedron. Then its edges are rounded with hammer blows, and the process is completed with the help of a cut-out hammer and a crimp, which is placed in the hole in the face of the anvil. Forging mode is hot.
Decoration of ledges. On the sharp edge of the anvil, the heated forging is given a different cross-section with a sledgehammer and a backing hammer. The ledges can be one-sided or two-sided.
| Rice. 15. Broach: 1 - on the edge; 2 - with a rounded hammer |
Upsetting is an operation as a result of which a thin workpiece is made more voluminous in a certain part (in the middle, at the end) due to the thickening of the spherical shape.
| Rice. 16. Forging ledges on an anvil | |
If the planted part should become more voluminous, the cold end of the workpiece is placed on the anvil, and blows with a sledgehammer are applied from the opposite heated end. If the planted part is needed thinner, and therefore longer, the hot part is placed on the anvil and hit on the cold part.
Too long (thin) landing is made on the heel of the anvil; The pliers that hold the workpiece rest on the anvil mirror.
To achieve upset in the middle part of the workpiece, only the middle of the rod (rod) is heated (with a burner). Using upsetting, fastening crutches are made: the workpiece must be square, so cylindrical workpieces receive exactly a square profile; Only the part from which the head of the crutch is forged on a nail plate is left unforged.
Upset is an increase in the cross-section of a forging due to its shortening. This operation is used in the manufacture of tools (for example, percussion, shaped) and the creation of decorative elements with a variable cross-section. The heated workpiece, held with tongs, is placed vertically on the anvil and upset.
If not the entire workpiece needs to be upset, i.e. along the entire length evenly, and some part of it, then they heat up this particular part and work in the same way. This operation is called landing.
Forgings of considerable length and mass are upset without impact tools. If the shape of the thickening is distorted, the workpiece is forged and the operation is repeated.
Notching and threading. In the manufacture of gratings, gates, and wickets, the operation of threading rods one into another is used. To implement this, you need to make cuts in the rods. Mode - hot. The chisel for cutting through the rod should be round, long and sharp. Once the hole is made, the chisel is soaked to cool. Square rods are cut with a square mandrel with a guide handle to hold it. The resulting holes are adjusted using appropriate mandrels to the cross-sectional size of the rod being threaded. The combinations are different: round to square, square to round, etc.
Chopping. Tools: chisels, hooks, sledgehammer, pliers. For cutting cold metal - sharpening at an angle of 60°; hot - 80°. During the cutting process of cold metal, structural stress arises in it, as a result of which cracks may appear in the workpiece. To avoid this, it is pre-annealed. When cutting a hot forging, the chisel needs to be cooled from time to time, preferably in an oil emulsion that envelops the chisel blade and prevents it from sticking to the hot metal. Cutting is carried out by preliminary marking with a core on a cold workpiece. Having cut through 2/3, the forging is turned over (the cut should coincide with the edge of the anvil) and cut completely. This operation can be carried out both on the hook and in a combination of chisel and hook.
When chopping while cutting, you need to be extremely careful so that when the hammer hits the workpiece again, complete cutting does not occur, since there is a danger of damaging the handbrake striker and the cutting edge.
| Rice. 17. Sequence of notching for threading |
| Rice. 18. Cutting: 1 - on an anvil; 2 - in a vice |
Sheet blanks up to 3 mm are cut in cold mode, thicker sheets are cut in hot mode.
Holes of non-standard shapes are cut out using shaped chisels in hot mode.
There are also some types of felling:
- the workpiece is cut, pulled, twisted, bent into a pattern;
- divide the forging along the axis;
- metal is separated along the outer contour. Punching. Tools: punches (bits), chisels, mandrels.
The hot spot of the forging is installed against the hole of the anvil and is punched with a beard in several stages. The metal is squeezed out from the back side of the workpiece with a beard. Without removing the punch, the forging is placed on the anvil mirror and the blows continue to be struck until the contours of the future hole appear in the form of a dark spot. The forging is then turned over and transferred again to the hole in the anvil, where counter punching completes the operation. A hole called an otter hole is formed. This hole is processed with a mandrel in order to give it a correct and neat shape. To enlarge the hole, the part is forged on the horn of an anvil. Chisels used to cut holes in a section have the shape of cones connected by bases.
The appearance of the cut-out part depends on the massiveness of the chisel and the sharpening angle of its working part. Chisels with thick blades sometimes cause deformation of the forging. Therefore, when the metal is less than 3 mm short, it is worth finishing the cutting with a chisel with a thin blade.
Hood. Tools: sledgehammer, handbrake, pliers, crimpers, sharpeners, straighteners, smoothers, attachments, mandrels, leveling plate.
Drawing is carried out with the aim of lengthening the workpiece, changing its length by reducing the cross section. For example, a strip is hot-forged from a thick forging with a sledgehammer. First, forging is done on one side of the hot forging, then on the other. Forging is completed with a handbrake. Irregularities are removed with a smoothing iron. The small-sized workpiece is drawn using a handbrake at the corner of the anvil, repeating the operation until the specified size is obtained.
A workpiece of round cross-section is pulled out, giving it a square cross-section, after which the edges are knocked down into an octagon and the rod is finally formed to a round cross-section in crimps, and then passed with a smoothing iron. The same operation is carried out if it is necessary to obtain a rod with different cross-sectional shapes and thicknesses.
The spreading operation is carried out with the aim of increasing the area of the forging or its fragment, due to its thinning. Flatten the workpiece with a handbrake, and part of it with a tool. Special forging tools are also used—dispersals.
To draw out hollow forgings, conical guides and spraks are used, depending on the type. diameter Operations are carried out with crimping or free forging, respectively.
Another operation related to the hood is the distribution of one-piece rings. Depending on the diameter, it is made with a handbrake on the anvil horn, on a shperak or a mandrel, which is secured in the anvil hole or in a vice.
When the rings expand, their outer and inner diameters increase, but their cross-section decreases, i.e. the rings become wider but thinner.
So, the forging operation of drawing has three main types: actual drawing (extension), expansion (increase) and expansion (expansion), and is associated with the use of many main and auxiliary forging tools.
It is practically impossible to do without this key operation in forging when creating a wide variety of artistic metal products.
Flexible. This operation allows you to give the workpiece or part of it a shape bent at different angles. The process mode is cold or hot depending on the thickness and profile of the forging. Bending is done on an anvil, in a vice and other devices that fix the part. At the point of bending, the cross-section of the part becomes thinner. To avoid this, preliminary planting is carried out at the bend site. On the contrary, bending for decoration is done by undercutting the metal. If it is necessary to obtain several or many identical curved fragments of the product, a bending plate is used.
There are bending at an angle and bending along a radius. The first is carried out on the sharp edge of the anvil, the second - on its round horn; The bending radius is adjusted by changing the distance from the top of the horn.
Twisting (torsion). Tools: wrench, vice, tubes, pliers.
During this operation, parts of the workpiece are rotated along the axis relative to each other. Rods up to 15 mm thick are twisted in cold mode, but the forging is annealed before twisting.
| Rice. 19. Twisting (torsion) “cold”: 1 - vice; 2 - pipe; 3 - workpiece; 4 - knob |
This operation is performed as follows: marking is done (in which exact place to twist), then one end of the rod or rod is fixed in a vice, and the other is secured to the collar and turned the required number of times. To fix linear contours, a twisted rod is inserted into a pipe of the appropriate diameter and length.
Thick rods are twisted hot. When part of the twist is heated by turning the knob on the cold side of the workpiece, a curl of the hot edge of the rod is obtained, clamped in a vice, which gradually unwinds and disappears. Combinations of such techniques produce original parts. Twisting can also be done in the opposite direction.
Particularly beautiful are the twisted rods, which have deep grooves extruded along all edges before torsion. Twisted flat rods are also effective.
Spiral volutes are common decorative and artistic elements of forged products, namely, ionic columns, spirals, lattices, etc. The forging of the volute is done freely, and its correctness and beauty depend on the skill of the forger-artist. If a lot of spiral elements, for example, in a railing or fence, are required, use templates made according to a standard sample and producing equal-sized parts. And volutes are forged. The size of the workpiece (its length) can be easily determined by using twisted wire according to the shape of the future volute. Having straightened the measure, the length of the forging is obtained to fit the volute, the forging is cut off to that length, heated at one end and its end is made. The main, steepest curl of the volute is formed on the horn or edge of the anvil. Then it is heated along its length and a spiral is forged using a spiral mandrel. The endings of the volutes can be decorated with ornaments.
| Rice. 20. Torso rod |
The shape of the volutes can be one-sided, two-sided, with a reverse twist, with a branch from the rod,
Overlapping crossing is used when fitting heavy wooden doors, wickets, and gates. Intersecting overlapping forged belts are laid on a wooden surface so that both fit tightly to it and lie in the same plane. The required deflection of the belt in hot mode is performed on the backing stamp. Overlapping is also used in round bar gratings. To do this, use a mandrel stamp with semicircular cutouts in the upper and lower parts. Both intersecting rods are heated; the lower one is laid perpendicular to the lower cutout of the mandrel, and the upper one is perpendicular to the lower rod above the lower cutout, the upper half of the mandrel is applied and an overlap is obtained with strong blows.
Cutting is the production of product elements emerging from one metal forging. A thick sheet is placed under the metal being cut to protect the chisels and anvil from damage when cutting the workpiece. Elements of a certain design are bent, pulled one from the other so that they can be forged, rounded and finished each separately. The branch from the heated rod is cut off with a chisel after preliminary marking of the forging. If rounding of dissected branches is required, then the forging is cut to the beginning of the radius of curvature, the dissected branches are separated, placed on the round surface of the anvil horn and the branch is bent with a sledgehammer, and the specified pattern according to the size of the radius is obtained by blows on its end. If it is necessary to cut off a branch from a forging that is much thinner than the base, then cutting (cutting) is done in a vice in a vertical position of the forging (it is, as it were, trimmed, obtaining metal shavings that are not cut off from the rod at the base).
Ironing. Tools: smoothers (flat and special).
The purpose of the operation is to finish the fragments and the artistic forging product as a whole. Performed after completion of all form-building operations. Before ironing, the product is heated to a dark cherry color. Stronger heating can lead to deformation of the forged product. Smoothing is done with ordinary flat trowels, and convexities or concavities are eliminated with special trowels. Ironing is carried out by moving a smoothing iron along the metal surface and is accompanied by striking the handbrake on it. Decorative elements of a forged product are not ironed - they may lose that unique charm created by a metal artist.
DIY mechanical hammer
You can make a homemade hammer for forging in several stages:
- Preparing the foundation for installation.
- Creating a machine frame.
- Assembly of the mechanism.
- Installation of the device.
But before you begin manufacturing the entire structure, you need to decide on the dimensions of such equipment, which will subsequently determine its weight and capabilities. Examples of devices are shown in the diagram.
The easiest way to make a forging mechanical hammer, shown in option “A” with a horizontal arrangement, it will be more stable.
Foundation
Having made a drawing of the future device, they begin to prepare the foundation. It is needed for normal operation to prevent the hammer from tipping over and dampening the impact force.
A hole of the required size is dug at the installation site. Sand and crushed stone are poured into the bottom, watered and compacted. A reinforcing frame made of 12-14 mm reinforcement is mounted on top, always with bandaging in increments of 250-300 mm.
Concrete is prepared in a ratio of 1:2:3 (cement grade M400, crushed stone fraction 10-20, and sand).
Filling should be done at a time, constantly trying to compact the mass to avoid voids inside.
Upon completion, anchor bolts can be installed in the uncured concrete, onto which the installation will then be additionally attached.
Frame
The frame material is selected depending on the installation parameters and dimensions of the parts being processed. Either a profile pipe or a channel will do. You can also use other convenient rolled metal.
The frame is assembled by welding. Additional spacers and cross beams must be installed.
Mechanism
The main working part - the lever with the striker and counterweight - can be monolithic or prefabricated. The metal must be solid (not a pipe), otherwise the rod will gradually deform under the weight. Such a lever can be “collected” from strips by welding them together.
The firing pin must be made of tool grade steel and, preferably, hardened for greater strength. It needs to be welded to the lever.
Any heavy metal or other material will be suitable for a counterweight.
It is also better to make the shaft on which the hammer will rotate from a solid piece of steel. The lever itself with the hammer is fixed on the axis using transverse pins. The shaft in the frame must rotate freely, so it is best to equip the ends with appropriate bearings.
The drive pedal and transmission can be welded from a regular profile pipe to the required size. Moreover, the control lever itself must move freely. Bearings or simply pieces of pipe into which the shaft with the pedal are mounted are also suitable for this.
Hammer assembly steps
Initially, you need to assemble and install the frame of the device on the foundation. The lower slide is mounted on anchor bolts with nuts. The remaining guides and jumpers are welded to them.
A shaft is inserted into the racks, onto which a lever with a hammer is fixed.
The assembly of the drive with a pedal or lever is also carried out.
The anvil itself can be made from a piece of rail, I-beam or channel. However, it is desirable that the front part be hardened.
After final assembly and testing, the structure must be painted.
What can you add to this material from your personal experience in making such devices for forging metal? What designs have you used? Share your ideas in the block for this article.
Making an anvil with your own hands
The design of the anvil is quite simple. Its manufacture by hand does not require drawings, special skills or special tools and equipment. By and large, the device is a monolithic device with a special shape and planes that meet certain requirements.
At the moment, forging equipment is presented quite widely in specialized stores. There you can choose any tool, including an anvil, from a huge assortment of varieties. So does it make sense to make this device yourself?
When answering this question, you need to decide for what tasks the tool will be used. In professional production, you should definitely choose a factory model. Its advantages include compliance with all necessary standards, as well as manufacturing features using casting technology.
Such an instrument is highly hard, has regularly shaped horns and perfectly straight side edges.
However, the price for a good model is quite high, especially in the case of large-sized options. However, there is no alternative to such devices; making them by hand is definitely not possible, because the weight of a forge anvil can reach 300 kilograms.
But for homework, a small-sized, lightweight anvil is perfect. You can just do it yourself. The described option is unlikely to have a negative impact on the quality of work.
One of the arguments in favor of hand-making the device is the fact that high demands are placed on anvils. For example, the edges of the device must be strictly straight and undeformed.
During constant use of the tool, quite often the edges become uneven. Of course, everything depends on the type of material used by the master in his work. Nevertheless, this defect must be eliminated. There are two ways to correct such a defect: buy a new device or repair the old one.
Naturally, repairs will cost less than purchase. It should be noted that restoring a hand-made anvil is a simpler task. So this is a great opportunity to save money once again.
Now we can safely move on to the question of how to make an anvil for forging metal? There is no point in providing any standard dimensions or drawings. There are a large number of different options for this equipment. Everyone can choose what suits them best.
The main goal is to understand and master manufacturing technology. The master will decide all other points himself, especially since on the Internet you can easily find various photographs of anvils and use them as a template when creating the most optimal version of such a forging device.
First of all, the issue related to installation should be resolved. In the case of a stationary option, as noted earlier, a massive stump should be used. But in the case of a portable model, a metal frame welded from corners is used.
Do not forget that it needs to be resistant to serious shock loads. This problem is solved by installing additional ribs in the frame, providing increased rigidity.
Although, of course, there are other methods to strengthen the structure. It all depends on the ingenuity of the master and his preferences.
If the base for the anvil is a stump, then it should be tightened with metal rings. Simply burying part of the tree's base in the ground is not a good idea. Even if properly treated with antiseptics, it will begin to deteriorate over time.
It is advisable to use a metal barrel placed in a hole as a base. Sand should first be poured into the barrel. The amount of sand depends on the preference of the blacksmith. As for the wood, it is selected from strong species. Which has already been mentioned earlier.
Installation of the device on the base is implemented in several ways. The most reliable option is fastening using metal brackets. They must be secured between the side surfaces of the hemp and the tool.
A similar installation method can be implemented using fittings. It must be bent into an “G” shape and welded to the base. Then, when the device is installed on the stump, the reinforcement is driven into its sides. As a result, any possibility of the device falling on your feet is eliminated.
This type of fastening will be very effective. The forging device will be securely connected to the base and will not lose grip even after a long period of use.
The second option is simpler. It consists in drilling holes in the sole. Bolts are subsequently inserted into them and screwed directly into the stump. The disadvantage of this method is the loosening of the tool after impacts. To avoid having to tighten the bolts from time to time, it is better to use staples.
According to industrial technology, forging anvils are made of 35L alloy steel. At home, an anvil is usually made from a rail or channel. One of the sides of the selected material will be used as a base.
You can make a face by welding a metal plate of the appropriate brand. You can do without it. In this case, you will have to spend a lot of time and effort on grinding one of the sides of the rail.
A handmade rail anvil will last a very long time. It is perfect for almost any household needs or small workshop.
It is worth noting one nuance: making such a forging tool from a channel is not the best option. On the one hand, it is simpler and more convenient to process. However, its strength characteristics are not high. As a result, the service life of the device will be short.
You can make a horn from an elongated part of the rail, treating it accordingly. However, you will have to spend not only a lot of effort, but also consumables, for example, angle grinder discs. This problem is much easier to solve by welding this part to a ready-made tool. Don't forget about the insert that is welded.
Thus, it can be noted that the best manufacturing material is rail. The characteristics of this material meet all the requirements, and it is quite cheap, perhaps the craftsman even already has it in his household.
The manual version will not be a replacement for a full-fledged factory device, but in case of small volumes of work it will be an excellent choice. It is important that during manufacturing no special skills, specialized tools or any drawings are needed.
Materials you will need:
- a piece of rail up to three hundred millimeters long;
- profile pipe;
- stump.
The necessary tools are a grinder and welding, depending on the type of structure.
Finally, after all the manufacturing work has been completed, the instrument can be given a nice final look through painting.
As you can see, every person can cope with the manufacture of such a simple but very important tool. This does not require the use of specialized equipment and does not require special skills. In addition, the materials used to create such a device are not so difficult to obtain.
The only problem may be the processing of the rail, in particular its grinding. The material from which it is made is highly durable, so you will have to spend a lot of disks on processing.
However, the result is worth it, because the end result is a reliable and durable anvil made by yourself. She, without any doubt, can become the pride of the workshop.
Classification of anvils
The types of anvils and their shapes are different. They are classified:
- by weight: for example, a 10 kg anvil can only be used for hot forging with a hammer weighing no more than 1 kg (this is the ratio of weights that is considered optimal);
- by the presence of a blacksmith's horn: the anvil is two-horned or one-horned. in the simplest cases, an anvil of a simple configuration is used, but much cannot be done with it;
- according to the shape of the supporting part - with or without paws, on a solid base;
- according to the presence of a hole and its shape - steel anvils with a round and/or square blind hole;
- with or without a tail.
Such a complex design and shape of the equipment is determined by the variety of forging operations that can only be performed using an anvil.
Traditional components of a blacksmith's anvil:
- horn, which is a cone-shaped process on one or both of its lateral ends. It can be removable or non-removable. In the first case, several sets are made with different base diameters, which makes it possible to do such forging transitions on this element with your own hands as curling, rolling, and bending. The removable horn is equipped with a threaded part (the thread must be self-locking) and is screwed into the body of the anvil;
- tail: a protrusion, square in plan, placed on the side opposite the horn. The cross-sectional size and reach approximately corresponds to the parameters of a horn. Using the tail, bend at an angle of 90°;
- holes, and in a classic anvil there should be two of them: a square one - for installing some kind of backing stamp, and a round one - for fixing the opposite end of the wire during its curling.
A simplified mini-anvil can be made by hand either from a wide equal-flange channel GOST 8240, or from a piece of steel rail, and experts believe that not a railway, but a crane rail KR120 or KR140 is suitable for these purposes.
Blacksmith's anvil.
A forging anvil is a support tool that is simply necessary if you are engaged in metal processing (both hot and cold). The tool is quite specific, but if you are professionally involved in forging and working with metal products, then it is simply necessary. There are two types of blacksmith anvils: one-horned and two-horned. The horn is needed to bend a metal workpiece around it (for example, when forging figured products). The one-horned model is in greatest demand.
The side edges of the anvil allow you to bend the metal at an angle of 90 degrees. The surface is flat and smooth, carefully ground and hardened, since it is the main working part of this tool. The anvil has 2 holes: a small round one and a square one, which serve for additional operations with metal; they can also be used as a tool holder (insert a hammer handle into the hole, for example).
Anvils differ primarily in weight, the most popular weights are: 5, 10, 30 and 50 kg (two small, medium and large anvils). In blacksmithing, it is rational to use the largest model, weighing 95 kg, for working with large workpieces.
In a household, a blacksmith's anvil is not an essential item, although if you have one, it is very convenient to straighten bent nails, straighten bent wire, or straighten sheet metal. Of course, it’s unlikely that anyone will specifically buy an anvil for home, since its functions can easily be performed by an ordinary rail. But if you are engaged in the manufacture of metal figured products, then it will be quite difficult to forge anything worthwhile on a piece of rails. And in such cases, an anvil is simply a must-have tool.
The highest quality are Glazovsky anvils. They fully meet the requirements for this type of tool and are made of high-quality steel. By the way, you can check the quality of the anvil in the following way: hit it with a hammer and if the sound is clear, then the anvil is of high quality. But if it is deaf, then most likely it is metal with impurities, a low-quality product. So I recommend buying anvils.
Estimated cost for anvils from the Glazov plant:
5 kg 1800 rubles 10 kg 3000 rubles 30 kg 6000 rubles 50 kg 9000 rubles
Another note: A great screwdriver for gifts and for work. Kraftul is a proven company.
Features of the use of hammers of other types
A pneumatic hammer installed in a single unit is usually equipped with an individual compressor unit. This type of pneumatic hammer does not have a high mass of falling parts, and therefore can be used for forging small products. A pneumatic hammer usually has a C-shaped frame, which is fastened with side posts for rigidity. The stamping area of the pneumatic hammer is thus open on three sides, which facilitates its maintenance.
The hydraulic hammer has limited use. Hydraulic forging units are often used in hot sheet stamping, when processing titanium alloys that have low plasticity in the cold state. The speed of the die in hydraulic hammers is lower, which is explained by differences in the density of oil/water compared to air/steam. The hydraulic actuator requires increased requirements for sealing seals; otherwise, its design is not fundamentally different from other schemes of the considered installations.
Mechanical drives of impact forging machines - with a belt, board, or spring-spring - are now rare, since in this case additional energy cannot be supplied to the deformation zone. Their design is quite simple, but the efficiency is low.
Making an anvil
How to make an anvil? The sequence of operations is as follows. First you get a horn. To do this, one of the ends of the workpiece is gradually processed with a grinder to an approximately conical surface, after which it is ground and sharpened to the appearance of a truncated cone. Then the sharp part is adjusted with a file. The tail is also obtained by mechanical processing in the same way.
For a tabletop anvil from a channel, it is impossible to make the above elements, since the composite version does not have a section body to securely fasten them.
The next stage is to design the support paws with your own hands. For a rail anvil there is no need for this, since the headrest already has technological protrusions. Using them, you can drill the mounting holes required for fastening with your own hands. In the channel profile, all holes are drilled in the conditionally lower flange. Considering the large weight, a long anvil is secured with six bolts, a short one - four are enough. Bolts from M16 and higher are suitable for fastening.
An important point is the installation of the anvil in the workshop. Since the product experiences significant dynamic vibrations and vibrations during use, a wooden base should be installed under it, which will successfully dampen vibrations. It can be made from an oak stump or a dry wooden block, and the ratio of height to cross-sectional size should be no more than 1.5:1. The weight of the deck/stump must exceed the weight of the assembled equipment by at least 10 times. Such an improvised chabot is buried into the ground at least half the height, leveled, after which the soil is thoroughly compacted. When pouring a concrete base, you should treat the wood with an antiseptic before installation.
A blacksmith's anvil, made by hand, is not inferior in durability to professional samples.