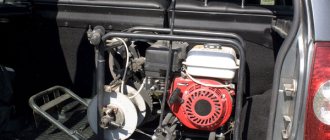
Hilling up agricultural crops allows you to more successfully maintain soil fertility, increases the yield and decorative qualities of plants, and reduces the cost of pesticides and irrigation. It is impossible to obtain a good harvest of a number of crops, especially potatoes, without hilling. Hilling is especially effective in private farms and small commercial farms, where the soil is usually depleted and is used intensively. However, hilling rows with a hoe (hoe) is an extremely tedious job, and the cost of ready-made hillers, manual and for walk-behind tractors, is frankly not encouraging. We live in a post-industrial society (consumer, neoliberal, tolerant - it’s all just water on jelly), one of the main principles of its organization is that the more necessary a thing is, the greater the unjustified “markup” on its price. The basic product is offered at a reduced price, but on the accessories, without which the “base” is just an expensive toy, the “bells and whistles” are put in from the heart. For example, a plow often comes complete with a walk-behind tractor, but it is not very durable; so we will have to address this topic soon. But the second most needed attachment - a hiller - must be purchased separately, and is clearly disproportionately expensive to the cost of the product. However, there is a way out: you need to make a hiller with your own hands. At home, having a hand tool, a regular electric one (drill, grinder), a workbench and the ability to use a welding machine, this is quite possible.
Homemade hillers: manual and for walk-behind tractors
Choosing a prototype
Hilling in general is a type of soil cultivation and is most often carried out with a conventional cultivator with replaceable working parts. The exception is hilling potatoes. In order for potatoes to form more large nutritious tubers, their rows are made wide (0.5-0.6 m), and the bushes are hilled high. Therefore, a potato hiller is a specialized mounted tool. Another specific case is the hilling of crops grown in narrow beds. Specialized cultivators for narrow rows exist, but in private household plots you can almost always get by with a regular cultivator with minor modifications, see for example. selection of videos:
Active or passive?
In large agricultural machinery, they often work with active hillers, the working parts of which are driven into rotation by the power take-off shaft of the traction unit. Walk-behind tractors and mini-tractors for private household plots and small farms are on sale, but in practice it turns out that an active hiller for them increases the productivity and quality of work slightly, but its cost and fuel consumption increase significantly, and the life of the engine is exhausted faster.
The reason is the engine. There are no mini-potatoes or tomatoes - we need edible ones. A mini-hiller should turn over soil per meter of row as much as a large one; the same amount of energy is needed for this. Taking 10 kW for a 5-hull hiller from a 100 kW diesel engine is not a problem, but giving 2 kW to a single-hull 6-10 kW engine will be at the limit of possibilities.
There is one more significant circumstance. Tractor diesel engines have a special design, although this is only noticeable to an engine specialist. Their liter power is small, but the engines themselves are very responsive, with a soft external characteristic, so the power output to the mounted unit has little effect on the specific fuel consumption in g/kW*h. It is difficult to install the same motor on a walk-behind tractor because the required performance characteristics are obtained only with a sufficiently large displacement of the engine. But even if this obstacle can be overcome, the motor will still turn out to be too expensive, heavy and bulky.
Large agricultural farms consume tons of fuel; Private household plots and small farms - in liters. But even here the engine of the walk-behind tractor must maintain a uniform traction force, adapting itself to the heterogeneity of the soil, because Processing errors are unacceptable in any case. Therefore, mini-agricultural machinery is equipped with engines, carburetor or with fuel injection, which are obviously power-hungry and designed for the speed of movement of the unit, approx. equal to walking speed. In this way, it is possible to minimize the costs of mechanization as a whole, but the external characteristics of the engine necessary for “painless” power take-off are no longer obtained: the engine is strained, burning an excessive amount of fuel and itself. Therefore, further we will limit ourselves to considering only passive hillers (without transmitting power directly to the working element), which load the source of traction force as little as possible.
Introduction to making a hiller
To make it easier to understand how to make a mounted hiller for a unit, we will first look at how to make a manual hiller for potatoes.
As can be seen from the drawing, to make work easier without a motor, you also need to try. But not as much as it seems. First of all, you need tools for work:
- hammer;
- vice;
- welding machines, preferably both electric and autogenous;
- calipers;
- taps for cutting internal threads;
- tap driver;
- grinding machine with replaceable discs;
- gas burner for heating the metal when it needs to be bent;
- Workbench;
- all kinds of auxiliary tools.
Motor or yourself?
Hilling can be carried out in half a row (top right in the figure at the beginning), when each bed is wrapped with earth in 2 passes, and immediately in a row (bottom left in the same place). Hilling in 2 passes in half a row is useful only for individual crops grown on a thin fertile layer under conditions of insufficient moisture: the depression on the crest of the dump prism serves as a moisture trap. Effective hilling of potatoes is carried out only immediately in a row.
Manual hilling by one worker is only possible in half a row on light, loose, poorly moistened soils, up to a width of 30-35 cm. Already for hilling potatoes on ordinary garden soil without mechanical traction, at least two are needed (item 1 in the figure below ): the front one creates the actual traction, and the rear one maintains the furrow and the depth of cultivation. A great exercise for feminists who want to prove themselves no worse than vile male harassers. But liberal-tolerant ladies prefer public events, online or in kind. Maybe because there is no useful work to be done there? And for something useless you can bargain for more payment, because... 100% reliable criteria for assessing unproductive work are impossible in principle. But let's get back to the topic.
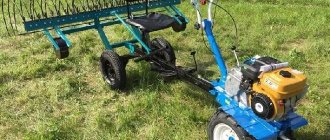
Possibility of manual and mechanized hilling depending on the source of traction
Having a walk-behind tractor with a power of 0.5-1 kW at your disposal will make it possible to hill potatoes in a row, pos. 2 in Fig. Motoblock Neva, etc. will pull a 2-body hiller for a working width of up to 0.8 m, pos. 3, according to the pattern 0.5 row + 1 row + 0.5 row. On any mini-tractor you can attach a 3-body hiller of the same type (item 4), for processing 0.5 + 1 + 1 + 0.5, or a 2-body hiller for processing 1 + 1. Labor productivity increases, per 1 pass, 2-3 times compared to hilling in a row, but the cost of purchasing special equipment increases significantly. Therefore, further we will focus on how to make a hiller for a walk-behind tractor with your own hands, with the possibility of using it “by gravity”, and how to make a manual hiller for small areas, approx. up to 20 acres.
Note: although mounted implements for mini-tractors are generally not the topic of this article (mini special equipment is purchased by competent, already prosperous owners), but if you suddenly got a tractor, below we give a video on how to make a 3-row hiller for a mini-tractor yourself. tractors:
And about the results of his tests:
Disc or ploughshare?
In large-scale agricultural technology, at least 10 types of hillers are used. There are hundreds of patents for this type of mounted implements for cultivating land, and more are being added. But, taking into account the capabilities of home technologies and the requirement to work also on human muscular traction, the choice of prototype turns out to be small: it is a hiller or a general-purpose plow, or a disk for potatoes. For more information on both, see below, but for now let’s see in what conditions which one is better suited. The most important of them is the granulometric composition and physical properties of the soil. If your plot is on loose, non-sticky sandy or sandy loam soil (which, as you know, is best for potatoes), then you can, without further ado, build a manual mini-hiller for light soils, which you can work with alone, see for example. video:
or a manual hiller for light soils, which may have to be pulled by two people:
In all other cases, you will have to take into account the features of weapons of pre-selected types. For a plow hiller they are:
- The required traction force depends relatively weakly on the type of soil - two moderately developed people pull a single-body plow hiller with a body of type 2 (see below) over medium-moistened black soil, but it is quite large - you cannot pull this tool alone.
- The second worker driving the furrow must be quite experienced, otherwise the implement’s share may “dive” and get stuck in the ground or move to the side and cause a blemish.
- The plow hiller is multifunctional, because You can install a variety of working parts on its frame, see fig..
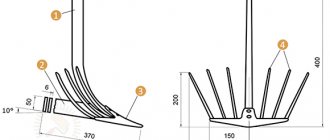
Replaceable working parts of the plow hiller - The maximum grip of one body (share) does not exceed 400-450 mm.
- A plow hiller is of little use for hilling potatoes on light, loose soils—the raised soil crumbles. The blade prism is obtained with a height of less than 250 mm and with a hollow along the ridge, while a blade for potatoes is needed with a height of 300-350 mm and with a sharp ridge.
- High hilling in 2 half-rows (2 passes along each row spacing) is impossible - the ploughshare tears the roots of the plants.
- Having stumbled upon a stone, a thick root, etc., the plow hiller clings to it and gets stuck.
- When traction from an agricultural winch driven by an internal combustion engine over heterogeneous soil, processing flaws are inevitable.
- Technologically, the plow hiller can be completed entirely at home.
The disc hiller has a mark. peculiarities:
- The worker's qualification requirements are minimal: a correctly configured disk hiller (see below) automatically maintains the specified processing parameters.
- On light loose soils, the traction force required is less than for a plow.
- On medium and heavier soils the situation is opposite.
- On silty, heavy alluvial, etc. The disc hiller will not last on sticky soil and neither will the tractor - the engine will stall, the hitch will break or the implement will break.
- On soils that are optimal for potatoes, high hilling immediately in a full row with a sharp prism ridge is possible manually.
- The working width of a single-row disc hiller is up to 630-650 mm.
- High hilling in 2 half-rows is possible: discs running close to the root ball either roll over the roots or damage them imperceptibly for the plants.
- Having encountered an obstacle, the working parts roll over it. A small mistake is possible, but there is no forced interruption in work.
- When pulled by a winch, with an internal combustion engine or electric, it works just as well as when pulled directly.
- For manufacturing, you need purchased or custom-turned components, see below.
Finally, you need to take into account the fact that potatoes are an excellent insurance crop for any type of farm. Potatoes cannot be called a record holder in terms of profitability, but the demand for “second bread” is stable, and the shelf life of potato tubers makes it possible to sell the crop with the highest possible profit. Therefore, a significant share of the total area is allocated for potatoes in complex agricultural enterprises. Which one exactly is a matter of economics in relation to specific local conditions, but first of all it makes sense to make a disk hiller. The exception is the case if your area on the ground is above average gravity, and you have not yet acquired mechanical traction.
Tips for using equipment
Before work, it is necessary to check the tightness of bolt connections and the settings of the unit. To do this, treat an area free of plants. During the test run, the operation of individual components is closely monitored. If deviations are detected, loose connections are tightened or the attachments are re-adjusted. All problems must be corrected immediately.
Before you begin, you must study the operating instructions and safety recommendations for using the walk-behind tractor. When processing beds, observe the following rules:
- They don't make sharp turns.
- Transfers are carried out in transport position.
- The unit is moved over long distances in a disassembled state.
Disk
The device of a disk hiller for potatoes is shown in Fig. below; its working parts rotate while moving under the influence of friction with the ground. However, if manufactured independently for a small private household, this unit can be significantly simplified by setting the vertical angle of inclination (in motorist’s terms – disc camber) fixed at 30 degrees with an angle of attack (negative toe) of 0 degrees, or leaving the discs vertical. In the first case, when adjusting the hiller to the desired angle of attack, the tilt of the discs will also change slightly, but when walking at walking speed this is not significant and is even convenient: the adjustment of the implement is done by just turning the discs.
Disc hiller device for potatoes
The point here is processing speed. The maximum possible speed, which does not gradually kill soil fertility, is theoretically 20-26 km/h. Accelerating the movement of the implement provides double fuel savings: by optimizing the operating mode of the internal combustion engine of the traction unit and reducing the time for processing a field of a given area. Considering that, according to the most optimistic forecasts, there is only 50-60 years of oil left on Earth suitable for diesel fuel, and agricultural machinery consumes up to 20% of the heavy motor fuels produced in the world, this is a matter of vital importance, which teams of highly qualified specialists are struggling with.
Note: light, low-sulfur shale oil is suitable for gasoline for passenger cars (which are already beginning to be replaced by electric vehicles), but you cannot get diesel fuel, jet fuel and fuel oil for marine power plants from it. Almost all known reserves of heavy oils are concentrated (in descending order) in Saudi Arabia, Russia and Iran; In the USA and Venezuela, dark oil deposits are almost depleted. Moreover, their magnitude in the Russian Federation is not precisely known - Russian experts, when asked directly, dismiss them with general remarks that, they say, many potentially oil-bearing areas have not yet been properly explored. Why they remain silent is quite understandable; this is information of the greatest strategic importance, greater than nuclear-laser-stealth-hypersonic secrets all together.
The “real” disc cultivator shown in Fig. higher, it is adjusted to the maximum possible speed of movement on a given soil. But in private household plots or on a small farm, in general, it doesn’t matter; hilling will take, say, 2 or 2.5 liters of low-octane gasoline and the processing will take 1 hour 30 or 40 minutes, but making a hiller will be much easier.
Drawings of a disk hiller for potatoes designed for mechanical and manual traction are shown in the figure:
Drawings of a disk hiller for potatoes for a walk-behind tractor and manual traction
This is an old, well-tested Soviet amateur design, fragments of which, scattered throughout the Russian Internet, are brought together here. Its distinctive feature is the presence of scrapers that remove adhering soil from the disks. During manual processing, this greatly reduces traction force, and during mechanized processing, fuel consumption. layout by item in Fig. is this:
- General view, marking of adjustment holes on the rake (emphasis on the first “e”), scraper, straight bracket (for an inclination of the disks of 0 degrees on ordinary garden soil;
- Disk sizes and disk configuration schemes (see also below);
- Angled disc bracket for working on sand and sandy loam;
- Rake dimensions.
At pos. Figure 2a shows the setting of the discs for hilling in one full row (see bottom left in the figure above) with traction predominantly. from a walk-behind tractor or winch. At pos. 2b – setting up primary drives. for manual hilling in 2 half-rows per pass, top right in Fig. at first. For more information about setting up a disk hiller, see the video.
Where needs improvement
The weak points of the described design today are:
- the discs themselves - they must be made of tough carbon steel;
- scraper - the material is the same, but it cannot be bent at home: it will undergo thermal tempering, and the scraper will bend itself and not clean;
- disc hub – works in the most difficult conditions.
Disk
The authors of the original design recommended taking discs and scrapers from agricultural machinery. It was easy for them to give such advice - then both were lying under their feet on any collective farm/state farm yard. Alas, those times are not now. Although, of course, not alas - we all experienced the hard way what happened at that time. Now, of course, buying discs for a hiller is not a problem. Problems appear later - with the quality of the material and the hub, see below. The price is the same - a obviously high-quality disc for a hiller for a walk-behind tractor costs half the price of a new mounted unit, or even more. So you need to find ways to make a good, durable disc for the hiller with your own hands.
The profile of the disk is simple: it is a spherical segment. Its deflection (distance from the base to the pole) for working at walking speed should be approx. 6% of diameter. You can do twice as much, then on light loose soils the blade prism will form better, but the traction force will increase.
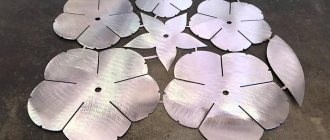
The profile of a homemade disk for a hiller and its dimensions are shown in the figure:
Dimensions and profile of the disc for the hiller
Material – tough carbon steel no worse than St44. Disc thickness (not to be confused with the deflection arrow) 2-4 mm; the better the steel, the thinner the disk can be and the easier it will be to pull the hiller (or the less gasoline the walk-behind tractor engine will consume). For the same purpose, the cutting wedge is sharpened from the inside by 3-5 degrees; this can be done with a cylindrical abrasive roller inserted into an electric drill.
Where can I get it?
Yes, this steel is no worse than St44. The bottoms of household gas cylinders and the tops of boilers are not suitable. They are viscous, but low-carbon so that they can withstand pressure (have a fairly high yield strength) without the danger of sudden destruction. Unfortunately, their material is not adapted to abrasive, alternating and shock loads: the discs will quickly become dull and will soon become completely dented.
The most suitable blanks for hiller disks are wheels from car wheels; this is exactly what is needed, and with a large margin. They are a bit thick, however, but this will increase the traction force slightly. How to make disk shares for a hiller from auto disks, see video:
and the hiller itself with the following disks:
The disadvantage of hiller plowshares made from autodiscs is their not completely spherical profile. This further increases the traction force. If you have suitable sheet material, then how to make spherical discs for a hiller from it, see the video:
Scrapers
Old junk cars can also help out with scrapers: they can be made from pieces of springs; This is again what we need, with a large margin. Since it is impossible to bend spring steel in a home workshop without depriving it of its durability, toughness and elasticity, scrapers are simply cut out with a grinder. The discs are made according to the radius of curvature of the spring, because that of the disk itself is not critical, see above. You just need to take into account that the gap between the scraper and the disk is needed within 2-5 mm, depending on the stickiness (adhesiveness) of the soil.
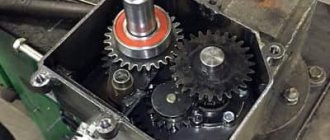
Hub
Design of the disc share hub of a potato hiller
It is precisely because of the hub that it is strongly not recommended to buy disks for a hiller (especially on the Internet): most of them have one plain bearing and become loose during operation literally on the first bed. The disc share hub for the hiller should sit on a pair of nylon plain bearings (see figure on the right). “Balls”, bronze and even fluoroplastic are not suitable, it’s all in the ground and dust. Therefore, the hub bushing is tightly closed at the ends with threaded caps, and its internal groove is regularly filled with shahtol, etc. grease for mechanisms operating in harsh conditions. The bushing is pinned onto the shaft. Which, of course, makes it difficult to remove/install the disk, but any other fastening will not withstand its operating conditions.
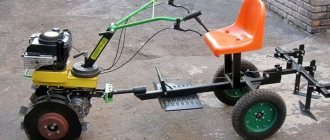
Note: on garden soil, which is somewhat heavier (more dense) than usual, simple disk hillers without separate adjustment of the tilt of the disks are sometimes squeezed upward while moving. In such a case, you can make a hiller for a walk-behind tractor with a platform on which some kind of load is placed, see for example. video:
Required materials and tools
To make such a homemade product, the following materials are needed:
- cold-rolled sheet steel 2.5 mm thick;
- steel corner 20×20×3 mm;
- a loosening pointed paw from a cultivator or a disc from a potato digger or disc harrow;
- steel blank for the stand, 10 mm thick and 20-30 mm wide;
- pipe (round or profile);
- a wheel from a folding bicycle, a garden wheelbarrow;
- 4 bearings.
Among the tools in the process of making a homemade hiller you will need:
- welding machine;
- Bulgarian;
- drill;
- compressor with spray gun;
- emery;
- vice.
Consumables you will need are metal cutting discs, electrodes, primer and oil paint, sandpaper, a sanding attachment for a drill, and solvent.
Pluzhny
The design of a 2-row plow hiller for a walk-behind tractor is shown in the figure:
Construction of a 2-row universal plow hiller
Gardeners often call the plow hiller eared because of its mouldboard wings. Its supporting frame is no different from that of a universal cultivator; Yes, in fact, this is a cultivator with replaceable working parts. Body Type 1 (furrower, tiller) is designed for furrowing (plowing furrows); Type 2 is actually for hilling. Type 1 wings are rigidly attached; the spread of Type 2 blades is adjustable. The Type 2 body is also equipped with a field board that sets the depth of the working body: less on heavy soils, more on light soils; The volume of the blade prism is adjusted in the same way, i.e. hilling height. The principle of operation of both bodies is the same: the coulter knife cuts the soil and transfers it to the ploughshare, which divides the cut layer in two. Only the operation of the wings and blades differs somewhat. The wings simply move the soil slightly to the sides and smooth the top of the blade prism. The dumps (no longer of soil, but of the hiller's ploughshare), on the contrary, form the smoothest possible prism with a sharp ridge.
It's all about the plowshare
There is no prompt adjustment of the plow hiller to the processing conditions. Instead, replaceable plowshares are placed on the frame carrier(s).
Peasant plow
The plow share (item 1 in the figure) is not adjustable for the working width: it is 20-25 cm. It is a direct successor to the old peasant plow (see figure on the right). It is easiest to pull a hiller with a plowshare along narrow rows on light or ordinary garden soil. In addition, the plow share is suitable for shallow plowing, weeding, and digging up potatoes - but not on light sandy soils, where potatoes “scatter” large, tasty tubers widely and deeply.
Replacement shares for plow hiller
A typical plow hiller is a lister, with lister blades of adjustable span, pos. 3 and 4 in Fig. higher. Lister in English is a page turner from to list (to flip through); just list without a preposition indicating that it is a verb (in Russian, a purely inflectional language, there are no such things) it is a list and a few more additional meanings. The working width of the lister hiller is the maximum possible for this type of implement, up to 450 mm. How to make a simple single-row lister hiller with your own hands, suitable for hand-pulling, see for example. video:
Potatoes, as mentioned above, are planted in wide rows. It is very difficult to pull a lister hiller with such a wide mouldboard, and then it will not form the required mouldboard prism. Therefore, potatoes are hilled with a chisel hiller (item 5). In general agricultural terms, a chisel is a knife that performs preliminary or additional tillage of the soil. There is some analogy here with tearing fabric: it is difficult to tear a whole piece of width, because... its edges are coated in a special way specifically against this; Likewise, the soil is cemented by the roots of plants. But if you cut the edge of the fabric just a little, the child will tear it “with a whistle”; This pioneering cut into the soil is what makes a chisel. For better loosening of the soil and the formation of a high pointed prism, the plowshares of chiser hillers are often made split (see the figure below): the springy “feathers” of the wings (which are also called chisers), under the impact of lumps of soil, further loosen it and are further discarded. The advantage of chisel plow hillers for potatoes is that only the underground knife-arrow needs to be made from high-quality viscous carbon steel, and all other parts can be made from ordinary structural steel; complex profiling of the chisel, the ploughshare itself and the dumps is also not required.
Chisel hiller plowshare for potatoes
Do you need a profile?
The surface profile of the ploughshare determines the fuel consumption of the traction unit during plowing and hilling with a plow hiller. The role of energy saving in agricultural technology was discussed above, therefore entire scientific institutes are engaged in profiling the ploughshares of agricultural implements. The development of a new profile that provides savings of 2-3% compared to current consumption is considered a major achievement. But it is very difficult to make a “truly” profiled ploughshare with your own hands, and it is also said above why in private household plots and small agricultural farms, when processing on foot, fuel economy fades into the background. As for the traction force (this is the main thing for a manual hiller), then at the same speed, careful profiling of the ploughshare reduces it slightly; almost imperceptible. But a foundry with a cupola furnace and a stamping press with a capacity of 2-5 thousand tons or more do not exist in a home workshop, and bending and knocking out the most ordinary structural steel with a thickness of 2 mm is exhausting work. Therefore, it makes complete sense to make a plow hiller with your own hands with a ploughshare of a simplified profile.
Design examples
In the Russian zone for cultivating open ground for potatoes from homemade plow hillers, a lister hiller with a simplified ploughshare(s) and a chisel hiller are applicable. Which one to do is determined by the nature of the soil on your site. We do not touch chernozems and other highly productive soils: they are not allocated for dachas, private plots and small farms; If you have such luck, then you need to work as an active hiller. On the gray, brown and brown soils common in the Middle Zone and southern Siberia, potatoes do not produce record yields, but their rows can be narrowed to a limit of 50 cm - the roots of the bush will not spread far, and there will be no tangible benefit from very high hilling. A lister unit will be effective here.
But another version of potato luck is also possible. When the last great glacier melted, flows from it in the Valdai region merged with a river up to 200 km wide (!). It flowed into the sea somewhere between present-day Rostov-on-Don and Taganrog. For the first time, the existence of such a river was proven by alluvial deposits on the Ergeni Upland, and geologists called it the Ergen River, and the sediments remaining from it were called Ergeni. Ergeni are widespread in the European part of the Russian Federation. For example, in the Voronezh region. literally across the road from rich, more than meter-high black soils, a stretch of thin grayish soil on loose sandy loam or sand may begin, God knows where in width - this is Ergen, stretching from here to the Dnieper; Chernigov and Sumy regions. with their famous potatoes (and the unbearably disgusting moonshine made from them) are almost entirely located on Ergeni. Potatoes grow well on spring trees, but they need to be planted in wide rows and hilled with a chisel or disc hiller.
Listerny
Drawings of a simplified profile ploughshare for a lister hiller drawn from a walk-behind tractor are shown in the figure:
There is not a single double-curvature part in the product, and only the knife is made from high-quality steel (detail 5 in the figure). The ploughshare itself is a piece of steel angle from 40x40x2. The blades are attached to it on card loops. Curvilinear blades (item 2 in Fig.) made of sheet steel from 2 mm can be further simplified by making them faceted, as shown at the top left in Fig. In this case, no greater traction force will be required, and the quality of processing of ordinary garden soil will not noticeably deteriorate.
Chiselny
A general drawing of a plow hiller for potatoes on light loose soils with a chisel share is shown in the following. rice.:
Drawings of a plow hiller for potatoes with a chisel share
It can also be used to make the ploughshare itself; shown in Fig. There are enough sizes and sections for this. Only an arrow knife is made from strong, tough carbon steel (a piece of a spring, a part of a car disk, etc.); its cutting edge is ground to a simple wedge with a tip angle of approx. 20 degrees. The span of the dumps is up to 550 mm, they are made of sheet steel with a thickness of 2 mm. First you need to make a life-size model of the plowshare from packaging cardboard, etc. light sheet material, and accurately fit the wings to each other, maintaining the specified dimensions. The model is then disassembled and its parts are used as templates for cutting sheet metal. The cut blanks are bent until they coincide along the weld line and are welded using tacks. Next, the wings are carefully bent to the desired opening angle, complete symmetry, and the seam is finally welded.
Lister model
This homemade hiller for a walk-behind tractor is interesting because it is easy to make in a rigid, non-sliding version. Here is a photo of such a hiller:
Lister hiller
In order to do this, you need little time and material. Cut a blank from 2 mm steel according to the drawing, a certain configuration. Let's sharpen the future bottom edge. Let's bend it in the middle. How to bend? Through a fixed pipe. Complete the fold by punching the leading edge with a hammer. Then we spread the wings of the hiller. We fix the width between the wings with a steel cross member welded between them at the back. We punch through the bottom of the product so that the wings turn out to be ploughshare-like.
From the inside in front of the hiller, we weld a stand with several holes drilled so that you can adjust the depth (higher, lower) of the hiller’s immersion in the soil. We bolt the rod going to the walk-behind tractor to the stand. We attach the bar to the walk-behind tractor.
The same list model, made in a sliding version:
Sliding lister hiller
The hiller lies bottom up, so its structure is visible. Apparently, the hiller is factory-made. You can do exactly the same thing manually. Instead of a cross member tightly connecting the wings, three connection elements are used here: in the middle, welded in front, a rod with holes; two cross members from the wings, overlapping onto the middle rod. The connection point is secured with a bolt and nut.
The diagonal cross members are attached to the fenders using a welded eye, so the cross members can be moved. By moving the bolt closer or further along the rod, you can adjust the width of the wings. Everything else with a sliding lister hiller is done in the same way as with a non-sliding one. Of course, a sliding one is better. It turns out that you can adjust not only the depth, but also the width of the hilling.
Completely on its own
If you are just planning to buy a walk-behind tractor and need to hill up potatoes, a manual plow hiller with the possibility of converting it to mechanical traction will suit you. In this case, the flexible rope strap is replaced with a rigid rake, and the plow share with a wingspan of up to 25 cm (you can’t pull it anymore) with a lister or chisel.
Drawings of a manual hiller of this type are shown on the left in Fig. This is, in fact, a “semi-manual” unit: without modification it is suitable for traction from an agricultural winch. If its power is sufficient, you can immediately install a wider plowshare. When converting it to a walk-behind tractor, you can leave the wheel, but then two people will have to work: one drives the traction unit; the second is a hiller. This way, by the way, is more convenient: the work gets done faster, and the result is better.
Drawings of manual plow hillers.
If on your 4-12 acres the payback of the walk-behind tractor is not expected, then you can make (or purchase) a completely manual hiller, see on the right in the figure. Its feature is the rapid adjustment by lanyard 1 of both the size of the blade and the traction force in accordance with the properties of the soil. Basic dimensions are the same as before. case. The kink of the carrier is also the same, 5 degrees. Rake break approx. 80 degrees, and the bend of the front handles is selected according to the height and physique of the source of traction.
Note: doesn’t it seem paradoxical to you that in an era when people are mastering the quantum world and seriously discussing the possibilities of interstellar travel, implements for cultivating the land using... human muscular traction are actively offered on the agricultural machinery market and are selling well? The slave owners of Ancient Rome would have laughed until their bellies burst.
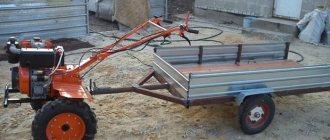
Double lister hiller
There is another option. For processing two rows at once. This improvement speeds up the work process. The walk-behind tractor saves time, effort and fuel. A dual device is made in this way. Two homemade hillers with stands are attached to a square horizontal rod. There are plenty of such metal products. You can always find the right thing. We attach the hiller stands to the rod like this. We cut out (or saw out) a strip of two-millimeter steel. At the ends of the strip we make long rectangular slits.
Be sure to read: Front adapter for walk-behind tractor with steering
We bend the metal in the middle, so that the middle goes around the square bar at a right angle from behind. We thread the hiller stand into the resulting double eyelet at the front. A hole for the bolt is pre-drilled in the mount. We make holes on the rod on the right and left, at the same distance from each other.
We manually cut the threads for the bolt in the holes using a tap with a crank. By screwing the bolt into the rear part of the mount through the thread in the rod, we tighten the hiller stand inserted into the lugs of the mount. Because the bolt will rest against the front of the bar and begin to move the bar forward, pulling on the bent mount, securing the rack.
Double lister hiller
In the middle of the rod we make a small stand for a rigid hinged connection to the walk-behind tractor. By moving the racks with hillers along the bar, you can select the width of the double hilling rows. Sliding wings help you select the blade mode.
Types of plows
A plow for a tractor can be purchased ready-made, but it is possible to make it yourself. Tillage is a complex operation that is performed before sowing crops and after harvesting.
Read also: MTD gasoline lawn mowers: reviews
The models of plows are different, but they are united by their structure. The product has a ploughshare made of metal, which turns over layers of earth. The walk-behind tractor drives across the field, and the ploughshare follows it, turning over the top layer of soil and destroying the weeds. This happens because their roots are cut by the ploughshare, as a result of which the weeds end up deep in the ground after plowing. They cannot germinate and die.
During the plowing process, the soil is loosened, it becomes crumbly and saturated with oxygen. There are different types of plows, so when choosing a tool you need to take into account the area of land, soil type and other indicators, then the quality of land cultivation will be high.
Blueprints
If you decide to build a blade or plow for motor vehicles, then you cannot do without drawing up detailed and correct drawings. The reliability and wear resistance of a homemade part largely depends on its well-designed design. Based on the rich experience of professionals who regularly make good plows for walk-behind tractors, it is recommended to make the ploughshare in such a way that it can be easily and quickly removed.
With this function, sharpening this part will be significantly simplified, and you can safely resort to it before plowing the land on the site.
For the manufacture of the cutting component of the plow, 9XC alloy steel is best suited. The material is used mainly to make discs intended for simple hand saws. You can use steel marked 45, which was brought to the optimal level of hardness during the hardening process. If you only have simple steel, for example carbon, which cannot be heat treated, then by removing the cutting edge (using an anvil) and then grinding it off, you can safely use the steel for working with the soil.
When independently drawing up a drawing of a future plow, it is recommended to rely on accurate diagrams. The do-it-yourself structure will be assembled from the following components:
- a metal pipe that acts as a load-bearing part;
- wheels necessary to move the structure on the ground;
- working cutting part with or without blades (you can fix the cutting elements of old devices);
- attachment mechanism to the walk-behind tractor itself.
When drawing up a drawing of a future plow, it is important to indicate in it the parameters of the future design. No element is left unattended. In this case, when using the circuit, you will get a high-quality and reliable device.
CULTIVATING THE LAND WITH A MOTOR-BLOCK
Before planting potatoes with a walk-behind tractor, the soil must be cultivated so that it is loose and soft. Previously, it was dug up with a shovel, which took a lot of time and effort. Now, having attached cutters to the equipment instead of wheels, we cultivate it quickly and efficiently.
We use a Neva-MB2 walk-behind tractor, a reliable and unpretentious piece of equipment that has been serving us well for several years. With its help we carry out all garden work. Cultivation is carried out at 2nd speed. We start work from the edge of the site. Having reached its end, we cultivate 2 meters of land perpendicular to the furrows; this will be the place to turn around. On the other side of the site we do the same.
Now we cultivate the area along the beds.
The cutters leave small depressions in the soil. In order for the garden to be processed efficiently, when driving in the opposite direction, you need to use one cutter to follow the trail left by the other cutter. Then the land will be cultivated to the depth of a spade, which is optimal for planting potatoes. There are times when someone asks mercenaries to plow the garden with a cultivator, but in order to do it faster, they do not put the cutter in the furrow left by another cutter. This reduces the depth of cultivation and makes it difficult to plant potatoes in such a garden.
Some summer residents cultivate their garden in a circle, starting from the edge, reaching in a spiral to the center of the plot. The disadvantage of this method is that the soil must then be leveled with a rake, which also requires some effort.
When you cultivate the area along the beds, the plowing turns out to be even; you need to use a rake to level the ground only in the places where the equipment turns.
How to do it yourself?
It is easier to manufacture any equipment if there is a corresponding drawing with given dimensions. The tool manufacturing algorithm is required first:
- draw drawings on paper;
- make a template in full size, according to which steel parts will then be cut out;
- bend the disk blanks according to the level until parallel radius lines are reached;
- organize welding work using a machine with the appropriate power for the metal used;
- Sand the welding edges with sandpaper;
- fasten the racks and turnbuckles with bolts;
- weld structural elements;
- Adjust the location of the disks.
The required steel thickness for discs is 2-3 mm. The distance between elements can vary from 35 to 70 cm. Racks and brackets are made from ordinary water pipes with a diameter of up to 20 mm, steel about 2 mm thick.
Required materials and tools
It is allowed to use ordinary lids from kitchen utensils with a diameter of 40 to 60 cm as disks. These parameters are selected experimentally and are related to the power traction of the walk-behind tractor. If the device is too heavy, the unit may simply not be able to pull it. The connector elements will be replaced by a hollow pipe with a diameter of at least an inch, with a meter in size.
The purpose of the traction force will be provided by a hollow pipe with a cross-section of 3⁄4 inches. For the leash, you need to choose T-shaped steel products. Adjustable adapters are useful for coupling the disc elements. The role of fastening elements will be played by bolts. The elements are fastened with welds, bent with a turbo bender or using a gas lamp. If the structure is made for a walk-behind tractor, a bracket should be provided. Hand tools need comfortable handles.
Manufacturing
You can make a hiller for the popular walk-behind tractors “Ugra”, “Belarus 09N-02”, “Motor Sich” using the same principle. The main axles on which the disks are mounted are adjusted to the parameters of the walk-behind tractor. The parts are connected to each other by welding. The main condition for disks is a symmetrical arrangement. Both elements are mounted at an angle, and the best connection option would be an adjustable one using an adapter. The holder elements are bent using a turbo bender and then attached to the axle by welding. The reliability of the fastenings must be checked, and the edges of the weld must be cleaned.
The elements are attached to the axis using the letter T. The assembled structure is installed on the walk-behind tractor using a bracket. The stopper can be inserted inside the profile pipe and pressed tightly. The hiller is completed before planting the potatoes. This will allow you to eliminate defects in a timely manner and not spoil the harvest.
During operation, you will be able to set the optimal speed, which will correspond to the power of your walk-behind tractor. Do-it-yourself mechanisms allow you not only to save on attachments for a walk-behind tractor, but also to facilitate manual labor. Even if there is no unit with a power device on the farm. A homemade manual disk hiller will be a good helper, and will also save money on the purchase of equipment.
Assembly
The basic elements of a manual disc hiller remain the same. Assembly of the product is simpler, since the two discs of the hiller are connected to each other by a regular bushing or by welding through a pipe, which will act as a jumper. Manual models do not require adjustment of the connection angle, so working with them is possible along row spacing with a standard distance. The free rotation of the disks around the axis will be facilitated by the hubs. Due to rotation, the tool will easily enter even heavy, dense soil.
Elements with disks are connected to a beam, for connecting which a welding machine is useful. You can choose anchor bolts as connectors. Such fasteners make it easy to disassemble garden tools.
A handle is useful to operate the device. For which you can choose a steering wheel from an old bicycle or other similar equipment. It is fixed to the beam and aligned with the height of the person who will operate the hiller.
By the way, you can also adapt wheels from an old bicycle to a manual hiller. If they are attached to the frame at the front, this will significantly reduce the load on the operator. Some craftsmen also use a bicycle frame in the assembly, installing hiller discs instead of pedals. The design retains the steering wheel and one wheel.
Advantages
- Making your own plow for a walk-behind tractor has its positive aspects: compliance of the parametric characteristics of the blade and ploughshare with the requirements of a specific type of soil. Speaking about parametric characteristics, it is customary to highlight efficiency, grip dimensions, depth and quality of plowing, and blade angle.
- Taking into account the power characteristics of a walk-behind tractor with a plow, it becomes possible to produce a plow that does not cause significant load on its engine, but provides maximum grip area. The use of high quality materials will increase the service life of the plow.
- In addition, you can take into account the possibility of attaching different attachments. This will make the structure multifunctional, which in turn will make it possible to carry out the entire range of soil treatment work.
General characteristics
There are several types of plows according to their purpose:
- manual - for plowing soft land of a small area;
- horse-mounted - used in situations where it is necessary to cultivate land, access to which is limited for special equipment;
- with rope traction - helps to cultivate the soil in hard-to-reach places, for example, in the mountains or in a swamp;
- mounted – works in conjunction with special equipment, allows you to reduce the turning radius during sequential plowing;
- trailed – general purpose plow.
The mentioned types of plows, in turn, are divided into the following subspecies:
- single-hull;
- double-hull or more;
- disk - reversible;
- rotary.
The generally accepted configuration of a plowing tool, which you can construct with your own hands, is shown in Figure 1.
The main parts of the hull structure have the following parts:
- chisel – pad on the cutting part;
- ploughshare – removable “knife”;
- wing, chest and blade feather;
- uglosnim – cuts corners from layers of soil;
- stand – fastening element.
Modern technologies make it possible to make a plow with your own hands. You can design it according to your drawings or modify a ready-made one to suit your needs. A tool made independently has a number of advantages and characteristic design features.