A hand-held circular saw, or circular saw as it is commonly called, is a versatile and valuable tool in a craftsman's arsenal. It is indispensable when performing carpentry and joinery work. The main task is cutting sheet material, as well as transverse and longitudinal cuts of lumber. The design of the saw allows you to get an accurate cutting line.
A circular saw is used for cutting sheet material, as well as transverse and longitudinal cuts of wood.
To increase accuracy and facilitate the execution of work, various devices and equipment are produced.
For all their advantages, they have a fairly high cost, which not everyone can afford. And sometimes it is difficult to buy them and deliver them to the desired address, especially in areas remote from large cities. Therefore, the logical way out of this situation is to make the necessary device for the circular machine with your own hands.
Devices for working with a hand-held circular saw can be very diverse: from primitive disposable stops to very complex and universal devices. And if to make the simplest devices it is enough just to select even pieces of thick plywood or boards of the required size, then more complex equipment will already be made using tools.
Materials and tools
Diagram of a homemade workbench (side view).
The material from which the tools for the circular saw are made can be selected from scraps of thick (at least 10 mm) plywood or hard wood (for example, birch) available on hand.
Tools you will need:
- carpenter's square for measuring and marking workpieces;
- electric jigsaw or hand-held circular saw (for cutting workpieces);
- drill (drilling mounting holes for fasteners);
- a screwdriver or screwdriver with a set of bits for installing fasteners.
The process of manufacturing accessories for a circular saw consists of several stages:
- a sketch is developed and details are thought out;
- material is selected;
- marking and cutting of material is carried out;
- assembly and, if necessary, adjustment of devices.
Circular saw guide
Diagram of a homemade workbench (front view).
The simplest device is a guide bar. You can easily get a clean, straight cut. For manufacturing you will need an even straight bar of the required length. It is attached to the material being processed using self-tapping screws (if permissible) or clamps. The fastening must be carried out at such a distance from the required cutting line that the position of the saw blade coincides with the marking when the side sole of the circular saw rests on the block. This method is suitable for a one-time cut, however, when repeating the same type of operations, the procedure for marking and installing the block will need to be repeated each time.
The guide bar can be improved by securing it to a sheet of durable plywood 6-8 mm thick. When working, one edge of the sheet will align with the cutting line. At a distance equal to the distance between the saw blade and the edge of the circular saw sole (working distance), a guide block is attached to the plywood with self-tapping screws. When working, you only need to align the working edge of the plywood sheet with the cutting line and secure the opposite edge with clamps.
Features of a manual circular saw
The tool is based on an electric motor with a saw blade mounted on a shaft. Models from different manufacturers have approximately the same design.
The products are equipped with many additional accessories:
- Start button with rotation speed controller;
- Protective casing;
- Retractable parallel stop;
- Regulators for cutting depth and tilt angle;
- Sawdust ejection pipe.
The saw blade rotates towards the base plate, towards itself. The main rule when working with a manual circular saw: first start the engine so that the disk begins to rotate, then carefully bring it closer to the surface to be treated.
The tool is convenient when performing the following work:
- Sawing boards, plywood, particle boards;
- Cutting timber, cutting slats;
- Recesses for groove tenons;
- Edge processing, chamfering;
- Cutting waste lumber for fuel.
The power of the device is selected based on needs. For short-term work in domestic conditions, processing workpieces up to 4.5 cm thick, a power of up to 1.2 kW is sufficient. Semi-professional tools have a power of 1.8 kW and cut workpieces up to 6.5 cm thick.
Professional equipment with a power of 2.2 kW can withstand long-term loads and leaves a cut of up to 8.5 cm. Woodworking enterprises use saws with a power of up to 5.5 kW; their weight reaches 100 kg.
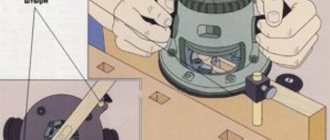
Breakout protection: device nuances
Diagram of a homemade workbench (top view).
The simplest devices can also include a block fixed at the point where the saw blade exits the workpiece. This will avoid such unpleasant effects as chips and tears. And if these defects do not play a role on the cut boards that will be used to make the frame of a house or formwork, then during carpentry work the cut must be smooth and clean.
To make more complex universal devices, you will already need tools and a certain amount of materials. The time spent on their production will subsequently be more than repaid by the ease of completion of the work, accuracy and ultimately saving the same time.
Types of circulars
According to the method of performing the work, circular saws are divided into two types:
- Stationary;
- Hand tools.
Each type has its own characteristics, advantages, and disadvantages. The main difference between a stationary machine and a hand tool is the object of movement. On a stationary machine, the sawn material is moved along the saw blade; the hand tool is moved along the stationary workpieces.
A circular saw is chosen depending on the type and amount of work performed. To make a shelf for books, a stool, or a flower stand, all you need is a hand saw.
For mass production and sawing of long, dimensional workpieces, a stationary installation is used. Many experienced craftsmen have both types of circular saws at their disposal.
Additional accessories
Assembling legs for a workbench.
- Blank template. If it is necessary to manufacture parts of the same type, you can use one of them as a guide template. To do this, a workpiece of the required length is cut and a thrust strip is attached to one end. The width of the rail must match the working distance. When working with this device, the thrust bar must fit snugly against the end of the workpiece. This way you can get a large number of parts of absolutely the same length without spending time marking the cutting line.
- Cutting square. For permanent use, you can make a cutting square. It consists of two massive wooden or plywood slats fastened with overlapping screws in the shape of the letter “T”. The length of the protruding ends of the “T” crossbar is adjusted to match the working distance of the circular saw. Positioning the aligned end of the crossbar against the marking line will allow for an accurate perpendicular cut.
- Edge stop. The standard configuration of the circular saw includes an angular (edge) stop. It allows you to make cuts parallel to the edge of the material being processed. Using a self-made edge stop, due to the expanded and longer base, you can get a cleaner and more accurate cut.
To make an edge stop, a stop strip and a base for a circular saw are cut out of 15 mm thick plywood. Keyways are selected in the base and thrust rack using a hand router. The dowels themselves are made from scraps of hard wood or from the same plywood and are attached to the grooves of the thrust strip. To strengthen the stop at an angle of 90°, another rail of sufficient width is attached to the stop rail, which will rest on the workpiece. Adjusting the distance of the cut from the edge of the workpiece is carried out by moving the stop bar along the guides and then fixing it using a locking screw.
Assembly of the front part of the workbench.
To install the screw, a through groove is sawn through the base. To increase cutting accuracy and improve work safety, it is recommended to use two screws. A hole is made in the base plate for the saw blade and a mounting system for the circular saw is installed. The design of the fastening system can be very diverse and will depend on the specific brand of saw. The common point for all options should be reliable fixation of the circular saw and the ability to remove it from the device after finishing work. To make it easier to set the required cutting width of the material, a measuring tape is attached to the front surface of the base of the device.
How to make a device with your own hands
The cutting device is made for a specific model of power tool. On your circular saw, measure the distance from the engine to the bottom plane of the sole and subtract 5 mm. The result obtained is the height of the guide stop.
Removing the required dimensions of the circular saw.
Prepare a plywood base with right angles and wooden slats with parallel edges according to the dimensions.
Blanks for assembling a device for cross-cutting with a circular saw.
Measure the distance from the cutting blade to the edge of the sole.
Add an allowance of 6–10 mm and install a guide rail at this distance from the right end of the plywood. Secure the plank with countersunk screws, ensuring its strictly perpendicular position.
Screw the stop block on the back side and fix the device on the workbench.
Cut the plywood to the final width with a circular saw, creating a reference edge for precise positioning of the jig along the markings.
Draw a template for the cam clamp cam on paper.
Drawing of an eccentric clamp.
Mark the piece on 10mm plywood and use an awl to mark the center of the drill hole for the bolt.
Cut the workpiece with a jigsaw.
Make a washer with a diameter of 50 mm from the same plywood using a ballerina extendable wood drill.
Sand the workpieces and select an M6 or M8 furniture bolt with a mustache (or with a square headrest), a handwheel nut, a washer and a bushing. The latter can be made from a tube of suitable diameter. The length of the sleeve is the total thickness of the base, lever and plywood washer.
Ready-made plywood eccentric.
Make holes in the base with a drill according to the diameter of the bushing, which serve to rearrange the eccentric clamp according to the width of the board being cut.
Hole drilling diagram.
Assemble the eccentric mechanism: insert a bolt with a sleeve on top, and install a wooden washer, the cam itself and a steel washer from below. Tighten the parts with a nut.
Stick a strip of sandpaper on the inside of the stop to prevent slipping when the eccentric is locked, which can happen when the device is fastened to a smoothly planed workpiece.
The clamping system of this device has a stroke that ensures fastening on boards with a spread of approximately 10 mm in width. If you need to cut or trim pieces of a different size, simply place a wooden block in front of the stop beam.
An example of using a device for cross-cutting a board of smaller width with a hand-held circular saw.
If desired, the potential of the considered device can be expanded by adding a cutting angle of 45°. To do this, you will need to slightly increase the dimensions of the support platform and install a second thrust block at a given angle.
Device for cutting beams
To cut a large number of identical beams, it makes sense to make a device called a saddle. It consists of three parts connected in the form of the letter “P” (back and two sides). The width of the backrest should correspond to the width of the timber being cut. The width of the sidewalls is selected to such a length that they can provide sufficient support for the edge of the circular saw sole until the saw blade enters the workpiece material. It is also necessary to provide grooves or holes in the sidewalls for reliable fastening of the device to the timber being processed using clamps.
Workbench assembly diagram.
Work with this device is carried out as follows:
- the cutting line is marked;
- at a distance equal to the working distance from the cutting line, the device is set and fixed;
- The beam is cut by moving a circular saw along the side surface of the device.
The advantage of this device is that there is no need to reconfigure when cutting timber whose thickness exceeds the reach of the saw blade. To do this, two saw passes are made from opposite sides.
The design of the device for working with bars can be slightly improved by analogy with the modernized guide bar. To do this, bars are attached to one or both sidewalls at a distance equal to the working distance, serving as a stop for the sole of the circular. This way, the edge of the side piece will coincide with the required cutting line.
Other types
If for some reason the plywood rail does not meet your requirements, you can make the guide of a more complex design. Below are a few more examples of guides for a manual circular saw that anyone can make with their own hands.
Aluminum profile tire
This type of tire differs from a simple plywood tire in that a U-shaped aluminum profile is installed in the guide gap. Its advantage is that the rigidity of aluminum slightly increases the cutting accuracy.
For better sliding of the saw along the bar, as limiters, you can attach not thick plywood to the guide groove of the sole, but a pair of cylinders of suitable height made of fluoroplastic or other material with a low coefficient of friction.
Ruler from a building code
There are long aluminum rules that are used by finishers to level walls. To make a guide ruler with your own hands, rules are suitable, the design of which provides a groove for the free movement of the handles.
The main advantage of such a line is the absence of elements protruding above the surface of the workbench. To do this, you need to take two collapsible clamps and slightly modernize them.
The handles are removed from the rule, and their upper parts from the clamps, which are replaced with polypropylene or fluoroplastic inserts. The profile of these inserts must be T-shaped so that they can be installed with the wide part into the rule groove and be held there.
The result is a ruler that is attached to the workbench only at the bottom. This will allow you to move the saw freely in the work area without fear of getting caught on something.
However, such a tool cannot be called a full-fledged tire. This is the ruler that needs to be adjusted before each cut.
Rail miter box
This device is most often used for cross cutting (trimming) of material.
Usually it consists of two parallel metal corners, the ends of which are rigidly fixed to a plywood or metal base.
The saw platform moves freely along the corners, as if on rails.
The corners are secured with bolts or studs, which are also used to adjust the height of the “rails” relative to the base. The height should be such that the material to be cut fits freely under the corners.
To make the saw movement smoother, the corners on the inside can be glued with a material with a high slip coefficient. For even smoother movement, you can install the saw sole on a platform with metal wheels.
External carriage on bearings
A circular saw on an external carriage is more like a stationary format-cutting machine. This design is highly stable and, accordingly, provides high cutting accuracy.
The remote carriage is made of a metal I-beam, which is firmly attached with its lower plane to the workbench. The carriage itself moves along the upper plane - a platform, the lower edges of which are bent inside the I-beam and are equipped with bearings that allow it to slide freely. These same bearings, tightly pressed to the I-beam axis, eliminate lateral play of the carriage.