In 1790, the Italian physiologist Luigi Galvani noticed that the leg of a dissected frog twitches if it is simultaneously touched with two instruments made of different metals. At that time it was already known that muscles could contract under the influence of electric current, so Galvani correctly attributed this phenomenon to the action of electric current. True, he believed that electric current appears due to some physiological processes in the frog’s leg.
Another Italian scientist Alessandro Volta was able to give the correct explanation for this phenomenon. He found that this phenomenon was associated with the presence of two dissimilar metals in contact with the electrolyte, which was the blood of the frog, and the paw itself played only the role of a sensitive indicator of electric current [1]. Based on his studies of Volta in 1799. created the first chemical current source. In this device, Volta used copper and zinc electrodes immersed in a sulfuric acid solution.
Zinc reacts violently with acids. It is not zinc atoms that pass into the solution, but positive ions, so that an excess of electrons remains in the electrode, therefore, the zinc plate is negatively charged. In general, most metals become negatively charged when immersed in an electrolyte; a similar process occurs on the surface of a copper plate. But the excess of negative charges on the copper electrode is much less, which means that its potential is higher relative to the zinc electrode. If you connect copper and zinc plates with an external conductor, then electrons will begin to move from the zinc plate to the copper one, i.e. electric current will flow in the circuit [2].
The electrical voltage that occurs between the electrodes depends on what metals the electrodes are made of and on their interaction with the electrolyte. The voltage supplied by the element does not depend in any way on the area of the plates.
Often the voltage provided by one galvanic cell is not enough. Then they can be connected in series into batteries.
In general, making a chemical current source is not at all difficult: you need to place two plates of different metals in an electrolyte [3]. Such galvanic cells arise spontaneously. For example, if rain wets a roof covered with galvanized iron, there are probably scratches on the iron, so that both iron and zinc come into contact with water, which acts as an electrolyte. The zinc in such a pair will begin to actively degrade, but the iron will not be affected until all the zinc is destroyed. This is why iron is coated with a layer of zinc.
For the same reason, twisting copper and aluminum wires together is, to put it mildly, not the best idea. Galvanic corrosion will begin at the point of contact, which will lead to an increase in the electrical resistance of the contact, which in turn will lead to greater heat generation and even faster corrosion. All together this can cause destruction of the connection and even a fire.
Galvanic corrosion can be most clearly observed by the example of contacts of iron with zinc and copper in a salt solution. Iron clips were placed on zinc and copper plates and immersed in a salt solution.
A day later, the paperclip connected to the copper plate became covered with rust. While the paper clip, which was in contact with zinc, was not damaged at all.
Scientists have compiled an electrochemical series of metal voltages. The farther apart the metals are in this row, the higher the voltage produced by the galvanic cell composed of these metals. Thus, a gold-lithium pair can theoretically produce an electromotive force (EMF) of 4.72 V. But such a pair will not be able to work in an aqueous environment - lithium is an alkali metal that easily reacts with water, and gold is too expensive for such an application.
In practice, the Volta element has a number of serious disadvantages.
- Firstly, its electrolyte is a very caustic liquid - a solution of sulfuric acid. Liquid electrolyte is always inconvenient or even dangerous. It may splash or spill if the housing is damaged.
- Secondly, hydrogen will be released at the copper electrode of such an element. This phenomenon is called polarization. In many properties, hydrogen is very close to metals, so its bubbles will create an additional emf of polarization, tending to cause a current in the opposite direction [2]. In addition, gas bubbles do not allow electric current to pass through, which also leads to a weakening of the current. Therefore, you have to periodically shake the vessel, removing bubbles mechanically, or introducing special depolarizers into the electrolyte.
- Thirdly, during the operation of the Volta galvanic cell, the zinc electrode gradually dissolves. Theoretically, when the galvanic cell is not used, the destruction of the zinc electrode should stop, but since zinc almost always contains impurities of other metals, when they come into contact with the electrolyte, they play the role of a second electrode, forming a short-circuited element, which leads to galvanic corrosion of the zinc electrode [2] . In order to eliminate this drawback, it is necessary to use ultra-pure zinc or design to provide for the possibility of removing the zinc electrode from the electrolyte. So when the battery is not in use, the electrolyte should be drained from it.
But for demonstration purposes, all these disadvantages can be neglected if the sulfuric acid is replaced with a safer electrolyte.
Ground battery
Navigation — → Electricity →
To power and charge portable electronics in places where there is no power grid, you can successfully use, along with other sources of electricity, the simplest chemical current sources, galvanic primary and secondary elements.
Their use is possible at dachas for long-term residence in the absence of an electrical network, as well as in remote villages where there is either no electricity at all, or constant power outages.
In Soviet Russia, chemical current sources or galvanic cells became widespread in amateur radio technology in the middle of the last century, since these sources are easy to manufacture and made from readily available materials.
Now that portable electronics have become very economical in terms of power consumption, their power supply from homemade chemical current sources can be very effective, since such current sources were successfully used at the dawn of the development of radio engineering.
Then the equipment consumed many times more electricity than modern equipment, and now with the development of energy-saving lighting technology.
For example, LED lighting consumes 4-5 times less electricity than the consumption of a conventional light bulb, and modern mobile phones, PDAs, and other gadgets consume not just more, but even less than radio equipment of past decades.
The simplest galvanic cell
Voltaic Column The first chemical current source was invented by the Italian scientist Alessandro Volta in 1800. It was Volta's element - a vessel with salt water with zinc and copper plates lowered into it, connected by wire.
The scientist then assembled a battery from these elements, which was later called the Voltaic Column. This invention was subsequently used by other scientists in their research. So, for example, in 1802, Russian academician V.V.
Petrov designed a Voltaic column of 2100 elements to produce an electric arc.
In 1836, English chemist John Daniel improved the Voltaic element by placing zinc and copper electrodes in a solution of sulfuric acid. This design became known as the "Daniel element".
In 1859, French physicist Gaston Plante invented the lead-acid battery. This type of cell is still used in car batteries today. In 1865, the French chemist J.
Leclanchet proposed his galvanic cell (Leclanchet element), which consisted of a zinc cup filled with an aqueous solution of ammonium chloride or other chloride salt, into which was placed an agglomerate of manganese(IV) oxide MnO2 with a carbon conductor.
A modification of this design is still used today in salt batteries for various household devices. In 1890, in New York, Conrad Hubert, an immigrant from Russia, creates the first pocket electric flashlight.
And already in 1896, the National Carbon company began mass production of the world's first dry cells, Leclanche "Columbia". The longest-lived voltaic cell is the zinc-sulfur battery, manufactured in London in 1840.
The bell connected to it still works today. (source WIKIPEDIA)
The simplest copper-zinc element consists of two electrode plates immersed in an electrolyte solution; when immersed in an electrolyte, a potential difference arises between the metals; when a copper plate and a zinc plate are immersed in a solution of table salt, a potential difference of approximately 1 volt occurs, and one element, regardless of size, has the voltage is one volt, and the power of such an element depends on its size and the area of the plates immersed in the electrolyte. To obtain a higher voltage, these elements, like factory batteries, are connected in series to obtain the required voltage.
Characteristics of copper-zinc element
Copper-zinc current sources. The production of these chemical current sources began back in 1889. Currently, they are produced on a small scale in the form of cells with a capacity of 250 to 1000 Ah. Smooth zinc plates and plates made from a mixture of copper oxide, copper and a binder are placed in a glass or metal vessel with a 20% NaOH solution.
The elements have a voltage of 0.6-0.7 V and a specific energy of 25-30 Wh/kg. Their advantages include constant discharge voltage, very low self-discharge, trouble-free operation and low price. Used in signaling and communication systems on railways.
In real conditions, energy intensity can vary greatly, and it depends on the area of the plastic, the purity of the metals and the density of the electrolyte.
An element assembled in a liter jar, with plates of maximum area, a twenty percent salt solution in the form of an electrolyte, produces a voltage of 0.6-1.1 volts, 10-20A/h, but in such elements the discharge current is very small, and the circuit current maybe about 100-150mAh.
, and the less the connected source consumes, the more electricity the copper-zinc element can generate. An element assembled in a liter jar with a discharge current of 50 mAh will work from 200 hours to 400 hours or more, but over time the plates oxidize and the voltage drops, and eventually the element stops working. To restore the element, you need to replace the electrolyte and clean the plates from oxidation and the element will work again.
The oxidation process depends on the discharge current; the higher it is, the faster the element will fail, but on average, an element in a liter jar before cleaning and recharging will work for about 3-4 months at a discharge current of 50 mAh, and at a discharge current of 2- 5 mAh will last for a year or more. A simple liter cell is not enough to power even a simple miniature radio, and in order to obtain the necessary characteristics you need to assemble a block of several elements.
Nowadays, basically all portable electronics are powered by a voltage of 3.6-4.5 volts, and in order to get such numbers you need to connect 4-5 such elements in series; if you connect 5 liter elements, you will get approximately 3.5-4.8 volts , and the capacity increases to 40-50A/h, and the discharge current can reach 400-600 mA/h, therefore such a source can easily cope with powering a small radio or LED flashlight, as well as charging miniature phone batteries within 10-30 hours. But to power powerful LED flashlights and power modern phones and PDAs, such a source will not be enough.
For stable power supply you will need something larger, for example an element with a capacity as in the figure, volume 40-50 liters, for stable power supply of portable indoor LED lamps and other equipment.
To manufacture such a chemical source of electricity, you will not need 5 copper plates of size 20/40, and 5 of the same zinc plates, then each plate needs to be soldered or pressed by bending the corner of the plate, insert a wire and flatten it with a hammer.
Afterwards, you need to secure the plates together through electrically conductive spacers (a wooden block or a plastic tube), then lower them into containers with electrolyte, this is either a solution of table salt, or a solution of ammonia, or a solution of sulfuric acid (auto electrolyte), then we connect the resulting batteries in series, that is, the copper plate of one element is connected through a wire to the zinc plate of another element, and as a result, on one side of the resulting block there remains a copper plate with a wire (+), and on the other a zinc plate (-). The larger the area of the plates and the better the electrolyte, the higher the efficiency of such a current source.
Do-it-yourself voltaic pole: making from portable devices
. We are engaged in the installation of fences, gates (including automatic ones), installation of poles and power lines throughout Moscow and the Moscow region. Call from 09:00 to 21:00 daily.
The Voltaic column was invented by such a famous scientist from Italy as Alessandro Volt. He conducted the first tests of a chemical current source back in 1800. It was called the Volta element.
It was a vessel with salted water and zinc and copper plates lowered into it, which were connected with wire. Then the scientist assembled a whole battery of such elements, which was later called the Voltaic Column.
Any tester could make a Voltaic pole with his own hands and successfully used it.
Operating principle
The simplest copper-zinc column is assembled from 2 electrode plates located in an electrolyte solution. In this case, by immersing the electrolyte in the space between the metals, you create a potential difference.
Attention! If you immerse copper and zinc plates in a salt solution, there will be a potential difference of approximately 1 volt, while each individual element, regardless of size, experiences a voltage of 1 volt. Remember that the power of the plates in the electrolyte depends on the area of action.
To create a higher voltage or power of these elements, factory batteries are made in series connected, the number is increased until the required voltage is obtained.
Factory design diagram
History of the development of the design of the Volta element
The discovery was further developed by scientists from other countries who successfully used it in their research. For example, in 1802, academician from Russia Petrov assembled a battery - a Voltaic column of 2.1 thousand elements, which provided an electric arc.
Subsequently, in 1836, the English-born chemist J. Daniel modernized the Volta element by placing electrodes of zinc and copper in a solution of sulfuric acid. This design was nicknamed the voltaic column device.
Second half of the nineteenth century
Then in 1859 in France, physical scientist Gaston Plante invented another type of battery - the lead-acid battery. It is still used in car batteries. But already in 1865 J.
Leclanche invented his own galvanic cell, which was called the Leclanche element. It consisted of a zinc glass, which was filled with a solution of aqueous ammonium chloride or other chlorine salt.
An agglomerate of manganese (IV) oxide with the formula MnO2 with a carbon current conductor was placed in it.
A modification of this design can also be used in modern salt batteries in various household devices. At this time, in 1890, in New York City, researcher Conrad Hubert, who immigrated from Russia, created the first electric flashlight.
Next, the National Carbon company in 1896 began mass production of the first dry cells named after Leclanche “Columbia” in the world. The longest-serving galvanic device based on a sulfur-zinc battery is a storage device manufactured in London in the second half of the 19th year.
It was connected to the bell and is still working.
Standard circuit of a simple battery
Modernity
Portable technology that people use today requires a voltage of at least 3.6 volts (but better - 4.5). To obtain this indicator, it is recommended to use 4-5 of the above-described elements connected in series.
When 5 liter (electrolyte volume) cells are connected, they achieve a reading of 3.5-4.6 volts, and the capacity increases to 45-50 amperes per hour. If the current discharge reaches 400-600 milliamps per hour, then you can power a small radio or LED flashlight with such a battery.
You can also charge a miniature phone battery for up to 10-20 hours, but powering modern phones and gadgets will require more serious sources.
Necessary materials
To make your own voltaic pole (chemical source of electricity), you will need:
- a larger capacity, for example, 40-50 liters (this is the minimum for stable power supply to portable LED light bulbs and other equipment).
- five 20/40 copper plates;
- five zinc plates 20/40;
- any salt.
At the preparatory stage, each plate is soldered or pressed, bending the corners of the plates. Then the wires are inserted and flattened with a hammer.
Assembling the structure of a chemical power source
Secure the plates together using electrically conductive spacers. Wooden blocks or plastic tubes are suitable for this.
Lower the column of plates into a container with electrolyte (a solution of table salt, ammonia or sulfuric acid - autoelectrolyte). The acid is added in portions and the density of the solution is periodically checked with an aerometer.
It is necessary to ensure that it is 1.21-1.31 grams per cm3 - this is approximately 280-300 g of acid.
Single element model
Next, connect the resulting batteries: connect the copper plates of one element with a wire to the zinc strip of the second element.
Thus, you will have a copper strip attached to a wire on one side of the block (+ positive), and a zinc strip on the opposite side (negative).
The efficiency of such a source can be increased by increasing the area of the plates, or using a stronger electrolyte (sulfuric acid).
Manufacturing technology of an alternative power source
Remember:
( 1 average: 5.00 out of 5)
digital electronics computing embedded systems
How to make a 9V battery with your own hands
The voltaic column was the world's first voltaic battery, which was little more than silver and zinc disks separated by paper soaked in salt water. Often in classrooms, an experiment is carried out to assemble such a pillar from a pile of copper coins, tin foil and vinegar or lemon juice.
Enthusiast Omars2 has a different approach to this old experiment. He developed a technique for creating a 9V battery using a number of zinc screws, copper wire and salt water.
The syringe plunger in this case serves as a substrate for the plating cells, and each cell is just a screw with paper wrapped around it. In this case, after wrapping it in paper, copper wire is wound on it, making a total of 35 turns. The battery is soaked in salt water, but vinegar or lemon juice will likely work even better. Warming the electrolyte is also a good idea.
The principle of operation of such a homemade battery is quite simple. Salt dissolves in positively charged sodium ions and negatively charged chlorine atoms to form an electrolyte. The cathode donates electrons to the solution, leaving it positive. The other electrode, called the anode, collects electrons so it only has a negative charge. The difference between the magnitude of the charges on the two electrodes creates a potential difference, that is, voltage. When you close the circuit, electrons flow from the anode back to the cathode, causing an electrical current to flow.
By assembling such a battery and connecting a multimeter to it, you can expect the voltage reading to be in the region of 7 V to 9 V DC, if everything was done correctly, of course. After this, you can connect some load to such a battery, for example, a light bulb, and it should work normally. To charge this battery, you will need a multimeter to determine the polarity of this battery and then you will need to use a 9-volt DC adapter to charge. The output should be somewhere around 0.30 - 0.40 A.
The process of creating a 9V battery is shown in the video below.
If you choose to make this version with coins, make sure they all contain a good amount of copper. Otherwise, such a battery will either work poorly or not work at all. If you don't have copper coins, you will need another metal material, such as tin foil.
Source
How to make a battery easily
A battery is a chemical source of electrical voltage. All commercially available batteries have similar operating principles. The positive terminal of the product is made of manganese or lithium, the negative terminal is made of zinc or aluminum. You can assemble the battery yourself from simple materials.
Batteries are a source of electrical voltage.
Homemade battery from improvised means
The battery can be made from materials whose properties are similar to those of substances used in industrial conditions.
From lemon
The acid contained in the juice of the fruit acts as an electrolyte. Electrodes are made from thin wire, nails or needles. The iron element is the anode, the copper element is the cathode. The lemon is cut in half and placed in a small container (jar or glass). The wires are connected to the electrodes, the stripped ends are inserted into the pulp of the fruit at a distance of 1 cm from each other.
Using a multimeter, measure the voltage supplied by a homemade galvanic cell. If it is not high enough, several lemon batteries are connected in series.
Jar with electrolyte
Using this method, it is possible to assemble a device that resembles the world's first battery. Electrodes are made of copper and aluminum. Elements must have a large area.
The aluminum electrode is connected to the wire using a clamp or bolt, while the copper electrode is soldered. The parts are immersed in a jar at a short distance from each other. A lid with holes is used for fixation.
The following compositions are used as electrolytes:
Making batteries with your own hands.
- Ammonia. The substance is mixed with water in a ratio of 1:2. Ammonia cannot be used as an electrolyte. A suitable substance (ammonium chloride) has the form of a white, odorless powder. It is used as a fertilizer or soldering flux.
- Sulfuric acid solution.
The substance is mixed with water in a ratio of 1:5. You cannot pour the acid first. In this case, the added water boils and splashes fall on the person’s skin and clothing.
The solution is poured into a glass container so that the distance to the edges of the jar is at least 2 mm. Using a multimeter, measure the resistance and calculate the required number of batteries.
The principle of operation of a homemade element is similar to that of a salt power source.
Copper coins
The electrodes are made of aluminum and copper; 9% acetic acid is used as the electrolyte. Coins are cleaned of dirt by soaking them in vinegar. Circles are cut out of cardboard and foil. Cardboard products are soaked in a solution of acetic acid; they must absorb the electrolyte. A column is laid out from circles and coins.
The cardboard piece is placed first, the foil piece is placed second, and the coin is placed third. Wires are pre-connected to the extreme elements. Instead of soldering, the cables can be pressed to metal parts and sealed with tape. When the battery is used, the coin becomes unusable. You should not make power supplies from valuable products.
Battery in a beer can
The negative terminal is the body of the aluminum container, the positive terminal is the graphite rod. You will also need coal dust, polystyrene foam, water, paraffin candles and salt.
The top of the jar is removed, a circle is cut out of foam plastic, which is inserted into the container. A hole for the rod is made in advance. The latter is installed in the central part of the jar. The remaining space is filled with coal dust.
The material is impregnated with an aqueous solution of salt (3 tablespoons of product per 0.5 liters of water). The edges of the jar are filled with paraffin.
Potatoes, salt and toothpaste
The potato battery is intended for one-time use. It is used to produce a spark by shorting wires. To make the element you will need a large potato, insulated copper cables, salt, wooden sticks and toothpaste. The assembly is done like this:
- Potatoes are cut into 2 equal parts. A recess is formed in one half, where salt and paste are added.
- The ingredients are mixed until smooth. The electrolyte should fill the depression.
- In the other half of the potato, make 2 holes at a distance of 1-2 cm. They should coincide with the filled recess.
- The stripped ends of the wires are inserted into the holes, and the halves are combined. The wires must be immersed in the composition.
- Potato parts are secured with toothpicks. After a few minutes, the cables short out, creating a spark to start the fire.
Step-by-step instructions for making a battery
Cylindrical batteries with a height of 50 mm can be easily made at home.
Required materials and tools
Before starting the experiment, prepare the following materials and tools:
- corrugated cardboard;
- flat copper washers with a diameter of 1 cm - 12 pcs.;
- flat zinc washers with a diameter of 1 cm - 15 pcs.;
- purified water;
- heat-shrink tubing;
- acetic acid 70%;
- salt;
- soldering iron;
- containers for preparing solutions;
- multimeter;
- sandpaper.
Corrugated cardboard is one of the materials for making batteries yourself.
Cleaning the washers
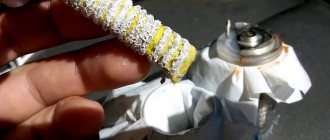
The homemade battery is based on 11 copper-zinc washers that produce a voltage of 0.15 V. The parts must participate in chemical reactions, so they are cleaned with sandpaper. The result is a smooth, shiny surface.
Electrolyte preparation
Metals create electric current, but it requires a medium to conduct it. The electrolyte is made from 120 ml of water, 4 tbsp. l. salt and 30 ml of acetic acid. The ingredients are mixed and infused for an hour.
Working with cardboard
To form the required distance between the washers, lay out circles cut from corrugated cardboard. After cutting, the material is impregnated with the solution prepared at the previous stage.
Tube stretching
Before placing the copper-zinc washers, the tube is given the desired diameter. Using needle nose pliers, the product is stretched by 10% of its original size.
Device testing
Electrolyte-impregnated cardboard is placed on the copper washer. The multimeter is switched to constant voltage mode. The black wire is connected to the copper part, the red wire to the zinc part. A value of 0.05-0.15 V should appear on the device screen. This is enough to create a battery from 11 conductive components.
Final battery assembly
The elements are laid in the following sequence: copper - zinc - piece of cardboard. Each part is aligned perpendicular to the axis of the tube. For convenience, the washers are pressed with a thin rod. Having installed the last part, the homemade battery is compared with the factory one. If necessary, an additional zinc washer is introduced. The tube is heated, creating something like a battery. Excess is removed.
Contact installation
Using a heated soldering iron, solder points are welded to the ends of the resulting structure. When installed in the socket, the soldered parts must touch the contacts of the battery holder.
Area of use
Electrochemistry has many important applications, especially in industry. Its processes are used to make electric batteries. They have many uses including:
- A fuel cell converts chemical potential energy obtained from the oxidation of fuels, such as gas, hydrogen, hydrocarbons, and alcohols, into electrical energy.
- Various types of piezo lighters for gas.
- Electrical appliances such as mobile phones.
- Digital cameras are lithium.
- Hearing aids (silver oxide).
- Electronic watches (mercury/silver oxide).
- Military power sources (thermal).
- Batteries A, AA, AAA, D, C and others.
Using chemical reactions to produce electricity is currently a priority for many researchers. The ability to adequately utilize chemical reactions as a source of energy will greatly help solve environmental pollution problems.
All about the galvanic cell
The world's first galvanic cell was developed by Luigi Galvani. Read about his story in this article.
In essence, this is a temporary source of electric current, which is formed due to the occurrence of a chemical reaction. The flow of electrons is formed due to the interaction between two dissimilar metals.
As a result, chemical energy is converted into electrical energy, which can already be used in everyday life.
A concentration galvanic cell is a current source that includes 2 identical metal electrodes placed in a mixture of salts of this metal in different concentrations.
In addition to Galvani, Daniel Jacobi was involved in the creation of an effective battery. He slightly modified his energy source. It consists of a copper plate placed in CuSO4 and a zinc plate immersed in ZnSO4. To prevent them from directly affecting each other, a porous wall is installed between them. Below is a diagram of Daniel Jacobi's galvanic cell.
Zinc and copper have different activities and therefore their charge will be different in magnitude. As a result, the level of the electrodes is also not unambiguous.
This allows them to move and produce electrical or galvanic current. It begins to flow when any person or inventor of a current storage device connects a load.
It can be a light bulb, a receiver, a computer mouse and other electrical devices.
Galvanic cell diagram
By scheme we mean its composition and structure. It can be made from several chemical elements using auxiliary devices. Below the structure of a galvanic cell will be briefly described. Read more about it in this article!
Galvanic cell device
The simplest energy storage device consists of:
- Coal rod.
- Two dissimilar metals.
- Electrolyte.
- Resin or plastic.
- Isolator.
As can be seen from this diagram, the structure of the galvanic cell contains a negative and a positive electrode. They can be made of copper, zinc and other metals. They are named after the copper-zinc type. Sometimes they are called dry batteries.
The designation of a galvanic cell in the diagram is made in the form of two vertical straight lines close to each other at a short distance. One of which will be smaller.
Along the edges near each such line there are signs indicating polarity. The long line is given a plus, and the short line a minus. Voltage may be located nearby.
This means that the circuit in which the battery is used operates only on this voltage.
Operating principle of a galvanic cell
The operation of a galvanic cell is carried out by the movement of electrons from one metal contact to another. There is some kind of chemical transformation going on. Read more about the thermodynamics of a galvanic cell and the formation of galvanic electricity here.
Answers to frequently asked questions
| Galvanic | Explanation |
| Battery | An energy source that operates through processes occurring in a limited miniature space. In particular, energy appears when a chemical reaction occurs. |
| Volta element or Voltaic pillar | This is an energy element first created by a scientist named Volt. |
| Process | The interaction between chemical elements resulting in the formation of electric current. |
| Discharge | This is the completion of a chemical reaction. That is, there will be no interaction between substances. Galvanic discharge is available in the game Warframe. In fact, this is a modification that is in great short supply. It is used for edged weapons. Polarity V2. |
| Galvanic contact | This is the contact between the electrodes and the solution. |
| Effect | The appearance of a difference between two contacts made of 2 types of metals. The value depends on the temperature and chemistry of the conductors. Essentially this is Volta's first law. |
| Connection/Communication/Circuit | Combining 2 or more sections of an electrical circuit with a current source. |
| Galvanic charge | Filling the battery with energy. |
Galvanization is the occurrence of chemical processes using electric current.
The reaction reduces the amount of dissolved metal cations to such an extent that they eventually form a single coating on the metal electrode. As a result, the item becomes more durable, small dents disappear and its appearance becomes more attractive.
Types of galvanic cells
There are a number of specific types of batteries.
Table of galvanic cells
| Type | Voltage | Main advantages |
| Lithium | 3V | Large capacity, high current. |
| Salt batteries or carbon-zinc batteries | 1.5 V | The cheapest. |
| Nickeloxyhydroxyl NiOOH | 1.6 volts | Increased current. Large capacity. |
| Alkaline or alkaline | 1.6V | High current strength. Good volume. |
This topic is covered in more detail in the article types of batteries!
Purpose of the galvanic cell
It is designed to run electrical equipment. It can be:
- Watch.
- Remotes.
- Flashlights.
- Medical equipment.
- Laptops.
- Toys.
- Keychains.
- Phones.
- Laser pointers.
- Calculators.
And similar things around us.
Galvanic cell at home
You can make a simple current source with your own hands. To do this we need the following equipment:
- Plastic cup.
- Electrolyte. You can use a saline solution, soda or citric acid diluted in water.
- Plates of two different metals. For example, aluminum and copper.
- Wires
Manufacturing process
Take a plastic cup and pour electrolyte into it. Do not fill the glass to the very brim. It’s better not to add 1-2 centimeters. Attach the conductors to the metal plates. Next, install copper and aluminum plates on the edges of our container. They should be parallel to each other. When everything is ready, you can measure the voltage with a voltmeter.
Connect the device and touch the probes to the contacts of our current source. Hold them and do not tear them off until the voltage appears on the display. Typically it is 0.5-0.7 volts. Such numbers are shown depending on the electrolyte. More precisely the substance used in its quality.
Creating a battery with your own hands is described in more detail in this article.
In this way, a homemade galvanic cell is made.
Schemes for connecting batteries to a battery
We experimented with batteries and galvanic cells. Now let's move on to batteries, because most often the voltage of one element - be it a galvanic cell or a battery - is not enough to solve our problems. First of all, let's figure out in what ways you can connect individual elements and what this will give. For clarity, we will work with popular and very efficient industrial 18650 batteries.
This current source has the following characteristics:
- type - lithium-ion;
- output voltage - 4.2–2.8 V (depending on the degree of rarefaction);
- electrical capacity - from 1,800 mAh to 3,500 mAh, depending on the model;
- dimensions (height/diameter, mm) - 66.8/18.5;
- built-in controller (see section below) - depends on the model.
Suppose we have 3 batteries with a capacity of 2,200 mAh each and 1 with a capacity of 1,800 mAh. First, let's connect them in series:
When current sources are connected in series, their voltage is added, and the electrical capacity will be equal to the capacity of the lowest-power battery in the circuit. Thus, we received a battery with an output voltage of 3.7 x 4 = 14.8 V and a capacity of 1,800 mAh.
Important! Voltage 14.8 V is typical. Depending on the state of charge, this voltage can range from 16.8 to 11.2 V. Typically, a 4-cell assembly is considered a 12 V battery.
Now let’s connect our batteries in parallel:
When connecting elements in parallel, the voltage does not change, but the electrical capacitance is added. This means that our battery will still produce the same 3.7 V, but its capacity will be 2,200 x 3 +1,800 = 8,400 mAh. More than 8 Ah!
Homemade battery from improvised means
A battery or galvanic cell is a chemical source of electric current. All batteries sold in stores essentially have the same design. They use two electrodes of different compositions.
The main element for the negative terminal (anode) of salt and alkaline batteries is zinc, and for their positive terminal (cathode) is manganese.
The cathode of lithium batteries is made from lithium, and a variety of materials are used for the anode.
The electrolyte is located between the electrodes of the batteries. Its composition is different: for salt batteries, which have the lowest resource, ammonium chloride is used. Alkaline batteries use potassium hydroxide, while lithium batteries use an organic electrolyte.
When the electrolyte interacts with the anode, an excess of electrons is formed near it, creating a potential difference between the electrodes.
When the electrical circuit is closed, the number of electrons is constantly replenished due to a chemical reaction, and the battery maintains the flow of current through the load.
In this case, the anode material gradually corrodes and breaks down. When it is completely used up, the battery life is exhausted.
Despite the fact that the composition of the batteries is balanced by manufacturers to ensure long and stable operation, you can make the battery yourself. Let's look at several ways you can make a battery with your own hands.
Method one: lemon battery
This homemade battery will use a citric acid-based electrolyte found in lemon pulp. For electrodes we will take copper and iron wires, nails or pins. The copper electrode will be positive, and the iron electrode will be negative.
The lemon needs to be cut crosswise into two parts. For greater stability, the halves are placed in small containers (glasses or shot glasses). It is necessary to connect the wires to the electrodes and immerse them in the lemon at a distance of 0.5 - 1 cm.
Now you need to take a multimeter and measure the voltage on the resulting galvanic element. If this is not enough, then you will also need to make several identical lemon batteries with your own hands and connect them in series using the same wires.
Method two: a jar of electrolyte
To assemble a device with your own hands, similar in design to the first battery in the world, you will need a glass jar or glass. For the electrode material we use zinc or aluminum (anode) and copper (cathode).
To increase the efficiency of the element, their area should be as large as possible.
It would be better to solder the wires, but the wire will have to be attached to the aluminum electrode with a rivet or bolted connection, since it is difficult to solder.
The electrodes are immersed inside the can so that they do not touch each other, and their ends are above the level of the can. It is better to secure them by installing a spacer or a cover with slots.
For the electrolyte we use an aqueous solution of ammonia (50 g per 100 ml of water). An ammonia aqueous solution (ammonia) is not the ammonia used for our experiment.
Ammonia (ammonium chloride) is an odorless white powder used in soldering as a flux or as a fertilizer.
The second option for preparing the electrolyte is to make a 20% sulfuric acid solution. In this case, you need to pour the acid into the water, and in no case vice versa. Otherwise, the water will instantly boil and its splashes, along with the acid, will get on your clothes, face and eyes.
When working with concentrated acids, it is recommended to wear safety glasses and chemical-resistant gloves. Before making a battery using sulfuric acid, it is worth studying in more detail the safety rules when working with aggressive substances.
All that remains is to pour the resulting solution into the jar so that there is at least 2 mm of free space left to the edges of the vessel. Then, using a tester, select the required number of cans.
A self-assembled battery is similar in composition to a salt battery, as it contains ammonium chloride and zinc.
Method three: copper coins
The ingredients for making such a battery yourself are:
- copper coins;
- aluminium foil;
- thick cardboard;
- table vinegar;
- wires.
It is not difficult to guess that the electrodes will be copper and aluminum, and an aqueous solution of acetic acid is used as the electrolyte.
Coins first need to be cleaned of oxides. To do this, you will need to briefly dip them in vinegar. Then we make circles from cardboard and foil according to the size of the coins, using one of them as a template. We cut out the mugs with scissors, put the cardboard ones in vinegar for a while: they should be saturated with electrolyte.
Then we lay out a column of ingredients: first a coin, then a cardboard circle, a foil circle, a coin again, and so on until the material runs out. The final element should again be a copper coin. You can solder wires to the outer coins in advance. If you don’t want to solder, then the wires are attached to them, and the entire structure is tightly wrapped with tape.
During the operation of this DIY battery, the coins will become completely unusable, so you should not use numismatic material that is of cultural and material value.
Method four: battery in a beer can
The anode of the battery is the aluminum body of a beer can. The cathode is a graphite rod.
Additionally you will need:
- a piece of foam more than 1 cm thick;
- coal chips or dust (you can use what’s left from the fire);
- water and regular table salt;
- wax or paraffin (candles can be used).
You need to cut off the top part of the can. Then make a circle of foam plastic the size of the bottom of the jar and insert it inside, having previously made a hole in the middle for the graphite rod.
The rod itself is inserted into the jar strictly in the center, the cavity between it and the walls is filled with coal chips. Then an aqueous solution of salt is prepared (3 tablespoons per 500 ml of water) and poured into a jar.
To prevent the solution from spilling out, the edges of the jar are filled with wax or paraffin.
You can use clothespins to connect the wires to the graphite rods.
Method five: potatoes, salt and toothpaste
This battery is disposable. It is suitable for starting a fire by short-circuiting the wires to produce a spark.
To create a potato lighter you will need:
- large potato;
- two copper wires in insulation;
- toothpicks or similar thin slivers;
- salt;
- toothpaste.
Cut the potato in half so that the cut plane has the largest possible area. Using a knife or spoon, select a hole in one half where you pour salt and add toothpaste. Mix them together until a homogeneous mass is obtained. The amount of “electrolyte” should be level with the edges of the recess.
In the other half, which will be the top, we pierce two holes at some distance from each other so that they both fall into the recess with the electrolyte when assembling the “battery”.
We insert wires into the hole, previously stripped of insulation by about a centimeter. Place the halves together so that the ends of the wires are dipped into the electrolyte.
Use toothpicks to secure the halves together.
We wait about five minutes, after which, by connecting the wires to each other, you can strike a spark and start a fire.
All the methods described above are not a full replacement for a battery purchased in a store. The voltage on homemade elements can fluctuate and its value cannot be adjusted accurately. You won't be able to use them for a long time either.
But somewhere in the wilderness, in the absence of electricity, anyone can assemble a battery for a mobile phone or an LED light bulb with their own hands. Naturally, if you have the appropriate materials at hand.
Ways to make a battery at home are a good illustration of how galvanic cells work. Assembling them with your own hands is available to schoolchildren in physics lessons.
Advantages and disadvantages of homemade products
The advantages of self-assembling a Power Bank include:
- the ability to create devices with increased voltage or capacity;
- components of old products, lithium-ion or nickel-metal hydride batteries left over from household or computer equipment are used for manufacturing;
- It is possible to replace some of the batteries that have failed during operation (when using a collapsible box).
Disadvantages of homemade equipment:
- Electrical knowledge and skills in working with soldering equipment are required;
- requires the purchase or independent production of a charging unit (with an overdischarge protection circuit) and a booster module;
- difficulty in finding a box of a suitable configuration;
- rough appearance of the device (except when factory casings are used);
- shorter service life compared to factory products;
- lack of additional elements (power switch, control diodes or auxiliary connectors);
- risk of damage to external equipment when charging due to errors in the installation or assembly of the voltage regulator;
- When using high-quality components, the final cost of the charger is comparable to the price of factory devices.