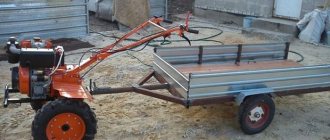
Goats for sawing firewood are a necessary tool for those who have a stove, fireplace, or at least a barbecue in their home. It is also difficult to imagine a real Russian bathhouse without a wood-burning stove. Having comfortable sawhorses means greatly simplifying the work of preparing firewood, especially if you need a lot of it. Today, in addition to traditional wooden homemade stands with “horns,” you can also acquire ready-made factory products of both horn and clamp type, made of durable metal.
Goats make the sawyer's work easier Source samodelkin-pposad.ru
Preparatory stage
First of all, you need to prepare a design drawing.
The optimal height of the “goat” for manual sawing of firewood varies in the range of 90 – 110 cm; at this height you will not have to work in a half-bent position, which means your back will not get so tired. In our case, the “goat” has cross-shaped supports made of bars 1 meter long; accordingly, the sawn log will be located at a height of about 90 cm. The boards and bars for assembling the “goat” must be dry, without deformations and knots (otherwise they will may just burst). In order for the structure to successfully perform its functions for many years, the wood should be protected from rot and various types of pests. To do this, wooden blanks, sawn to size, are treated twice with an antiseptic, with a break for drying. You can also additionally coat the workpieces with waterproof varnish.
Wooden trestles for the garden
These goats are made quite simply, and they literally look like a stool.
- You will need a wooden beam and some kind of shield. The latter can be made from boards or thick sheet material can be used for it - the same old doors, a piece of thick OSB or chipboard, or plywood, and so on.
- First, we make a preparation.
We take a beam, cut off four identical legs and eight jumpers with a length equal to the dimensions of the future goat. Four of them are equal to the width of the goat, and the other four are equal to its length. - Now we assemble the structure and first of all we connect a pair of legs of any of the jumpers (as a rule, we start from the long sides). The legs are connected by jumpers at the top and bottom - this way they will not move apart during operation. You need to make two such blanks.
- Next, we connect these two blanks to each other using short jumpers. The principle is the same - two jumpers are placed on each side of the almost formed base of the goat. One at the top, the other at the bottom.
Do-it-yourself construction goats photo
Basically, that's it. We can say that the homemade construction trestles are ready, and all that remains to be done before they are fully manufactured is to lay them on the manufactured base - the shield. Like everything else, it should be securely secured with nails or screws.
How to make construction trestles with your own hands: Review of options + Video and Photo
Construction trestles - how to make them yourself? Many works related to repairs and construction must take place on an elevated surface. The first thing you come across is a stepladder, but it greatly limits your options. For this purpose, they came up with trestles and scaffolds, because even two people can stand on them, as well as all the necessary tools that are needed in the public domain. Since goat-building production is not yet so widely developed, you can learn how to assemble construction trestles with your own hands.
Construction trestles are a practical solution that allows you to be on a hill and move freely.
General information
Nothing can compete with goats in this. They can be made from:
- Trees,
- metal,
- Mixed (wood and metal).
What types of goats are there?
If a little earlier such supports for work could only be made independently, now they are freely available in any hardware store. Most often, sawhorses from the store are made of aluminum, thanks to this they are very durable and stable, and also have very little weight.
There are two types of construction scaffolds:
- Foldable. Very comfortable, compact trestles when folded are very convenient to store. But you should also be careful with them; they should always be checked for stability.
- Not foldable. They are extremely convenient to work on and stable, as they represent a single support. But in this case it will not be very convenient to store them.
Aluminum trestles are quite difficult and cost-effective to install at home. Therefore, wooden goats are a good option. After all, wood is very practical and convenient.
Installation
For installation you will need:
- Scheme,
- Tape measure (for measuring wooden panels before starting work),
- Saw (used to cut boards),
- Pencil (for marking),
- Drill (for fastening boards with screws; when working with electric tools, you must know and follow safety precautions),
- Screws,
- Bolts, nuts, etc.
- Carpenter's Corner,
- Wooden material.
Note! It is necessary to choose a material without cracks and knots. If they do not correspond, then it is under no circumstances recommended to use such material
Assembly diagram
It is necessary to place on a flat surface five wooden bases with dimensions of 1500x100x30, and three with dimensions of 500x100x30 mm. Place boards with smaller dimensions on the edge side so that the distance between them does not exceed 1.5 m.
The third must be placed exactly between them. Place two larger boards on top of the smaller ones in the shape of a rectangle. The board in the middle, the length of which is 0.5 meters, must be leveled using a tape measure.
Next, be sure to check whether the structure is even and connect everything using self-tapping screws.
- Place two more boards in the shape of a rectangle on the inverted structure and connect them. It turns out to be flooring or an area for work.
- Take four more wooden panels with dimensions 1100x100x30 and attach them at the ends. The result is a structure somewhat reminiscent of a table.
- The next step is to strengthen the structure with boards 1700x100x30mm and 1500x50x30mm. They must be attached so that the opposite reinforcements are in different diagonals.
- And the last point is attaching the ladder. For more convenient operation, the steps at the bottom can be made with a small protrusion. You select the length of the stairs based on individual preferences.
- That's it, your goats are ready. But for safe construction and repair work they need to be checked. To do this, we place any objects with a large weight on the surface; if the trestles can withstand it, then you can not be afraid and safely use them in installation.
Features of metal goats
If you do not have the opportunity or desire to install wooden trestles yourself, you can purchase metal ones. They are more stable for any type of work.
Types of metal scaffolding:
- Pin,
- Khomutovy,
- Frame,
- Wedge (have one of the most complex connections, in the form of disks welded to straight posts and pipes. The lock is located on the disk, the wedge fits into the hole. The advantage of such scaffolding is that they are very easy to assemble and disassemble, and move to another place.)
It is necessary to choose construction trestles very carefully, taking into account the complexity of the future work, the degree of load and cost.
You can also purchase materials for self-assembly, or already manufactured parts that just need to be fastened together.
sawhorses for hand sawing
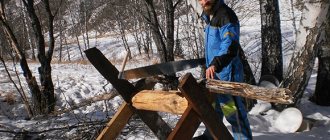
It would seem that this simple device can be improved, and what parameters can be changed, except for the height, to make working on it more comfortable? In the old days, wooden logs were usually sawed by 2 people using a two-handed saw with large teeth.
They were in complete control of the process and with their free hand they held the ends of the log on both sides, and if necessary, they could press on it so that the cut did not pinch the saw blade. And often, when cutting thick logs, they were sawed a little more than halfway and turned 180°. True, the cut was not very even, which created difficulties for installation during subsequent cutting.
The distance between the cross-shaped posts of the goat was usually made slightly less than twice the length of the furnace firebox for which firewood was prepared.
And now such designs have not gone into oblivion, although they have still been improved by adding a third crosspiece for the convenience of working with a one-handed bow saw and reducing the distances between them for less risk of jamming the saw blade.
Some metal trestle structures have been equipped with teeth to better secure logs, and more traditional types have been improved by adding sharp screw-type adjustable stops for the same purpose.
Working has become much more convenient. And, if you have a need to regularly harvest not a very large amount of firewood, then this option for a device for sawing it may be quite suitable for you.
How to make a sawhorse with your own hands for sawing firewood with a two-handed saw
Anyone who has ever sawed a large number of logs with a two-handed “friendship” saw (that’s right, with a small letter. This is not a brand of saw, but a hint of the friendship of two sawmills), knows well how important it is to correctly select the height of the log on the sawhorse. It is believed that the most comfortable height is from 90 to 110 cm. You don’t need to bend your back too much when bending forward, you don’t have to squat, you work comfortably and quickly. After all, working for a long time in an uncomfortable position the next morning will make you like a rusty iron woodcutter - your back and knees will bend with great difficulty.
Important! Basic requirements for goats: stability and strength. Strength is required due to the large weight of the logs and the lateral, alternating forces applied by the sawyers
These efforts will weaken the goats, so the X-shaped racks (“legs” should be supported by a good beam with a side of at least 100 mm.
In order to make sawhorses for sawing wood, we will need:
- Beam 100x100 mm, length 1100 mm. It will serve as the basis of the structure. You can also use a flat, dry and not very thick log as a base.
- Beam 50x50 mm, four sections of 1100 mm each. They will become the “legs” of the goat.
- Beam 50x50 mm, two pieces of 350 mm each. We will make “horns” from them.
- Beam 50x50 mm, two pieces of 1100 mm each for tying the “legs”.
- Self-tapping screws 5x100 mm, about 30 pcs. in total.
- Impregnation "Bioprotection".
We make cuts on the timber that will serve as the base. We make 12 cuts, two for each groove. We will need 6 grooves, each 25 mm deep, for the “legs” and “horns”.
Important! Try to make cuts slightly narrower than the block. Literally 2 mm
That is, instead of 50 mm, we make cuts of 48 mm. This way the beam will fit into the groove with force, and the entire structure will be stronger.
Using a chisel and hammer, select the grooves along the intended cuts. We forcefully drive the prepared pieces of timber into the grooves: four “legs” and two “horns”. We tighten the screws. Using a hacksaw, we saw off the ends of the timber, which serves as “legs,” at an angle, so that the goats stand firmly and evenly on the ground. The trestle base is assembled.
We make the binding of the “legs”. We attach one end of the beam to the “legs” from the inside, the other – from the outside. Now we are sure that the “legs” will not move apart. We also fix the transverse “leg reinforcements” with self-tapping screws. If the ends of the beam protrude, use a hacksaw to cut them flush with the “legs.” We treat it with bioprotection and you can start cutting firewood.
In addition to the “classic” version of a wooden trestle, you can make metal trestles. This design will be lighter and last longer. They are made from rectangular steel pipe with a side of at least 50 mm. For ease of storage, it is better to secure the crosspieces and trim with bolts rather than welding. When bolted, the structure can be disassembled.
Important! The structure should not be light, otherwise it will be unstable during operation. And make the design according to your height
The pipe pieces are attached to each other at an angle of 45°. The resulting three crosses are tied with the same pipe horizontally and diagonally for rigidity.
As you can see, sawhorses for sawing wood can be made quite simply with your own hands. Very little material is required for their manufacture, and it is available. Just remember that the goats must be stable, durable and match the height of the sawyer.
Goat design options
The traditional material for goats is wood. However, there are trestle structures made of metal. When deciding what to make a goat for sawing wood from, you should proceed from the following.
A metal structure has less weight, and its service life is longer than a wooden one. The initial components for such trestles are metal rectangular profiles with a minimum side size of 5 cm.
To be able to disassemble the trestle, their design should include bolted rather than welded connections. After disassembling, the sawhorses will not take up much space in storage areas.
It should be noted that the goats must have significant weight. Otherwise, they will not be stable enough when sawing logs. It is also necessary to make the structure taking into account the height of the sawyer.
When manufacturing metal trestles, profile sections are fastened at an angle of 45°. The three resulting parts in the shape of an oblique cross are fastened for rigidity with the same metal profiles diagonally and horizontally.
If you have difficulties choosing a material and design, it is recommended that you familiarize yourself with photos of firewood sawhorses posted on the Internet.
The article you just read showed quite convincingly that making goats on your own is not difficult.
When making a goat, you will not need scarce, expensive tools and materials. The main task in their creation is stability, strength and ease of use.
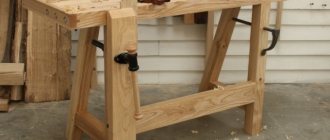
Leg assembly and fitting
The performance of the device depends on the quality of the marking of the hole for the bolt. Therefore, preliminary fitting using technology is necessary:
- the leg is placed on the table so that the cutout hangs over the tabletop (you can use a stool, chair)
- the support bar (upper) is installed vertically in the groove
- a second leg is added on top of the first (the bar should fit snugly into the cutouts in both parts)
- the structure is temporarily tightened with a clamp
Then the following operations are performed:
- Using a vertical square, the intersection of the legs is transferred to the side surface on both sides of the structure
- the resulting points are connected by a line, which becomes the vertical axis of rotation
- the longitudinal axis of the leg is marked with a square
- at the intersection of these lines there will be a center for the hole of the M10 bolt, which is the hinge of the connection
Attention: The holes must be perpendicular to the plane of the boards, so a jig is required. They can serve as a cut in a block pressed to the leg with a self-tapping screw or clamp
If the hole is inclined, the legs will not be able to transform into the working position.
The legs are assembled in stages:
- the bolt goes through one piece
- two washers are put on it to facilitate the rotation of the wooden elements relative to each other
- the second leg is put on the threaded part
- the hinge joint is secured with a nut
The result is a set of two legs, into the cuts of which a support bar is easily inserted from above.
Goats for cutting firewood with chain saws
But still, when we are dealing with large volumes of firewood, torturing ourselves by manually sawing logs is a wasteful activity in terms of time and physical costs. Gasoline and electric chainsaws speed up the process tenfold and reduce physical labor.
But traditional sawhorses are not suitable for working with them, due to the high risk of injury and tool breakage when clamping the saw bar in a cut. Of course, you can only saw logs that exceed the dimensions of the log, but you will not achieve rational cutting of the logs. Therefore, other devices were invented to work with such saws, which, by tradition, retained their old name, although they bear little resemblance to their grandfathers.
The simplest sawhorses for working with a chainsaw have a similar design.
Heavy stable base and a pair of horns for fixing the log. What else is needed? Sawing takes place outside the dimensions of the structure, and the log is held in it by the foot. Productivity is low, but such goats are quite functional.
For sawing thin logs, the most suitable, in our opinion, are sawhorses of a similar design:
Their only drawback is that the logs of the bottom row are not sawn, but for large volumes this design flaw will not be fundamental. And you choose the dimensions of such trestles depending on the length of the firebox of your stove, the length of the bar and the power of your saw. Their undoubted advantage is quick disassembly, which makes it possible to simplify and speed up the removal of lumber.
A similar design of a trestle, but with the ability to saw bundles of logs to the end, due to the presence of transverse supports that provide a gap between the woodpile and the base of the trestle, is shown in this video, but the lack of the ability to quickly disassemble to a certain extent neutralizes this advantage.
Although you can turn it over on the end side, however, with a little more effort.
For thicker logs, a similar design is suitable, but with them secured in a sawing container, which will prevent the logs from pinching the saw.
And the size of lumps obtained in such goats can be minimal.
Not the most successful, as it seems to us, but a quite workable version of the device for sawing not very thick logs is shown in this photo:
The most valuable thing in such a trestle design is the stop template, which allows you to maintain the ideal height of the chocks, which is extremely important for small-sized stoves
Making your own sawhorse for sawing wood
A chainsaw makes the hard work of preparing firewood much easier. When using it, productivity increases many times over. Without a chainsaw, large and damp logs make the cutting task even more difficult.
Assembly of the "goat"
Cutting blanks. To ensure precise cutting when using a hand saw, use a miter box. The supports (6 elements) must be absolutely identical to each other; for this, use the first of the prepared elements as a template.
Assembly of the structure will take about two hours. The work order is as follows:
Step 1: Prepare holes for bolted connections that fasten the X-shaped supports. Two supports with side ribs are laid on top of each other and leveled. Using a tape measure, measure 70 cm from the bottom end and draw a transverse line. Drill a through hole in its center for installing an M80 bolt. The remaining two pairs of supports are prepared in the same way.
Then each pair is fastened with a bolt, washer and nut.
Step 2: The side boards are attached to the supports using self-tapping screws, for which you need to make holes using an electric drill or a brace with a thin drill. It is important that the holes are positioned strictly vertically, this affects the reliability of the structure - if the screw is located in the wood at an angle, this will disrupt the uniform distribution of the load and the board may crack at the attachment point
We make holes for fasteners on the boards that will connect the X-shaped support posts. The first pair of boards (they will be installed on one side of the “goat”) are laid one on top of the other and leveled. In accordance with the drawing presented below, a pair of vertical holes are drilled in them at a distance of 67 mm from each end, plus another pair of holes at a distance of 145 mm from one of the ends.
The second pair of boards (for the other side of the goat) are also stacked on top of each other and carefully leveled. Pairs of vertical holes are drilled 22 mm from each end and 335 mm from one of them.
Please note: according to the general drawing, the first and second X-shaped supports should open in different directions, and the third should open in the same way as the second, this increases the rigidity of the system. Between the centers of the legs of the first and second support, open to the right, the distance should be 200 mm, between the first and third “right leg” - 910 mm
Step 3: The bottom boards of each pair are screwed to the X-shaped supports, connecting them together. The gap between the bottom end of the support and the bottom edge of the board should be 80 mm. Then the top boards are screwed on each side of the “goat”. The gap between the bottom edge of the board and the bottom edge of the end of the support should be 535 mm.
Folding sawhorses of this design are quite strong and stable, perfect for sawing logs, stumps, thick boards using a two-handed or gasoline saw.
Folding trestles should be stored in a dry place to avoid wood deterioration due to moisture.
Video on the topic “do-it-yourself goat for sawing wood”:
Homemade goats
When planning to make a sawhorse for sawing firewood, you can choose any of the designs described. But if standard X-shaped stands can be made from both wood and metal, then clamping stands can only be made from metal. Metal ones of any kind are lighter and more durable, but also more expensive, especially if you consider that wooden trestles can be assembled from waste material - bars and boards left after construction, pickets, thick branches.
The simplest goats consist of two intersecting supports, the connection of which is shifted upward from the center. They connect at an angle of about 45 degrees. But if you make the mount movable, you can change both this angle and the working height of the equipment. But to prevent the legs from moving apart, you will need to come up with a stopper. This can be strong twine or chain.
Advice! Double-horned sawhorses for firewood are not reliable and convenient; it is advisable to strengthen them with one or two additional supports.
Homemade four-horned goats from bars and picket fences Source proraboff.rf
General provisions
A wooden trestle for firewood should be light, comfortable and durable
It is extremely important to understand that the design must be adjusted to your height. But let's take a closer look at this issue and find out how to make a sawhorse for sawing wood with your own hands
The drawing in this case, or at least a sketch, will be what will help complete all the work more accurately and quickly.
The cutting height in most cases should not exceed 110 centimeters and be less than 90 cm. This way, the person does not need to squat or tilt the body too much. If you plan to use a two-handed saw, then you need to take care of the rest of your free hand. In this case, an additional piece of wood to be cut is placed on the machine, acting as a stop. But if you are going to work with a chainsaw, then the emphasis will be meaningless, which is due to the employment of both hands. When working with gas or electric tools, it is much more important to take care of the maximum distance of the log from the sawhorse. This way the workpiece will not be pinched, which is almost inevitable when sawing between the posts of the goat.
Goat designs
The classic sawhorse design allows you to use a chainsaw when sawing logs. In this case, a significant problem arises - clamping of the cutting part of the saw at the end of the cut.
The part of the log that protrudes from the side beyond the edge of the sawhorse can be sawed off without difficulty. When cutting occurs between the posts, clamping is inevitable.
In order to avoid this, the log must be rotated. Such exhausting, unproductive work takes a lot of effort and time, and in the absence of assistants it becomes the main difficulty in collecting firewood.
Some designers have developed and patented devices that prevent clamping of the cutting part of the saw.
DIY tool box according to drawings: instructions with step-by-step guide- Form for paths - a large selection of forms and a simple method for creating a beautiful and comfortable garden (photo + video)
Do-it-yourself snow blower - we remove snow easily, an overview of designs and types for a suburban area
Features of storage and operation of goats
The work of making sawhorses for sawing wood begins with preparing holes for the bolts. To do this, you need to place two supports on top of each other (side ribs) and drill holes at a mark of 70 cm from the bottom edge.
Next, you need to install an M8 bolt with a semicircular head between them.
1. Using a jigsaw, the board prepared for fastening the legs is sawn. If the boards were prepared according to the specified parameters (with a width of 7-8 cm), they do not need to be sawed.
2. On a pair of boards located on one side of the trestle, two vertical holes should be drilled at a distance of 67 mm from each edge (see drawing of the trestle). Additionally, holes are drilled on one side at a distance of 245 mm.
3. On the second pair of boards, you need to prepare the following pairs of vertical holes: at a distance of 22 mm from the edge on both sides, at a distance of 335 mm from one edge.
4. Prepared boards, pre-divided into pairs, are screwed to the legs: the bottom ones at a distance of 80 mm from the edge, the top ones at a distance of 535 mm from the edge (see diagram of the wooden trestle). The indicated indents are measured to the extreme bottom line of the board.
When screwing in pairs, it is important to ensure that the indentations match. Shifting the fixing points for the left and right crossbars eliminates their screwing to one beam, which increases the strength of the structure
When carrying out work according to these instructions, it is recommended to additionally use the attached drawings, photos and video materials. They will help you easily make durable sawhorses
The finished structure can withstand a lot of weight, but it is important to store it in normal conditions: a dry room. Constant exposure to moisture or humid air will cause materials to deteriorate
It is especially important to consider the rules for using the workpiece. It is not recommended to overload it with heavy logs
Folding sawhorses are suitable for sawing firewood with a chainsaw and a hand saw. The reliable design will become indispensable in a summer cottage or in a private house. With its help, you can easily and quickly prepare firewood, logs for lighting a stove, barbecue or home fireplace.
The main element of the trestle structure is a cross connection of two frames that fold out in an X shape. The retaining elements are transverse strips secured to the frames with self-tapping screws. These strips prevent further unfolding of the trestle structure.
Do-it-yourself sawhorses for sawing firewood - design drawing
The structure of the sawhorses for sawing firewood consists of three X-shaped joints and four cross bars. All dimensions are shown in the drawing above. The product is stable and can withstand even a large log.
It is recommended to connect the trestles with bolts and washers to make them easy to fold after use. If it is not important for you to make a folding structure, then you can limit yourself to a furniture screw, or just four self-tapping screws.
Do-it-yourself sawhorses for sawing wood - drilling a hole
Do-it-yourself sawhorses for sawing firewood - preparing cross bars
We also drill holes for self-tapping screws on the transverse strips, which will hold the stop and prevent the sawhorses from moving apart.
The drawing above shows the dimensions and locations for drilling holes on the strips
Please note that the distance between the holes is different for each side
Do-it-yourself sawhorses for cutting wood - assembly
Assembling the sawhorses for sawing firewood occurs as follows: we secure the timber with clamps and attach the transverse strips at levels. Then we screw in the bolts and secure them with nuts and washers.
Do-it-yourself sawhorses for cutting wood
Well, I’ll show you the goats at work one more time. I think it turned out to be very convenient and practical! Take note, buy materials and make these sawhorses for sawing wood with your own hands! All the best!
The idea of a tripod is sawing sawhorses.
The simplest version of a goat is with a timber base.
Three-horned and two-horned log goats.
The entry was published in the Summer cottage construction section. Bookmark the permalink.
The classic look of the machine is represented by a simple design.
The material for making wood sawing equipment is more than available and can be chosen at your discretion: wooden beams, thin tree trunks, metal profiles, scrap metal at hand.