A plow is a labor tool designed for plowing hard soil and has been used by man since ancient times. The intended use of a plow determines its technical and quality characteristics: the design of the frame and cutting element, fastening mechanisms and stops, material of manufacture and its thickness.
General characteristics
There are several types of plows according to their purpose:
- manual - for plowing soft land of a small area;
- horse-mounted - used in situations where it is necessary to cultivate land, access to which is limited for special equipment;
- with rope traction - helps to cultivate the soil in hard-to-reach places, for example, in the mountains or in a swamp;
- mounted – works in conjunction with special equipment, allows you to reduce the turning radius during sequential plowing;
- trailed – general purpose plow.
The mentioned types of plows, in turn, are divided into the following subspecies:
- single-hull;
- double-hull or more;
- disk - reversible;
- rotary.
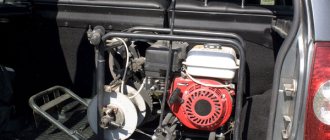
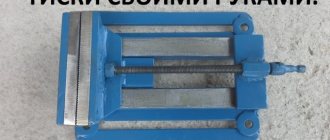
The generally accepted configuration of a plowing tool, which you can construct with your own hands, is shown in Figure 1.
The main parts of the hull structure have the following parts:
- chisel – pad on the cutting part;
- ploughshare – removable “knife”;
- wing, chest and blade feather;
- uglosnim – cuts corners from layers of soil;
- stand – fastening element.
Modern technologies make it possible to make a plow with your own hands. You can design it according to your drawings or modify a ready-made one to suit your needs. A tool made independently has a number of advantages and characteristic design features.
Various plow designs
First you need to decide on the design of the device, because there are several different types.
Cylindrical
The cylindrical type of the plow is distinguished by its excellent versatility, because it is suitable for almost any type of soil and field size. This shape allows you to cope well with crushing soil. In addition, making such a unit yourself will not be a problem.
Cylindrical
The only drawback of this design is its shallow penetration into the ground.
Half-screw
If you do not need to loosen the soil, but only need to raise layers of soil, then the semi-helical shape of the working part of the plow would be an excellent option. It penetrates deeply into the ground, but at the same time practically does not create a loosening effect. It is usually used for heavy soil.
Lemeshny
There are also plowshare plows, but they are quite difficult to make with your own hands, so they are not worth considering.
Features of a homemade model
A plow assembled with your own hands is a tool that meets target needs and has a low cost. To assemble it, you can use materials available, as well as parts of the structures of other agricultural units. The latter can be taken from old agricultural workshops, ferrous metal collection points, and other similar places.
A homemade plow can be easily adjusted to suit your needs. It is possible to adapt it to different types of soil, draft mechanisms, and even to the functions of processing agricultural crops. Your own plow can be manufactured taking into account the power and productivity of tractor equipment, which will allow you to achieve the highest efficiency and reduce destructive loads on the plowing tool.
The cutting element of this plow can be replaceable and manufactured/sharpened independently, which significantly reduces the cost of servicing the mechanism. With independent production, it becomes possible to vary the intended use - introducing the function of replaceable elements: nozzles, fasteners, parts of the body and frame. This allows for combined work, such as plowing and mowing bushes.
When making your plow, you can pay special attention to the choice of materials and their quality. This is one of the key advantages of homemade assembly, since when buying a plow in a store, it is difficult to be sure of the quality of the metal used to manufacture the factory unit. After purchasing a store model, you may need to further refine it or replace some low-quality structural components.
Comparison of factory and homemade plows
We will select for analysis attachments for a mini tractor with a skimmer, sold in Moscow and made with our own hands (prices for self-assembled consumables, analogues of purchased ones).
| Model | price, rub. | Price for self-assembled (consumables), rub. |
| Double-furrow plow 1L-220, country of origin: China | 25 700 | 15 000 |
| Double-furrow plow CR-M15, country of origin: Russia | 27 900 | 16 000 |
| Double-furrow moldboard plow, Chelyabinsk | 22 000 | 10 000 |
| Plow 2-hull, St. Petersburg | 45 000 | 17 000 |
| Wirax double-furrow plow, country of origin: Poland | 34 000 | 15 000 |
From the presented table it can be seen that the price of a factory unit ranges from 25,000 to 45,000 rubles.
Making a plow with your own hands in the most expensive scenario will cost half as much. This is achieved by using scrap materials and parts from broken down agricultural machinery, which are abundant in the villages of our country.
Materials and tools
Making a homemade plow for a mini-tractor requires the following basic tools:
And an additional tool, the list of which is determined by the design of a particular mechanism and the conditions of its production.
The materials making up the main structure must be solid steel blanks. Violations of their integrity - cracks, deformation, severe rust - are unacceptable.
List of materials that may be needed:
- thick-profile sheet metal of high strength;
- metal corners and plates of sufficient thickness;
- bolts of various calibers;
- additional items (washers, bearings, springs) determined by the characteristics of a particular design.
How to do it?
In order to facilitate the process of assembling a plow for a mini-tractor, you can go by reconstructing another tool of the same name, used in conjunction with draft objects: a horse-drawn plow or a skimmer from the plowing mechanism of a large tractor.
Assembling the required unit requires drawing up the correct drawings. Their presence will ensure optimization of the design, reduction in the number of components, simplicity and quality of assembly.
The drawings should indicate the dimensions of the elements, which are closely related to the dimensions of the mini-tractor and the properties of the cultivated soil. During the manufacturing process, it is important to adhere to these parameters.
At the design stage, it is worth drawing separately each detail that has an irregular shape, respecting its natural size. In the future, from such drawings it will be possible to create a pattern for transferring the image of the part onto a metal workpiece. Some variations of the plow drawing are shown in Figures 2 and 3.
Let's consider two options for making a plow for a mini-tractor.
From a horse plow
This plow configuration, mounted with a mini-tractor, is considered the easiest to manufacture. All work on reconstructing a horse-drawn plow comes down to adapting to it a frame that has a special fastening mechanism, equipping it with a wheel (if necessary) and a weighting agent.
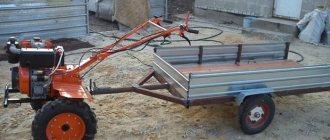
A horse-drawn plow consists of a body and a double-sided frame, which serves as a mechanism for attaching to the animal's harness and as a means of controlling the plowing process. Its simplest configuration is shown in photo 4.
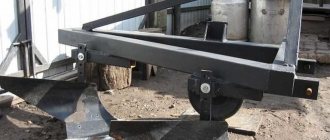
In this case, it is necessary to reconstruct the mounting part of the horse-drawn plow into one that will be installed on a mini-tractor with the least effort. This process can be simplified by making a tow bar for a tractor mount. A copy of it is shown in photograph 5.
The towing device is easy to manufacture. A wide plate, which has two horizontal holes with internal threads at the edges, is complemented by a protrusion in the middle, into which a fork ball with a leg is screwed/welded. An L-shaped part is attached to the center of the plate, serving as a locking mechanism for the plow frame mounted on the tow bar. The plate is placed between the two “ears” of the tractor mount and secured with four bolts.
The modification of the horse-drawn plow shown in photograph 4 is equipped with a special wheel. It serves as a support for the structure frame; it can be used to adjust the depth of penetration of the plow into the soil.
Adjustment is carried out using a simple mechanism - a threaded bracket into which a clamping bolt is screwed. The wheel stand can move vertically inside the bracket. The bolt fixes it in the desired position. This design allows, if necessary, to move the bracket along the plow frame.
The wheel itself is made of a metal rim, spokes and an axle drum. To make it, you can use a 300x50 mm metal strip, reinforcing bars, or a piece of pipe with a diameter equal to the diameter of the wheel axle.
Read also: Technical characteristics of steel 09g2s
The metal strip is bent in the form of a hoop, its edges are welded together, the weld seam is ground with a grinder or cutting wheel of an angle grinder. A piece of pipe equal to the width of the tape is placed in the center of the circle. The distance from the rim to the outer surface of the pipe - drum is measured. The reinforcement spokes will be equal to this distance. The resulting blanks are welded together. To improve the torsion characteristics of the wheel, a bearing of the appropriate diameter can be welded into the drum. This will reduce friction and reduce the load on the wheel axle.
The described plow design can be operated in two ways. In the first case, a second person will be needed to control the plow from behind, adjusting the furrow line. In this case, the “manager” applies pressure on the frame necessary for sufficient immersion of the ploughshare into the ground.
In the second case, the presence of an assistant is not necessary. The plow becomes heavier and moves on its own. The load can be a piece of heavy metal or a stone enclosed in a frame. The weighting agent is placed on the edge away from the tractor. In this case, the pressure on the share will be maximum with the available weight. To prevent the load from overturning the plow, it should be secured on the underside of the frame.
When operating a plow without a second person, it is worth considering the factor of furrow curvature. The simplicity of the described design assumes that the plow “swims” from side to side. To eliminate this problem, it is necessary to equip it with a “hard” clutch with the tractor. In this case, the draft mechanism will straighten the furrow strip.
From skimmers
A skimmer is an element of a tractor plow that serves to cut off the top layer of soil during plowing. Photo 6.
Its shape is similar to the working body of a plow share, and its size is half the size. This fact allows you to effectively use the skimmer as a plow for a mini-tractor.
During the design process, you will need to weld a frame that will hold the skimmer and attach it to the tractor towbar, and also equip it with a stop wheel.
When creating drawings of this design, it is worth taking into account the power of the tractor, the condition of the cultivated soil, and the volume of future work. If you plan to plow a large area of land, you can use two skimmers on one frame. In this case, the plow will have a double body. This is necessary in order to reduce the load on one plowshare body and reduce its wear.
The process of assembling the structure and installing it on a tractor is similar to reconstructing a horse-drawn plow. A frame of a similar configuration, a wheel, fastenings for the ploughshare stand and the entire structure to the towbar are made. A weighting device or control handles are installed for manual correction of the furrow.
Plow classification
Plows are standardly divided according to the following criteria:
- Type of working bodies: disk or plowshare;
- Type of traction: semi-mounted, mounted and trailed on tractors;
- Number of working bodies: single-, double- and simply multi-body;
- Purpose. Basic or special plowing;
Standard plows can plow from 18 to 35 centimeters deep. They consist of the following components: body, knife, frame, skimmer, as well as a coupling mechanism with the tractor (see diagram of a conventional plow below).
1 - Skimmer; 2 - Plow body; 3 - Frame; 4 - Plow knife; 5 - Support wheel; 6 — Support wheel adjustment screw; 7 — Mechanism for aggregation with the tractor.
Now let’s look at these criteria in more detail:
Disc plows are used when plowing a new field, even on rocky and heavy soils, marshy areas, as well as on land heavily overgrown with weeds and wild motherworts. Therefore, they are used for special purpose plowing.
Plowshare plows are the most popular among farmers. Unlike their disc counterparts, they are famous for their durability; they are used for general purpose plowing.
Mounted plows are attached to the tractor using the tractor linkage mount.
Trailed plows are attached to the tractor via a hitch.
An example of a plow attachment diagram is shown below:
1 - Castle; 2 - Brace; 3 - Plow handle; 4 - Cervix; 5 - Finger; 6 - Frame; 7 - Fastening pawl; 8 - Finger; 9 - Plow stand; 10 - Bolt; 11 - Plow brace; 12 - Bracket.
During operation, the frame and lock are supported by a pawl, which is connected to the tractor driver's cabin through a cable. Thanks to this, the driver will be able to disconnect the clutch without leaving the cab. The hitch includes two counter posts and a brace, which are connected to each other by a single bolt.
The photo shows the attachment of the plow to the tractor:
The posts are connected to the brackets. And the brackets themselves are attached to the plow frame with bolts. If we consider trailed plows, they are characterized by the presence of 3 wheels in their design. Now let’s touch on the topic of existing wheels on plows:
- Furrow wheels are the frontmost wheel, which is placed very close to the front body at a distance of 3 to 4 cm from the wall of the furrow. But it is important to take into account that the wheels do not have the right to interfere with soil rejection.
- Field wheels are the second wheel that follows directly behind the furrow wheel, i.e. the very last.
Each wheel supports about 30% of the entire plow weight. Semi-mounted plows always have only two wheels - a field wheel and a furrow wheel, which is located at the rear.
The most popular request of any farmer is a homemade ploughshare plow. This plow is quite simple in its design and does not require too ingenious skill in tinkering or understanding the intricacies of engineering. Therefore, let’s look at an example of how to make your own plow.
Safety precautions
When operating a homemade plow, appropriate safety measures must be observed. Among them, the most important points can be highlighted.
- while the plow is moving along the furrow, it is unacceptable to adjust it in height, clear the wheel and ploughshare from the earth and other manipulations associated with human participation;
- all connection points must be securely fastened - play is unacceptable;
- it is necessary to carry out timely cleaning of mechanisms and sharpening of cutting elements;
- Perform all actions only with the plow immobilized and the tractor turned off.
To ensure labor safety, it is important to carry out work that meets the technical characteristics of a specific agricultural mechanism. Excessive loads can lead to rapid wear, damage to the unit and harm to human health.
To learn how to make a plow on a mini-tractor with your own hands, see the following video.
A plow for a mini tractor is necessary to cultivate the land before planting. The presence of the unit allows you to increase labor productivity. The stores offer a wide selection of agricultural tools, so homeowners will find equipment for their garden and vegetable garden. With its help, you can quickly cultivate large areas of land.
Mini tractors are suitable for garden work; they have attachments. By purchasing a plow, you can quickly plow the land and prepare it for planting.
Setting up a plow on a mini tractor
Today, many farmers use a tool such as a mini tractor to work on their land.
Of course, a mini tractor, like any equipment, has the ability to break down, and in order to prevent this, you must first use it correctly, as well as correctly configure the plow on the mini tractor.
Setting up a plow on a mini tractor is a rather labor-intensive process that requires special care. So, in order to adjust the plow on a mini tractor to a given depth for plowing, you must first deliver the mini tractor to a concrete site.
First, you need to set up the skimmers, since they will also be very actively used in the future during the work process. In order to adjust the skimmers, you will need to fix the skimmer using a cylindrical protrusion.
The edge of the skimmer itself must be parallel to the plane of the edge of the main body. At the very end of the setup, you will need to tighten the clamps that are used to attach the skimmer to the frame that the plow has.
After the skimmers have been adjusted, it will be necessary to adjust the plow itself. In order to do this, you must first place a wooden lining under the left wheels of the mini tractor.
The thickness of such linings should be 3-4 centimeters less than the plowing depth. The same pads will need to be installed under the plow wheel, which is the support wheel.
Then, using a screw mechanism, the plow is lowered onto the platform. In this case, you need to ensure that the plowshares fully touch the same area.
After this, the lateral movements of the plow are adjusted relative to the longitudinal axis of the mini tractor. To do this, you need to raise the plow so that the plowshares are approximately 2 - 3 centimeters above the ground.
The latest adjustments to the plow can be made directly at the work site, that is, in the field. During the first approaches, the processing depth is checked along with the working width. If transverse distortions are observed, they will need to be eliminated by adjusting the braces.
After all these processes have been completed, it will be necessary, of course, to check whether the plow is configured correctly - for this you will need to check the location of the plow towards the main draft. The limiting chains must be in a completely free state.
Types of plows
A plow for a tractor can be purchased ready-made, but it is possible to make it yourself. Tillage is a complex operation that is performed before sowing crops and after harvesting.
The models of plows are different, but they are united by their structure. The product has a ploughshare made of metal, which turns over layers of earth. The walk-behind tractor drives across the field, and the ploughshare follows it, turning over the top layer of soil and destroying the weeds. This happens because their roots are cut by the ploughshare, as a result of which the weeds end up deep in the ground after plowing. They cannot germinate and die.
During the plowing process, the soil is loosened, it becomes crumbly and saturated with oxygen. There are different types of plows, so when choosing a tool you need to take into account the area of land, soil type and other indicators, then the quality of land cultivation will be high.
Most common varieties
The plow can be of different types:
- 2-hull – characterized by maneuverability and ease of use (a double-hull plow can serve for a long time and provide large volumes of work);
- disk - will provide reliability and withstand heavy loads;
- single-hull – very light, ideal for seasonal work;
- reversible - “active” plow, the parts in which rotate - a little heavy, but convenient and efficient in operation;
- horse (or equestrian) – produced for working with “human” force, that is, with horses, but it is also easy to make yourself (for example, from a bicycle frame);
- changeover plows provide not only stable operation, but also save fuel.
As you can see, the design thought does not dry out, and the variety of plows makes it possible to cover any needs of both the area and the workers. In addition, if you ask yourself how to properly adjust and how to set it up, devote some time to them, then you can get the ideal option for a particular case. Let us add that sometimes it is advisable to use a rotary option.
Disc plow
It is suitable for cultivating heavy soil in early spring. A disc plow is different in that it plows the ground but does not turn it over. The design consists of a front and rear frame, each of which is equipped with disk housings. Knives are installed in front, they make a ditch along which the discs move.
A support wheel is attached to the product; it is used to regulate the depth of plowing. Durable steel is used to produce cutting elements.
How to make a MTZ tractor from a LEGO constructor: instructions, diagram, description
The Lego MTZ tractor is a more complex design and will take a lot of time to assemble. But having assembled such a vehicle, the child will be proud of his achievement, because the task is far from easy.
To assemble such a machine you will need:
- 2 big wheels
- 2 small wheels
- 8 parts 1*4
- 8 single cubes
- 2 plates 4*4
- 5 parts 2*1
- 3 plates 2*4
- 1 PC. 2*6
- Hood
- 2 glasses
- 3 pcs. parts 2*1 with one protrusion
- Part 2*2 with one hole in the center, which plays the role of a seat
Tractor
Such a simple tractor is made according to approximately the same instructions as the previous tractors described above. More detailed instructions can be seen in the video.
Rotary plow
The mechanism has several curved shares; manufacturers fix these parts on one axis. After turning on the mini tractor, the axle starts to move, it rotates and turns the soil. The unit can move not only in a straight line, but also in different directions. It plows the soil to a depth of 25-30 cm.
Do-it-yourself LEGO tractors: photos
Lego constructors are perhaps the most popular toy for children and even adults. This is an amazing educational game that evokes a storm of emotions and excitement in children. All designs are so well thought out that they allow even the smallest children to play, and for older children complex details and designs have been developed, which arouses the child’s interest.
Lego
Lego
The construction set not only helps develop finger motor skills, but also teaches the child perseverance. Thanks to such a simple game, children develop endurance and the ability to concentrate. There are both ready-made products that need to be assembled, and those assemblies of plates from which you can make anything, this contributes to the development of the child’s imagination and creative thinking.
Modern technology made from Lego
Lego tractor
Lego agricultural machinery is of particular interest to both boys and girls. Even a 5 year old child can handle a regular tractor. To make the game even more interesting, you can attach a bucket or trailer to the vehicle, which can be easily made from construction kit parts. Every year, the Lego manufacturer introduces more and more designs to the toy market and develops new technologies for assembling models. Here we offer the most popular and new models of tractors and Lego.
How to make a plow for a mini tractor with your own hands
Making a plow with your own hands will be a good option for those gardeners who want to save money. The equipment is made from materials already available on the farm; parts from old agricultural machinery are suitable.
A homemade plow for a mini tractor is good because it is created taking into account the type of soil on the site. When manufacturing the unit, the crops that will be grown on the land are taken into account. If necessary, different types of plows can be made for different areas.
Store-bought products often require modification, but a homemade product does not have many disadvantages.
The design, made of high-quality materials, does not require reinforcement. Due to the fact that the product is made from parts that are already in the household, it is possible to reduce costs.
Read also: Treatment of eyes after welding at home
Homemade mini tractor plows are good because they are created to fit existing agricultural equipment. When constructing a plow, it is necessary to take into account the power of the tractor and its productivity. If the need arises, you can additionally equip it with other tools. This will allow for combined processing of the land plot.
You can make moldboard tools yourself; their working part is made in the form of wedges. They assemble disc plows with their own hands; they are suitable for processing hard and heavy soils. They perform preliminary plowing of the land. It is cut with knives made in the form of metal discs. The overturning of the layers is carried out using dump elements.
Rotary products have high performance, but they are difficult to make at home. Most often, a double-furrowed plow is assembled; its working tools are made in the form of ploughshares. There is a dump. This is a proven model that most farmers choose. The design can be supplemented with skimmers; they cut off the top turf layer of soil.
A homemade unit consists of a frame with parts attached to it. A metal profile is used to make the base; it can be rectangular or circular in cross-section. Its thickness should be at least 2-3 mm. The working bodies are mounted on the frame, and auxiliary elements are mounted on it.
The shape of the frame depends on which control element will be installed on the unit. It must correspond to the number of tools used in the work.
Before you begin work on creating a plowshare-moldboard plow, you should take into account the following geometric features of the product:
- Ploughshare. This is the lower part of the unit; it cuts into the ground.
- As the plow moves, the layer of earth moves toward the dump. He turns it over, breaks it into pieces. The soil moves into the furrow.
- In order to give the plow the correct direction of movement, a field board is needed. Thanks to the installation of this element, the unit does not shift towards uncultivated ground.
To mount the tool on the supporting frame, you need a stand; it holds the knife. The structure of the ploughshare is as follows:
Thanks to these elements, the tool penetrates into the ground. The double-furrow plow is suitable for cultivating small plots of land.
When manufacturing the unit, it is necessary to pay attention to the shape of the cutting part and its dimensions. They determine how efficiently the product will work. These indicators influence the depth of immersion of the plow into the soil, as well as the volume of cultivated land.
It is bad if, when plowing the ground, the product comes out or buries itself deeply into the soil. If the unit has been assembled correctly, when moving forward it moves smoothly, without deviating from the trajectory.
Having decided to make a plow for a mini tractor with your own hands, you need to prepare drawings of the plow. During manufacturing, increased attention is required to the angle of the edge entering the ground, as well as the angle of bending of the blades.
If the edge angle is chosen correctly, the product easily penetrates the ground. It is best to install elements at an angle of 40°. If it is sharper, the unit will slip out, and if the angle is large, it will not be able to complete the task, because it will get stuck in the ground.
The bend of the blades affects the blade angle. The larger the element size, the more land it captures in 1 pass. But having decided to make a large structure, you need to take into account that this will increase the load on the mini tractor.
The main part of the load falls on the ploughshare, so it must be made of thick steel. You need to purchase a suitable sheet of metal. The element's form can be as follows:
- screw;
- cylindrical;
- semi-cylindrical.
The angle of bending of the share must correspond to the angle at which the blade is placed. The holder mount is fixed to the same element. When drawing up a drawing, you must strive to simplify it, because you can make a unit with your own hands with a minimum number of parts. It should be simple and functional.
A two-body product consists of several frames, on which various tools are hung. They are rigidly connected to each other. With the help of a 2-hull system, you can quickly plow and harrow the ground.
If the area is small, a single-body solution is sufficient to process it. The frame is made of a metal pipe having a rectangular cross-section. On one side there is the cutting part of the product, and on the other side the wheel is welded and fasteners are made.
When work on the drawing is completed, you need to do the detailing. After this, you need to make a list of materials, and then make a pattern that will outline the contours of the product.
When creating units for a mini tractor, you need to use alloy steel. They are durable, the structure made from them will not be fragile. The use of such material increases the wear resistance of the product.
To make a blade, it is better to use sheet bending machines. If they are not there, then you can use a vice and an anvil. The metal sheet is cut out and bent, acting in stages.
To speed up the manufacturing process, you can cut the element according to a template from a cylinder or pipe, setting the wedge shape. In this case, the lower part of the blade must be reinforced. Strength can be increased by welding a metal strip 5 mm thick. The surface is sharpened, and a holder is installed on the back of the product. You can make fastenings in it, with their help it will be easy to process the soil at different depths.
Wheels are installed on the plow. They must be placed so that the structure is in balance. Large wheels with a diameter of 20 cm are fixed along the width of the blade, and a smaller one with a diameter of 10 cm is placed on the opposite side in the middle.
You can make a horse plow with your own hands. It is designed for plowing and cultivating soil. With its help you can harrow the ground, but the scope of application is not limited to this. Using a plow, you can make a trench under a strip foundation, dig drainage channels and carry out other construction work.
A horse plow is installed on a mini tractor. The work can be done by 2 people. In this case, 1 of them must drive the mini tractor, and the responsibility of the other becomes control of the plow. The homemade unit evenly cultivates the ground, the top layers of the soil are not destroyed.
Drawings of a plow for a walk-behind tractor
Using the experience of craftsmen who made a plow for a walk-behind tractor with their own hands and left drawings, the ploughshare should be made in such a way that it can be removed, this will make it easier to sharpen it before plowing.
Alloy steel 9ХС, from which I make blades for hand saws, is considered an ideal material for the cutting part of a plow.
Suitable steel grade 45, when hardened, brought to a hardness of HRC 50-55. If you only have ordinary steel on hand, say carbon St5ps, which is not subject to heat treatment, then by beating the cutting edge on an anvil and sharpening it, it is quite suitable for cultivating the soil.
Plow blade for walk-behind tractor
The moldboard of the plow is the part that takes the earth to the side.
The first method of making a blade:
The working surface of the blade must be given a curved shape. If you have a metal bending machine or sheet bending rollers, then giving the workpiece the desired shape will not be difficult.
A metal blank with a thickness of 3-5 mm is required, the rollers are directed at an angle of 20-22 degrees, as shown in the drawing, and the desired bend is given.
Second way:
Here, prepared. A pipe with a diameter of 600-650 mm can serve (this is the diameter that will require less labor, since the bend of the pipe will maximally repeat the desired bend of the future dump) and a thickness of 3-5 mm. We make a template from cardboard and apply it to the pipe, not forgetting the angle of 20-22 degrees, as shown in the drawing below.
We outline the template with a pencil or chalk and cut it out using gas. welding, if necessary, grind the workpiece and bring it to the desired condition.
Third way:
Probably the most difficult method of making a moldboard is when the workpiece is heated and, using a matrix, given the desired shape, which can be a moldboard from another plow.
The material of the plow body is steel sheet grade St3 - St10 with a thickness of 3 mm.
Drawing of plow parts for walk-behind tractor
a — ploughshare made of alloy steel;
b — side shield of the rack, St3;
c — spacer plate, St3;
g — plow base plate, St3;
d - field board, corner 30x30 mm;
e - stand, pipe with a diameter of 42 mm
We advise you to first make the plow parts from cardboard and attach them to each other at the required angles. Thus, the values of the angle α on different parts of the plow body will be from 25° to 130°, the values of the angle γ - from 42° to 50°. If the homemade model of a cardboard plow suits you in all respects, you can move on to working with metal.
When the metal parts of the plow are ready, you need to find an additional sheet of steel 3 mm thick, 600x600 mm in size, it will be needed to assemble the plow, and a welding machine (preferably an inverter). On this sheet we retreat 40 mm from the edges and measure the angle γ0.
Plow assembly
1 - ploughshare;
2 — side shield of the rack;
3 - additional sheet 2-3 mm
Using wedges with an angle α0=25 degrees and an angle γ0=42 degrees, a ploughshare is installed on the additional sheet and tacked to the sheet by welding, pointwise on both sides.
The side shield of the rack is connected to the ploughshare vertically so that its edge extends beyond the ploughshare by 4-7 mm, while the raised shield should be higher than the blade of the ploughshare (that is, higher than the additional sheet) by 6-8 mm, so as not to interfere with the ploughshare, cut the ground. The shield is also attached to the ploughshare and to the additional sheet.
Next, the blade is attached to the ploughshare very tightly, without leaving a gap, so that their surfaces are one whole. The angle between the upper edge of the blade and the ploughshare blade is equal to (γmax − γ0) = 6-8°.
Mounting the plow share
- ploughshare;
— countersunk head screw M8;
- dump;
— base plate;
— corner 30x30x90 mm;
- M8 nut
If it is found that the corners and/or surfaces do not correspond, the blade is adjusted using a hammer. After fitting the blade to the ploughshare, it is welded from the back to the ploughshare and to the side shield. Then the side shield is welded to the spacer bar and the base plate; the thrust corners for the ploughshare are attached to the latter by welding.
Followed by. Inspect the finished plow again, and if everything is clearly welded completely. Add. the sheet is separated from the body with a chisel or LNA. All welds are ground.
How to set up a plow on a mini tractor
After the unit is installed, we begin to configure it. Adjustment of the plow on a mini tractor must be done. Each element should be checked and lubricated with oil. Carefully inspect the wheels on the plow, tighten the screws on all structural elements.
You can set up the plow yourself. It is necessary to check each fastening and adjust the angle of rotation. If the unit will be used on heavy soils, it must be weighted. This is done by installing a metal disk, it is mounted on the frame. In order to properly adjust the product, do the following:
- Adjust the depth. There is a bolt on the outer part of the pipe that allows you to adjust the wheels. If you turn it clockwise, the depth of tillage will be increased.
- Adjust the width of the land.
- Adjust the frame level. To do this, tighten the front bar or stretch it.
Read also: Makita screwdriver battery design
Additional equipment can be attached to the plow. Mounting devices used for cultivating land can be done on your own. If the elements are installed incorrectly, the plow will not work well on the ground.
Assembling a homemade product
After all the elements of the future plow are ready, to complete the work you will need a 0.5 x 0.5 m metal sheet and a welding inverter. The plow parts are welded to the workpiece with certain angular dimensions: the plow and the side shield. The moldboard part is applied to the surface of the ploughshare.
If the angles are calculated incorrectly, the plow blade is brought to the correct shape using a hammer, and then it is attached to the back of the ploughshare and to the side shield by welding. Afterwards, an expansion bar and a base in the form of a plate are installed on the shield, on which the corners for the ploughshare are attached.
The assembled home-made product for tillage is carefully inspected for all welded joints and, if there are no defects, all seams are finally welded.
Upon completion of the assembly and welding work, the auxiliary sheet is removed using an angle grinder or available metalworking tools. Places of welded joints require mandatory cleaning, and the blade and ploughshare are treated with sandpaper for standard roughness.
To set the product in motion, it must be attached to a walk-behind tractor. A similar design can be used when constructing a plow for mini tractors. The difference will only be in overall and geometric dimensions, depending on what type of mini tractor the product is designed for.
Building a plow with your own hands, in addition to acquiring certain skills, will significantly help reduce the labor intensity when working on your site.
Useful tips
In order to sharpen blades, it is not necessary to contact specialized organizations. It is enough to use a sharpening stone for this purpose.
While working on the site, soil may stick to the unit. It increases resistance, so it should be cleaned off the blade. You should do the same with plant roots.
When working in the field, it is necessary to lubricate the bearings daily. This increases the service life of the unit. After completion of processing, the plow is washed, dried and lubricated with oil, protecting the product from corrosion.
Agriculture has become a profitable business using modern technology. To grow first and then harvest is the true goal of a farmer. Compliance with technology and endless work is the key to obtaining results.
Among the necessary, mandatory tools, the plow remains, since it allows you to work with different crops; every good farmer needs it. A really good farmer can make a plow for a mini tractor with his own hands, if only he puts in the effort.
Good plow for private farming
A good plow is needed in every farm where a lot of land is cultivated. Of course, such a device can be purchased by paying a considerable amount of money, but not every farmer can afford such an expensive purchase. At the same time, buying a plow is not very rational, since the owner will use it very rarely. Of course, the advantage is that you can plow a small field and spend very little money and fuel if you have a small mini-tractor with a plow.
If the farmer does not have a lot of capital, then the right and correct decision would be to make attachments for his unit with his own hands at a minimum cost. It will not be difficult for a person who knows how to do things on his own to do this kind of work. You just need to choose a good and durable material that would be suitable for this type of work, spare parts for plows, and follow all the instructions in the instructions and rules, in general, nothing complicated. Most people think that it is very difficult and time-consuming to make a plow for a mini tractor yourself. Unsuccessful projects are just poor knowledge of simple geometry among masters who are just beginning their journey. The picture shows a diagram of the development of a drawing for calculating a double-furrow plow for a mini tractor.
To achieve a good result, you need, first of all, skill, and at home it will be difficult to do any thing, since the necessary materials and tools are not always available. There are also different plow models, for example, double-furrow, reversible, rotary. Each option requires a special design and well-selected material; the tools that will be needed when working on the unit are also important.
The shape that is inherent in a plow on a mini tractor
For proper entry into the soil, this attachment, made of metal, is wedge-shaped with an angle specifically required for entry into the ground. A plow for a mini tractor must have consistent parameters for the work for which it is intended. A plow made correctly, according to all the rules and drawings, will serve no worse than its factory counterpart.
First, you need a model; to make it, a drawing of a plow for a mini tractor will help, then you need to make an exact template. The template will be a cardboard cutout of your device for a mini tractor. After the cardboard parts are made, they are assembled. If the design is correct, correct, you need to do the same according to the diagram, only, of course, from metal. This will help the manufacturer avoid mistakes when starting to manufacture a home-made unit.
What blanks are needed to make a plow?
The production of a plow (the process itself) consists of several stages. To create equipment you need materials and equipment:
- Rollers;
- Metal scissors;
- Iron welding machine;
- High quality steel tube (diameter 600mm);
- Several sets of nut-screw (M8);
- Alloy steel 9ХС (5mm);
- Metal sheet (3 mm, 50*50 cm);
If you want a rotary plow model for a mini tractor, then you need to start working on it only after watching an instructional video or consulting with a knowledgeable person. For the agricultural sector, the most popular ones are: double-body, single-body (rotary), reversible. The picture shows the model of the rotary version; it is the simplest and is very inferior to other analogues of the unit.
Single body plow model
First you need to make an oval cylinder shape. Parts for assembly: side shield of the rack, additional sheet, plowshare. To install the ploughshare, you need to insert the wedges onto the sheet at an acute angle of 45 degrees, then the surface of the ploughshare must be connected to the side shield, while the blade of the ploughshare itself must protrude 1 cm below the shield. Next, the blade must be attached to the ploughshare, then we weld everything to the plow welding
Rotary plow model
You can make a reversible plow for a mini tractor with your own hands according to the principle of a trailer. For convenience when cornering, this model has a grip. A reversible plow will allow the minitractor to make even furrows; with each subsequent pass there is no need to return to the other end of the site, since reversing the plow will turn the furrow in the opposite direction.
The reversible plow model consists of three parts:
• Lower horizontal plane of the runner;
• Front blade plane.
The edge that will be cut must be positioned 2 cm below the runner, and the edge of the ploughshare and the side edge of the blade must converge. It is necessary that the ploughshare leans against the blade without gaps, very tightly. If such a model is put together, then you can weld all the structural elements together and be confidently satisfied with the result.
How to make a farm tractor from a LEGO constructor: instructions, diagram, description
Children really love to play with agricultural machinery, for example, a tractor, excavator, crane, etc. Therefore, it is not surprising that many are interested in the question “How to make a tractor from Lego?” Because assembling a toy yourself is a great activity for all kids, and then they can also play . If you attach a trailer or bucket to the tractor, the game will become even more interesting.
Making an agricultural tractor is also easy; to do this, follow these instructions:
- Attach the 2*4 shape to the top of the small wheels.
- Attach a 2*10 plate on top.
- Attach large wheels to the back of the structure.
- Attach 2 parts to the 2*4 plate: trailer, 1*2 shape, attach to the bottom of the large wheels, so that the part with the hook protrudes.
- Attach a 3*2 plate to the 2*8 piece and attach it to the top of the structure.
- Connect the headlights to the fenders and place them on the front of the tractor.
- Connect 2 parts 2*3 and a plate 2*2, so that the latter remains at the bottom, and place it in the upper front part, it should coincide with the wings of the tractor.
- You need to place a 2*2 cube nearby.
- Take two 1*2 pieces with two holes inside and attach them next to the previous piece.
- Attach the hood and place smooth plates on the rest of the part.
- Place 3 parts on a 4*4 mold, leaving a passage and attach to the back of the structure.
- Place windows in the cabin and close the gaps with 1*1 parts.
- Place a windshield in front.
- Make the roof from a 4*4 piece.
- Make a pipe for a tractor.
- Take 2 4*1 cubes with three holes and place them on the sides of the roof.
- Attach the bucket.
Tractor with bucket
More detailed instructions are presented in the video. You can optionally attach a trailer to such a tractor; it can also be made from Lego bricks.
And also, many designers allow the child to make not only the transport itself, but also the driver. The figure of the tractor and its contents, color, etc. can be very different, it all depends on your imagination.