A workbench is an indispensable tool for a garage or workshop. This is not just a table on which additional elements are placed. When properly manufactured according to pre-thought-out drawings, it can become an excellent assistant, allowing you to speed up the execution of various works with wood. Let's look at how to make a workbench with your own hands at minimal cost, taking into account the features of the workshop and the amount of free space in it.
DIY portable workbench
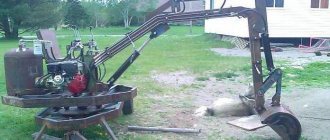
Homemade items from a washing machine motor:
1. How to connect a motor from an old washing machine through or without a capacitor 2. Homemade emery from a washing machine motor 3. Homemade generator from a washing machine motor 4. Connecting and adjusting the speed of a commutator motor from a washing machine - automatic 5. Potter's wheel from a washing machine 6. Lathe from an automatic washing machine 7. Wood splitter with an engine from a washing machine 8. Homemade concrete mixer
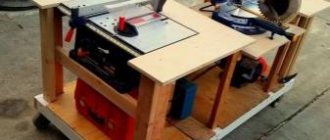
DIY mobile folding workbench
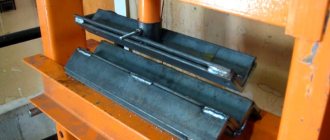
In anticipation of carrying out renovation work in a new apartment before moving in there and to facilitate the work, I decided to make myself a mobile folding workbench. It’s somehow easier to work with and much more convenient. Of course, you could buy them, but the quality leaves much to be desired, they are kind of flimsy. Although the price tag is very cheap.
And then a window of time appeared, and I started. Screws with persistent threads were taken from spring ties. Delo of technology - 850 rubles for a set of ties. I looked for screws separately on the iron market, but the price tag was such that... they have no conscience. And then the spring ties caught my eye and suddenly the design of the workbench was born in my head. And then, over 10 evenings for 3-4 hours and 3 days off, this miracle was born.
Surprisingly it turned out to be very durable and very stable.
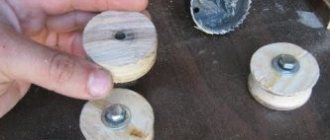
How to make a stand for a drill?
Making a mini-drilling machine with your own hands does not require high qualifications, but it greatly expands the scope of application of an ordinary electric drill. In addition, the machine will be much cheaper than a purchased one, and components can be borrowed from previously used devices.
Making a wooden stand will take very little time and will not require any special materials or tools:
- wooden blocks or boards no thinner than 20 mm;
- furniture guides;
- metal rod with thread for caliper;
- fasteners for wooden parts (screws, glue);
- emery.
Tools:
- hacksaw;
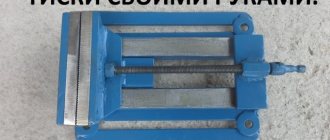
- vice;
- Screwdriver Set;
- electric drill.
Making a stand from metal requires a little more time and materials, so it is necessary to cover it in a little more detail.
The proposed metal stand is more versatile than one made of wood and includes:
- supporting frame;
- guide posts of the drill, to which it is attached and moved vertically;
- vertical tool feed handle;
- additional components for ease of use.
About carpentry workbenches
Design and purpose of the workbench
A carpentry workbench is a work table for manual and mechanical processing of wooden products. The design and ergonomics of a classic carpentry workbench allow you to fix parts in various spatial positions and perform basic carpentry operations with maximum convenience: making wooden parts, assembling structures, coating them with finishing compounds. A traditional carpenter's table is designed to work with lumber up to 3-3.5 m long. To process longer workpieces, a carpenter's workbench is used.
A table for carpentry work consists of a bench board (cover) and a bench (supporting frame). A traditional workbench is equipped with front (front) and rear (end) vices, with the help of which the workpieces are fixed in the required spatial positions.
There are holes in the table top and the wooden jaws of the vice. They are designed for installing clamps and stops of various sections and heights.
Having placed the stops in the desired configuration, the part is placed between them and pressed with the screw mechanism of the vice. This way the workpiece is securely fixed in a horizontal position. Based on the thickness of the wooden part, use a stop of appropriate height that will not protrude beyond the edge of the workpiece and interfere with processing.
How to choose the optimal workbench height?
The height of carpentry workbenches varies between 85-95 cm. The optimal table height is selected based on the height of the craftsman. If, standing at the workbench, your palms rest freely on its lid, then the size has been selected correctly. At such a workbench it will be convenient to perform all basic operations, without frequent bending and stretching, which lead to rapid fatigue.
What materials are best to make the structure from?
A carpentry workbench must have sufficient strength and rigidity, since during operation it is subjected to large loads, both static, formed under the weight of massive workpieces, and dynamic, arising in the process of sawing, drilling, impacts, etc. Sufficient strength characteristics are ensured not only by the features of the fastening units, but also the type of materials used.
Coniferous wood is traditionally used to make the base. The table top is made of durable wood: oak, beech, ash, maple, etc. The lumber used to create the bench board must be dry (humidity about 12%) without knots and other defects.
About making a workbench cover
Experience shows that when making a carpentry workbench with your own hands, it is more advisable to purchase a ready-made glued board, which will become a blank for the lid. The effort and time spent on cutting, jointing edges, gluing the shield and leveling it when creating such a massive part will be incomparable with the funds saved.
When performing work that increases the risk of damage to the lid: drilling, chiselling, etc., it is better to cover the working surface of the workbench with a thick plywood sheet or fiberboard cut to the shape of the lid. It is advisable to make this simple flooring immediately together with the workbench.
Recommendations
For clearer contact, the contact points between the parts are coated with wood glue. Strengthen glued joints using ready-made furniture corners or cut-off corner profiles. Strengthen corner joints where there is no contact with the drawers using triangular spacers.
It is advisable to immediately mount an extension cord with several sockets on the finished workbench - they will be needed to operate some power tools.
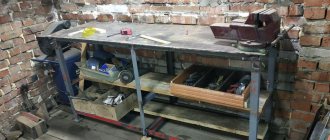
A folding workbench is hardly intended for heavy work such as assembling windows and doors. It makes turning operations difficult to produce massive parts weighing dozens of kilograms. For “heavy” work, it is better to assemble a stationary wooden workbench that can withstand a weight of more than one hundred kilograms.
- Regardless of how long the workbench is, it can be foldable (including a transformer). A one-room apartment or a small country house of 20-30 square meters is unlikely to allow you to place a stationary workbench that cannot be folded. Be guided primarily by the square footage of the living space. The same advice applies to an outside utility room or garage.
- Do not use plywood less than 15 mm thick or made from soft wood types for the tabletop. Such a workbench is only suitable for sewing work or activities that do not require the use of brute physical force.
- Do not work on a workbench with strong reagents, especially if there is frequent splashing. For chemically active work, special tables and stands, for example, made of glass, are used.
Carpentry workbench frame
Take smooth pine boards without large knots with a cross-section of 50x150 mm. Dry the raw lumber: the lower the moisture content of the boards, the less likely the structure will warp. The carpentry workbench in question is designed for comfortable work by a craftsman with a height of 170–180 cm. To change the height of the structure, make the legs higher or lower.
Drawing of a carpentry workbench (front view).
Workbench drawing (side view).
Table 1 - list of frame parts
Finish dimensions, mm
All elements of the base of the carpentry workbench are paired, so mark two parts of the same length on a 150 mm wide board at once.
Saw all the wooden pieces to length, with the exception of the spacers: it is easier to cut the short ones already planed, and the long ones should be sawed off later in place.
Measure the width of the board, subtract the thickness of your circular saw blade and divide the result in half. Set the calculated size on the measuring scale and make sure that the saw blade is perpendicular. Unfold the boards exactly in the middle.
Board cutting diagram.
Sharpen the parts and sand them with medium-grit sandpaper.
File the bottom spacers and sand the ends. After cleaning the surfaces from dust, apply glue to the small leg and to the end of the leg.
Squeeze the parts together with a clamp, wipe off the squeezed out glue and drill holes with a countersink drill.
Fasten the workpieces with 6.0x70 screws. Prepare the remaining legs of the woodworking bench frame.
Bevel the bottom ends to reduce the likelihood of the wood splitting when the workbench moves.
Prepare the joints connecting the legs with the longitudinal legs for gluing. Fasten the parts with screws, setting a right angle.
Screw all four legs into place.
Place the frame halves and longitudinal drawers on the floor, measure the length of the upper spacers.
File the parts and secure them with glue and screws.
Assemble the top frame of the woodworking bench on a flat surface. Fasten the bars with wood glue and 6.0x80 mm screws, drilling guide holes for them.
Assemble the lower frame of the workbench, using clamps and auxiliary boards for convenience.
Replace the top frame and level the entire structure. Connect the frame parts with screws.
Cut out the bottom shelf from sheet material 16 mm thick and secure it to the bars
Implementation of a transforming structure
To do it yourself, most often they use pine boards about ninety centimeters long with a width of fifteen and twenty-five millimeters in thickness.
In order to have a small supply, they are prepared in quantities of twenty pieces. Fifty self-tapping elements will be required, and the bolts must be at least five centimeters long.
A drawing of a suitable model can always be borrowed from the Internet. Here you can clearly see the image of all the necessary parts with dimensions. All that remains is to assemble the table correctly according to the diagram and use it for its intended purpose.
Workbench table top for carpentry work
Use sheets of MDF, chipboard or plywood 16–20 mm thick for the workbench cover. Glue the slabs in two layers and get a tabletop 32–40 mm thick.
Drawing and arrangement of the workbench cover: 1 – edge strips (birch, maple); 2 – working surface (hard fiberboard); 3 – load-bearing board (chipboard, plywood or MDF).
For the countertop, you can take sheets of chipboard left over from unnecessary furniture. For example, the walls of a wardrobe will do. Take them as a base and add small pieces so that the carpentry workbench lid measures 670x1940 mm.
Place narrow slabs toward the back wall and toward the center of the workbench. Place large sheets in the top layer of the countertop. Glue the cut pieces together.
Fasten the sheets with self-tapping screws, deepening them into the countersunk holes. Trim the edges with a hand-held circular saw 20mm from the edge.
Align the tabletop with the frame and secure with screws.
Sharpen slats for edge trims. Saw off the 45° bevels and cut the planks to length. Place a piece of fiberboard on the lid of the workbench, add a flat panel on top and secure it all with clamps.
This makes it easier to attach the pads. Align the ends with the edges of the tabletop and press the rail against the panel - the top plane will be flush with the workbench lid. Holding the bar with one hand, drill pilot holes and secure the parts with screws.
Move the device to the other side and install the remaining pads. Sand the slats with a sander.
Drill a hole in the corner of the slab so that the fiberboard can be easily pushed out of its recess when replacing it.
Clean the surfaces from dust and cover the wooden parts of the frame with stain. Place the fiberboard in the recess of the lid. If you are using pieces of material, secure them with double-sided tape. Place a carpenter's vice on your workbench.
Advantages of the folding system.
- The working surfaces of this design are ergonomic and compact. When folded, they practically do not occupy any useful space.
- Multifunctionality. A folding table is used not only for production activities and performing assembly and plumbing work, it is very convenient as a temporary stand for various parts, units and tools, taking notes, eating and resting.
- Simplicity and ease of use.
- No difficulties in self-manufacturing and installation.
Boxes for storing tools in a carpentry table
When filling the space under the cover of a carpentry workbench, use a modular principle. It’s easier to make individual blocks and more convenient to change them later when you need space for a new tool. There will be a certain waste of material, but the weight of the workbench will increase and its stability will be enough to work with power tools.
Scheme of organization of storage places: 1 – full extension drawer; 2 – spacious plywood box; 3 – chipboard container; 4 – wide box; 5 – compartment for a portable tool box; 6 – space for cases and workpieces.
Use boxes from old furniture
Select suitable sized drawers from an unnecessary desk or chest of drawers.
Label the wooden elements and carefully separate them. Clean the glue from the spikes and eyes.
Trim the planks to width, removing worn corners and cracked grooves. If the original bottom of the box is flimsy, prepare thicker plywood or fiberboard. Make new grooves on a circular saw.
Dry assemble the box and adjust parts if necessary. Clean the surfaces and glue the structure. Use mounting angles to accurately assemble right angles.
Once the glue has dried, sand the corners and sides of the box, securing it in place for ease of work.
Prepare guide strips and calculate the dimensions of the module.
Calculation of a block for three drawers
File the bottom, top and side panels. Screw the guide rails with screws.
Assemble the panels into a module and test the movement of the drawers. Place the block inside the workbench with supports underneath it.
Drill pilot holes, countersink and tighten the screws. Attach the chipboard to the top beams and to the legs of the workbench.
Install front covers on the drawers. Having marked the location of the housing, secure it with one screw. Insert the drawer into place and adjust the position of the panel. Carefully remove the drawer and tighten the remaining screws.
Secure the remaining linings - the module with wide drawers is ready.
Carpentry table compartment for portable box
The middle module is made to the full height of the bench to enhance the rigidity of the carpentry workbench. For the body, take 16 mm thick chipboard and cut out two sides, a bottom and a lid.
Middle module housing: 1 – frame diagram; 2 – side wall; 3 – lower and upper panels.
Attach the guide strips to the sides, assemble the frame with screws and install it close to the right block.
Prepare the parts for the drawer.
Drawings of box elements: 1 – long wall; 2 – short wall; 3 – bottom; 4 – front pad; 5 – rail.
Use a circular saw to select grooves in the walls, which can be done with a regular disk. Set the cutting depth to 6 mm and the width to 8 mm. Run all four parts through. Move the saw fence 2 mm and make a test cut. Check the groove and adjust the stop if necessary. Run the rest of the workpieces.
Assemble the module and install slats at the bottom to protect the edges of the chipboard from chipping and ensure smoother operation.
Secure the front panel with screws and place the drawer in place.
How to make modules with convenient drawers
The design of the housings of these modules is identical to the previous designs. The retractable container placed on roller guides is made taking into account the installation gap, so its width will be 26 mm less than the internal size of the case (for common guides with a thickness of 12 mm).
Module structure and box parts: 1 – assembly diagram; 2 – back and front walls; 3 – front panel; 4 – bottom; 5 – side walls.
Before assembling the case, secure the restrictive wooden slats and metal guides to the sides.
Installation diagram of guides on the walls of the housing.
Secure the finished module under the workbench lid.
To install the drawer rails, unclip the latches and pull out the small rails.
Fasten the parts to the walls. Determine the required distance from the edge to the guide yourself based on the specific design and the 10 mm gap between the wall of the box and the top panel of the frame.
Pull out the middle rails all the way.
Insert both rails at the same time, holding the middle rails with your fingers. If the drawer is tight, remove it and try again.
Replace the front trim.
Peculiarities
A folding workbench when folded takes up to 10 times less space than when working.
- Portable - a version whose operating principle is similar to a folding chair or a regular extendable table that is easy to carry. The disadvantage is the almost complete absence of drawers, which noticeably weigh down the structure: instead of them there are one or two shelves without back walls, the workbench itself resembles a rack.
- Universal - a structure that is attached to the wall, but unlike a regular wall-mounted table, this table has all four legs. The scheme is complicated by retractable wheels, allowing you to use the workbench as a cart. This version is reminiscent of a mobile table for preparing hot dogs, popular among fast food sellers in the 90s of the last century: there are shelves with back walls (or full-fledged drawers). It can be folded against the wall, lifted and secured, and rolled to another place. Carrying requires the help of two more people: the weight is significant - tens of kilograms.
- folding wall- mounted workbench is used in a home “office” or utility room – outside the home. It is stylized to match the general design of a home interior, and can be made as a mini-transformer, from the appearance of which guests will not immediately guess that this is a workbench. A profile pipe can be used for the underbench.
How to make a carpentry workbench drawer from plywood
Saw the box body blanks from 10mm plywood, and for the bottom take a 5mm thick sheet.
Scheme of cutting parts for two plywood boxes: 1 – front panel; 2 – rear liner; 3 – side wall; 4 – front liner.
Sand the workpieces with a grinder.
Make grooves for the plywood bottom in the side walls, back and front liner. Remove burrs with sandpaper.
Glue and screw together the parts of the front and back walls.
Apply glue to the joints and into the groove.
Assemble the structure using angles and clamps.
Fasten the parts with screws, drilling guide holes.
Assemble the second plywood box with your own hands.
Install a panel on the back wall of the carpentry workbench designed to increase the rigidity of the structure and to accommodate hand tools.
Cover the drawers and cut ends of the particle boards with finishing compound.
Connect power to your homemade workbench and start filling the containers with tools.