Equipment for fixing the workpiece
To carry out the milling process, it is necessary to fix the workpiece, for which they are used:
Read also: What is the difference between a technological map and a technological process
Round rotary tables are used for milling operations on workpieces with a curved surface. This type of table has a wide range of offsets:
- rotation;
- changing the angle of the table plane;
- Possibility of processing products in a vertical position.
Clamps or clamps allow you to fix products using special elements, which in turn are attached to the table using bolts and nuts. To fix small-sized workpieces, a simple vice with a rotating mechanism is used.
Features of sharpening various types of cutters
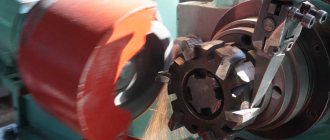
For metalworking, cutters made of tool or high-speed steel are used. The teeth can be made of carbide materials and secured by soldering. Processing such materials is complex, so sharpening of cutters for metal, especially those with complex cutter shapes, is carried out using specialized equipment. To operate effectively, the machine must rotate and translate the item being sharpened relative to the abrasive wheel and allow the angle of their contact to be changed.
Sharpening of wood cutters (relevant for end cutters) can be done manually with a block or on a regular sharpener at low speeds. The main task is to ensure uniform surface treatment and maintain the original angle. It may not work out at first, but with experience you can achieve good results.
Sharpening spiral cutters is one of the most complex operations and is performed with a cup grinding wheel on a sharpening machine. It is carried out along the back surface of the teeth; a stop is used to ensure a stable angle, otherwise the geometry of the cuts will change and there will be strong runout. The circle is set at a slight angle, the depth of the layer for removal is about 20-40 microns, for cleanliness the pass is carried out 2 times
Sharpening end mills for metal is carried out in a similar way, but an operation with end teeth is added, each of which is set strictly horizontally, the circle moves along at a given angle, while it is important to maintain uniformity of operations for all cutters. Sharpening of hob cutters for metal is carried out depending on the shape of the teeth: for those sharpened along the back, for backed ones at the front
The service life of cutting tools and the quality of processed surfaces directly depend on the timeliness of sharpening. When working with a dull tool, there is not only an increase in the time required to perform operations, but also a violation of the temperature regime, which in turn leads to deformation of the material being processed and the cutter itself. The process is growing and there may come a time when restoration becomes impossible, and the purchase of new ones will lead to financial costs and possible downtime. The costs of additional sharpening equipment with the active use of a large number of cutters will quickly pay off.
Using hob sharpening equipment
When processing workpieces, hobs are most often used.
Rice. 3 The process of sharpening a hob cutter on a universal machine.
The characteristics of hob cutters are strictly regulated by GOST 9324-60 and are produced:
- whole;
- prefabricated (welded, plug-in).
Prefabricated hobs (for modules from 10 to 16) are used with insert combs, which are made of high-speed cast steel or forged. Hobs (for modules 18 to 30) are manufactured by welding and mounting carbon steel teeth on a base.
When using hobs to cut cylindrical gears, the working parts of the tooth wear unevenly.
To increase the service life of hob cutters, a height correction method is proposed by changing the shape of the spatial curve characterizing the working process. The method of axial displacement of the tool is also used, which increases the speed of operations with an increase in the service life of hob cutters.
The process of sharpening backed hob cutters is performed along the front surface, and sharpened ones along the back surface of the tooth. After finishing the sharpening process, measurements are taken:
- front surface profile;
- circumferential pitch;
- compliance of chip flutes.
Sharpening technology
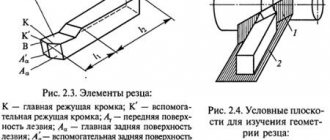
There are a number of parameters that affect the sharpening angles of cutters, primarily the shape of the tooth: sharpened or backed. Characteristics of each cutter:
- front angle, formed by the tangent to the front surface and the plane of the axis;
- rear angle, formed by a tangent to the rear surface and a tangent to the circle of rotation of the reference point;
- the size of the area that is processed when sharpening along the back surface;
- the angle of inclination of the teeth relative to the central axis.
The sharpening angles of cutters for metal depend on the material and brand of the product; they are indicated in special reference books and GOSTs. When processing workpieces made of high-alloy steel, they are practically zero or negative. Failure to comply with the recommended parameters will lead to rapid destruction of the cutting edge without the possibility of restoration.
During the sharpening process, the area of the teeth decreases, so it is extremely important to perform all operations in the same way for everyone. Distortions will lead to a change in the shape of the cut and strong beating, which is critical when working with viscous materials - you can simply break the cutter
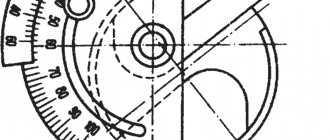
After sharpening, a check is necessary: visual inspection for cracks, chips and deformations using a magnifying glass; for angles, a deviation of 1 degree is acceptable, determined by a pendulum inclinometer.
Using the machine
You can restore the cutting properties of almost any tool. Sharpening of carbide cutters is carried out only on machines. For example, for the end, the first stage will be circular grinding to remove possible chips and defects of the cutting edges; after this operation, the diameter will change depending on the degree of wear of the surfaces. Then, for the pointed side teeth, sharpening is done along the back. For this, a special device in the form of a needle is used, which ensures a uniform sharpening angle throughout the entire length of the tooth during translational movement along the abrasive
By adjusting its position, you can change the clearance angle, and this is important for reducing friction and increasing service life. Sharpening of the end teeth begins with their installation horizontally, the wheel is fed at the required angle
Using the machine, it is easy to update tools for a manual router.
The efficiency and quality of processing will be much higher when the machine is equipped with a liquid cooling system - when overheated, the cutting edges become covered with microcracks, which cause chips during operation, which greatly reduces the service life.
Also, with increasing temperature, the hardness of abrasive materials decreases, which increases the processing time of workpieces and provokes rapid wear of expensive wheels. For sharpening, abrasive wheels of cup and disc shapes are used to grind the back corners of the teeth; for the front corners, flat ones can be used.
The abrasives used are:
- electrocorundum (well suited for tool steel);
- CBN (standard and high-performance high-speed steel);
- diamond and green silicon carbide (for carbide cutters).
When processing hard alloys on a wheel, the surface is heated unevenly, microcracks form, leading to deformation of the teeth. For finishing, you can use cast iron whetstone, use boron carbide as an abrasive, and it can also be used to quickly eliminate irregularities without removing the cutter.
Industrial machines are expensive, but for a home workshop you can make one yourself by combining an electric sharpener and a feed mechanism for the cutter being sharpened. It is impossible to make a universal device in this way, but it is quite suitable for performing several operations with acceptable quality.
Using sharpening wheels
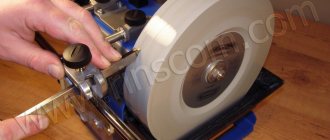
With experience, you can sharpen cutters of simple shapes on a conventional sharpener, but you should understand that a large number of curved surfaces and the need to comply with angular parameters can negate all efforts. It is necessary to work at low speeds, otherwise there is a risk of overheating the cutting edges - the ejection cutter.
Using improvised means
All that is required is the presence of abrasive materials of different grain sizes. During work, the bars must be moistened with soapy water, rinsed and dried when finished. Sharpening cutters for wood with your own hands is possible, but it requires a lot of practice - the main difficulty lies in uniform processing of all the teeth, for this it is necessary to control the pressure and the number of movements. All costs are covered by the word “free”, and the cost of the sharpened items is low if the attempt is unsuccessful. The quality of such work is usually not very high, but within the framework of a home workshop it is acceptable.
Homemade sharpening machine for metal cutters - Moy-Instrument.Ru - Review of tools and equipment
> Tools
articles Loading... The best products from AliExpress HERE
Details 01/13/2017 11:03 Aleshkin 6804
A homemade device for sharpening cutters and other cutting tools.
During the operation of our machines, the need for such a device arose.
You can sharpen a drill by hand, but what about cutters, where there are not two, but four, or more edges only at the bottom, and you need a less precise geometry, and the size is small.
So I decided to make such a device.
It's a simple back and forth feed mechanism, plus tilt and swivel.
It will be installed simply next to the sandpaper.
The materials available were aluminum, some steel, and sandpaper.
I will now show you how this was done in photographs.
Let's start with the device that must hold the cutter or drill, that is, the spindle, to install the tool.
To do this, I have such a part in it, Morse taper number two (KM2), this is what I need.
After all, my machines also have KM2 everywhere, and you can use their equipment, and mortises and drills with such a cone can be installed directly into the spindle.
I removed everything unnecessary from this mandrel.
The result is a small spindle that can rotate around its axis.
I'll do a little modification, drill a hole for a cleaning rod, which will secure the tool from suddenly falling out of the spindle.
Now the spindle will be able to accept any tool with KM2, both with a presser foot and with M10 threads, a drill or collet chuck, cutters with KM2 and all kinds of mandrels for disk cutters.
Now the housing for this spindle.
All that remains is to make a locking ring for the spindle and a handle.
Handle for rotation around the spindle axis.
This is what the first assembled part for my device looks like.
Fitting equipment, drill chuck.
Now you can work on the movement mechanism, it will be like a small cross table, similar to that of a milling machine only with rotation around its axis.
I am sawing a blank for the table.
Milling future movement axes.
Preparing a table for installing a spindle.
The workpiece is ready for dovetail milling.
I'm milling a dovetail.
I drill, cut the threads and add an axial movement nut.
I try on the guide for the table; the screw for it will be an ordinary pin.
The propeller supports are made from two small pieces of aluminum.
General view of the finished axle with fitting of the collet chuck.
The general appearance of the device is already emerging, but this is just a project.
I had some free time and I spent it in the workshop, working on the ears or hinges, for the tilt and the turntable with the axis.
So that the loops or ears were the same, I connected them immediately into one piece.
And then I drilled and bored holes for the axle.
I cut off a little excess aluminum and drilled it, then cut a thread for the hinge adjustment screws.
A turntable in the shape of an ordinary pancake.
This simple cylinder will serve as my tilt axis.
I tried everything on the table, all that remains is to drill and assemble this unit.
Drilled and assembled.
I assemble two axes into one whole device.
Again we drill and tap the threads for the screws.
I cut out a corner and put a pin on it to read the cutter strip when sharpening.
This is what the entire device looks like assembled.
Over the weekend at the dacha I couldn’t resist and carried out the first tests, tried to level and then sharpen the end of the cutter.
To do this, I secured my homemade device on the table with self-tapping screws, near the sandpaper.
Here is a video report on the experiment.
All that remains is to finalize the sharpening of the cutter strips and make a stop that limits the cutter from falling to the front, and finally, a table for this device.
For those who are interested in this topic, below is a link to the continuation.
Machine for sharpening cutters for metal: review of models, self-assembly
Devices for sharpening the end cutting elements of a milling-canter machine are divided according to the nature of the work and are divided into two types - universal and special.
Let's look at each of these options below.
1 Machines for sharpening cutters for metal - review of factory models
Sharpening cutters for working on metal and wood is done with your own hands using universal worm gear devices.
In addition, the cutting elements of the milling-canter machine can be sharpened using special devices.
The process of manual sharpening according to the type of cutter
Now let's briefly talk about the features of the tool depending on its configuration. The main problems are that it is not always easy to ensure uniform processing along the entire length of the cutting edge.
The peculiarity of manual sharpening is that the emphasis is provided not by the vice of the machine, but by a special device.
End
The cutting elements are located at the end and side. This allows you to make grooves along the edges. Processing takes place according to the following algorithm:
- Fastening of the cutter is horizontal in relation to the rotating one.
- Tilt it enough to achieve the required angle.
- The circle rotates with high amplitude.
- During installation, note the position of the cutting part upwards.
Sharpening end (finger) cutters
This is an elongated tool whose shank has a cylindrical or conical shape. Due to its appearance it has also been compared to fingers. Actions:
- Select a diamond stone to place on the edge of the table.
- If the tool has a large enough recess, then it should be secured along the tabletop.
- As you sharpen, the edge will become sharper and the diameter will decrease.
Recommendation: if the package includes a bearing, then it must first be dismantled, and in any case it would not be superfluous to clean the surface with a specialized solvent.
Disk
Essentially, it is a disk with teeth around its circumference that must be directed upward. If it is simple (unidirectional), then the cutter itself should be positioned vertically. And in the case of a versatile direction, the sharpening angle is the same as the angle of the cutting teeth.
Prefabricated
Their design assumes the presence of removable plates. Each one should be sharpened separately. It should be taken into account that they have several elements for processing - these are rear, main and auxiliary corners, as well as a transition edge.
Cutters with backed teeth
Such an instrument has a flat front surface, and the back is made in an Archimedes spiral. In order to sharpen the product, you must use a disc wheel
Each tooth must be ground down along the outer base, and it is also important to ensure that the same layer of metal is constantly removed
Classification of cutters according to some characteristics
Of course, the above distinctions (by configuration, purpose) are not the only ways to distinguish between equipment. A real milling machine operator has such a large assortment of products that he will not be able to sort it out without difficulty. What other reasons are there for classification?
Different number of visits
The following are considered standard:
- • Single pass.
- • Two-way.
- • Four-lead.
But there can be any number of turns.
The fewer entries, the larger the allocated area for the grooves. The peculiarity of working with such a tool is that at each moment only one specific cutting edge affects the workpiece. This has a very positive effect on creating a product at high speeds and speeds, as it allows waste to be removed smoothly.
This is also relevant when carrying out activities with soft metals and other substances, for example, plastic or PVC, acrylic. They are also used for roughing and roughing procedures, when quality and accuracy are not the most important indicators.
Multi-pass ones are used when working with materials that have a hard and brittle structure. The movement will be smooth, without shocks, because several teeth touch the surface at the same time.
Chip removal type
Everything is simple here - the waste flies either upwards, which is the direction all milling operators are accustomed to handling, or downwards. The first option is most convenient if grooves or a blind hole are created, since metal does not accumulate there. But there is also a minus - part of everything “flying out” can land again on the working area and interfere with good cutting. The second option, accordingly, has narrower capabilities, but is more recommended for some types of work.
Features of cutters
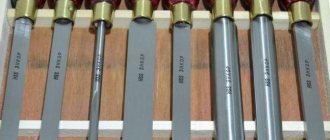
Different materials are used to produce cutters. Tool steels suitable for wood are: high-speed, alloy and carbon. For processing metal, plastic, ceramics, and stone-like materials, hard alloys, diamonds, CBN, and mineral ceramics are used.
Steel for wood cutters
- The following grades of tool steels are used for cutting wood: U-9-A, U-8-A, U-7-A, KhV-5, 9-KhS, KhG, KhVG.
- High speed steel can be of normal performance. These are brands R-18, R-6-M-5, R-9, R-12, etc. The high-performance metal is alloyed with vanadium, cobalt, molybdenum and tungsten. These are brands R-6-M-3, R-18-F-2-K-5, R-9-F-2-K-10, R-9-F-2-K-5, etc.
Teeth geometry
Shape of teeth.
According to their design, the cutters of milling cutters are divided into sharpened (pointed) and backed.
- For sharpened teeth, the section of the rear surface (width n) adjacent to the cutting part is a plane. Such incisors are sharpened along the back surface. However, if necessary, you can sharpen them along the front edge.
- In backed cutters of shaped cutters, the back surface has the shape of an Archimedes spiral. Processing it is technically very difficult. Therefore, such teeth are sharpened exclusively along the front edge.
Each tooth is a separate incisor.
It has standard parameters: back (a) and front (y) angles, area of the sharpened surface (n), slope angle (l).
- Platform n is a section of the rear surface of the cutter that is ground during turning. This is where the teeth wear out the most; their size affects the friction force between the cutter and the workpiece. Because of this, this surface should be maintained within the normalized range.
- The leading edge angle (y) is measured between the tangent to the leading edge and the radius of the cutter.
- The main back angle (a) is measured between the tangent to the back edge at the normalized point of the main sawing edge and the tangent to the rotation circle of this point. When this angle decreases, it reduces friction between the workpiece and the cutter.
- Not all cutters have an additional clearance angle (a1). It describes the expanded gap between the cut surface and the body of the cutter. The instructions indicate the need to sharpen this gap with a certain wear of the cutter and expansion of the area n. The purpose of the operation is to reduce friction between the tooth and the workpiece.
Cutter parameters.
- Based on the direction and configuration of the cutting edge, helical or straight teeth are distinguished. Their slope describes the angle (l) between the axis of the tool and the deployed helical edge.
The size of the angle depends on the type of cutter, the grade of its material and the type of workpiece being processed. When cutting wood, the main rake sharpening angle is selected in the range of 10-20 degrees, sometimes more. The back angle also fluctuates within a wide range of values.
Types of equipment used for fixing tools
The equipment used to fasten the tool is divided into 2 types:
- nozzle;
- end
The end equipment is attached using a collet and a chuck, and the attachment equipment is used by installing it on a spindle using a special mandrel. To fasten the tool, 2 types of mandrels are produced:
- center;
- terminal
Center mandrels are produced with a conical shank, which has dimensions corresponding to the hole in the spindle, and are produced in 2 types 7:24 and Morse taper. When using this type of mandrel, it is allowed to install several cutting tools secured with special rings. When using a cylindrical end mill, a chuck with a collet is required. Typically, the equipment includes 7-11 collets, allowing you to select the required size for reliable fixation.
Method for sharpening end mills for metal
A milling cutter is a tool used to process various products. Milling cutters of various types are used, which allow changing external and internal surfaces with the required accuracy. To achieve high productivity, the cutter must be of high quality - be sharply sharpened. Sharpening of end mills for working with metals, wood, plastic, glass is carried out using special machines and equipment.
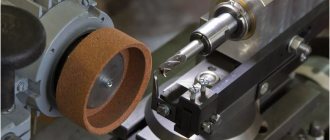
Rice. 1 Sharpening the tool using an emery disc.
Finishing of cutters made of carbide material
The material is sharpened with a grinding wheel, and then microcracks may form on the base. As work is carried out, the formations increase in size, which leads to chipping of the teeth. The purpose of finishing is to remove the damaged layer. This is the primary task, the second is to improve the surface cleanliness of the working edge, the third is to give the appropriate geometric parameters.
How the finishing is carried out:
- Cast iron discs installed on machine tools. The optimal result will be when sharpening at a speed of 1 to 1.5 m/sec.
- Manually, providing light pressure on the cast iron whetstone.
Boron carbide paste is used with a grain size ranging from 170 to 230.
When carrying out finishing work manually, it is necessary to control the correct location of the touchstone in relation to the working edge, and ensure the following technological operations:
- Finish the surface: back and front.
- To form chamfers: at an angle of 450, the plane of the touchstone is brought to the leading edge, and then, using gentle pressure from the touchstone, a series of passes are made along the working edge.
- Each individual knife takes 2-3 seconds.
The strongest abrasive agent is boron carbide, with its help it is easy to remove holes on worn teeth without removing the tool from the machine.
Recommendations for the use of cutters for longitudinal wood fusion
I. Installation of cutters on the spindle of a tenoning machine.
1.1. Before installing cutters, ensure that the spindle of the tenoning machine is clean.
1.2. Install the cutters in the order of the numbering stamped on the cutters and rings, starting with the installation of cutter No. 1 (Fig. 1). Each subsequent cutter is installed with the knives offset relative to the previous cutter by 45°, and the pin must fit into the corresponding hole. The second hole for the pin is intended for arranging the knives on all cutters in one line for subsequent sharpening if the necessary sharpening equipment is available.
II. Work of cutters on a machine.
2.1. Before starting work, be sure to check the tightness of the mounting screws.
2.2. Preliminary calibration of the blanks will provide better tensing and the possibility of subsequent selection of blanks by texture.
2.3. The presence of dust, sand and other abrasive materials on tenoned workpieces significantly reduces the service life of knives.
2.4. It is recommended to work in the following modes:
– The number of spindle revolutions with installed cutters should be in the range of 3–4.5 thousand rpm.
Increased speeds lead to “burning” of the cutting edges of the cutter knives, which significantly reduces the service life of this tool.
– workpiece feed speed 5–8 m/min. – mechanical feeding of workpieces increases the service life of the cutter before regrinding.
2.5. When using cutters, it is imperative to ensure reliable horizontal and preferably vertical clamping of the workpieces.
Failure to comply with these recommendations leads to breakage of knives due to undermining of workpieces.
2.6. It is recommended to install an adjustable miter saw in front of the router. This makes it possible to increase the service life of knives between regrinds by 3–4 times and ensure high-quality closure of the machined ends of the workpieces (Fig. 2).
By moving the adjustable miter saw, tenoning is achieved, ensuring a tight connection between the workpieces even after repeated sharpening of the knives.
2.7. It is necessary to prevent excessive dulling of the knives. The criterion for dullness is the inability to ensure a tight seal even when adjusted with a miter saw.
2.8. If the machine on which the workpieces are tenoned for splicing is not equipped with an adjustable miter saw and a clamp, you can purchase them from us or make them yourself, but the presence of these devices is required.
III. Sharpening knives, caring for the cutter.
3.1. Maintenance is one of the most important factors that will help you operate your cutters correctly and efficiently. At the end of each working day, it is necessary to remove the adhering resin on the body and cutter blades with a brush dipped in diesel fuel, and at the end of the working week, lower the cutters into a container filled with diesel fuel. This must be done because adhered resin leads to “burning” of the knives and, as a result, to their release, which significantly reduces the service life of the cutter.
Also, soaking the cutters in diesel fuel makes it easy to unscrew the mounting screws to remove the knives when resharpening.
3.2. Resharpening cutter knives can be done in two ways:
– without removing knives;
– with removal of knives.
To perform sharpening without removing the knives, it is necessary to install cutters with the knives arranged along the same line (see paragraph 1.2). Such sharpening is carried out in the presence of specialized sharpening equipment and trained personnel to service it.
In the absence of such specialized equipment, all knives are removed and sharpening is carried out by simultaneously grinding all knives along the front plane. To do this, the knives are laid out in a row against the stop on the magnetic table of a surface grinding machine and a layer of 0.08...0.1 mm is removed (Fig. 3).
3.3. As a result of resharpening, it is possible to thin the knives up to 4 mm (40–50 resharpenings).
3.4. After sharpening, rinse all knives in diesel fuel to remove abrasive from the grinding wheel.
3.5. The installation of knives after sharpening must be controlled with a dial indicator in accordance with Fig. 4. The indicator leg is installed on the cutting edge. The difference between adjacent knives must correspond to the nominal pitch of a given cutter with a tolerance of ± 0.01 mm. Before installing the knives, the seats must be cleaned with a brush.
Manufacturer: Iberus
Homeland of the brand: Ukraine
Cutter tooth geometry
Productivity depends on proper sharpening of the teeth. Work surface configurations are used to solve even the most complex problems.
The design of a spiral cutter is carried out with a large and small inclination of the teeth at a given angle. The purpose of this type of tool is to carry out roughing and finishing operations, including variable steps.
The rake angle is the angle formed between the flat end and the flute edge of a standard cutter.
Angle value:
- small no more than 35;
- large 35 and above.
An excellent option for initial and finishing machining is the tooth angle of 38. Rectangular tools have the maximum value.
A tool with a variable pitch is in demand; the pitch of the spiral is measured along the length.
Using Accessories
To fix cylindrical parts, a three-jaw chuck and special centers are used, which, with the help of clamps and steady rests, carry out fixation, as well as the use of dividing heads. These devices are used to process parts at a given angle during rotation. The dividing head consists of the following elements:
A three-jaw chuck is attached to the spindle, designed to fix the workpiece; the other end rests against the headstock. The block can rotate and lock at the required angle. When processing a long workpiece, steady rests are used for fixation.
If you find an error, please select a piece of text and press Ctrl+Enter.
The peculiarity of sharpening cutters is the relatively large length and curvilinearity of the cutting edges of their teeth. When sharpening, it is necessary to ensure that the surface of the wheel moves exactly along the edge. Particularly difficult in this regard is the sharpening of shaped cutters that have a backed corner. To maintain the shaped profile of the cutter and simplify sharpening, the backed teeth are sharpened only along the front surface (where the front and where the back surfaces are, see below). Sharpened teeth, having a straight or standardized curved shape, are sharpened along the back surface. Slotting and parting cutters are sharpened along the front and back surfaces of the teeth. Read about sharpening them in the article Sharpening circular saws.
Tool sharpening
Sharpening is carried out to restore cutting ability, with operations performed contour-wise and separately.
Cutters received for sharpening are usually pre-ground on a cylindrical surface using a cylindrical grinding machine to eliminate damage, followed by further sharpening of the back or front of the teeth.
End mills with pointed teeth are sharpened along the back surface with a special disk- or cup-shaped wheel. To do this, the circle is installed with respect to the axis at an angle of 89°, which makes it possible to achieve the required contact between the contacting surfaces. When sharpening the back surfaces of end mills, 2 main methods are used:
- polyelement;
- contour.
When using the multi-element method, the cutting edges are sharpened separately. First, the main surfaces of all teeth are sharpened, then the auxiliary and transitional ones. With the contour method, sharpening is performed sequentially on each tooth in one operation. A single-turn sharpening method is also used, when the cutting edges are processed in one operation. All teeth are sharpened in one revolution and the allowance is removed using a grinding operation.
Drawings of simple devices
The simplest devices for sharpening can be bushings, the internal diameter of which corresponds to the transverse dimensions of the drills. The sleeve is rigidly fixed into a reliable base, taking into account a certain angle
When selecting a bushing for such devices, you should pay attention to the correspondence of its internal diameter with the transverse size of the tools being sharpened. It is prohibited for the tools being processed to dangle in the sleeve, since even with a deviation of 1-2 degrees along the axis from the required values, the quality and accuracy of sharpening can significantly decrease. In some cases, the task can be simplified by installing a wooden block on this structure, in which holes must be drilled, with a diameter corresponding to the tool used
One of the most important elements of such a product is the presence of a tool rest, which is necessary for:
In some cases, the task can be simplified by installing a wooden block on this structure, in which holes must be drilled with a diameter corresponding to the tool used. One of the most important elements of such a product is the presence of a tool rest, which is necessary for:
- ensuring correct fixation of the drilling tool and the possibility of precise movement in relation to the surface of the abrasive stone;
- creating a stop point for the drill being sharpened.
Such products made from oak bars, which have holes of different sizes, are the most reliable. Thanks to them, high-quality and precise sharpening of tools is performed. The main task that must be solved by a homemade machine or similar device is the correct orientation of the cutting part of the tools being processed to obtain the accuracy of the required sharpening angle.
Types of cutters
There are several types of cutting tools. These include: cylindrical, end, disk, end and groove.
By type of purpose:
- angular;
- shaped;
- keyed;
- to provide T-type grooves.
On the surface:
- plastic;
- tree;
- metal;
- glass;
- others.
Sharpening is difficult, since the length of the cutting base is large. Therefore, specialized tools are used. And in some cases, grinding is carried out manually, but the worker performing this work must have experience. An employee who does not have the skills may allow defects and defects to appear on the teeth: cracks, burrs or cavities, due to which the tool will need to be ground again, and this will lead to a reduction in size.
Types of cutting elements
Milling is a delicate process that requires a special approach, so craftsmen very carefully select equipment, focusing on different needs. Depending on the material being processed, there are:
- for metal;
- on wood;
- for plastics;
- on glass.
The second important feature is the purpose; cutters are distinguished:
- angular (for corners);
- shaped - depending on the part being processed;
- keyed - to create a special groove with the appropriate name;
- for recesses in the material in the shape of the letter “T”;
- cutting machines for dividing the sample into parts, etc.
Also, when purchasing products, the first thing that is usually called is the shape of the cutter; it can be:
- cylindrical;
- conical;
- disk;
- terminal;
- worm, etc.
It is difficult to list all the types, since for each milling procedure you can buy or even grind your own tool. There are several tens of thousands of items in total, and their range is constantly growing along with increasing production needs. In each variety, the cutting base is quite large in length, regardless of how it is located. Therefore, it is very difficult to ensure correct and uniform sharpening. Sometimes this requires special tools; in other cases, meticulous sanding by hand is more suitable. Lack of experience or work done poorly for other reasons can lead to chips, scratches and cracks on the surface on the cutting edge.
Milling cutter maintenance
Despite the use of high-strength alloys in the manufacture of cutters, long periods of operation lead to abrasion and deformation of the edges. Over time, worn-out elements are disposed of, but before the expiration of the working life, the master can restore the characteristics of the part using maintenance measures
It is important to consider that sharpening cutters allows not only to give them the same geometry, which ensures high-quality work. This procedure also increases the durability of the element, reducing tool consumption
But this does not mean that any cutter can be restored in this way.
Technologists do not recommend bringing the tool to a state of complete wear. Manufacturers of cutters indicate in the markings technical and operational values that are limiting for a specific element, and after they are overcome, the cutting edges cannot be restored.
Classification of sharpening machines
The classification of machines for sharpening metal-cutting tools is carried out according to several parameters. According to their purpose, they are divided into two groups:
- universal;
- specialized.
Using universal equipment, any tool can be sharpened: knives, axes, and metalworking tools.
Specialized units sharpen one type of tool, for example, hobs for cutting gears. In addition to sharpening the cutting edge, each plate is also backed. The tooth is processed in a similar way on circular saws. The equipment differs in its design and devices for securing the parts being sharpened.
Based on size and power, a distinction is made between desktop equipment and sharpening machines.
In terms of performance, equipment can be:
- amateur;
- semi-professional;
- industrial or professional.
Small units are often used in home workshops and garages. If you have lathe and other desktop equipment on which work is constantly carried out, it is recommended to use semi-professional equipment. The sharpener has small dimensions, 2 wheels and fits on a workbench.
Control on sharpening machines:
- manual;
- semi-automatic;
- with CNC.
Manual sharpening is available to everyone, subject to safety precautions.
Special workers – sharpeners – operate semi-automatic machines. They set the operating parameters, and the equipment independently processes the cutting edges. This group of machines includes most specialized equipment. Circular saws and hobs can be processed in as many shifts as possible.
CNC machines produce the shape of the cutter and the angles of all its planes as accurately as possible. They work from a pre-loaded program or use a template as a template.
Machine device
A tool sharpening machine has a frame on which the motor is mounted. Through a belt or gear drive, the torque is transmitted to a shaft with mandrels for installing wheels. On the side there are buttons to turn on the electric drive. For ease of operation, there is a pedal at the bottom in front of each circle. By pressing it with his foot, the worker sets the circles in motion. It is enough to remove the leg, and the shaft disengages from the engine and continues to rotate by inertia, gradually stopping even when the start button is turned on.
At the front of the machine, slides are installed in front of each circle. The part being sharpened rests on them. To maintain a minimum gap between the platform of the slide and the circle, as the latter is erased, the platform moves. If there is a large gap between the abrasive tool and the table, the part may turn out.
Grinding and sharpening machines for working with flat tools have a table that moves translationally relative to a rotating circle.
Sharpening end mills
Sharpening of end mills with a helical tooth is also carried out manually on universal sharpening machines.
Sharpening end mills along the main back surface is done in the same way as cylindrical cutters with the end surface of a cup wheel, when installing the end mill in the centers. Sharpening along the auxiliary back surface is carried out similarly to an end cup wheel. Currently, a semi-automatic model B3125 is produced for sharpening end mills with a diameter of 14-50 mm on the front and rear surfaces.
This is interesting: Sharpening turning tools for metal - angles, machines, video, do it yourself
Annular or core drill
To produce holes in metal workpieces, annular cutters are used, which are also called core drills or crowns.
Compared to a twist drill, a core drill provides increased productivity (4 times faster drilling speed), but most importantly, they allow you to drill larger diameter holes. Annular cutters are used not only with a hand router, but also with magnetic drills. In everyday life, ring attachments can be used on electric drills, only in this case it is allowed to drill metal, the thickness of which should not exceed 4-5 mm.
The design of core drills includes centering drills that act as a core. The equipment in question is also available in two types - with and without bearings. With bearings, attachments are used to work on a manual milling machine to process the edges of a part. Bearingless bits allow processing on any part of the workpiece, but they are not suitable for precision work.
This is interesting!
Annular cutters are popular on the farm for drilling holes in sheet materials. To drill a large-diameter hole in thick metal, you will need not only a high-quality carbide cutter, but also powerful power tools.
The process of sharpening cutters on a machine
Sharpening a cutting tool requires special precision so that the geometric dimensions and properties are restored. A professionally performed operation helps to increase the durability of the metal and reduce tooth wear.
The machine equipment set includes two clamping chucks, one for a three-flute tool, and the second for four and two. No installation error.
Sharpening on a ribbon
Select one of the cup sockets and a collet that matches the size.
Execution process:
- Insert a collet into the chuck and tighten it with a nut, but there is no need to tighten the latter too much.
- Set the length of the ribbon to be processed. The distance is adjusted by unscrewing screws. By moving the bottom of the socket, you should set the desired length, after which fix it with screw connections.
- Install the tool into the chuck through the top, specifying the angle and diameter. Secure the cartridge in the glass with the tool line aligned in relation to the sharpening element. Fastening is done to the pin using grooves.
- Turn on the equipment and ensure the supply of the processed element to the sharpening wheel. By means of regulators, you can reduce or increase the removal of the metal surface.
Sharpening the end cutter
You need to use another socket on the machine tool.
Work process:
- Set the settings on the socket; they depend on the hardness of the material. If the metal is hard, then the socket is larger.
- Turn on the machine, insert the chuck and process the element until the noise stops.
- In another socket, ensure sharpening of the tool from the end.
- Treat the back wall of the tool by inserting the chuck into the socket of the machine equipment.
Equipment and methods for sharpening cutters
Even a small production cannot do without using milling cutters for a variety of purposes. The range of manufactured products currently includes thousands of items, varying in shape, size, and scope of application. With active use, wear and loss of the necessary cutting ability occurs; the use of a dull cutter affects the quality of the cuts and accelerates its destruction many times over, which is unacceptable. Sharpening cutters will increase the service life and reduce financial costs, but only in case of high-quality work performed on special equipment by an experienced sharpener.